一、Spring Boot 应用暴露监控指标【版本 1.5.7.RELEASE】
首先,添加以下依赖:
            org.springframework.boot
            spring-boot-starter-actuator


            io.prometheus
            simpleclient_spring_boot
            0.0.26
然后,在启动类 Application.java 添加如下注解:
@SpringBootApplication
@EnablePrometheusEndpoint
@EnableSpringBootMetricsCollector
public class Application {

    public static void main(String[] args) {
        SpringApplication.run(Application.class, args);
    }

}
启动应用程序后,会看到如下一系列的 Mappings:
上面这张图需要 idea2017.2版本以上才能看到哦~~
这时很开心以为这样就成功了,接下来看遇到的第一个坑。。。
坑一、访问监控地址报错
打开浏览器访问 http://localhost:8080/metrics ,不好意思报错了哦,请看报错原因:
相信使用过 springboot 的人看到这个页面一定很熟悉,竟然没有权限,那咋办呢,当然是打开官方文档瞄一眼咯~~~
敏感的访问节点需要用户名密码才能访问。
坑一、解决方法
(1)放弃安全性,临时暴露出来看一下的方法。(不建议使用)
在application.properties配置文件增加如下选项
management.security.enabled=false
endpoints.health.sensitive=false
(2)设权限,安全查看:
第一步,添加依赖:
            org.springframework.boot
            spring-boot-starter-security
第二步,配置用户名密码
security.user.name=admin
security.user.password=123456
management.security.roles=SUPERUSER
这样在浏览器访问时会要求先输入密码才能访问。
这里给出一个完整的 application.properties配置:
# 启用基础认证
security.basic.enabled = true

# 安全路径列表,逗号分隔,此处只针对/admin路径进行认证
security.basic.path = /admin

# 认证使用的用户名
security.user.name = admin

# 认证使用的密码。 默认情况下,启动时会记录随机密码。
security.user.password = 123456

# 可以访问管理端点的用户角色列表,逗号分隔
management.security.roles = SUPERUSER

# actuator暴露接口使用的端口,为了和api接口使用的端口进行分离
management.port = 8099

# actuator暴露接口的前缀
management.context-path = /admin

# actuator是否需要安全保证
management.security.enabled = true

# actuator的metrics接口是否需要安全保证
endpoints.metrics.sensitive = false

# actuator的metrics接口是否开启
endpoints.metrics.enabled=true

# actuator的health接口是否需要安全保证
endpoints.health.sensitive=false

# actuator的health接口是否开启
endpoints.health.enabled=true
打开浏览器访问http://localhost:8099/admin/prometheus ,输入用户名密码;可以看到以下信息,是不是很完美。
二、Prometheus 采集 Spring Boot 指标数据
首先,下载 Prometheus 的安装软件,下载可能比较慢,有需要的可以给我留言,我可以提供prometheus-1.8.0.linux-amd64.tar.gz版本,官网下载地址:https://github.com/prometheus/prometheus/releases
其次,编写配置文件 prometheus.yml :
global:
  scrape_interval: 10s
  scrape_timeout: 10s
  evaluation_interval: 10m
scrape_configs:
  - job_name: spring-boot
    scrape_interval: 5s
    scrape_timeout: 5s
    metrics_path: /admin/prometheus
    scheme: http
    basic_auth:
      username: admin
      password: 123456
    static_configs:
      - targets:
        - 192.168.8.244:8099  #此处填写 Spring Boot 应用的 IP + 端口号
有关配置选项的完整规范,请查看配置文档。
然后,启动 Prometheus :
./prometheus -config.file=prometheus.yml &
最后,访问 http://localhost:9090/targets , 检查 Spring Boot 采集状态是否正常。
三、Grafana 可视化监控数据
首先,获取 Grafana 的安装包,有需要的可以给我留言,我可以提供grafana-4.5.2-1.x86_64.rpm,官方下载地址:https://grafana.com/grafana/download
其次,启动 Grafana:
sudo /bin/systemctl start grafana-server.service
然后,访问 http://localhost:3000/ 查看Grafana是否安装成功。开始登陆时需要用户名密码,Grafana 登录账号 admin 密码 admin
能够打开上面的页面表示安装成功。
最后,就是配置Grafana。
1、Grafana配置
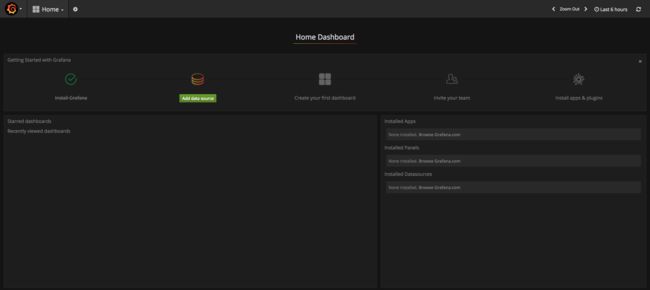
1、登陆成功后显示的页面如下:
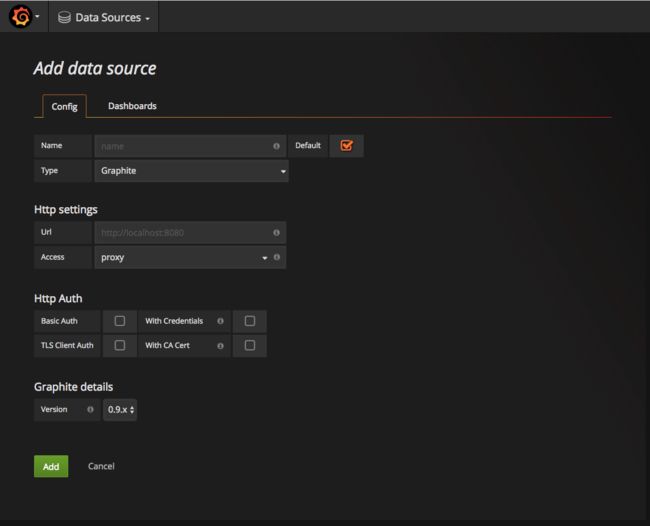
2、配置数据源,点击Add data source,进入以下页面:
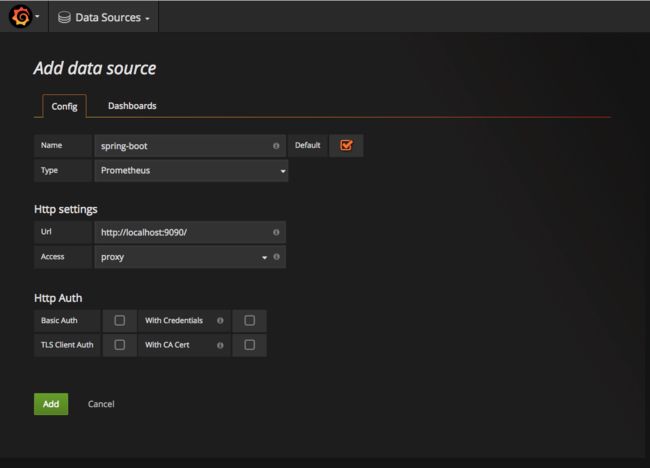
配置结果如下:
3、配置单个指标的可视化监控面板,点击Create your first dashboard,进入如下页面:
注意:此处不能任意填写,只能填已有的指标点,具体的可以在 Prometheus 的首页看到,即 http://localhost:9090/graph
多配置几个指标之后,即可有如下效果:


