前言
我们知道,Launcher图标的加载是在 IconCache 这个类上,协同一些工具类完成桌面图标的加载,源码里并没有主题功能的设计。所以在这里介绍一下主题设计的简单开发。
主题的构思
要添加主题功能我们得了解图标的加载,缓存等机制。还有,调研市面上的主题加载方式主要有两种方式,
1. APK包的方式,将主题资源放在Android工程上通过打包安装实现主题的替换
2. 指定格式的压缩包方式,如 .HW, .theme格式等等
在这基础之上我们可能还会有,主题的加密需求(目前也就想到这个)。
按上面的需求做出如下的设计:
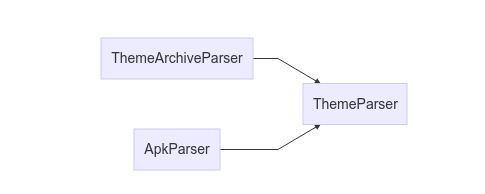
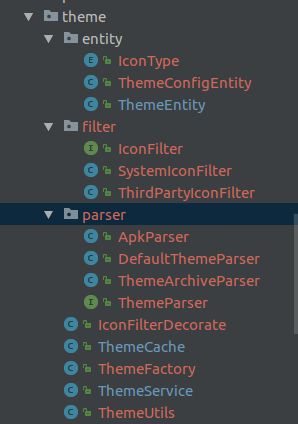
定义接口 ThemeParser,用于解析主题压缩包和apk,让子类主题规则解析器ThemeArchiveParser 和 APK主题解析器 ApkParser 分别实现解析方法.
public interface ThemeParser {
    String TAG = ThemeParser.class.getSimpleName();
    /**
     * parse the theme archieve or apk or something else in future
     *
     * @param path
     * @return return the Theme wrap entity
     */
    T parse(String path);

}
当我们有新的规则,或者想适配市面上的某一款主题时,只要添加一个解析器来解析即可,而不用修改原本的解析去适配各种情况。
对于复杂类的创建我们有多种选择,这种情况下,我们就可以设计一个工厂模式 ThemeParseFactory 来创建特定的解析器。工厂模式是什么?出门左转就到了
然后将解析好的资源统一包装成 ThemeEntity,这个entity不外乎就是图标,壁纸,主题配置等等,大家自行设计即可,设计公司源码就不方便透露了,见谅。
解析器有了,我们就拿到资源了,在开发过程中还遇到几个坑,
1. 同一个应用有多个入口
2. 系统图标和三方图标的识别方式不一样。系统图标通常用 ic_music.png等方式命名,三方图标通常用包名来标识
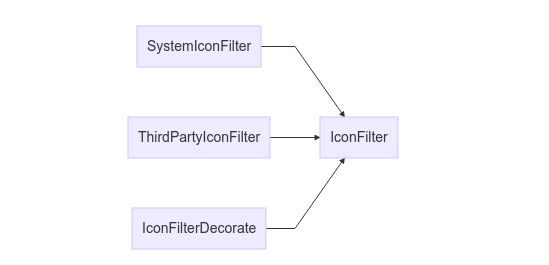
由此,我们可以设计一个过滤器接口IconFilter,让子类系统图标过滤器和三方图标过滤器实现过滤方法。考虑到Launche里IconCache都是使用 ComponentKey 来标示图标,我们沿用即可。返回的String呢,是主题包里的图标命名。
public interface IconFilter {

    String TAG = IconFilter.class.getSimpleName();

    /**
     * find the proper icon key by componentKey and
     * return the icon key we cached
     *
     * @param componentKey IconCache key filter
     * @return the fileName or key from theme archive
     */
    String filter(ComponentKey componentKey);
}
同时,由于有多个过滤器,我们也不清楚什么时候用哪个?甚至以后可能会有新的过滤器,新的过滤规则,故这里设计一个装饰者 IconFilterDecorate,同样的实现 IconFilter接口。什么是装饰者,出门右转
这样有新规则,新过滤器时,加到装饰器的过滤方法里即可。这样整体的适配性就好多了
通常我们会有一个主题商店,在主题商店里下载主题并应用主题,倘若在主题商店里实现对launcher图标的替换,也就是操作Launcher的icon数据库,这并不是很合理。由于是不同的应用,我们可以通过AIDL跨进程通信的方式来让Launcher应用主题。
    interface IThemeServiceInterface {
        /**
        * apply the new theme.
        * @param path theme pkg file path
        * return true when apply theme success.
        */
        boolean apply(String path);

        /**
        *  apply the default theme of Launcher
        */
        boolean reset();
    }
AIDL接口有了,解析器有了,过滤器也有了,然后我们就要把这些东西用起来了。
我们设计一个 ThemeManger 主题管理器,供AIDL接口实现和Launcher的IconCache使用,使用的时候注意 ThemeManager实例的唯一性,避加载过多的ThemeManager造成内存浪费。
ThemeManager 可以设计如下几个方法(仅供参考):
1. Bitmap loadIcon(ComponentKey componentKey)
2  boolean apply(Context context, String path, boolean updateWorkspace)
加载主题图标和应用主题的功能。在 loadIcon 方法里,就可以使用我们的 IconFilter过滤匹配正确的主题图标。 apply 方法里,就可以使用我们设计好的的工厂类 ThemeParseFactory,可以根据文件路径识别文件类型找到正确的解析器来解析。
除了上面内容外,图片缓存机制,如数据库,图片处理工具就不介绍了,方式很多。个人写的主题类(仅供参考)主题应用到 IconCahce
在应用之前,我们要先了解下IconCache。在LauncherModel的加载桌面流程里,也会初始化所有图标的信息。在IconCache扫描到所有应用后,会开启一个线程遍历所有应用自带的图标缓存到内存和数据库里。
    /**
     * A runnable that updates invalid icons and adds missing icons in the DB for the provided
     * LauncherActivityInfoCompat list. Items are updated/added one at a time, so that the
     * worker thread doesn't get blocked.
     */
    @Thunk
    class SerializedIconUpdateTask implements Runnable {
     @Override
        public void run() {
            if (!mAppsToUpdate.isEmpty()) {
                LauncherActivityInfoCompat app = mAppsToUpdate.pop();
                String cn = app.getComponentName().flattenToString();
                ContentValues values = updateCacheAndGetContentValues(app, true);
                mIconDb.update(values,
                        IconDB.COLUMN_COMPONENT + " = ? AND " + IconDB.COLUMN_USER + " = ?",
                        new String[]{cn, Long.toString(mUserSerial)});
                mUpdatedPackages.add(app.getComponentName().getPackageName());
                // add folder
                mUpdatedPackages.add(ThemeCache.KEY_FOLDER);
                if (mAppsToUpdate.isEmpty() && !mUpdatedPackages.isEmpty()) {
                    // No more app to update. Notify model.
                    LauncherAppState.getInstance().getModel().onPackageIconsUpdated(
                            mUpdatedPackages, mUserManager.getUserForSerialNumber(mUserSerial));
                }

                // Let it run one more time.
                scheduleNext();
            } else if (!mAppsToAdd.isEmpty()) {
                LauncherActivityInfoCompat app = mAppsToAdd.pop();
                PackageInfo info = mPkgInfoMap.get(app.getComponentName().getPackageName());
                if (info != null) {
                    synchronized (IconCache.this) {
                        addIconToDBAndMemCache(app, info, mUserSerial);
                    }
                }

                if (!mAppsToAdd.isEmpty()) {
                    scheduleNext();
                }
            }
        }
    }
调用 addIconToDBAndMemCache 方法开始缓存操作,通过 updateCacheAndGetContentValues 方法创建图标。因此,在给 entry.icon 赋值之前,优先加载我们主题里的图标, ThemeManager的loadIcon方法,没有的话在使用原本的获取机制。
 ContentValues updateCacheAndGetContentValues(LauncherActivityInfoCompat app,
                                                 boolean replaceExisting) {
        final ComponentKey key = new ComponentKey(app.getComponentName(), app.getUser());
        CacheEntry entry = null;
        if (!replaceExisting) {
            entry = mCache.get(key);
            // We can't reuse the entry if the high-res icon is not present.
            if (entry == null || entry.isLowResIcon || entry.icon == null) {
                entry = null;
            }
        }
        if (entry == null) {
            entry = new CacheEntry();
            Bitmap icon = mThemeMan.loadIcon(key);
            if (icon == null) {
                entry.icon = Utilities.createBadgedIconBitmap(
                        app.getIcon(mIconDpi), app.getUser(), mThemeMan.getThemeCache(), mContext);
            } else {
                entry.icon = Utilities.createBadgedIconBitmap(
                        new FastBitmapDrawable(icon), app.getUser(), mThemeMan.getThemeCache(), mContext);
            }
        }
        entry.title = app.getLabel();
        entry.contentDescription = mUserManager.getBadgedLabelForUser(entry.title, app.getUser());
        mCache.put(new ComponentKey(app.getComponentName(), app.getUser()), entry);

        return newContentValues(entry.icon, entry.title.toString(), mActivityBgColor);
    }
此外,我们还知道IconCache读取数据库图标是在 cacheLocked 方法里。Launcher加载流程里会预加载图标,第一次读取数据库时,数据库是空的,也就是 getEntryFromDB 方法会返回false, 所以在 if 里,需要添加上我们的主题图标获取。
    private CacheEntry cacheLocked(ComponentName componentName, LauncherActivityInfoCompat info,
                                   UserHandleCompat user, boolean usePackageIcon, boolean useLowResIcon) {
        ComponentKey cacheKey = new ComponentKey(componentName, user);
        CacheEntry entry = mCache.get(cacheKey);
        if (entry == null || (entry.isLowResIcon && !useLowResIcon)) {
            entry = new CacheEntry();
            mCache.put(cacheKey, entry);

            // Check the DB first.
            if (!getEntryFromDB(cacheKey, entry, useLowResIcon)) {
                if (info != null) {
                    Bitmap icon = mThemeMan.loadIcon(cacheKey);
                    if (icon != null) {
                        entry.icon = Utilities.createBadgedIconBitmap(
                                new FastBitmapDrawable(icon), info.getUser(), mThemeMan.getThemeCache(), mContext);
                    } else {
                        entry.icon = Utilities.createBadgedIconBitmap(
                                info.getIcon(mIconDpi), info.getUser(), mThemeMan.getThemeCache(), mContext);
                    }

                } else {
                    ...
                }
            } else {
                // saveBitmap(mContext, entry.icon, cacheKey.componentName.getClassName());
            }
            ...
        }
        return entry;
    }
当然第二次度数据库的时候,在就能拿到数据库里的图标了,所以在 getEntryFromDB 里也要加上我们获取主题图标的方式,这样基本就满足我们对主题图标的替换了。
还有一个比较重要的,因为主题包大部分是图片资源,加载需要一定的时间和消耗内存,除了保证唯一性外,我们也要预加载主题图标的资源。熟悉Launcher的小伙伴知道,我们可以在LauncherModel的加载流程里,优先加载我们的主题资源,然后后续的工作就会自动完成了。不需要我们在加载完默认的图标后再应用我们的主题了。
码字不易,感谢阅读


