Webpack 是当下最热门的前端资源模块化管理和打包工具。它可以将许多松散的模块按照依赖和规则打包成符合生产环境部署的前端资源。还可以将按需加载的模块进行代码分隔,等到实际需要的时候再异步加载。通过 loader 的转换,任何形式的资源都可以视作模块,比如 CommonJs 模块、 AMD 模块、 ES6 模块、CSS、图片、 JSON、Coffeescript、 LESS 等。
webpack.config.js的基本配置
webpack.config.js的基本形式:
var webpack = require('webpack')
var path = require('path');

module.exports = {
    entry: {
        index: ['./src/script/main.js', './src/script/a.js']
    },
    output: {
        path: '/home/xin/桌面/learning-records/09-webpack/demo04/dist/js',
        filename: 'bundle.js'
    }
 }
- entry:entry指示了哪些文件需要打包,它有三种使用方式
    1. 打包一个文件  (1 to 1)
    entry: "./src/script/main.js",
    2. 打包多个文件到一起 (n to 1)
    entry: ["./src/script/main.js", "./src/script/a.js"],
    3. 打包多个文件到不同的输出文件 (n to n),适用于多页面应用
    entry: {
        main: ["./src/script/main.js", "./src/script/a.js"], //这部分表示将main.js和a.js打包到一起
        a: "./src/script/a.js",
        b: "./src/script/b.js",
        c: "./src/script/c.js"
    },
    // 这里main、a、b、c是chunk name,其后的js文件即为chunk
- output: 指定了打包文件的输出相关配置(路径、文件名)
将文件打包输出到path目录下的index.js
output: {
        // 在webpack2中,输出路径必须使用绝对路径
        path: '/home/xin/桌面/learning-records/09-webpack/demo04/dist',
        filename: 'index.js',
    },
但是,如果要打包不同的文件并输出到不同的文件该如何操作?
这时应该在filename中使用[name] [hash] [chunkhash]来确保生成输出到不同的文件:
[name] 会被chunk的名称所替换(chunk就是entry中的“键”)
[hash] is replaced by the hash of the compilation.
[chunkhash] is replaced by the hash of the chunk.
entry: {
        main: ["./src/script/main.js", "./src/script/a.js"], //这部分表示将main.js和a.js打包到一起
        a: "./src/script/a.js",
        b: "./src/script/b.js",
        c: "./src/script/c.js"
    },
output: {
        path: '/home/xin/桌面/learning-records/09-webpack/demo04/dist',
        filename: 'js/[name]-[chunkhash].js',
    },
运行 webpack(全局安装webpack的前提下),就可以得到如下结果
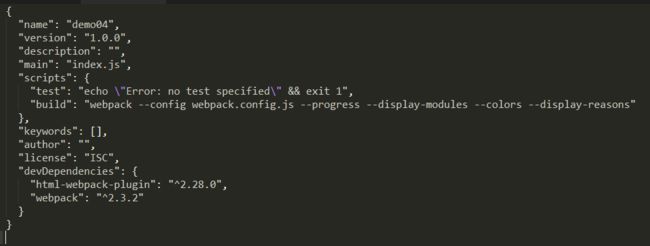
如果只是局部安装webpack,可以在项目的package.json中的script进行配置
这样,只需运行npm run build就可以间接运行webpack命令了
使用webpack插件
- html-webpack-plugin:是一个简化生成HTML文件的webpack插件
安装:npm install html-webpack-plugin --save-dev
使用插件:在webpack.config.js中进行配置
var webpack = require('webpack')
var path = require('path');
// 建立对插件的引用
var htmlWebpackPlugin = require('html-webpack-plugin');

module.exports = {
    entry: {
        main: ["./src/script/main.js", "./src/script/a.js"],
        a: "./src/script/a.js",
        b: "./src/script/b.js",
        c: "./src/script/c.js"
    },
    output: {
        path: '/home/xin/桌面/learning-records/09-webpack/demo04/dist',
        filename: 'js/[name]-[chunkhash].js',
    },
    // plugins是一个数组,用来对插件进行配置
    plugins: [
    new htmlWebpackPlugin({
        // 这里的路径指的是根目录下的index.html,但是生成的a.html是在output指定的path路径下
        template: 'index.html',
        // 以index.html(webpack.config.js目录下的index.html)为模版,生成output指定路径下的a.html
        filename: 'a.html',
        // 指定脚本位置 可选值: 'head',' body',false (false表示不指定,脚本位置由html模版决定)
        inject: "body",
        // 在这里传入参数,在模板中进行引用,动态操控生成文件的内容
        title: 'this is a', // 传入title参数
        // 使用chunks参数来指定生成的页面包含哪些js文件
        chunks: ['main', 'a'],
    }),]
}
webpack.config.js所在目录下的index.html(模版文件)
<%= htmlWebpackPlugin.options.title %>
运行webpack或者npm run build 在 output 中path指定的目录下,生成a.html
this is a
上面的例子中提到过,plugins是一个数组,用来对插件进行配置。但是上面的例子中,plugins中只有一项,该项只能对一个html文件进行配置,如果需要对多个html文件进行配置,则需要往plugins数组中添加多个插件
var webpack = require('webpack')
var path = require('path');
// 建立对插件的引用
var htmlWebpackPlugin = require('html-webpack-plugin');
module.exports = {
    entry: {
        main: "./src/script/main.js",
        a: "./src/script/a.js",
        b: "./src/script/b.js",
        c: "./src/script/c.js"
    },
    output: {

        path: path.resolve(__dirname, './dist'),

        filename: 'js/[name]-[chunkhash].js',
    },

    // 注意:plugins是一个数组,可以生成多个插件用来处理多个文件(构建多个html页面)
    plugins: [
       // 利用一个html模版,根据要求生成多个HTML文件
        new htmlWebpackPlugin({
            filename: 'a.html',
            template: 'index.html',
            inject: "body",
            title: 'this is a',
            chunks: ['main', 'a'],
        }),
        new htmlWebpackPlugin({
            filename: 'b.html',
            template: 'index.html',
            inject: "body",
            title: 'this is b', // 传入title参数
            chunks: ['b'],
        }),
        new htmlWebpackPlugin({
            filename: 'c.html',
            template: 'index.html',
            inject: "body",
            title: 'this is c', // 传入title参数
            chunks: ["c"],
        })
    ]
}
如何在项目中使用jQuery?
- 安装jQuery到项目中:
npm install jquery --save-dev - 在需要使用jQuery的模块中中直接require:
var $ = require('jquery'); - 这样就可以在当前模块中使用jQuery了
或者,在对应的HTML页面中,使用script标签,引入jQuery,这样,在对应的页面就可以使用jQuery了
loader
主要是处理资源的
postcss-loader用于css后处理,autoprefixer
{
test: /.css$/,
loader: 'style-loader!css-loader
}

