   今天在github上偶然看见一个关于身份证号码识别的小项目,于是有点手痒,也尝试了一下。不过由于以前也没有太多关于这方面的经验,所以还是走了一些弯路,所以在这里分享一些自己的经验。

    项目链接:(https://github.com/haoxinl/haosir_learning)
依赖
opencv
pytesseract
numpy
matplotlib
特别注意要安装Tesseract-OCR,并将其路径加入到系统环境变量中
流程
- 获取身份证号区域
image-》灰度=》反色=》膨胀=》findContours
- 数字识别
采用tesseract识别,由于本项目所处的环境较为简单,所以使用pytesseract.image_to_string(image, lang='ocrb', config=tessdata_dir_config)函数即可识别
引用
- https://github.com/JinpengLI/deep_ocr/
下面是具体代码细节
首先是第三方库的导入
 -*- coding: UTF-8 -*-
import cv2
import matplotlib.pyplot as plt
import numpy as np
import pytesseract
from PIL import Image
debug = 1
然后是灰度化函数
def grayImg(img):
    # 转化为灰度图
    gray = cv2.resize(img, (img.shape[1] * 3, img.shape[0] * 3), interpolation=cv2.INTER_CUBIC)
    gray = cv2.cvtColor(gray, cv2.COLOR_BGR2GRAY)
    #otsu二值化操作
    retval, gray = cv2.threshold(gray, 120, 255, cv2.THRESH_OTSU + cv2.THRESH_BINARY)
    return gray
以及图像预处理以及身份证号码区域的确定
def preprocess(gray):
    #二值化操作,但与前面grayimg二值化操作中不一样的是要膨胀选定区域所以是反向二值化
    ret, binary = cv2.threshold(gray, 180, 255, cv2.THRESH_BINARY_INV)
    ele = cv2.getStructuringElement(cv2.MORPH_RECT, (15, 10))
    #膨胀操作
    dilation = cv2.dilate(binary, ele, iterations=1)
    cv2.imwrite("binary.png", binary)
    cv2.imwrite("dilation.png", dilation)
    return dilation
def findTextRegion(img):
    region = []
    # 1. 查找轮廓
    image, contours, hierarchy = cv2.findContours(img, cv2.RETR_TREE, cv2.CHAIN_APPROX_SIMPLE)
    # 2. 筛选那些面积小的
    for i in range(len(contours)):
        cnt = contours[i]
        # 计算该轮廓的面积
        area = cv2.contourArea(cnt)
        # 面积小的都筛选掉
        if (area < 300):
            continue
        # 轮廓近似,作用很小
        epsilon = 0.001 * cv2.arcLength(cnt, True)
        approx = cv2.approxPolyDP(cnt, epsilon, True)
        # 找到最小的矩形,该矩形可能有方向
        rect = cv2.minAreaRect(cnt)
        #函数 cv2.minAreaRect() 返回一个Box2D结构 rect:(最小外接矩形的中心(x,y),(宽度,高度),旋转角度)。
        if debug:
            print("rect is: ", rect)
        # box是四个点的坐标
        box = cv2.boxPoints(rect)
        box = np.int0(box)
        # 计算高和宽
        height = abs(box[0][1] - box[2][1])
        width = abs(box[0][0] - box[2][0])

        # 筛选那些太细的矩形,留下扁的
        if (height > width * 1.2):
            continue
        # 太扁的也不要
        if (height * 18 < width):
            continue
        if (width > img.shape[1] / 2 and height > img.shape[0] / 20):
            region.append(box)
    return region
然后将preprocess与findTextRegion结合起来构成detect检测函数
def detect(img):
    # fastNlMeansDenoisingColored(InputArray src, OutputArray dst, float h=3, float hColor=3, int templateWindowSize=7, int searchWindowSize=21 )
    gray = cv2.fastNlMeansDenoisingColored(img, None, 10, 3, 3, 3)
    #cv2.fastNlMeansDenoisingColored作用为去噪
    coefficients = [0, 1, 1]
    m = np.array(coefficients).reshape((1, 3))
    gray = cv2.transform(gray, m)
    if debug:
        cv2.imwrite("gray.png", gray)
    # 2. 形态学变换的预处理,得到可以查找矩形的图片
    dilation = preprocess(gray)

    # 3. 查找和筛选文字区域
    region = findTextRegion(dilation)
    # 4. 用绿线画出这些找到的轮廓
    for box in region:
        h = abs(box[0][1] - box[2][1])
        w = abs(box[0][0] - box[2][0])
        Xs = [i[0] for i in box]
        Ys = [i[1] for i in box]
        x1 = min(Xs)
        y1 = min(Ys)
        cv2.drawContours(img, [box], 0, (0, 255, 0), 2)
        if w > 0 and h > 0 and x1 < gray.shape[1] / 2:
            idImg = grayImg(img[y1:y1 + h, x1:x1 + w])
            cv2.imwrite("idImg.png", idImg)
            cv2.imwrite("contours.png", img)
            return idImg
最后就是最后的字符检测以及结果展示
def ocrIdCard(imgPath, realId=""):
    img = cv2.imread(imgPath, cv2.IMREAD_COLOR)
    img = cv2.resize(img, (428, 270), interpolation=cv2.INTER_CUBIC)
    idImg = detect(img)
    image = Image.fromarray(idImg)
    tessdata_dir_config = '-c tessedit_char_whitelist=0123456789X --tessdata-dir "./"'
    print("checking")
    print('the real id is '+realId)
    # result = pytesseract.image_to_string(image, lang='ocrb', config=tessdata_dir_config)
    tessdata_dir_config = '--tessdata-dir "C:\pylearning\card_ocr_cv\idcard_identification\\tessdata"'
    result = pytesseract.image_to_string(image, lang='ocrb',config=tessdata_dir_config)
    print('the detect result is '+result)
    if realId==result:
        print('ok,it is right')
    else:
        print('sorry,it is false')
    # print(pytesseract.image_to_string(image, lang='eng', config=tessdata_dir_config))
    if debug:
        f, axarr = plt.subplots(2, 3)
        axarr[0, 0].imshow(cv2.imread(imgPath))
        axarr[0, 1].imshow(cv2.imread("gray.png"))
        axarr[0, 2].imshow(cv2.imread("binary.png"))
        axarr[1, 0].imshow(cv2.imread("dilation.png"))
        axarr[1, 1].imshow(cv2.imread("contours.png"))
        axarr[1, 2].imshow(cv2.imread("idImg.png"))
        plt.show()
运行函数如下
if __name__=="__main__":
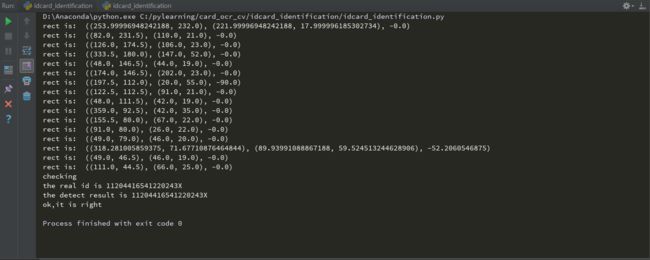
    ocrIdCard("test1.png", "11204416541220243X")
最终结果如下:

