这篇文章我将分享openstack的主要知识点
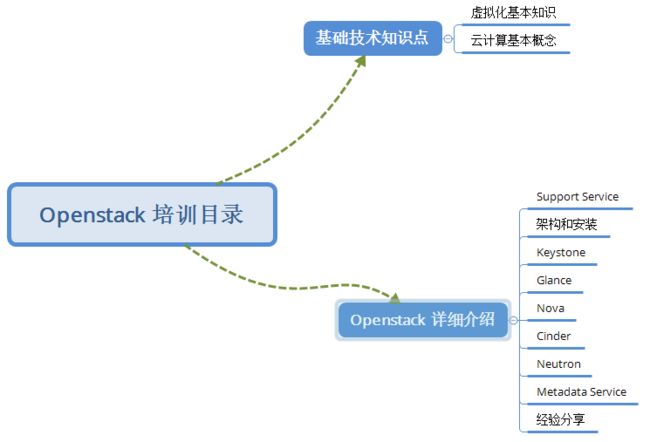
这篇文章会涉及的主要内容:
| 知识点名称 | 具体内容 |
|---|---|
| 基础技术点 | 虚拟化基础知识和云计算概念 |
| Openstack 实验环境搭建 | 手动安装 |
| 支持服务 | ntp mariadb rabbitmq memecache |
| Keystone | 概念理解,具体实现方法理解 |
| Glance | 实现原理,和基本的镜像制作方法 |
| Nova | nova对instance的生命周期管理,界面的instance 功能详解 |
| Cinder | cinder工作原理 |
| Neutron | dhcp 原理,ML2 详解,linux bridge,openvswitch |
| Metadata 服务 | 详细介绍metadata |
| 日常经验分享 | 日常案例分析帮助加深对openstack各个服务的理解 |
接下来我们按照上面的顺序详细的讲解
-
虚拟化:
- 虚拟化主要以qemu-kvm 来讲解
- 其他基础知识后期更新。。。
- libvirt: The virtualization API
- 特别注意:
virbr0 是 KVM 默认创建的一个 Bridge,其作用是为连接其上的虚机网卡提供 NAT 访问外网的功能。
virbr0 默认分配了一个IP 192.168.122.1,并为连接其上的其他虚拟网卡提供 dhcp。使用的是开源软件dnsmasq。
-
云计算基本概念:
** Infrastructure as a Service (IaaS) is a form of cloud computing that provides virtualized computing resources (include cpu/memory/disk) over the Internet. IaaS is one of three main categories of cloud computing services, alongside Software as a Service (SaaS) and Platform as a Service (PaaS).** by Wikipedia
- Openstack 和云计算:
OpenStack is a free and open-source software platform for cloud computing, mostly deployed as infrastructure-as-a-service (IaaS), whereby virtual servers and other resources are made available to customers.
The software platform consists of interrelated components that control diverse, multi-vendor hardware pools of processing, storage, and networking resources throughout a data center. Users either manage it through a web-based dashboard, through command-line tools, or through RESTful web services.
- RESTful API:
Representational state transfer (REST) or RESTful web services is a way of providing interoperability between computer systems on the Internet. REST-compliant Web services allow requesting systems to access and manipulate textual representations of Web resources using a uniform and predefined set of stateless operations. Other forms of Web service exist, which expose their own arbitrary sets of operations such as WSDL and SOAP.[1]
"Web resources" were first defined on the World Wide Web as documents or files identified by their URLs, but today they have a much more generic and abstract definition encompassing every thing or entity that can be identified, named, addressed or handled, in any way whatsoever, on the Web. In a RESTful Web service, requests made to a resource's URI will elicit a response that may be in XML, HTML, JSON or some other defined format. The response may confirm that some alteration has been made to the stored resource, and it may provide hypertext links to other related resources or collections of resources. Using HTTP, as is most common, the kind of operations available include those predefined by the HTTP verbs GET, POST, PUT, DELETE and so on.
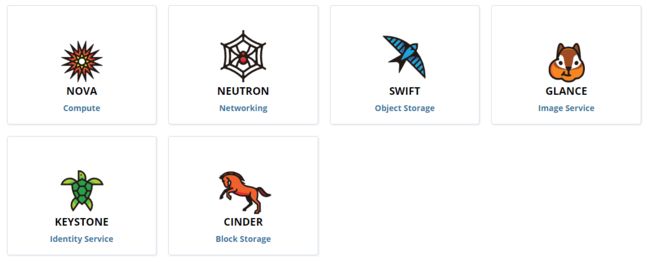
- Openstack 核心组件:
咱们今天培训的内容除了swift 之外都会涉及到,以上内容就是咱们在学习openstack之前需要了解的基础知识。
- 总结
云计算其实就是将咱们原本传统IT 的工作都用软件代替,其中主要的技术就是我们现在比较成熟的虚拟化来代替的,云计算是丰富了虚拟化的管理。由此可见,OpenStack 针对的是 IT 基础设施,是 IaaS 这个层次的云操作系统
-
Support 服务:
支持服务指的是哪些不是openstack的组件,但是openstack 却必须的服务:例如,ntp提供时间同步,rabbitmq 提供消息服务,mariadb 提供数据库服务,httpd 提供web 服务等。接下来我们将逐一进行介绍:
- NTP 服务
- NTP Server 搭建
- NTP client 的配置
- 基本调试方法
- RabbitMQ
RabbitMQ是一个由erlang开发的AMQP(Advanced Message Queue )的开源实现。AMQP 的出现其实也是应了广大人民群众的需求,虽然在同步消息通讯的世界里有很多公开标准(如 COBAR的 IIOP ,或者是 SOAP 等),但是在异步消息处理中却不是这样,只有大企业有一些商业实现(如微软的 MSMQ ,IBM 的 Websphere MQ 等),因此,在 2006 年的 6 月,Cisco 、Redhat、iMatix 等联合制定了 AMQP 的公开标准。
RabbitMQ 官网
1. Why RabbitMQ ? RabbitMQ 解决了什么问题?没有会如何?
1)信息的发送者和接收者如何维持这个连接,如果一方的连接中断,这期间的数据如何方式丢失?
2)如何降低发送者和接收者的耦合度?
3)如何让Priority高的接收者先接到数据?
4)如何做到load balance?有效均衡接收者的负载?
5)如何有效的将数据发送到相关的接收者?也就是说将接收者subscribe 不同的数据,如何做有效的filter。
6)如何做到可扩展,甚至将这个通信模块发到cluster上?
7)如何保证接收者接收到了完整,正确的数据?
AMDQ协议解决了以上的问题,而RabbitMQ实现了AMQP
- Rabbimq web plug-in
安装代码:
yum install rabbitmq-server -y 1>/dev/null sed -i "2a ${MGMT_IP} $(hostname)" /etc/hosts systemctl start rabbitmq-server.service
创建用户和赋予权限:
rabbitmqctl add_user openstack $RABBIT_PASS 1>/dev/null rabbitmqctl set_permissions openstack ".*" ".*" ".*" 1>/dev/null
#rabbitmq-plugins list
#enable rabbitmq_management boot after the os boot
#Use rabbitmq-web
启动web UI Plug-In
rabbitmq-plugins enable rabbitmq_management 1>/dev/null 2>&1 systemctl restart rabbitmq-server.service &&
访问ip:<15672> 默认登录密码是guest/guest
- Mariadb
数据库这里我们主要探讨下galera 数据库高可用吧
MariaDB Galera Cluster 介绍
MariaDB集群是MariaDB同步多主机集群。它仅支持XtraDB/ InnoDB存储引擎(虽然有对MyISAM实验支持 - 看wsrep_replicate_myisam系统变量)。
主要功能:
同步复制
真正的multi-master,即所有节点可以同时读写数据库
自动的节点成员控制,失效节点自动被清除
新节点加入数据自动复制
真正的并行复制,行级
用户可以直接连接集群,使用感受上与MySQL完全一致
优势:
因为是多主,所以不存在Slavelag(延迟)
不存在丢失事务的情况
同时具有读和写的扩展能力
更小的客户端延迟
节点间数据是同步的,而Master/Slave模式是异步的,不同slave上的binlog可能是不同的
- Memcached
- 基本简介:
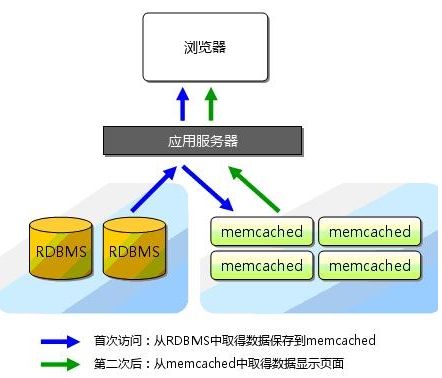
Memcached是一种基于内存的key-value存储,用来存储小块的任意数据(字符串、对象)。这些数据可以是数据库调用、API调用或者是页面渲染的结果。
Memcached简洁而强大。它的简洁设计便于快速开发,减轻开发难度,解决了大数据量缓存的很多问题。它的API兼容大部分流行的开发语言。
本质上,它是一个简洁的key-value存储系统。
一般的使用目的是,通过缓存数据库查询结果,减少数据库访问次数,以提高动态Web应用的速度、提高可扩展性。
The Identity service authentication mechanism for services uses Memcached to cache tokens.
The memcached service typically runs on the controller node.
memcached 官网
2. 在openstack中的安装与配置:
yum install memcached python-memcached -y sed -i "s/127.0.0.1/$MGMT_IP/g" /etc/sysconfig/memcached systemctl enable memcached.service systemctl start memcached.service
2.1 如果是需要安装最新的话:
wget http://memcached.org/latest tar -zxvf memcached-1.x.x.tar.gz cd memcached-1.x.x ./configure && make && make test && sudo make install
- HAproxy
HAProxy 官网
The Reliable, High Performance TCP/HTTP Load Balancer
| Stateful | Stateless |
|---|---|
| Cinder Volume | Neutron Server |
| Neutron L3,DHCP agents | OpenStack APls |
| Ceilometer central agent | Apache web server |
| RabbitMQ | Nova Scheduler |
| Mariadb | Cinder Scheduler |
Stateless service:
A service that provides a response after your request and then requires no further attention. To make a stateless service highly available, you need to provide redundant instances and load balance them. OpenStack services that are stateless include nova-api, nova-conductor, glance-api, keystone-api, neutron-api, and nova-scheduler.
Stateful service:
A service where subsequent requests to the service depend on the results of the first request. Stateful services are more difficult to manage because a single action typically involves more than one request. Providing additional instances and load balancing does not solve the problem. For example, if the horizon user interface reset itself every time you went to a new page, it would not be very useful. OpenStack services that are stateful include the OpenStack database and message queue. Making stateful services highly available can depend on whether you choose an active/passive or active/active configuration.
Active/passive versus active/active
Stateful services can be configured as active/passive or active/active, which are defined as follows:
active/passive configuration
Maintains a redundant instance that can be brought online when the active service fails. For example, OpenStack writes to the main database while maintaining a disaster recovery database that can be brought online if the main database fails.
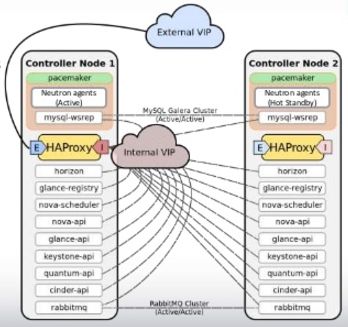
A typical active/passive installation for a stateful service maintains a replacement resource that can be brought online when required. Requests are handled using a virtual IP address (VIP) that facilitates returning to service with minimal reconfiguration. A separate application (such as Pacemaker or Corosync) monitors these services, bringing the backup online as necessary.
active/active configuration
Each service also has a backup but manages both the main and redundant systems concurrently. This way, if there is a failure, the user is unlikely to notice. The backup system is already online and takes on increased load while the main system is fixed and brought back online.
Typically, an active/active installation for a stateless service maintains a redundant instance, and requests are load balanced using a virtual IP address and a load balancer such as HAProxy.
A typical active/active installation for a stateful service includes redundant services, with all instances having an identical state. In other words, updates to one instance of a database update all other instances. This way a request to one instance is the same as a request to any other. A load balancer manages the traffic to these systems, ensuring that operational systems always handle the request.
*总结
有状态服务:后续对服务的请求依赖于之前对服务的请求。
无状态服务:对服务的请求之间没有依赖关系,是完全独立的。
Active/Passive HA:集群只包括两个节点简称主备。在这种配置下,系统采用主和备用机器来提供服务,系统只在主设备上提供服务。在主设备故障时,备设备上的服务被启动来替代主设备提供的服务。典型地,可以采用 CRM 软件比如 Pacemaker 来控制主备设备之间的切换,并提供一个虚机 IP 来提供服务。
Active/Active HA:集群只包括两个节点时简称双活,包括多节点时成为多主(Multi-master)。在这种配置下,系统在集群内所有服务器上运行同样的负载。以数据库为例,对一个实例的更新,会被同步到所有实例上。这种配置下往往采用负载均衡软件比如 HAProxy 来提供服务的虚拟 IP。
云环境的 HA 将包括:
物理IT层:包括网络设备比如交换机和路由器,存储设备等
基础设施:比如电力、空调和防火设施等
控制节点服务的 HA
虚机的 HA
应用的 HA
memcached HA 配置
memcached_servers = controller1:11211,controller2:11211
Neutron L3 agent 使用 DVR
- Keepalived
Keepalived is a routing software written in C. The main goal of this project is to provide simple and robust facilities for loadbalancing and high-availability to Linux system and Linux based infrastructures. Loadbalancing framework relies on well-known and widely used Linux Virtual Server (IPVS) kernel module providing Layer4 loadbalancing. Keepalived implements a set of checkers to dynamically and adaptively maintain and manage loadbalanced server pool according their health. On the other hand high-availability is achieved by VRRP protocol. VRRP is a fundamental brick for router failover. In addition, Keepalived implements a set of hooks to the VRRP finite state machine providing low-level and high-speed protocol interactions. Keepalived frameworks can be used independently or all together to provide resilient infrastructures.Keepalived is free software; you can redistribute it and/or modify it under the terms of the GNU General Public License as published by the Free Software Foundation; either version 2 of the License, or (at your option) any later version.
总结:
以上,我们就把主要的openstack support服务都有大致的梳理了下,接下来我们正式开始学习openstack的核心组件:
掌握基本的概念和keystone 如何实现不同用户不同权限
概念理解,命令行导入镜像,web 导入,各种格式的image
介绍nova 对虚拟机的整个生命周期的管理,围绕对虚拟机的管理来展开。
主要涉及的内容为:
同步调用
API 直接调用 Scheduler 的接口是同步调用。
其特点是 API 发出请求后需要一直等待,直到 Scheduler 完成对 Compute 的调度,将结果返回给 API 后 API 才能够继续做后面的工作。
异步调用
API 通过 Messaging 间接调用 Scheduler 就是异步调用。
其特点是 API 发出请求后不需要等待,直接返回,继续做后面的工作。
Scheduler 从 Messaging 接收到请求后执行调度操作,完成后将结果也通过 Messaging 发送给 API。
openstack 设计思想:
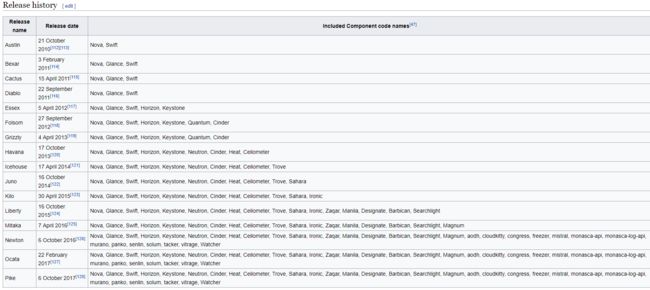
OpenStack 作为开放的 Infrastracture as a Service 云操作系统,支持业界各种优秀的技术。
这些技术可能是开源免费的,也可能是商业收费的。
这种开放的架构使得 OpenStack 能够在技术上保持先进性,具有很强的竞争力,同时又不会造成厂商锁定(Lock-in)。
那 OpenStack 的这种开放性体现在哪里呢?
一个重要的方面就是采用基于 Driver 的框架。
以 Nova 为例,OpenStack 的计算节点支持多种 Hypervisor。
包括 KVM, Hyper-V, VMWare, Xen, Docker, LXC 等。
neutron 部分主要为大家讲解
neutron 的架构,
ml2
l3 agent
dhcp原理
openvswitch agent
防火墙原理
安全组原理
浮动IP原理
虚拟机获取ip地址log如下
Aug 4 17:36:09 10 dnsmasq[7361]: read /var/lib/neutron/dhcp/37c18fec-8e10-48cc-b697-4e418254bde5/addn_hosts - 8 addresses
Aug 4 17:36:09 10 dnsmasq-dhcp[7361]: read /var/lib/neutron/dhcp/37c18fec-8e10-48cc-b697-4e418254bde5/host
Aug 4 17:36:09 10 dnsmasq-dhcp[7361]: read /var/lib/neutron/dhcp/37c18fec-8e10-48cc-b697-4e418254bde5/opts
Aug 4 17:36:10 10 dnsmasq[7361]: read /var/lib/neutron/dhcp/37c18fec-8e10-48cc-b697-4e418254bde5/addn_hosts - 8 addresses
Aug 4 17:36:10 10 dnsmasq-dhcp[7361]: read /var/lib/neutron/dhcp/37c18fec-8e10-48cc-b697-4e418254bde5/host
Aug 4 17:36:10 10 dnsmasq-dhcp[7361]: read /var/lib/neutron/dhcp/37c18fec-8e10-48cc-b697-4e418254bde5/opts
Aug 4 17:36:24 10 dnsmasq-dhcp[7361]: DHCPDISCOVER(tap49b03d00-49) 10.245.59.50 fa:16:3e:cd:60:f2
Aug 4 17:36:24 10 dnsmasq-dhcp[7361]: DHCPOFFER(tap49b03d00-49) 192.168.2.3 fa:16:3e:cd:60:f2
Aug 4 17:36:24 10 dnsmasq-dhcp[7361]: DHCPREQUEST(tap49b03d00-49) 192.168.2.3 fa:16:3e:cd:60:f2
Aug 4 17:36:24 10 dnsmasq-dhcp[7361]: DHCPACK(tap49b03d00-49) 192.168.2.3 fa:16:3e:cd:60:f2 host-192-168-2-3
cinder 介绍:
以lvm 为例,了解cinder工作的原理,了解volume是如何给不同的compute节点上的虚拟机使用的。
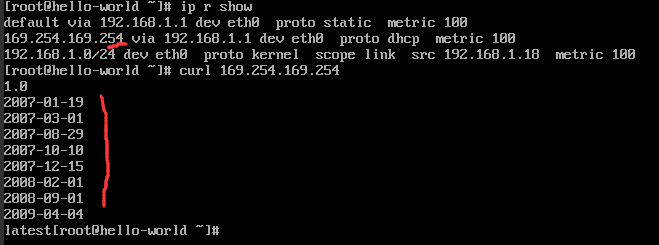
metadata service 相关的组件包括:
neutron-ns-metadata-proxy:作为一个独立的进程运行在 master virtual router 的 network namespace 中。它接受由 qrouter 通过 iptables 控制转交的 instance 访问 metadata service 的 request。
neutron-metadata-agent:Neutorn 的组件之一,运行在Neutorn 网络节点上,通过本地 socket 和 neutron-ns-metadata-proxy 进程通信,其配置文件是 /etc/neutron/metadata_agent.ini;它会通过 http(s) 和 Nova metadata service 通信;它通过 RPC 和 neutron-server 通信。你还可以通过配置 metadata_workers 的值来运行多个独立的进程。
nova metadata api:这个和 nova api 类似,是 nova 的 API 的一部分,通常使用的端口是 8775。它接收neutron-metadata-agent 的request。
web console.log如下:
[ 2.555658] intel_rapl: no valid rapl domains found in package 0
[ 3.930465] cloud-init[594]: Cloud-init v. 0.7.5 running 'init-local' at Tue, 01 Aug 2017 09:59:31 +0000. Up 3.81 seconds.
CentOS Linux 7 (Core)
Kernel 3.10.0-514.el7.x86_64 on an x86_64
localhost login: [ 10.272690] cloud-init[951]: Cloud-init v. 0.7.5 running 'init' at Tue, 01 Aug 2017 09:59:38 +0000. Up 10.17 seconds.
[ 10.358342] cloud-init[951]: ci-info: ++++++++++++++++++++++++++Net device info+++++++++++++++++++++++++++
[ 10.359299] cloud-init[951]: ci-info: +--------+------+--------------+---------------+-------------------+
[ 10.360157] cloud-init[951]: ci-info: | Device | Up | Address | Mask | Hw-Address |
[ 10.360994] cloud-init[951]: ci-info: +--------+------+--------------+---------------+-------------------+
[ 10.361832] cloud-init[951]: ci-info: | lo: | True | 127.0.0.1 | 255.0.0.0 | . |
[ 10.362673] cloud-init[951]: ci-info: | eth0: | True | 192.168.1.18 | 255.255.255.0 | fa:16:3e:fc:f2:1c |
[ 10.363511] cloud-init[951]: ci-info: +--------+------+--------------+---------------+-------------------+
[ 10.364348] cloud-init[951]: ci-info: ++++++++++++++++++++++++++++++++++Route info+++++++++++++++++++++++++++++++++++
[ 10.365252] cloud-init[951]: ci-info: +-------+-----------------+-------------+-----------------+-----------+-------+
[ 10.366152] cloud-init[951]: ci-info: | Route | Destination | Gateway | Genmask | Interface | Flags |
[ 10.367058] cloud-init[951]: ci-info: +-------+-----------------+-------------+-----------------+-----------+-------+
[ 10.367951] cloud-init[951]: ci-info: | 0 | 0.0.0.0 | 192.168.1.1 | 0.0.0.0 | eth0 | UG |
[ 10.370877] cloud-init[951]: ci-info: | 1 | 169.254.169.254 | 192.168.1.1 | 255.255.255.255 | eth0 | UGH |
[ 10.371790] cloud-init[951]: ci-info: | 2 | 192.168.1.0 | 0.0.0.0 | 255.255.255.0 | eth0 | U |
[ 10.372701] cloud-init[951]: ci-info: +-------+-----------------+-------------+-----------------+-----------+-------+
[ 18.633488] cloud-init[2195]: Cloud-init v. 0.7.5 running 'modules:config' at Tue, 01 Aug 2017 09:59:46 +0000. Up 18.56 seconds.
[ 19.108819] cloud-init[2218]: Cloud-init v. 0.7.5 running 'modules:final' at Tue, 01 Aug 2017 09:59:47 +0000. Up 19.02 seconds.
ci-info: ++++++++++Authorized keys from /home/centos/.ssh/authorized_keys for user centos+++++++++++
ci-info: +---------+-------------------------------------------------+---------+-------------------+
ci-info: | Keytype | Fingerprint (md5) | Options | Comment |
ci-info: +---------+-------------------------------------------------+---------+-------------------+
ci-info: | ssh-rsa | 27:a4:f2:53:f1:22:fa:49:38:d4:29:94:ea:6a:eb:07 | - | Generated-by-Nova |
ci-info: +---------+-------------------------------------------------+---------+-------------------+
ec2:
ec2: #############################################################
ec2: -----BEGIN SSH HOST KEY FINGERPRINTS-----
ec2: 256 e6:11:61:b1:f2:58:17:f1:85:09:3c:3a:3f:6d:f6:e1 (ECDSA)
ec2: 256 06:47:1b:8e:60:55:93:57:81:62:fe:52:ab:8e:f8:b8 (ED25519)
ec2: 2048 0f:ee:b4:c9:e9:57:e5:e2:94:20:3c:e8:bb:73:be:a3 (RSA)
ec2: -----END SSH HOST KEY FINGERPRINTS-----
ec2: #############################################################
-----BEGIN SSH HOST KEY KEYS-----
ecdsa-sha2-nistp256 AAAAE2VjZHNhLXNoYTItbmlzdHAyNTYAAAAIbmlzdHAyNTYAAABBBO1UDFGJBY2E17mcMz2DGL49g6xb6+r4nyqsXGjgsMK9f+U2fPBMzdhwlqI/Rb1/qnZrF2wLtIrc4W2rzgKBPgQ=
ssh-ed25519 AAAAC3NzaC1lZDI1NTE5AAAAIAJPbvtXyej18U9Z99lUJODaWsZpOgcoE42PcwsrVcGX
ssh-rsa AAAAB3NzaC1yc2EAAAADAQABAAABAQC5+iEjBNOntpwTIWfOZn+b7/uF21f1/7SPRpqBkmmm7pP2ZlajeWkf4XVn5Yasik6NLFWZpyVa8EebJDixnl6X2KTtZnNCtLmVAnUyyxPW5pTX92J+qkHpzjPIqDYUUcCNsIpHP7iyAPnJ9PE+/bHUWLE7zT45dPJgX+JxngZFGYSevnv8nA/ERIGdswy/pYgoJLDwlDc/TwbdV22CvDrX2XKilifgn9LBZcnL4kE1f2NdXnqCUvAQ8fMgBCetkkK/k2LKCwHpvOmLhIh9OdecsAHw8Clq3cIiRf3tV+KjxnLtd8bjjNyhWRCBIt4e3joQKf3hQwM5q9+hp6MVr2xn
-----END SSH HOST KEY KEYS-----
[ 19.160399] cloud-init[2218]: Cloud-init v. 0.7.5 finished at Tue, 01 Aug 2017 09:59:47 +0000. Datasource DataSourceOpenStack [net,ver=2]. Up 19.15 seconds
总结:
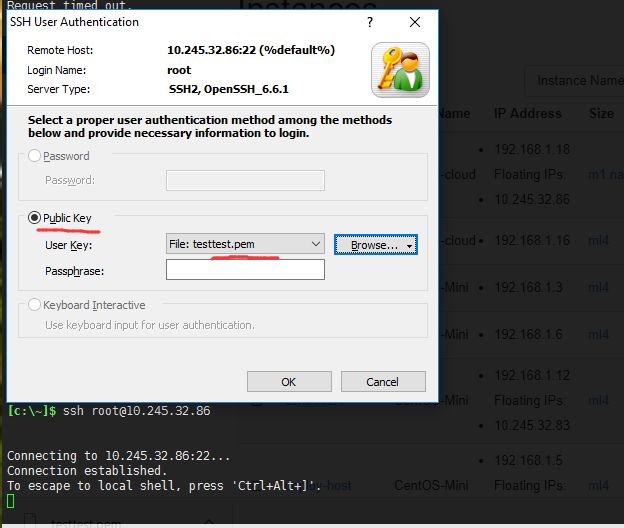
cloud-init 是 linux 的一个工具,当系统启动时,cloud-init 可从 nova metadata 服务或者 config drive 中获取 metadata,完成包括但不限于下面的定制化工作:
设置 default locale
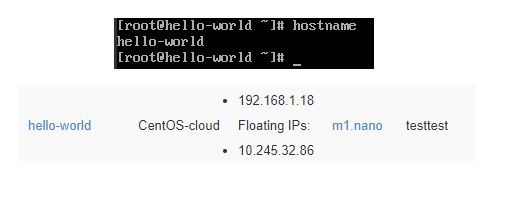
设置 hostname
添加 ssh keys到 .ssh/authorized_keys
设置用户密码
配置网络
安装软件包
