LNMP
LNMP就是:Linux系统下Nginx+MySQL+PHP这种网站服务器架构。
Linux是一类Unix计算机操作系统的统称,是目前最流行的免费操作系统。代表版本有:debian、centos、ubuntu、fedora、gentoo等。
Nginx是一个高性能的HTTP和反向代理服务器,也是一个IMAP/POP3/SMTP代理服务器。
Mysql是一个小型关系型数据库管理系统。
PHP是一种在服务器端执行的嵌入HTML文档的脚本语言。
这四种软件均为免费开源软件,组合到一起,成为一个免费、高效、扩展性强的网站服务系统。
开始搭建LNMP环境
注:由于系统是最小化安装的CentOS 7,所以在编译安装之前需要安装gcc
[root@localhost ~]# yum install -y gcc*
1、编译安装Nginx
(1)、安装软件依赖包
[root@localhost ~]# yum -y groupinstall "Development Tools" "Server Platform Deveopment"
[root@localhost ~]# yum -y install openssl-devel pcre-devel
(2)、下载Nginx安装包并解压
[root@localhost ~]# cd /usr/local/src/
[root@localhost src]# wget http://nginx.org/download/nginx-1.12.0.tar.gz
[root@localhost src]# useradd nginx    ##创建Nginx用户
[root@localhost src]# tar -xf nginx-1.12.0.tar.gz
(3)、编译安装Nginx
[root@localhost src]# cd nginx-1.12.0
[root@localhost nginx-1.12.0]# ./configure --prefix=/usr/local/nginx --user=nginx --group=nginx --with-http_ssl_module --with-http_flv_module --with-http_stub_status_module --with-http_gzip_static_module  --with-pcre
[root@localhost nginx-1.12.0]# make && make install

注:
--prefix:Nginx安装目录
--user:Nginx用户
--group:Nginx用户所属组
--with-http_ssl_module:提供https支持
--with-http_flv_module:搭建flv视频服务器使用的
--with-http_stub_status_module:开启Stub Status模块,该模块会产生一个服务器状态和信息页
--with-http_gzip_static_module:开启Gzip静态模块,该模块用于发送预压缩文件
--with-pcre:perl执行文件路径
(4)、配置Nginx启动脚本
[root@localhost ~]# cat /usr/lib/systemd/system/nginx.service
[Unit]
Description=The nginx HTTP and reverse proxy server
After=network.target remote-fs.target nss-lookup.target

[Service]
Type=forking
PIDFile=/usr/local/nginx/logs/nginx.pid
ExecStartPre=/usr/bin/rm -f /run/nginx.pid
ExecStartPre=/usr/local/nginx/sbin/nginx -t
ExecStart=/usr/local/nginx/sbin/nginx
ExecReload=/bin/kill -s HUP $MAINPID
KillMode=process
KillSignal=SIGQUIT
TimeoutStopSec=5
PrivateTmp=true

[Install]
WantedBy=multi-user.target

[root@localhost ~]# chmod a+x /usr/lib/systemd/system/nginx.service   ##给权限
(5)、启动Nginx
[root@localhost ~]# /usr/local/nginx/sbin/nginx -t      ##检查Nginx的配置是否有问题
nginx: the configuration file /usr/local/nginx/conf/nginx.conf syntax is ok
nginx: configuration file /usr/local/nginx/conf/nginx.conf test is successful
[root@localhost ~]# systemctl start nginx
[root@localhost ~]# ps -ef | grep nginx
root      10072      1  0 10:52 ?        00:00:00 nginx: master process /usr/local/nginx/sbin/nginx
nginx     10073  10072  0 10:52 ?        00:00:00 nginx: worker process
root      10075    963  0 10:52 pts/0    00:00:00 grep --color=auto nginx
(6)、访问Nginx,如图1所示
图1
2、编译安装php-fpm
(1)、安装依赖包
[root@localhost ~]# yum -y install libmcrypt-devel bzip2-devel gcc openssl-devel php-mcrypt libmcrypt libxml2-devel libjpeg-devel libpng-devel freetype-devel
(2)、下载php-fpm安装包并解压
[root@localhost ~]# cd /usr/local/src/
[root@localhost src]# wget http://cn2.php.net/distributions/php-5.5.38.tar.gz
[root@localhost src]# tar -xf php-5.5.38.tar.gz
(3)、编译安装php-fpm
[root@localhost src]# cd php-5.5.38
[root@localhost php-5.5.38]# ./configure --prefix=/usr/local/php --with-mysql=mysqlnd --with-pdo-mysql=mysqlnd --with-mysqli=mysqlnd --with-openssl --enable-mbstring --with-freetype-dir --with-jpeg-dir --with-png-dir --with-zlib --with-libxml-dir=/usr --enable-xml --enable-sockets --with-mcrypt  --with-bz2 --enable-fpm --with-gd --enable-bcmath
[root@localhost php-5.5.38]# make && make install    ##这一步时间有点久

##模块说明:
--prefix:php安装目录
--with-mysql:mysql安装目录,对mysql的支持
--with-pdo-mysql:指定 MySQL 数据库的安装目录位置
--with-mysqli:mysqli扩展技术不仅可以调用MySQL的存储过程、处理MySQL事务,而且还可以使访问数据库工作变得更加稳定。
--with-openssl:openssl的支持,加密传输时用到的
--enable-mbstring:多字节,字符串的支持
--with-freetype-dir:打开对freetype字体库的支持
--with-jpeg-dir:打开对jpeg图片的支持
--with-png-dir:打开对png图片的支持
--with-zlib:打开zlib库的支持
--with-libxml-dir:打开libxml2库的支持
--enable-sockets:打开 sockets 支持
--with-mcrypt:算法
--with-bz2:打开对bz2文件的支持
--enable-fpm:打上PHP-fpm 补丁后才有这个参数,CGI方式安装的启动程序
--with-gd:打开gd库的支持
--enable-bcmath:打开图片大小调整,用到zabbix监控的时候用到了这个模块
(4)、修改一些配置
[root@localhost php-5.5.38]# cp /usr/local/src/php-5.5.38/php.ini-production /usr/local/php/lib/php.ini
[root@localhost php-5.5.38]# mv /usr/local/php/etc/php-fpm.conf.default /usr/local/php/etc/php-fpm.conf
[root@localhost php-5.5.38]# useradd -M -s /sbin/nologin php    ##创建用户
[root@localhost php-5.5.38]# sed -i -e 's\;pid = run/php-fpm.pid\pid = run/php-fpm.pid\g' -e 's\nobody\php\g' -e 's\listen = 127.0.0.1:9000\listen = 0.0.0.0:9000\g' /usr/local/php/etc/php-fpm.conf
[root@localhost php-5.5.38]# sed -i 's\;daemonize = yes\daemonize = no\g' /usr/local/php/etc/php-fpm.conf
(5)、配置启动脚本
[root@localhost ~]# cd /usr/local/src/php-5.5.38/sapi/fpm     ##php-fpm自带的启动脚本
[root@localhost fpm]# cp init.d.php-fpm /etc/init.d/php-fpm
[root@localhost fpm]# cd /etc/init.d/
[root@localhost init.d]# chmod +x php-fpm
(6)、启动php-fpm
[root@localhost ~]# /usr/local/php/sbin/php-fpm -t    ##检查php-fpm配置是否正常
[22-Dec-2017 11:13:16] NOTICE: configuration file /usr/local/php/etc/php-fpm.conf test is successful
[root@localhost ~]# service php-fpm start
Unit php-fpm.service could not be found.
Starting php-fpm  done
[root@localhost ~]# ps -ef | grep php-fpm
root       4677      1  0 11:12 ?        00:00:00 php-fpm: master process (/usr/local/php/etc/php-fpm.conf)
php        4678   4677  0 11:12 ?        00:00:00 php-fpm: pool www
php        4679   4677  0 11:12 ?        00:00:00 php-fpm: pool www
root       4681    963  0 11:12 pts/0    00:00:00 grep --color=auto php-fpm
(7)、访问PHP
首先先修改Nginx,使其支持PHP
[root@localhost ~]# vim /usr/local/nginx/conf/nginx.conf
        location / {
            root   html;
            index  index.html index.htm index.php;
        }
        location ~ \.php$ {
            root           html;
            fastcgi_pass   127.0.0.1:9000;
            fastcgi_index  index.php;
            fastcgi_param  SCRIPT_FILENAME  $document_root$fastcgi_script_name;
            include        fastcgi_params;
        }

##添加PHP代码
[root@localhost html]# cat /usr/local/nginx/html/index.php
访问网页,如图2所示
图2
3、编译安装MySQL
(1)、安装依赖包
[root@localhost ~]# yum install -y cmake gcc-c++ ncurses-devel perl-Data-Dumper boost boost-doc boost-devel
(2)、下载MySQL安装包并解压
[root@localhost ~]# cd /usr/local/src/
[root@localhost src]# wget https://dev.mysql.com/get/Downloads/MySQL-5.7/mysql-boost-5.7.20.tar.gz
[root@localhost src]# wget https://dev.mysql.com/get/Downloads/MySQL-5.7/mysql-5.7.20.tar.gz
[root@localhost src]# tar -xf mysql-boost-5.7.20.tar.gz
[root@localhost src]# tar -xf mysql-5.7.20.tar.gz
(3)、创建用户并授权
[root@localhost src]# useradd -M -s /sbin/nologin mysql
[root@localhost src]# mkdir -p /usr/local/mysql/mydata
[root@localhost src]# mkdir -p /usr/local/mysql/conf
[root@localhost src]# chown -R mysql:mysql /usr/local/mysql
[root@localhost src]# mv /etc/my.cnf /etc/my.cnf.bak   ##将该文件名修改为.bak作为备份,因为启动MySQL时默认会读取该文件里的内容
(4)、如果主机的内存不足2G的话,在cmake时会出错,解决办法是创建虚拟内存(或者可以把内存调整到2G以上也是可以的)
dd if=/dev/zero of=/swapfile bs=1k count=2048000   ##获取要增加的2G的SWAP文件块
mkswap /swapfile     ##创建SWAP文件
swapon /swapfile     ##激活SWAP文件
swapon -s            ##查看SWAP信息是否正确
注:
然后就可以继续下一步了,如果在编译安装完成后,不想要交换分区的话,可以删除,删除的命令如下
swapoff /swapfile
rm -fr /swapfile
(5)、编译安装
[root@localhost src]# cd mysql-5.7.20
[root@localhost mysql-5.7.20]# cmake -DCMAKE_INSTALL_PREFIX=/usr/local/mysql -DMYSQL_DATADIR=/usr/local/mysql/mydata -DSYSCONFDIR=/usr/local/mysql/conf -DMYSQL_USER=mysql -DWITH_MYISAM_STORAGE_ENGINE=1 -DWITH_INNOBASE_STORAGE_ENGINE=1 -DMYSQL_UNIX_ADDR=/usr/local/mysql/mysql.sock -DMYSQL_TCP_PORT=3306 -DEXTRA_CHARSETS=all -DDEFAULT_CHARSET=utf8 -DDEFAULT_COLLATION=utf8_general_ci -DWITH_DEBUG=0 -DMYSQL_MAINTAINER_MODE=0 -DWITH_SSL:STRING=bundled -DWITH_ZLIB:STRING=bundled -DDOWNLOAD_BOOST=1 -DWITH_BOOST=./boost
[root@localhost mysql-5.7.20]# make && make install    ##耗时比较长

注:
-DCMAKE_INSTALL_PREFIX=/usr/local/mysql 设置安装目录
-DMYSQL_DATADIR=/usr/local/mysql/mydata 设置数据库存放目录
-DMYSQL_UNIX_ADDR=/usr/local/mysql/mysql.sock 设置UNIX socket 目录
-DMYSQL_USER=mysql 设置运行用户
-DDEFAULT_CHARSET=utf8 设置默认字符集,默认latin1
-DEFAULT_COLLATION=utf8_general_ci 设置默认校对规则,默认latin1_general_ci
-DWITH_INNOBASE_STORAGE_ENGINE=1 添加InnoDB引擎支持
-DENABLE_DOWNLOADS=1 自动下载可选文件,比如自动下载谷歌的测试包
-DMYSQL_TCP_PORT=3306 设置服务器监听端口,默认3306
-DSYSCONFDIR=/usr/local/mysql/conf 设置my.cnf所在目录,默认为安装目录
更多参数执行 # cmake . -LH 或者查看官方说明
(6)、修改配置
##设置添加到系统服务并设置开机启动
[root@localhost ~]# cp /usr/local/mysql/support-files/mysql.server /etc/init.d/mysqld      ##配置启动脚本(6版本的)
[root@localhost ~]# chmod +x /etc/init.d/mysqld
[root@localhost ~]# cp /usr/local/mysql/bin/mysql /usr/bin/mysql    ##将MySQL添加到bash里面
##初始化MySQL,如图3(初始密码为图3中划线部分)
[root@localhost ~]# /usr/local/mysql/bin/mysqld --initialize --user=mysql --basedir=/usr/local/mysql --datadir=/usr/local/mysql/mydata
图3
##配置my.cnf
[root@localhost ~]# cp /etc/my.cnf.bak /usr/local/mysql/conf/my.cnf
[root@localhost ~]# vim /usr/local/mysql/conf/my.cnf
[mysqld]
datadir=/usr/local/mysql/mydata                 ##数据库存放目录路径
socket=/usr/local/mysql/mysql.sock              ##UNIX socket 目录路径
# Disabling symbolic-links is recommended to prevent assorted security risks
symbolic-links=0
# Settings user and group are ignored when systemd is used.
# If you need to run mysqld under a different user or group,
# customize your systemd unit file for mariadb according to the
# instructions in http://fedoraproject.org/wiki/Systemd
[mysqld_safe]
log-error=/usr/local/mysql/mydata/mysql.err     ##错误日志路径(名称可以定义为其他,一般为主机名,不过这里我定义为mysql.err)
pid-file=/usr/local/mysql/mydata/mysql.pid      ##pid路径(名称可以定义为其他,一般为主机名,不过这里我定义为mysql.pid)
#
# include all files from the config directory
#
!includedir /etc/my.cnf.d
##启动MySQL服务
[root@localhost ~]# service mysqld start
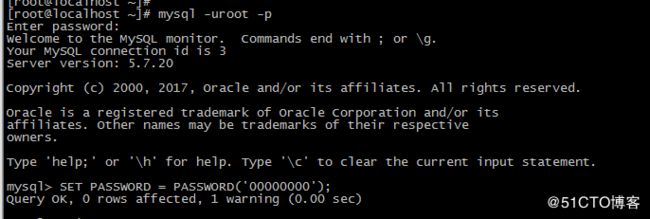
##修改密码(需要启动MySQL服务后才能进入数据库修改密码,密码为初始化后的密码,即图3划线部分),如图4所示
SET PASSWORD = PASSWORD('00000000');
图4
(7)、配置启动脚本(这是配置7版本的启动脚本,上面第6步时已经配置了一个6版本的启动脚本了)
[root@localhost ~]# cat /usr/lib/systemd/system/mysql.service
[Unit]
Description=MariaDB server and services
After=syslog.target
After=network.target

[Service]
Type=simple
User=mysql
Group=mysql
ExecStart=/usr/local/mysql/bin/mysqld_safe --basedir=/usr/local/mysql
TimeoutSec=300
PrivateTmp=false

[Install]
WantedBy=multi-user.target

[root@localhost ~]# chmod a+x /usr/lib/systemd/system/mysql.service   ##授权
[root@localhost ~]# systemctl start mysql
[root@localhost ~]# ps -ef | grep mysql
mysql     23300      1  0 12:22 ?        00:00:00 /bin/sh /usr/local/mysql/bin/mysqld_safe --basedir=/usr/local/mysql
mysql     23378  23300  3 12:22 ?        00:00:00 /usr/local/mysql/bin/mysqld --basedir=/usr/local/mysql --datadir=/usr/local/mysql/mydata --plugin-dir=/usr/local/mysql/lib/plugin --log-error=localhost.localdomain.err --pid-file=localhost.localdomain.pid
root      23408    963  0 12:22 pts/0    00:00:00 grep --color=auto mysql
至此,LNMP环境就已经搭建完成了


