创建weblogic用户和weblogic组:
groupadd weblogic
useradd –d /weblogic weblogic –g weblogic
2 将jdk1.7的安装包放在/usr/local下,以便后面配置时调用。
【weblogic】weblogic12c部署文档
3.使用weblogic用户
在vim ~/.bashrc,设置环境变量,添加下面橙色框中的内容。
【weblogic】weblogic12c部署文档
export JAVA_HOME=/usr/local/jdk1.7
export JRE_HOME=/usr/local/jdk1.7/jre
export CLASSPATH=.:$JAVA_HOME/lib:$JRE_HOME/lib:$CLASSPATH
export PATH=$JAVA_HOME/bin:$JRE_HOME/bin:$PATH
执行source ~/.bashrc,生效环境变量。
4.解压weblogic安装包
解压weblogic12.tar.gz,tar –xzvf weblogic12.tar.gz
解压后生成4个文件夹或目录:
【weblogic】weblogic12c部署文档
5.设置环境变量
cd /weblogic/weblogic12/wlserver/server/bin
./ setWLSEnv.sh
【weblogic】weblogic12c部署文档
6.安装weblogic(静默安装)
需要创建生成oraInst.loc和wls.rsp两个文件。
创建响应文件 wls.rsp [响应文件中的项一定要写全,否则会报参数不足等错误]
ENGINE]
#DO NOT CHANGE THIS.
Response File Version=1.0.0.0.0
[GENERIC]
#The oracle home location. This can be an existing Oracle Home or a new Oracle Home
ORACLE_HOME=/weblogic #此项为weblogic的安装目录
#Set this variable value to the Installation Type selected. e.g. WebLogic Server, Coherence, Complete with Examples.
INSTALL_TYPE=WebLogic Server
#Provide the My Oracle Support Username. If you wish to ignore Oracle Configuration Manager configuration provide empty string for user name.
MYORACLESUPPORT_USERNAME=
#Provide the My Oracle Support Password
MYORACLESUPPORT_PASSWORD=
#Set this to true if you wish to decline the security updates. Setting this to true and providing empty string for My Oracle Support username will ignore the Oracle Configuration Manager configuration
DECLINE_SECURITY_UPDATES=true
#Set this to true if My Oracle Support Password is specified
SECURITY_UPDATES_VIA_MYORACLESUPPORT=false
#Provide the Proxy Host
PROXY_HOST=
#Provide the Proxy Port
PROXY_PORT=
#Provide the Proxy Username
PROXY_USER=
#Provide the Proxy Password
PROXY_PWD=
#Type String (URL format) Indicates the OCM Repeater URL which should be of the format [scheme[Http/Https]]://[repeater host]:[repeater port]
COLLECTOR_SUPPORTHUB_URL=
创建Loc文件 oraInst.loc
inventory_loc=/weblogic/oraInventory
inst_group=weblogic
创建文件并权限授予用户权限
cd /weblogic/
创建/weblogic/domains目录作为域安装目录。
安装 wls.rsp,oraInst.loc必须指定绝对路径
java -jar fmw_12.1.3.0.0_wls.jar -silent -responseFile /weblogic/wls.rsp -invPtrLoc /weblogic/oraInst.loc
【weblogic】weblogic12c部署文档
安装域
执行环境变量:
export MW_HOME=/weblogic/domains
export WL_HOME=/weblogic/domains/oracle_common
执行安装过程
cd /weblogic/weblogic12/wlserver/common/bin
./commEnv.sh
./wlst.sh
wls:/offline>readTemplate('/weblogic/domains/wlserver/common/templates/wls/wls.jar')
wls:/offline/basedomain>cd('Servers/AdminServer')
wls:/offline/basedomain/Server/AdminServer>set('ListenAddress','')
#端口号可以自定义
wls:/offline/basedomain/Server/AdminServer>set('ListenPort', 7001)
wls:/offline/basedomain/Server/AdminServer>cd('../..')
wls:/offline/basedomain>cd('Security/basedomain/User/weblogic')
#密码可以自定义,但不能太过简单
wls:/offline/basedomain/Security/basedomain/User/weblogic>cmo.setPassword('welcome1')
wls:/offline/basedomain/Security/basedomain/User/weblogic>setOption('OverwriteDomain', 'true')
wls:/offline/basedomain/Security/basedomain/User/weblogic>writeDomain('/weblogic/domains/domains/basedomain')
closeTemplate()
exit()*
7.Weblogic启动和部署服务
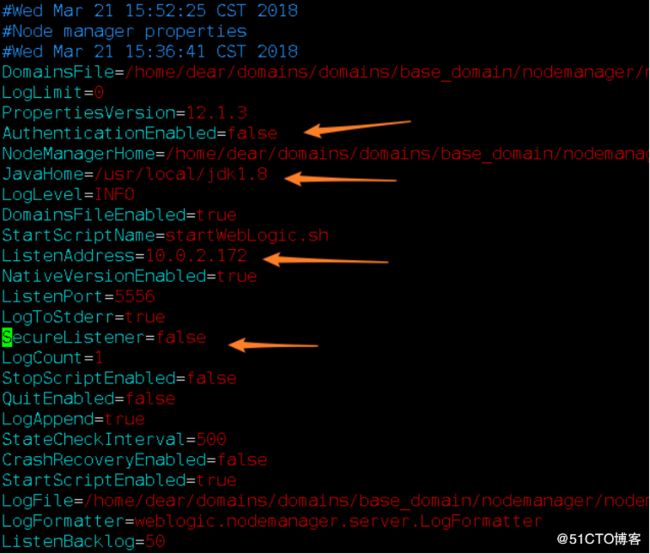
节点服务器配置
cd /weblogic/domains/domains/base_domain/nodemanager
vim nodemanager.properties
监听修改为本机地址,其他参数请按需修改。
【weblogic】weblogic12c部署文档
启动weblogic
cd /weblogic/domains/domains/base_domain/bin
nohup ./startWebLogic.sh &
#weblogic启动进程需要nohup或其他工具放到后台启动,启动情况可以查看nohup.out日志
8.至此weblogic部署完成,可以打开web控制台进行所需节点的部署。
登录weblogic的控制台页面:http://192.168.48.157:7001/console
刚才设置的默认账号:weblogic
passwd:welcome1