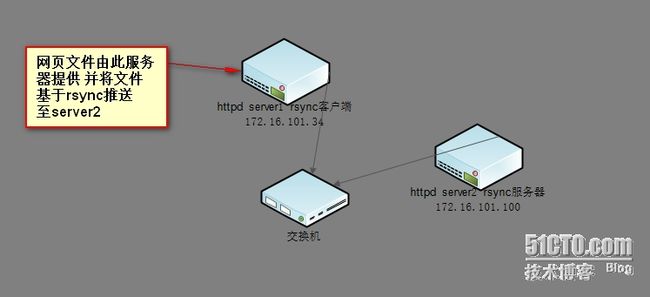
rsync+inotify实时同步
rsync 远程同步工具
工作机制为:通过rsync算法对源文件和目标文件特征码做对比,若相同则不复制不同才复制,因此相比与传统的【cp 和 scp】---(直接覆盖) 而言具有以下优点
1,执行效率高
2,本身传输数据是明文的但是可借助ssh实现数据的安全传输
3,可以镜像保存整个目录树或FS
4,支持匿名传输
工作模式:
1,shell模式 实现本地文件传输也称为本地模式
2,远程shell模式 利用ssh协议承载远程数据传输过程
3,列表模式 显示指定目标的列表,可以递归显示
4,服务模式 可以工作为守护进程接受客户端的同步请求
常用的命令选项
-n 做测试传输 不真正执行同步动作
-v 显示详情 --progress 显示进度 --stats 显示状态
-a -rlptgoD 归档
-q 静默模式
-c 开启校验功能
-r 递归
-g 保持属组
-o 保持属主
-u 强制跳过目标文件中那些modifiy time 新于源文件的文件
-p 保留文件权限
-t 保留文件的时间戳
-l 保留符号连接
-D 保留设备文件
-e 启用ssh
-z 启用压缩
工作于守护进程的启用方法:
rsync是一个瞬时守护进程依赖于xinetd
rsync服务模式的配置文件语法结构
################global段1个###########
uid  = “用户名”
gid  =  “组名”
use chroot = “yes|no”
max connections = “number”
strict modes = “yes|no”
pid file = /path/rsyncd.pid
log file = /path/rsyncd.log
lock file = /path/rsyncd.lock

##########share段多个################
[share name]
path = /path/dir
ignore errs = “yes|no”
read only = “yes|no”
write only = “yes|no”
hosts allow = “networkaddr|host addr”
hosts deny = 同上或是*
list = “ture|false”
uid = ‘username’
gid =  ‘groupname’
auth users = username
secret file = 文件-------格式为username:password 一行一个
进程模式命令
Access via rsync daemon:
Pull: rsync [OPTION...] [USER@]HOST::SRC... [DEST]
rsync [OPTION...] rsync://[USER@]HOST[:PORT]/SRC... [DEST]
Push: rsync [OPTION...] SRC... [USER@]HOST::DEST
rsync [OPTION...] SRC... rsync://[USER@]HOST[:PORT]/DEST
inotify 是一个应用程序编程接口 普通用户想使用可以借助inotify-tool这个应用程序
其有两个命令行工具
inotifywait:通过调用inotify 的api等待文件事件的发生并显示
inotifywatch:通过调用inotify的api 实现对文件相关事件的收集
inotifywait的相应命令选项
-m 持续监控 而默认是仅检测一次
-r 表示递归 可监控目录及子目录文件
-e 指定要监控文件发生的事件,默认是监控所有的事件;access, modify, attrib,close_write, close_nowirte, close, open, moved_to, moved_from, move, create,delete, delete_selt等;
--format :自定义inotifywait的输出格式,如--format '%T %w %f';常用的格式符如下:
%w:显示被监控文件的文件名;
%f:如果发生某事件的对象是目录,则显示被监控目录的名字;默认显示为空串;
%T:使用--timefmt选项中自定义的时间格式;
--timefmt :当在--format选项中使用%T时,使用此选项指定时间格式
后常用的参数是'%d/%m/%y %H:%M';
下面将通过实验说明inotify+rsync的应用
部署server2
httpd安装在此不再赘述
vim /etc/xinet.d/rsync
提供配置文件
vim /etc/rsyncd.conf
uid = nobody
gid = nobody
use chroot = no
max connections = 10
strict modes = yes
pid file = /var/run/rsyncd.pid
log file =/var/log/rsyncd.log
lock file =/var/lock/rsyncd.lock
[webpage]
path = /var/www/html
read only = no
write only =no
uid = root
gid = root
list = false
hosts allow = 172.16.0.1/16
hosts deny = *
auth users = server1
secrets file = /etc/rsyncd.passwd
提供密码文件
vim /etc/rsync.passwd
server1:hzm132
service xinetd restart
在server1编译安装inotify-tool
./configure
make && make install
为server1提供自动推送脚本

#!/bin/bash
#des : sync
#os ; linux
#date :2014-08-24
#######################VAR#################
DSTDIR="webpage"
SRCDIR="/var/www/html/"
RHOST="172.16.101.100"
USERNAME="server1"
USERPASSWD="/var/rsyncd.passwd"
LOGFILE="/var/log/rsyncd.log"
#####################SCRIPTS###############
export RSYNC_PASSWORD="hzm132"
inotifywait -m -r -q --format '%T %w%f   %e' --timefmt '%y-%m-%d    %H:%M:%S' -e create,modify,delete,attrib $SRCDIR| while read FILESTAT
do
   rsync -a   $SRCDIR $USERNAME@$RHOST::$DSTDIR
   echo "$FILESTAT" >> $LOGFILE 2>&1
done

