相信从我们写下"hello world"的小demo开始,我们就有了一个观念,Android UI布局是通过layout目录下的XML文件定义的。当然,xml文件的优势很多,可预览,结构清晰等,但是,总有那么些时候,在实现需求的时候用xml的方式会不太灵活,比如布局要求动态变化,这个时候,我们通过使用java代码来控制,在程序运行时,动态的实现对应布局。
我们可以从两个方面,简单的了解一下:
- 动态添加view,摆脱layout下的xml;
- 熟悉Drawable子类,摆脱drawable下的xml;
动态添加View
我们日常使用的UI组件大致可以分为两类:
- 控件(View),如Button、ImageView,一般用于呈现内容和交互;
- 容器(ViewGroup),如RelativeLayout、LinearLayout,一般用来装控件和容器;
所以,我们在用代码动态添加布局的时候,也需要遵循在xml中编写代码的规则,来段代码直观了解。
1.首先,我们因为不使用xml文件来setContentView了,所以,先new一个父布局:
        //添加父布局
        RelativeLayout root = new RelativeLayout(this);
        root.setLayoutParams(new ViewGroup.LayoutParams(ViewGroup.LayoutParams.MATCH_PARENT,
                                                        ViewGroup.LayoutParams.MATCH_PARENT));
        root.setBackgroundColor(getResources().getColor(R.color.colorPrimary));
        setContentView(root);
2.然后,我们在页面中间添加一个button
        //添加一个在页面中间的btn
        Button button = new Button(this);
        button.setId(View.generateViewId());
        button.setText("Hello");
        RelativeLayout.LayoutParams btnParams = new RelativeLayout.LayoutParams(
                ViewGroup.LayoutParams.WRAP_CONTENT, ViewGroup.LayoutParams.WRAP_CONTENT);
        btnParams.addRule(RelativeLayout.CENTER_IN_PARENT);
        button.setLayoutParams(btnParams);
        root.addView(button);
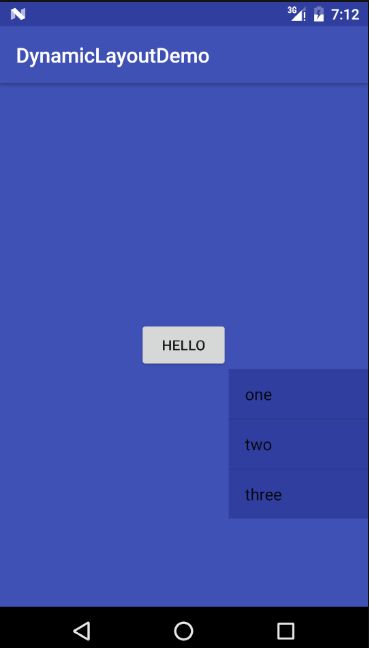
到这里,我们可以看见,只需要3步,一个控件(button)就已经添加到容器(root)中了:
- new Button(),并初始化控件相关属性;
- 根据root的类型,new button的 LayoutParams;
- 最后把button添加到容器中, root.addView(button);
3.嗯,我们再拓展一下,在button的右下方添加一个listview,
        //添加一个list 在button右下方
        ListView listView = new ListView(this);
        listView.setId(View.generateViewId());
        listView.setBackgroundColor(getResources().getColor(R.color.colorPrimaryDark));
        listView.setAdapter(new ArrayAdapter<>(this, android.R.layout.simple_list_item_1,
                new String[]{"one", "two", "three"}));
        RelativeLayout.LayoutParams listParams = new RelativeLayout.LayoutParams(
                ViewGroup.LayoutParams.WRAP_CONTENT, ViewGroup.LayoutParams.WRAP_CONTENT);
        listParams.addRule(RelativeLayout.BELOW, button.getId());
        listParams.addRule(RelativeLayout.RIGHT_OF, button.getId());
        listView.setLayoutParams(listParams);
        root.addView(listView);
需要注意的是,上面代码中的addRule()方法,该方法有两种重载方法:
- addRule(int verb):
该方法表示所设置节点的属性不能与其他兄弟节点相关或者属性值为布尔值。比如btnParams.addRule(RelativeLayout.CENTER_IN_PARENT)就表示在RelativeLayout中的相应节点是基于父布局居中。 - addRule(int verb,int anchor):
该方法表示所设置节点的属性必须关联其他兄弟节点或者属性值为布尔值。比如listParams.addRule(RelativeLayout.BELOW, button.getId())就表示RelativeLayout中的相应节点放置在一个
button这个兄弟节点的下面。
BTW,规则如果定义的是一个view相对于另一个view的,一定要初始化另一个view(button)的id不为0,否则规则会失效。通常,为了防止id重复,建议使用系统方法来生成id,也就是第二段代码中的button.setId(View.generateViewId())。
最终,我们出来的效果是这个样子的:
Drawable子类
OK,第二节,我们来看看drawable下的xml文件。drawable目录下的文件,通常是定义了一些selector、shape等,那么,考虑到一个场景,如果我们需要使用后台下发的图片,而不是使用res下面现有的资源呢?根据上一节的经验,xml定义能实现的,java代码中肯定也能实现。下面,就介绍几个常用的Drawable子类:
1. StateListDrawable:对应selector,主要用来描述按钮等的点击态。
下面这段代码大家都熟悉:
这是一个给button使用的背景选择,这种不同状态显示不同背景的xml文件我们称为selector。其实selector的本质是一个drawable对象。如果要用java代码实现上述的selector该如何实现呢?直接上代码:
button.setBackground(DrawableUtil.addStateListBgDrawable(this, R.mipmap.ic_background_normal,
                R.mipmap.ic_background_selected));

    /**
     * selector
     *
     * @param context
     * @param idNormal
     * @param idPressed
     * @return
     */
    public static StateListDrawable addStateListBgDrawable(Context context, int idNormal, int idPressed) {
        StateListDrawable drawable = new StateListDrawable();
        drawable.addState(new int[]{android.R.attr.state_selected}, context.getResources().getDrawable(idPressed));
        drawable.addState(new int[]{android.R.attr.state_pressed}, context.getResources().getDrawable(idPressed));
        drawable.addState(new int[]{android.R.attr.state_enabled}, context.getResources().getDrawable(idNormal));
        drawable.addState(new int[]{}, context.getResources().getDrawable(idNormal));

        return drawable;
    }
简单来说,2步:
- new 一个StateListDrawable对象;
- 给drawable对象挨个添上状态,并添加图片资源,和xml中逻辑一样;
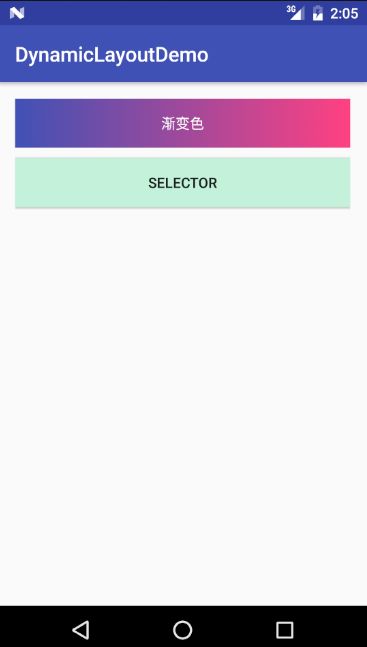
2.GradientDrawable:对应渐变色。
直接上代码:
button2.setBackground(DrawableUtil.addGradientBgDrawable(GradientDrawable.Orientation.LEFT_RIGHT,
                new int[]{getResources().getColor(R.color.colorPrimary), getResources().getColor(R.color.colorAccent)}));

/**
     * 渐变色
     * @param orientation
     * @param colors
     * @return
     */
    public static GradientDrawable addGradientBgDrawable(GradientDrawable.Orientation orientation, int[] colors) {
        GradientDrawable drawable = new GradientDrawable();
        drawable.setOrientation(orientation); //定义渐变的方向
        drawable.setColors(colors); //colors为int[],支持2个以上的颜色

        return drawable;
    }
简单来说,也是2步:
- new一个GradientDrawable 对象;
- 给对象设置orientation和colors;
最终效果如下:
demo下载地址:https://github.com/dys1715/DynamicLayoutDemo

