认证授权:
在开始调用任何API之前需要先进行认证授权,具体的说明请参考:
http://ai.baidu.com/docs#/Auth/top
获取Access Token
向授权服务地址https://aip.baidubce.com/oauth/2.0/token发送请求(推荐使用POST),并在URL中带上以下参数:
grant_type:?必须参数,固定为client_credentials;
client_id:?必须参数,应用的API Key;
client_secret:?必须参数,应用的Secret Key;
例如:
https://aip.baidubce.com/oauth/2.0/token?grant_type=client_credentials&client_id=Va5yQRHlA4Fq5eR3LT0vuXV4&client_secret=0rDSjzQ20XUj5itV6WRtznPQSzr5pVw2&
具体代码如下:
# -*- coding: utf-8 -*-
#!/usr/bin/env python
import urllib
import json
#client_id 为官网获取的AK, client_secret 为官网获取的SK
client_id =【百度云应用的AK】
client_secret =【百度云应用的SK】
#获取token
def get_token():
host = 'https://aip.baidubce.com/oauth/2.0/token?grant_type=client_credentials&client_id=' + client_id + '&client_secret=' + client_secret
request = urllib.request.Request(host)
request.add_header('Content-Type', 'application/json; charset=UTF-8')
response = urllib.request.urlopen(request)
token_content = response.read()
if token_content:
token_info = json.loads(token_content)
token_key = token_info['access_token']
return token_key
人脸检测与属性分析
具体说明请查阅:http://ai.baidu.com/docs#/Face-Detect-V3/top
人脸识别接口分为V2和V3两个版本,本文档为V3版本接口的说明文档,请确认您在百度云后台获得的是V3版本接口权限,再来阅读本文档。
能力介绍
接口能力
人脸检测:检测图片中的人脸并标记出位置信息;
人脸关键点:展示人脸的核心关键点信息,及150个关键点信息。
人脸属性值:展示人脸属性信息,如年龄、性别等。
人脸质量信息:返回人脸各部分的遮挡、光照、模糊、完整度、置信度等信息。
业务应用
典型应用场景:如人脸属性分析,基于人脸关键点的加工分析,人脸营销活动等。
调用方式
向API服务地址使用POST发送请求,必须在URL中带上参数access_token,可通过后台的API Key和Secret Key生成,具体方式请参考“Access Token获取”。
请求说明
请求体格式化:Content-Type为application/json,通过json格式化请求体。
Base64编码:请求的图片需经过Base64编码,图片的base64编码指将图片数据编码成一串字符串,使用该字符串代替图像地址。您可以首先得到图片的二进制,然后用Base64格式编码即可。需要注意的是,图片的base64编码是不包含图片头的,如data:image/jpg;base64,
图片格式:现支持PNG、JPG、JPEG、BMP,不支持GIF图片
HTTP方法:POST
请求URL:https://aip.baidubce.com/rest/2.0/face/v3/detect
Python3代码如下:
#获取人脸检测信息
def face_detect_url(url):
request_url = "https://aip.baidubce.com/rest/2.0/face/v3/detect"
params = dict()
params['image'] = url
params['image_type'] = 'URL'
params['face_field'] = 'faceshape,facetype,landmark,landmark72'
params = json.dumps(params).encode('utf-8')
access_token=get_token()
request_url = request_url + "?access_token=" + access_token
request = urllib.request.Request(url=request_url, data=params)
request.add_header('Content-Type', 'application/json')
response = urllib.request.urlopen(request)
content = response.read()
if content:
print (content)
return content
else:
return ''
这个函数将根据网上图片URL地址获取图片并进行检测。让我们用网上找的一张图片进行测试:
执行代码:
image_url='http://p0.qhimgs4.com/t0159dd32381d0c25b7.jpg'
face_detect_url(image_url)
返回结果:
b'{"error_code":0,"error_msg":"SUCCESS","log_id":304592843452042151,"timestamp":1554345204,"cached":0,"result":{"face_num":1,"face_list":[{"face_token":"5951950e8c05735152e696163b9a59cc","location":{"left":153.82,"top":248.56,"width":318,"height":317,"rotation":3},"face_probability":0.97,"angle":{"yaw":16.99,"pitch":10.57,"roll":-2.37},"face_shape":{"type":"heart","probability":0.37},"face_type":{"type":"human","probability":0.96},"landmark":[{"x":204.94,"y":313.87},{"x":340.33,"y":321.52},{"x":244.5,"y":402.48},{"x":256,"y":469.66}],"landmark72":[{"x":150.9,"y":310.37},{"x":146.88,"y":354.74},{"x":146.91,"y":400.53},{"x":155.44,"y":445.99},{"x":174.77,"y":493.18},{"x":205.04,"y":541.51},{"x":246.8,"y":572.16},{"x":303.11,"y":568.65},{"x":361.73,"y":541.55},{"x":413.84,"y":495.42},{"x":440.27,"y":442.75},{"x":456.03,"y":388.79},{"x":467.57,"y":334.35},{"x":171.98,"y":314.72},{"x":185.4,"y":302.98},{"x":200.74,"y":300.89},{"x":217.11,"y":307.92},{"x":229.67,"y":325.15},{"x":213.74,"y":325.74},{"x":196.71,"y":325.45},{"x":182.26,"y":321.23},{"x":204.94,"y":313.87},{"x":157.69,"y":275.88},{"x":172.48,"y":256.88},{"x":193.09,"y":254.09},{"x":213.77,"y":259.09},{"x":231.35,"y":276.15},{"x":211.35,"y":272.76},{"x":191.75,"y":269.52},{"x":173.47,"y":269.62},{"x":307.03,"y":329.36},{"x":321.9,"y":313.15},{"x":339.63,"y":308.27},{"x":357.91,"y":313.5},{"x":374.37,"y":327.15},{"x":358.16,"y":332.11},{"x":339.75,"y":333.86},{"x":322.58,"y":332.47},{"x":340.33,"y":321.52},{"x":299.9,"y":278.14},{"x":326.07,"y":261.57},{"x":354.67,"y":260.59},{"x":383.58,"y":268.55},{"x":406.72,"y":293.57},{"x":380.55,"y":281.15},{"x":353.84,"y":276.67},{"x":326.51,"y":278},{"x":243.97,"y":326.97},{"x":234.67,"y":354.6},{"x":224.5,"y":382.86},{"x":212.93,"y":410},{"x":229.08,"y":417.3},{"x":272.61,"y":419.89},{"x":299.76,"y":416.45},{"x":288.56,"y":386.93},{"x":285.88,"y":358.4},{"x":282.93,"y":329.6},{"x":244.5,"y":402.48},{"x":200.9,"y":453.98},{"x":223.42,"y":448},{"x":251.74,"y":451.01},{"x":289.71,"y":452.96},{"x":329.26,"y":462.63},{"x":293.65,"y":494.31},{"x":249.35,"y":504.21},{"x":216.52,"y":487},{"x":223.98,"y":456.81},{"x":251.93,"y":461.81},{"x":289.22,"y":461.47},{"x":289.29,"y":480.88},{"x":251.7,"y":484.9},{"x":223.34,"y":475.3}]}]}}'
现在大家只能看到检测的数字,为了方便大家查看图片,我把获取图片及画图的Python3代码也写了。如下:
def get_landmark72(content):
content=content.decode('utf-8')
data = json.loads(content)
#print (data)
return data['result']['face_list'][0]['landmark72']
def drow_face_line_72(url,imagefile,linedfile,landmark72):
from PIL import Image, ImageDraw
from io import BytesIO
import requests
response = requests.get(url)
image_origin = Image.open(BytesIO(response.content))
image_origin.save(imagefile)
restart_points=[0,13,22,30,39,47,58]
#image_origin = Image.open(imagefile)
draw =ImageDraw.Draw(image_origin)
i=0
for point in landmark72:
if i in restart_points:
start_x=point['x']
start_y=point['y']
else:
draw.line((start_x, start_y, point['x'], point['y']), 'blue')
start_x=point['x']
start_y=point['y']
i=i+1
#draw.line((0,0) +Image1.size, fill=128)
image_origin.show()
image_origin.save(linedfile, "JPEG")
def face_detect_line(url,imagefile,linedfile):
content=face_detect_url(url)
if len(content)>0:
landmark72=get_landmark72(content)
drow_face_line_72(url,'origin.jpg','lined.jpg',landmark72)
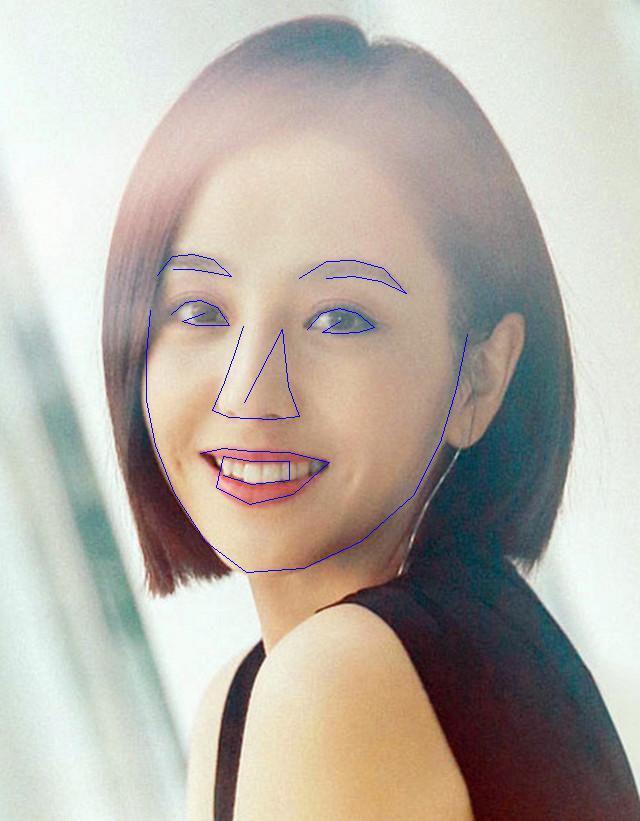
执行face_detect_line(image_url,'origin.jpg','lined.jpg'),将在代码目录生成,两张图片一张是原图,一张是根据landmark72划线后的图片。
如下图所示(图片来自网上,仅为示例使用):
大家还可以用网上找的其他人脸图片的URL来试一下。
建议:
感觉现在的人脸检测功能十分的强大和准确,有一个小建议,如果是张嘴的图,能否把人的牙齿和舌头等其他部分区分的点也都标出来。如果能实现的话就太好了。

