RHCE
查看主机名
(system1,system2)
hostname
system1.group8.example.com
配置 SSH 访问
允许域1访问,禁止域2访问
(system1,system2)
systemctl enable firewalld
systemctl start firewalld
firewall-cmd --permanent --add-service=ssh
firewall-cmd --permanent --add-rich-rule 'rule family=ipv4 source address=172.13.8.0/24 service name=ssh reject'
firewall-cmd --reload

// 验证
firewall-cmd --list-all
自定义用户环境
(system1,system2)
vim /etc/bashrc
# vim:ts=4:sw=4
alias qstat='/bin/ps -Ao pid,tt,user,fname,rsz'

// 验证 which qstat
配置端口转发
(system1)
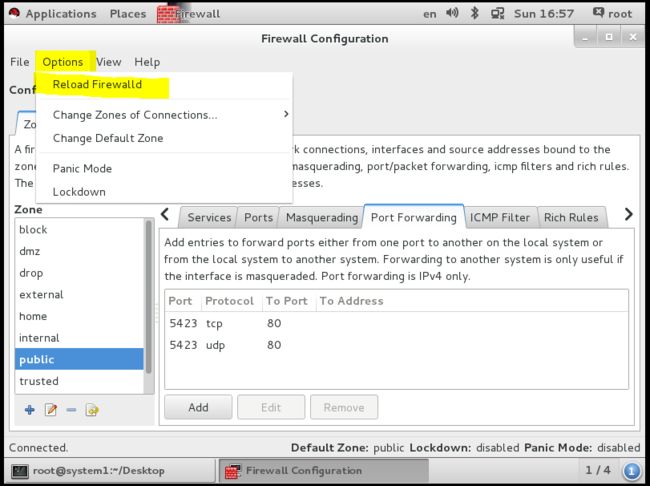
firewall-config
[图片上传失败...(image-9dbf58-1576021740357)]
[图片上传失败...(image-2af2cd-1576021740358)]
firewall-cmd --permanent --add-rich-rule 'rule family="ipv4" source address="172.24.8.0/24" forward-port port="5423" protocol="tcp" to-port="80"

firewall-cmd --reload

// 验证:firewall-cmd --list-all
配置链路聚合(图形界面)
(system1,system2)
nm-connection-editor
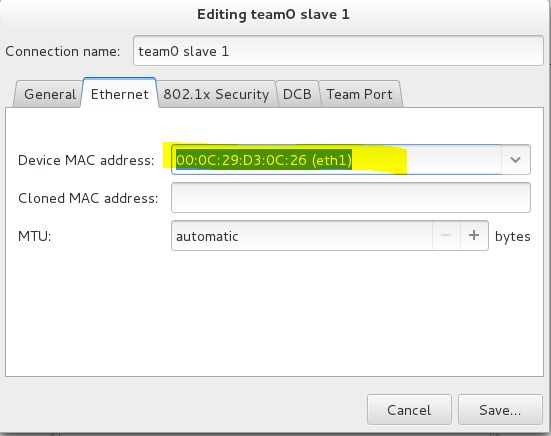
Add→Team
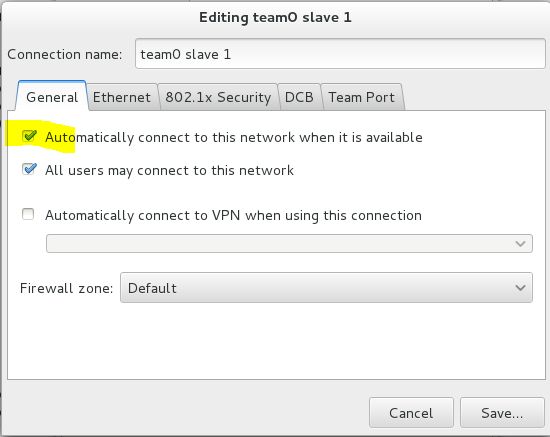
[图片上传失败...(image-ec40ed-1576021740358)]
[图片上传失败...(image-e67172-1576021740358)]
Add→Ethernet
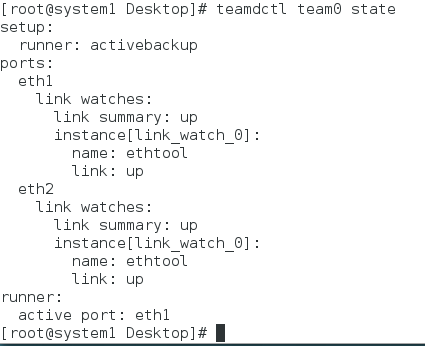
// 验证
systemctl restart network
ping 172.16.3.40
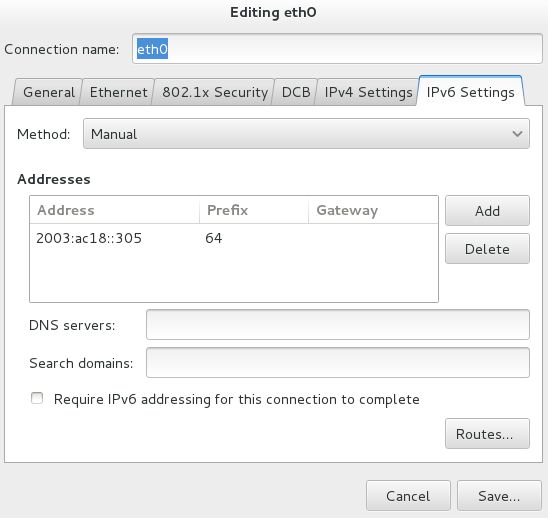
配置 IPV6 地址(图形界面)
(system1,system2)
// 重启网络
systemctl restart network

// 验证:ping6 2003:ac18::305
[图片上传失败...(image-ec88d6-1576021740359)]
配置本地邮件服务
(system1,system2)
cp -a main.cf main.cf.source
vim /etc/postfix/main.cf
inet_interfaces = loopback-only
local_transport=error:local
relayhost = mail.group8.example.com
myorigin = server.group8.example.com
postconf -e inet_interfaces=loopback-only
postconf -e mydestination=
postconf -e local_transport=error:err
postconf -e relayhost=[mail.group8.example.com]
postconf -e myorigin=server.group8.example.com

systemctl restart postfix
systemctl enable postfix

// 验证
echo "hello" | mail -s testmail dave
curl http://server.group8.example.com/pub/received_mail/8
通过SMB共享目录
(system1)
yum install samba samba-client -y
mkdir /common
vim /etc/samba/smb.conf
命令模式按大写 G 到文末,按小写 o 在新行输入
workgroup = STAFF
[common]
path = /common
hosts allow = 172.24.8.
browseable = yes
firewall-cmd --permanent --add-service=samba
firewall-cmd --reload
chcon -R -t samba_share_t /common
// -R, --recursive:递归处理所有的文件及子目录
// -t, --type=类型:设置指定类型的目标安全环境
// 创建 samba 用户
smbpasswd -a andy
systemctl restart smb nmb
systemctl enable smb nmb
在 system 2 上验证
yum install samba-client -y
smbclient -L //172.24.1.5 -U andy
配置多用户SMB挂载
(system 1)
mkdir /devops/
chmod o+w /devops/
chcon -R -t samba_share_t /devops/

smbpasswd -a silene
smbpasswd -a akira
vim /etc/samba/smb.conf

[devops]
path = /devops
hosts allow = 172.24.8.
browseable = yes
writable = no
write list = akira
systemctl restart smb nmb
systemctl enable smb nmb
(system 2)
smbclient -L //172.24.8.11 -U silene
yum install cifs* -y
mkdir /mnt/dev
chmod o+w /mnt/dev
vim /etc/fstab
172.24.8.11/devops /mnt/dev cifs defaults,multiuser,username=silene,password=redhat,sec=ntlmssp 0 0

mount -a

// 验证
df -h
配置NFS服务
(system1)
mkdir /public
mkdir -p /protected/confidential
chcon -R -t public_content_t /public
chcon -R -t public_content_t /protected
chown deepak /protected/confidential

vim /etc/exports
/public *.group8.example.com(ro)
/public 172.24.8.0/24(ro)
/protected *.group8.example.com(rw,sec=krb5p)
/protected 172.24.8.0/24(rw,sec=krb5p)

wget -O /etc/krb5.keytab http://server.group8.example.com/pub/keytabs/system1.keytab

vim /etc/sysconfig/nfs
RPCNFSDARGS="-V 4.2"

systemctl start nfs-server nfs-secure-server
systemctl enable nfs-server nfs-secure-server

firewall-cmd --permanent --add-service=nfs
firewall-cmd --permanent --add-service=rpc-bind
firewall-cmd --permanent --add-service=mounted
firewall-cmd --reload

exportfs -r
挂载NFS共享
(System2)
mkdir /mnt/nfsmount
mkdir /mnt/nfssecure

wget -O /etc/krb5.keytab http://server.group8.example.com/pub/keytabs/system2.keytab

vim /etc/fstab
172.24.1.5:/public /mnt/nfsmount nfs defaults 0 0
system1:/public /mnt/nfsmount nfs defaults 0 0
172.24.1.5:/protected /mnt/nfssecure nfs defaults,sec=krb5p,v4.2 0 0
system1:/protected /mnt/nfssecure nfs defaults,sec=krb5p,v4.2 0 0

systemctl start nfs-secure
systemctl enable nfs-secure

mount -a
df -h
实现一个 web 服务器
yum install httpd -y
wget -O /var/www/html/index.html http://server.group8.example.com/pub/system1.html

vim /etc/httpd/conf.d/httpd-vhosts.conf


  ServerName system1.group8.example.com
  DocumentRoot "/var/www/html"


      Require all granted
      Require not host .my133t.org
      // Require not ip 172.17.10.0/24


systemctl start httpd
systemctl enable httpd

firewall-cmd --permanent --add-service=http
firewall-cmd --reload

// 验证
(system2)
curl system1.group8.example.com
Site:system1.group8.example.com
配置安全 web 服务
yum install mod_ssl -y

cd /var/www/html
wget http://server.group8.example.com/pub/tls/certs/system1.crt
wget http://server.group8.example.com/pub/tls/private/system1.key
wget http://server.group8.example.com/pub/tls/certs/ssl-ca.crt

vim /etc/httpd/conf.d/httpd-vhosts.conf


  DocumentRoot "/var/www/html"
  Servername system1.group8.example.com

  // SSLEngine on
  // SSLProtocol all -SSLv2
  SSLCertificateFile /var/www/html/system1.crt
  SSLCertificateKeyFile /var/www/html/system1.key
  SSLCACertificateFile /var/www/html/ssl-ca.crt


firewall-cmd --permanent --add-service=https
firewall-cmd --reload

systemctl restart httpd

// 验证
(system2)
curl ‐k https://system1.group8.example.com
Site:system1.group8.example.com

测试通过浏览器打开[https://server0.example.com](https://server0.example.com)(开始会提示错误,添加证书后能正常打开)
配置虚拟主机
(system1)
mkdir /var/www/virtual
setfacl -m u:andy:rwx /var/www/virtual
wget -O /var/www/virtual/index.html http://server.group8.example.com/pub/www8.html

vim /etc/httpd/conf.d/httpd-vhosts.conf


  ServerName www8.group8.example.com
  DocumentRoot "/var/www/virtual"
  //
    // Require all granted
  //


systemctl restart httpd

// 验证
(system2)
curl http://www8.group8.example.com
Site:www8.group8.example.com
配置 web 内容的访问
(system1)
mkdir /var/www/html/private
wget -O /var/www/html/private/index.html http://server.group8.example.com/pub/private.html

vim /etc/httpd/conf.d/httpd-vhosts.conf


  DocumentRoot "/var/www/html"
  Servername system1.group8.example.com


      Require all granted
      Require not host .my133t.org


    Require all denied
    Require local


  DocumentRoot /var/www/virtual
  ServerName www8.group8.example.com


    Require all denied
    Require local


systemctl restart httpd

在 system1 上测试
[root@system1 ~]# curl http://system1.group8.example.com/private/
This a private file,only for local access!
在 system2 上测试
[root@system2 ~]# curl http://system1.group8.example.com/private/


403 Forbidden

Forbidden
You don't have permission to access /private/
on this server.
实现动态 web 内容
(system1)
yum install mod_wsgi -y

wget -O /var/www/html/webinfo.wsgi http://server.group8.example.com/pub/webinfo.wsgi

vim /etc/httpd/conf.d/httpd-vhosts.conf

Listen 8909

  DocumentRoot "/var/www/html"
  ServerName wsgi.group8.example.com
  WSGIScriptAlias / /var/www/html/webinfo.wsgi


// semanage port -a -t http_port_t -p tcp 8909
firewall-cmd --permanent --add-port=8909/tcp
firewall-cmd --reload

systemctl restart httpd

// 验证
curl http://wsgi.group8.example.com:8909
This Dynamic WSGI Page Was Generated at:
Sun Feb 12 21:23:01 2017
创建一个脚本
(system1)
vim /root/foo.sh

#!/bin/bash
case $1 in
redhat)
echo "fedora"
;;
fedora)
echo "redhat"
;;
*)
echo "/root/foo.sh redhat|fedora"
;;
esac

chmod 755 /root/foo.sh
linux终端先输入ls -al,可以看到如:
-rwx-r--r-- (一共10个参数)
第一个跟参数跟chmod无关,先不管.
2-4参数:属于user
5-7参数:属于group
8-10参数:属于others
接下来就简单了:r==>可读 w==>可写 x==>可执行
r=4 w=2 x=1
所以755代表 rwxr-xr-x
chmod a+x /root/foo.sh

// 验证
/root/foo.sh redhat
创建一个添加用户的脚本
(system1)
vim /root/batchusers

#!/bin/bash
if [ $# -eq 0 ];then
echo "Usage: /root/barchusers userfile"
exit 1
fi
if [ ! -f $1 ];then
echo "Input file not found"
exit 1
fi
while read line
do
useradd -s /bin/false $line
done < $1

chmod 755 /root/batchusers
wget -O /root/userlist http://server.group8.example.com/pub/userlist

// 验证:/root/batchusers /root/userlist
配置 ISCSI 服务端
(system1)
yum insatll target*
systemctl enable target
systemctl start target
firewall-cmd --permanent --add-port=3260/tcp
firewall-cmd --reload

fdisk /dev/sda 考试时是 /dev/vda

[root@system1 Desktop]# systemctl enable target
ln -s '/usr/lib/systemd/system/target.service' '/etc/systemd/system/multi-user.target.wants/target.service'
[root@system1 Desktop]# systemctl enable target
[root@system1 Desktop]# systemctl start target
[root@system1 Desktop]# firewall-cmd --permanent --add-port=3260/tcp
success
[root@system1 Desktop]# firewall-cmd --reload
success
[root@system1 Desktop]# df -hT
Filesystem     Type      Size  Used Avail Use% Mounted on
/dev/sda1      xfs       9.8G  3.2G  6.7G  33% /
devtmpfs       devtmpfs  667M     0  667M   0% /dev
tmpfs          tmpfs     675M  140K  675M   1% /dev/shm
tmpfs          tmpfs     675M  8.8M  667M   2% /run
tmpfs          tmpfs     675M     0  675M   0% /sys/fs/cgroup
[root@system1 Desktop]# fdisk /dev/sda
Welcome to fdisk (util-linux 2.23.2).

Changes will remain in memory only, until you decide to write them.
Be careful before using the write command.


Command (m for help): n
Partition type:
   p   primary (2 primary, 0 extended, 2 free)
   e   extended
Select (default p): p
Partition number (3,4, default 3):
First sector (26626048-41943039, default 26626048):
Using default value 26626048
Last sector, +sectors or +size{K,M,G} (26626048-41943039, default 41943039): +3G
Partition 3 of type Linux and of size 3 GiB is set

Command (m for help): t
Partition number (1-3, default 3): 3
Hex code (type L to list all codes): 8e
Changed type of partition 'Linux' to 'Linux LVM'

Command (m for help): p

Disk /dev/sda: 21.5 GB, 21474836480 bytes, 41943040 sectors
Units = sectors of 1 * 512 = 512 bytes
Sector size (logical/physical): 512 bytes / 512 bytes
I/O size (minimum/optimal): 512 bytes / 512 bytes
Disk label type: dos
Disk identifier: 0x000d9a10

   Device Boot      Start         End      Blocks   Id  System
/dev/sda1   *        2048    20482047    10240000   83  Linux
/dev/sda2        20482048    26626047     3072000   82  Linux swap / Solaris
/dev/sda3        26626048    32917503     3145728   8e  Linux LVM

Command (m for help): w
The partition table has been altered!

Calling ioctl() to re-read partition table.

WARNING: Re-reading the partition table failed with error 16: Device or resource busy.
The kernel still uses the old table. The new table will be used at
the next reboot or after you run partprobe(8) or kpartx(8)
Syncing disks.
[root@system1 Desktop]# partprobe
[root@system1 Desktop]# pvcreate /dev/sda3
  Physical volume "/dev/sda3" successfully created
[root@system1 Desktop]# vgcreate iscsi_vg /dev/sda3
  Volume group "iscsi_vg" successfully created
[root@system1 Desktop]# lvcreate -n iscsi_store -l 100%VG iscsi_vg
  Logical volume "iscsi_store" created
[root@system1 Desktop]# target cli
bash: target: command not found...
[root@system1 Desktop]# targetcli
Warning: Could not load preferences file /root/.targetcli/prefs.bin.
targetcli shell version 2.1.fb41
Copyright 2011-2013 by Datera, Inc and others.
For help on commands, type 'help'.

/> ls
o- / ..................................................................... [...]
  o- backstores .......................................................... [...]
  | o- block .............................................. [Storage Objects: 0]
  | o- fileio ............................................. [Storage Objects: 0]
  | o- pscsi .............................................. [Storage Objects: 0]
  | o- ramdisk ............................................ [Storage Objects: 0]
  o- iscsi ........................................................ [Targets: 0]
  o- loopback ..................................................... [Targets: 0]
/> backstores/block create name=iscsi_store dev=/dev/iscsi_vg/iscsi_store
Created block storage object iscsi_store using /dev/iscsi_vg/iscsi_store.
/> cd iscsi
/iscsi> create iqn.2014-08.com.example.group8:system1
Created target iqn.2014-08.com.example.group8:system1.
Created TPG 1.
Global pref auto_add_default_portal=true
Created default portal listening on all IPs (0.0.0.0), port 3260.
/iscsi> cd iqn.2014-08.com.example.group8:system1/
/iscsi/iqn.20...roup8:system1> ls
o- iqn.2014-08.com.example.group8:system1 ............................ [TPGs: 1]
  o- tpg1 ............................................... [no-gen-acls, no-auth]
    o- acls .......................................................... [ACLs: 0]
    o- luns .......................................................... [LUNs: 0]
    o- portals .................................................... [Portals: 1]
      o- 0.0.0.0:3260 ..................................................... [OK]
/iscsi/iqn.20...roup8:system1> cd tpg1/
/iscsi/iqn.20...:system1/tpg1> ls
o- tpg1 ................................................. [no-gen-acls, no-auth]
  o- acls ............................................................ [ACLs: 0]
  o- luns ............................................................ [LUNs: 0]
  o- portals ...................................................... [Portals: 1]
    o- 0.0.0.0:3260 ....................................................... [OK]
/iscsi/iqn.20...:system1/tpg1> luns/ create /backstores/block/iscsi_store
Created LUN 0.
/iscsi/iqn.20...:system1/tpg1> acls/ create iqn.2014-08.com.example.group8:system2
Created Node ACL for iqn.2014-08.com.example.group8:system2
Created mapped LUN 0.
/iscsi/iqn.20...:system1/tpg1> portals/ create 172.24.8.11 3260
Using default IP port 3260
Could not create NetworkPortal in configFS
/iscsi/iqn.20...:system1/tpg1> set attribute authentication=0
Parameter authentication is now '0'.
/iscsi/iqn.20...:system1/tpg1> set attribute generate_node_acls=0
Parameter generate_node_acls is now '0'.
/iscsi/iqn.20...:system1/tpg1> cd /
/> saveconfig
Last 10 configs saved in /etc/target/backup.
Configuration saved to /etc/target/saveconfig.json
/> exit
Global pref auto_save_on_exit=true
Last 10 configs saved in /etc/target/backup.
Configuration saved to /etc/target/saveconfig.json
配置 ISCSI 的客户端
(system2)
vim /etc/iscsi/initiatorname.iscsi
InitiatorName=iqn.2014‐08.com.example.group8:system2

[rhce]
name=rhce
baseurl=http://server.group8.example.com/yum
enable=1
gpgcheck=0
配置一个数据库
(system1)
yum install -y mariadb*
systemctl enable mariadb.service
systemctl start mariadb.service
mysql_secure_installation
Enter current password for root (enter for none):
ERROR 1045 (28000): Access denied for user 'root'@'localhost' (using password: YES)
Enter current password for root (enter for none):
OK, successfully used password, moving on...

Setting the root password ensures that nobody can log into the MariaDB
root user without the proper authorisation.

Set root password? [Y/n] y
New password:
Re-enter new password:
Password updated successfully!
Reloading privilege tables..
 ... Success!


By default, a MariaDB installation has an anonymous user, allowing anyone
to log into MariaDB without having to have a user account created for
them.  This is intended only for testing, and to make the installation
go a bit smoother.  You should remove them before moving into a
production environment.

Remove anonymous users? [Y/n] y
 ... Success!

Normally, root should only be allowed to connect from 'localhost'.  This
ensures that someone cannot guess at the root password from the network.

Disallow root login remotely? [Y/n]
 ... Success!

By default, MariaDB comes with a database named 'test' that anyone can
access.  This is also intended only for testing, and should be removed
before moving into a production environment.

Remove test database and access to it? [Y/n]
 - Dropping test database...
 ... Success!
 - Removing privileges on test database...
 ... Success!

Reloading the privilege tables will ensure that all changes made so far
will take effect immediately.

Reload privilege tables now? [Y/n]
 ... Success!

Cleaning up...

All done!  If you've completed all of the above steps, your MariaDB
installation should now be secure.

Thanks for using MariaDB!
[root@system1 Desktop]# mysql -u root -p
Enter password:
Welcome to the MariaDB monitor.  Commands end with ; or \g.
Your MariaDB connection id is 11
Server version: 5.5.44-MariaDB MariaDB Server

Copyright (c) 2000, 2015, Oracle, MariaDB Corporation Ab and others.

Type 'help;' or '\h' for help. Type '\c' to clear the current input statement.

MariaDB [(none)]> create database Contacts;
Query OK, 1 row affected (0.00 sec)

MariaDB [(none)]> exit
Bye
[root@system1 Desktop]# wget -O /root/users.mdb http://server.group8.example.com/pub/users.mdb
--2019-12-11 07:09:41--  http://server.group8.example.com/pub/users.mdb
Resolving server.group8.example.com (server.group8.example.com)... 172.24.8.254
Connecting to server.group8.example.com (server.group8.example.com)|172.24.8.254|:80... connected.
HTTP request sent, awaiting response... 200 OK
Length: 4577 (4.5K)
Saving to: ‘/root/users.mdb’

100%[======================================>] 4,577       --.-K/s   in 0s

2019-12-11 07:09:41 (302 MB/s) - ‘/root/users.mdb’ saved [4577/4577]

[root@system1 Desktop]# mysql -u root -p
Enter password:
Welcome to the MariaDB monitor.  Commands end with ; or \g.
Your MariaDB connection id is 12
Server version: 5.5.44-MariaDB MariaDB Server

Copyright (c) 2000, 2015, Oracle, MariaDB Corporation Ab and others.

Type 'help;' or '\h' for help. Type '\c' to clear the current input statement.

MariaDB [(none)]> use Contacts;
Database changed
MariaDB [Contacts]> source /root/users.mdb;
MariaDB [Contacts]> show tables;
+--------------------+
| Tables_in_Contacts |
+--------------------+
| u_loc              |
| u_name             |
| u_passwd           |
+--------------------+
3 rows in set (0.00 sec)

MariaDB [Contacts]> desc u_loc;
+----------+-------------+------+-----+---------+----------------+
| Field    | Type        | Null | Key | Default | Extra          |
+----------+-------------+------+-----+---------+----------------+
| uid      | int(11)     | NO   | PRI | NULL    | auto_increment |
| location | varchar(50) | NO   |     | NULL    |                |
+----------+-------------+------+-----+---------+----------------+
2 rows in set (0.00 sec)

MariaDB [Contacts]> grant select on Contacts.* to Mary@localhost identified by 'redhat';
Query OK, 0 rows affected (0.00 sec)

MariaDB [Contacts]> quit
数据库查询
(system1)
MariaDB [(none)]> use Contacts;
MariaDB [Contacts]> select u_name.firstname from u_name, u_passwd where u_name.userid = u_passwd.uid and u_passwd.password = 'fadora';
+-----------+
| firstname |
+-----------+
| John      |
+-----------+
1 row in set (0.00 sec)

MariaDB [Contacts]> select count(*) from u_name, u_loc where u_name.userid = u_loc.uid and u_loc.location = 'Santa Clara' and u_name.firstname = 'John';
+----------+
| count(*) |
+----------+
|        4 |
+----------+
1 row in set (0.00 sec)
