简介:视频水印处理效果相关的总结,其中参考了@落影loyinglin 的水印处理的文章,自己也相对的做了一些修改和总结希望将相关的经验分享给大家
一:主要思路
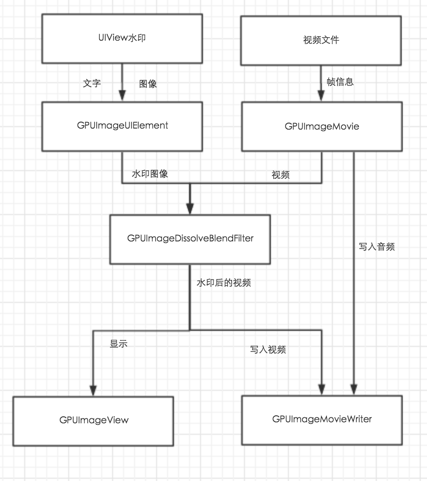
1、UIView上面有UILabel(文字水印)和UIImageView(图片水印),再通过GPUImageUIElement把UIView对象转换成纹理对象,进入响应链;
2、视频文件的图像数据通过GPUImageMovie进入响应链;
3、GPUImageDissolveBlenderFilter合并水印图像和视频,把数据传给响应链的终点GPUImageView以显示到UI和GPUImageMovieWriter以写入临时文件;
4、视频文件的音频数据通过GPUImageMovie传给GPUImageMovieWriter以写入临时文件;
5、最后临时文件通过ALAssetsLibrary写入系统库。
具体细节
1、GPUImageUIElement
GPUImageUIElement继承GPUImageOutput类,作为响应链的源头。通过CoreGraphics把UIView渲染到图像,并通过glTexImage2D绑定到outputFramebuffer指定的纹理,最后通知targets纹理就绪。
2、GPUImageOutput和GPUImageFilter
本次demo主要用到了frameProcessingCompletionBlock属性,当GPUImageFilter渲染完纹理后,会调用frameProcessingCompletionBlock回调。
3、响应链解析
1、当GPUImageMovie的纹理就绪时,会通知GPUImageFilter处理图像;
2、GPUImageFilter会调用frameProcessingCompletionBlock回调;
3、GPUImageUIElement在回调中渲染图像,纹理就绪后通知
GPUImageDissolveBlendFilter;
4、frameProcessingCompletionBlock回调结束后,通知
GPUImageDissolveBlendFilter纹理就绪;
5、GPUImageDissolveBlendFilter收到两个纹理后开始渲染,纹理就绪后通知GPUImageMovieWriter;
如图:相关流程请看下图,总结的下图的是:@落影loyinglin,我个人觉得很好很清楚
下面我自己写的相关的一些知识的实现
GPUImageView *gpuImageView = (GPUImageView*)self.view;
GPUImageVideoCamera *videoCamera = [[GPUImageVideoCamera alloc] initWithSessionPreset:AVCaptureSessionPreset640x480 cameraPosition:AVCaptureDevicePositionBack];
videoCamera.outputImageOrientation = UIInterfaceOrientationPortrait;
_videoCamera = videoCamera;
//添加时间戳水印和图片水印
UIView *contentView = [[UIView alloc] initWithFrame:self.view.bounds];
NSDateFormatter *formatter = [[NSDateFormatter alloc] init];
[formatter setDateFormat:@"yyyy年MM月dd日hh:mm:ss"];
NSDate *currentDate = [NSDate date];
NSString *timeString = [formatter stringFromDate:currentDate];
UILabel *timestampLabel = [[UILabel alloc] initWithFrame:CGRectMake(10, 30, 300, 30)];
timestampLabel.text = timeString;
timestampLabel.textColor = [UIColor redColor];
[contentView addSubview:timestampLabel];
UIImageView *imageV = [[UIImageView alloc] initWithFrame:CGRectMake(10, 100, 300, 80)];
[contentView addSubview:imageV];
//创建水印图形
GPUImageUIElement *uiElement = [[GPUImageUIElement alloc] initWithView:contentView];
//创建滤镜
GPUImageDissolveBlendFilter *filter = [[GPUImageDissolveBlendFilter alloc] init];
filter.mix = 0.5;
GPUImageFilter *videoFilter = [[GPUImageFilter alloc] init];
[videoCamera addTarget:videoFilter];
[videoFilter addTarget:filter];
[uiElement addTarget:filter];
// 添加滤镜
[filter addTarget:gpuImageView];
[videoCamera startCameraCapture];
//下面的回调必须写不然不会更新
__unsafe_unretained GPUImageUIElement *weakOverlay = uielement;
[videoFilter setFrameProcessingCompletionBlock:^(GPUImageOutput *output, CMTime time) {
[weakOverlay update];
}];(这句代码总是不断的调用很影响性能,通过查找资料修改如下)
__unsafe_unretained GPUImageUIElement *weakOverlay = uielement;
[filter disableSecondFrameCheck];//这样只是在需要更新水印的时候检查更新就不会调用很多次
runAsynchronouslyOnVideoProcessingQueue(^{
[weakOverlay update];
});
当然这样写因为GPUImage框架也有些不完善的地方调用update会崩溃,解决办法见:https://github.com/BradLarson/GPUImage/issues/2211
同时如果你觉得水印不够清晰你可以修改着色的语言,重写着色算法
重写blend的着色语言如下:
NSString *const kGPUImageDissolveBlendFragmentShaderString = SHADER_STRING
(
uniform sampler2D inputImageTexture;
uniform sampler2D inputImageTexture2;
uniform mediump int type;
// varying highp vec2 anyTexCoord;
varying highp vec2 textureCoordinate;
void main ()
{
mediump float alpha =texture2D(inputImageTexture2, textureCoordinate).a;
mediump vec4 base = texture2D(inputImageTexture2,textureCoordinate);
mediump vec4 overlay = texture2D(inputImageTexture, textureCoordinate);
mediump float r = base.r*alpha + overlay.r*(1.0 - alpha);
mediump float g = base.g*alpha + overlay.g*(1.0 - alpha);
mediump float b = base.b*alpha + overlay.b*(1.0 - alpha);
mediump float a =0.1;
gl_FragColor = vec4(r, g, b,a);
}
);
大家可以比较选择,选择合适自己的方法,这块我也在不断的学习,希望大家一起努力,共同进步,有什么好的方法和思路可以告诉我,我虚心学习