1、演示环境:
外网IP |
内网IP |
操作系统 |
主机名 |
部署服务 |
服务器角色 |
192.168.1.145 |
172.16.0.10 |
CentOS 7.6 |
node1 |
keepalived、nginx |
负载均衡调度器 |
192.168.1.146 |
172.16.0.11 |
CentOS 7.6 |
node2 |
keepalived、nginx |
负载均衡调度器 |
无 |
172.16.0.20 |
CentOS 7.6 |
web1 |
httpd |
后端real server |
无 |
172.16.0.21 |
CentOS 7.6 |
web2 |
httpd |
后端real server |
2、配置网络:
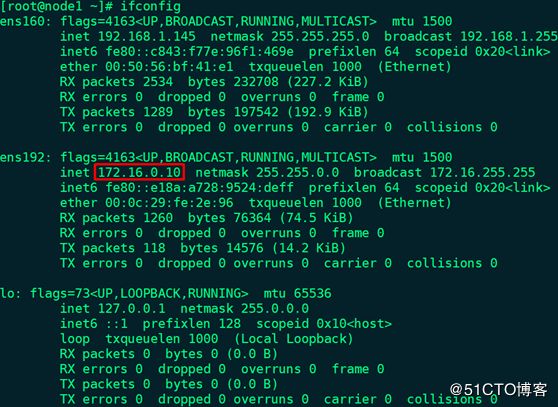
(1)node1新增一块网卡,并配置内网IP:
# vim /etc/sysconfig/network-scripts/ifcfg-ens192
# systemctl restart network.service
# ifconfig
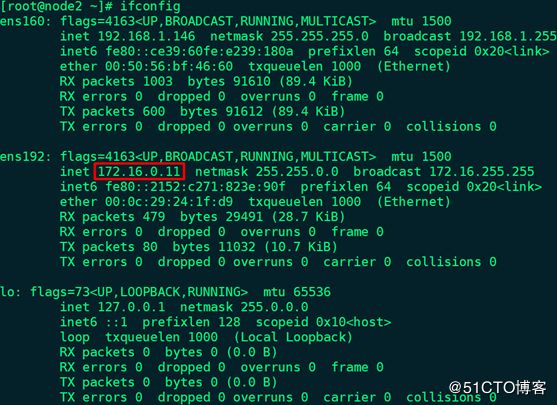
(2)node2新增一块网卡,并配置内网IP:
# vim /etc/sysconfig/network-scripts/ifcfg-ens192
# systemctl restart network.service
# ifconfig
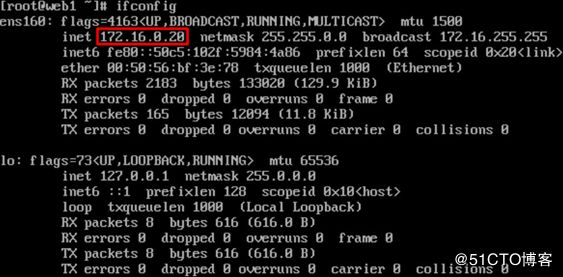
(3)web1配置内网IP:
# vim /etc/sysconfig/network-scripts/ifcfg-ens160
# systemctl restart network.service
# ifconfig
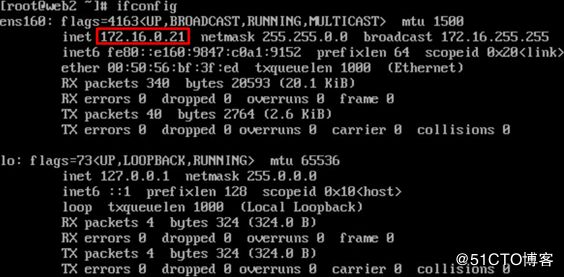
(4)web2配置内网IP:
# vim /etc/sysconfig/network-scripts/ifcfg-ens160
# systemctl restart network.service
# ifconfig
3、node1和node2通过chrony服务同步时间
4、各节点关闭firewalld和SELinux
5、node1和node2实现通过主机名互相通信:
# vim /etc/hosts
192.168.1.145 node1
192.168.1.146 node2
node1:
# ping -c 3 node2
# ping -c 3 172.16.0.11
node2:
# ping -c 3 node1
# ping -c 3 172.16.0.10
6、确保配置keepalived服务的node1和node2用于集群服务的接口支持MULTICAST(多播或组播)通信:
node1:# ip a l | grep MULTICAST
node2:# ip a l | grep MULTICAST
备注:如果网卡没有开启多播功能,可通过命令# ip link set multicast on dev ens160开启
7、web1安装部署httpd:
# yum -y install httpd
# vim /var/www/html/index.html --> web1
# systemctl start httpd.service
# ss -tunlp | grep -w :80
# systemctl enable httpd.service
8、web2安装部署httpd:
# yum -y install httpd
# vim /var/www/html/index.html --> web2
# systemctl start httpd.service
# ss -tunlp | grep -w :80
# systemctl enable httpd.service
9、node1访问web1和web2:
# curl http://172.16.0.20
![]()
# curl http://172.16.0.21
![]()
10、node1安装配置keepalived:
# yum -y install keepalived
# cd /etc/keepalived
# mv keepalived.conf{,.bak}
# openssl rand -base64 7 --> IDDf1j+yfw==
# vim keepalived.conf
global_defs {
notification_email {
root@localhost
}
notification_email_from node1@localhost
smtp_server 127.0.0.1
smtp_connect_timeout 30
router_id node1
vrrp_mcast_group4 224.1.100.88
}
vrrp_instance VI_1 {
state MASTER
interface ens160
virtual_router_id 50
priority 100
advert_int 1
authentication {
auth_type PASS
auth_pass IDDf1j+yfw==
}
virtual_ipaddress {
192.168.1.119
}
track_interface {
ens160
ens192
}
notify_master "/etc/keepalived/notify.sh master"
notify_backup "/etc/keepalived/notify.sh backup"
notify_fault "/etc/keepalived/notify.sh fault"
}
11、node2安装配置keepalived:
# yum -y install keepalived
# cd /etc/keepalived
# mv keepalived.conf{,.bak}
# vim keepalived.conf
global_defs {
notification_email {
root@localhost
}
notification_email_from node2@localhost
smtp_server 127.0.0.1
smtp_connect_timeout 30
router_id node2
vrrp_mcast_group4 224.1.100.88
}
vrrp_instance VI_1 {
state BACKUP
interface ens160
virtual_router_id 50
priority 98
advert_int 1
authentication {
auth_type PASS
auth_pass IDDf1j+yfw==
}
virtual_ipaddress {
192.168.1.119
}
track_interface {
ens160
ens192
}
notify_master "/etc/keepalived/notify.sh master"
notify_backup "/etc/keepalived/notify.sh backup"
notify_fault "/etc/keepalived/notify.sh fault"
}
12、node1定义邮件通知脚本:
# vim /etc/keepalived/notify.sh
#!/bin/bash
contact='root@localhost'
notify() {
local mailsubject="$(hostname) to be $1, vip floating"
local mailbody="$(date +'%F %T'): vrrp transition, $(hostname) changed to be $1"
echo "$mailbody" | mail -s "$mailsubject" $contact
}
case $1 in
master)
notify master
;;
backup)
notify backup
;;
fault)
notify fault
;;
*)
echo "Usage: $(basename $0) {master|backup|fault}"
exit 1
;;
esac
# chmod +x /etc/keepalived/notify.sh
# bash -n /etc/keepalived/notify.sh
# scp -p /etc/keepalived/notify.sh [email protected]:/etc/keepalived
13、node1定义在不停止keepalived服务的情况下进行主备切换测试的脚本:
# vim /etc/keepalived/chk_maint.sh
#!/bin/bash
if [ -f /etc/keepalived/maint ]; then
exit 1
else
exit 0
fi
# chmod +x /etc/keepalived/chk_maint.sh
# bash -n /etc/keepalived/chk_maint.sh
# scp -p /etc/keepalived/chk_maint.sh [email protected]:/etc/keepalived
14、node1修改配置文件:
# vim /etc/keepalived/keepalived.conf
global_defs {
notification_email {
root@localhost
}
notification_email_from node1@localhost
smtp_server 127.0.0.1
smtp_connect_timeout 30
router_id node1
vrrp_mcast_group4 224.1.100.88
}
vrrp_script chk_maint {
script "/etc/keepalived/chk_maint.sh"
interval 1
weight -5
}
vrrp_instance VI_1 {
state MASTER
interface ens160
virtual_router_id 50
priority 100
advert_int 1
authentication {
auth_type PASS
auth_pass IDDf1j+yfw==
}
virtual_ipaddress {
192.168.1.119
}
track_interface {
ens160
ens192
}
track_script {
chk_maint
}
notify_master "/etc/keepalived/notify.sh master"
notify_backup "/etc/keepalived/notify.sh backup"
notify_fault "/etc/keepalived/notify.sh fault"
}
备注:如果/etc/keepalived/maint文件存在,则权重-5
15、node2修改配置文件:
# vim /etc/keepalived/keepalived.conf
global_defs {
notification_email {
root@localhost
}
notification_email_from node2@localhost
smtp_server 127.0.0.1
smtp_connect_timeout 30
router_id node2
vrrp_mcast_group4 224.1.100.88
}
vrrp_script chk_maint {
script "/etc/keepalived/chk_maint.sh"
interval 1
weight -5
}
vrrp_instance VI_1 {
state BACKUP
interface ens160
virtual_router_id 50
priority 98
advert_int 1
authentication {
auth_type PASS
auth_pass IDDf1j+yfw==
}
virtual_ipaddress {
192.168.1.119
}
track_interface {
ens160
ens192
}
track_script {
chk_maint
}
notify_master "/etc/keepalived/notify.sh master"
notify_backup "/etc/keepalived/notify.sh backup"
notify_fault "/etc/keepalived/notify.sh fault"
}
16、启动优先级较低的node2上的keepalived服务,并查看VIP信息:
# systemctl start keepalived.service
# systemctl enable keepalived.service
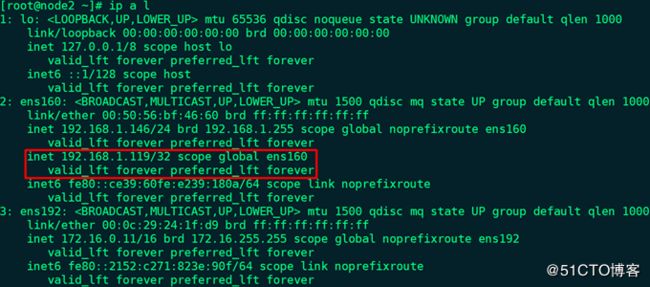
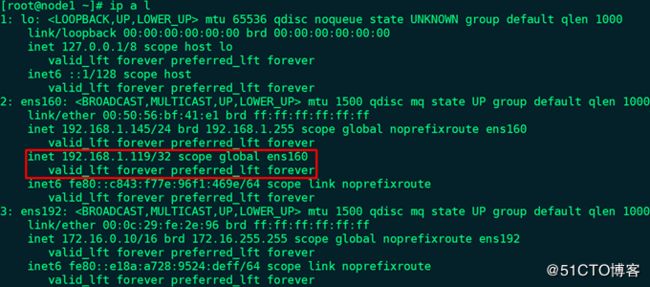
# ip a l
17、启动优先级较高的node1上的keepalived服务,并查看VIP信息:
# systemctl start keepalived.service
# systemctl enable keepalived.service
# ip a l
18、node1创建maint文件,并查看VIP信息:
# touch /etc/keepalived/maint
# ip a l
备注:VIP地址已经转移至node2
19、node1删除maint文件,并查看VIP信息:
# rm -rf /etc/keepalived/maint
# ip a l
备注:VIP地址又转移回node1
20、node1安装配置nginx:
# yum -y install nginx
# cd /etc/nginx
# cp nginx.conf{,.bak}
# vim nginx.conf
(1)在http配置段内、server配置段外新增如下代码:
upstream websrvs {
server 172.16.0.20;
server 172.16.0.21;
}
(2)在server配置段内新增如下代码:
location / {
proxy_pass http://websrvs;
}
# nginx -t
# systemctl start nginx.service
# ss -tunlp | grep -w :80
# systemctl enable nginx.service
备注:node2同样需要执行上述操作
21、使用其它主机访问node1、node2和VIP:
# for i in {1..4}; do curl http://192.168.1.145; done
# for i in {1..4}; do curl http://192.168.1.146; done
# for i in {1..4}; do curl http://192.168.1.119; done
22、node1定义nginx进程监控脚本:
# vim /etc/keepalived/chk_nginx.sh
#!/bin/bash
A=$(ps -C nginx --no-headers | wc -l)
if [ $A -eq 0 ]; then
systemctl start nginx.service
sleep3
B=`ps -C nginx --no-headers | wc -l`
if [ $B -eq 0 ]; then
systemctl stop keepalived.service
fi
fi
# chmod +x /etc/keepalived/chk_nginx.sh
# bash -n /etc/keepalived/chk_nginx.sh
# scp -p /etc/keepalived/chk_nginx.sh [email protected]:/etc/keepalived
备注:检查nginx是否运行,如果没有运行就启动nginx;如果nginx启动失败,则停止keepalived
23、node1停止keepalived服务,并修改配置文件:
# systemctl stop keepalived.service
# vim /etc/keepalived/keepalived.conf
global_defs {
notification_email {
root@localhost
}
notification_email_from node1@localhost
smtp_server 127.0.0.1
smtp_connect_timeout 30
router_id node1
vrrp_mcast_group4 224.1.100.88
}
vrrp_script chk_maint {
script "/etc/keepalived/chk_maint.sh"
interval 1
weight -5
}
vrrp_script chk_nginx {
script "/etc/keepalived/chk_nginx.sh"
interval 5
}
vrrp_instance VI_1 {
state MASTER
interface ens160
virtual_router_id 50
priority 100
advert_int 1
authentication {
auth_type PASS
auth_pass IDDf1j+yfw==
}
virtual_ipaddress {
192.168.1.119
}
track_interface {
ens160
ens192
}
track_script {
chk_maint
chk_nginx
}
notify_master "/etc/keepalived/notify.sh master"
notify_backup "/etc/keepalived/notify.sh backup"
notify_fault "/etc/keepalived/notify.sh fault"
}
24、node2停止keepalived服务,并修改配置文件:
# systemctl stop keepalived.service
# vim /etc/keepalived/keepalived.conf
global_defs {
notification_email {
root@localhost
}
notification_email_from node2@localhost
smtp_server 127.0.0.1
smtp_connect_timeout 30
router_id node2
vrrp_mcast_group4 224.1.100.88
}
vrrp_script chk_maint {
script "/etc/keepalived/chk_maint.sh"
interval 1
weight -5
}
vrrp_script chk_nginx {
script "/etc/keepalived/chk_nginx.sh"
interval 5
}
vrrp_instance VI_1 {
state BACKUP
interface ens160
virtual_router_id 50
priority 98
advert_int 1
authentication {
auth_type PASS
auth_pass IDDf1j+yfw==
}
virtual_ipaddress {
192.168.1.119
}
track_interface {
ens160
ens192
}
track_script {
chk_maint
chk_nginx
}
notify_master "/etc/keepalived/notify.sh master"
notify_backup "/etc/keepalived/notify.sh backup"
notify_fault "/etc/keepalived/notify.sh fault"
}
25、分别启动node1和node2上的keepalived服务:# systemctl start keepalived.service
备注:此时node1和node2上都运行着keepalived和nginx,且node1为主节点,绑定VIP
26、高可用测试:
(1)node1停止keepalived:VIP漂移至node2
(2)node1创建/etc/keepalived/maint文件:VIP漂移至node2
(3)node1停止nginx:VIP仍然绑定在node1上,且nginx会自动启动
(4)node1安装httpd,并且在停止nginx的同时启动httpd:# killall nginx && systemctl start httpd.service,由于80端口被httpd占用,所以node1上的nginx无法正常启动,根据chk_nginx.sh脚本,继而停止node1上的keepalived,导致VIP漂移至node2,但仍不影响VIP的访问:
# for i in {1..4}; do curl http://192.168.1.119; done
(5)后端real server服务器健康状态检测,停止web2上的httpd,访问VIP:
# for i in {1..4}; do curl http://192.168.1.119; done
备注:每次测试后都恢复至步骤25的状态
27、node1停止keepalived服务,并修改配置文件,配置高可用nginx双主模型:
# systemctl stop keepalived.service
# openssl rand -base64 7 --> 9xEKWUjHZw==
# vim /etc/keepalived/keepalived.conf
global_defs {
notification_email {
root@localhost
}
notification_email_from node1@localhost
smtp_server 127.0.0.1
smtp_connect_timeout 30
router_id node1
vrrp_mcast_group4 224.1.100.88
}
vrrp_script chk_maint {
script "/etc/keepalived/chk_maint.sh"
interval 1
weight -5
}
vrrp_script chk_nginx {
script "/etc/keepalived/chk_nginx.sh"
interval 5
}
vrrp_instance VI_1 {
state MASTER
interface ens160
virtual_router_id 50
priority 100
advert_int 1
authentication {
auth_type PASS
auth_pass IDDf1j+yfw==
}
virtual_ipaddress {
192.168.1.119
}
track_interface {
ens160
ens192
}
track_script {
chk_maint
chk_nginx
}
notify_master "/etc/keepalived/notify.sh master"
notify_backup "/etc/keepalived/notify.sh backup"
notify_fault "/etc/keepalived/notify.sh fault"
}
vrrp_instance VI_2 {
state BACKUP
interface ens160
virtual_router_id 51
priority 98
advert_int 1
authentication {
auth_type PASS
auth_pass 9xEKWUjHZw==
}
virtual_ipaddress {
192.168.1.118
}
track_interface {
ens160
ens192
}
track_script {
chk_maint
chk_nginx
}
notify_master "/etc/keepalived/notify.sh master"
notify_backup "/etc/keepalived/notify.sh backup"
notify_fault "/etc/keepalived/notify.sh fault"
}
28、node2停止keepalived服务,并修改配置文件,配置高可用nginx双主模型:
# systemctl stop keepalived.service
# vim /etc/keepalived/keepalived.conf
global_defs {
notification_email {
root@localhost
}
notification_email_from node2@localhost
smtp_server 127.0.0.1
smtp_connect_timeout 30
router_id node2
vrrp_mcast_group4 224.1.100.88
}
vrrp_script chk_maint {
script "/etc/keepalived/chk_maint.sh"
interval 1
weight -5
}
vrrp_script chk_nginx {
script "/etc/keepalived/chk_nginx.sh"
interval 5
}
vrrp_instance VI_1 {
state BACKUP
interface ens160
virtual_router_id 50
priority 98
advert_int 1
authentication {
auth_type PASS
auth_pass IDDf1j+yfw==
}
virtual_ipaddress {
192.168.1.119
}
track_interface {
ens160
ens192
}
track_script {
chk_maint
chk_nginx
}
notify_master "/etc/keepalived/notify.sh master"
notify_backup "/etc/keepalived/notify.sh backup"
notify_fault "/etc/keepalived/notify.sh fault"
}
vrrp_instance VI_2 {
state MASTER
interface ens160
virtual_router_id 51
priority 100
advert_int 1
authentication {
auth_type PASS
auth_pass 9xEKWUjHZw==
}
virtual_ipaddress {
192.168.1.118
}
track_interface {
ens160
ens192
}
track_script {
chk_maint
chk_nginx
}
notify_master "/etc/keepalived/notify.sh master"
notify_backup "/etc/keepalived/notify.sh backup"
notify_fault "/etc/keepalived/notify.sh fault"
}
29、分别启动node1和node2上的keepalived服务:# systemctl start keepalived.service
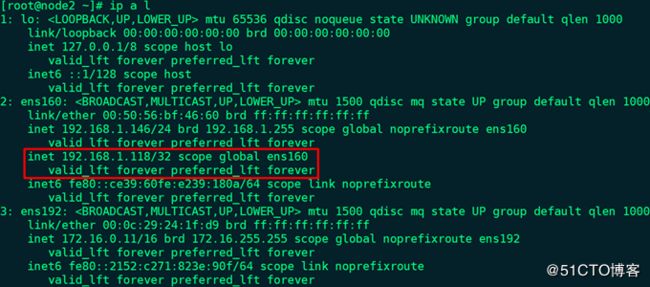
30、node1查看VIP信息:# ip a l
31、node2查看VIP信息:# ip a l
32、使用其它主机访问2个VIP:
# for i in {1..4}; do curl http://192.168.1.119; done
# for i in {1..4}; do curl http://192.168.1.118; done
备注:
Ø 此处2个VIP均为外网VIP,内网无需配置VIP
Ø DNS服务主从,将域名的2条A记录分别解析为上述2个VIP,通过主/备和备/主实现负载均衡
33、双主模型高可用测试:
(1)node2停止keepalived:2个VIP都绑定至node1
(2)node2创建/etc/keepalived/maint文件:2个VIP都绑定至node1
(3)node2停止nginx:VIP 192.168.1.118仍然绑定在node2上,且nginx会自动启动
(4)node2安装httpd,并且在停止nginx的同时启动httpd:# killall nginx && systemctl start httpd.service,由于80端口被httpd占用,所以node2上的nginx无法正常启动,根据chk_nginx.sh脚本,继而停止node2上的keepalived,导致VIP 192.168.1.118漂移至node1,但仍不影响2个VIP的访问:
# for i in {1..4}; do curl http://192.168.1.119; done
# for i in {1..4}; do curl http://192.168.1.118; done
(5)后端real server服务器健康状态检测,停止web1上的httpd,访问2个VIP:
# for i in {1..4}; do curl http://192.168.1.119; done
# for i in {1..4}; do curl http://192.168.1.118; done
备注:每次测试后都恢复至步骤25的状态

