#概述
1.springboot启动过程
2.spring容器refresh过程
3.BeanDefinitio注册过程
4.Bean实例化, 初始化过程
5.Bean的循环依赖问题
6.BeanFactory VS ApplicationContext VS FactoryBean
2.SpringBoot2.0核心原理(spring-boot-2.1.4, 即spring5.1.6)
IOC & DI基本流程图
Spring 启动时读取应用程序提供的Bean配置信息,
并在Spring容器中生成一份相应的Bean配置注册表,
然后根据这张注册表实例化Bean,装配好Bean之间的依赖关系,为上层应用提供准备就绪的运行环境。
2.1 Bean创建大致流程
XML方式创建bean
// 1.ResourceLoader
从存储介质中加载Spring配置信息,并使用Resource表示这个配置文件的资源.

// 2.BeanDefinitionReader
读取Resource所指向的配置文件资源,然后解析配置文件。
配置文件中每一个解析成一个BeanDefinition对象,并保存到BeanDefinitionRegistry中;

// 3.ClassPathBeanDefinitionScanner -- BeanFactoryPostProcessor
容器扫描BeanDefinitionRegistry中的BeanDefinition,
使用Java的反射机制自动识别出BeanFactoryPostProcessor实现类的Bean,
然后调用BeanFactoryPostProcessor实现类对BeanDefinitionRegistry中的BeanDefinition进行加工处理。
主要完成以下两项工作:
1) 对使用到占位符的元素标签进行解析,得到最终的配置值,
这意味对一些半成品式的BeanDefinition对象进行加工处理并得到成品的BeanDefinition对象;
2) 对BeanDefinitionRegistry中的BeanDefinition进行扫描,
通过Java反射机制找出所有实现java.beans.PropertyEditor接口的Bean,
并自动将它们注册到Spring容器的PropertyEditorRegistry注册表中.

// 4.InstantiationStrategy
Spring容器从BeanDefinitionRegistry中取出加工后的BeanDefinition,
并调用InstantiationStrategy着手进行Bean实例化的工作.

// 5.BeanWrapper
在实例化Bean时,Spring容器使用BeanWrapper对Bean进行封装,
BeanWrapper提供了很多以Java反射机制操作Bean的方法,
它将结合该Bean的BeanDefinition以及容器中PropertyEditor,完成Bean属性的设置工作.

// 6.BeanPostProcessor
利用容器中注册的Bean后处理器(实现BeanPostProcessor接口的Bean)
对已经完成属性设置工作的Bean进行后续加工,直接装配出一个准备就绪的Bean。

//////////////////////// 总结 ////////////////////////
整个过程中涉及到的组件按其所承担的角色可以划分为:
1)物料组件:
Resource、BeanDefinition、PropertyEditor以及最终的Bean等,
它们是加工流程中被加工、被消费的组件,就像流水线上被加工的物料;
2)加工设备组件:
ResourceLoader、BeanDefinitionReader、BeanFactoryPostProcessor、InstantiationStrategy以及BeanWrapper等组件
像是流水线上不同环节的加工设备,对物料组件进行加工处理。
2.1.1 BeanDefinition & BeanDefinitionBuilder
在Java中,一切皆对象。在JDK中使用java.lang.Class来描述类这个对象。

在Spring中,存在bean这样一个概念,那Spring又是怎么抽象bean这个概念,用什么类来描述bean这个对象呢?

Spring使用BeanDefinition来描述bean。
BeanDefinition类图
BeanDefinition类图补充
BeanDefinition方法&属性
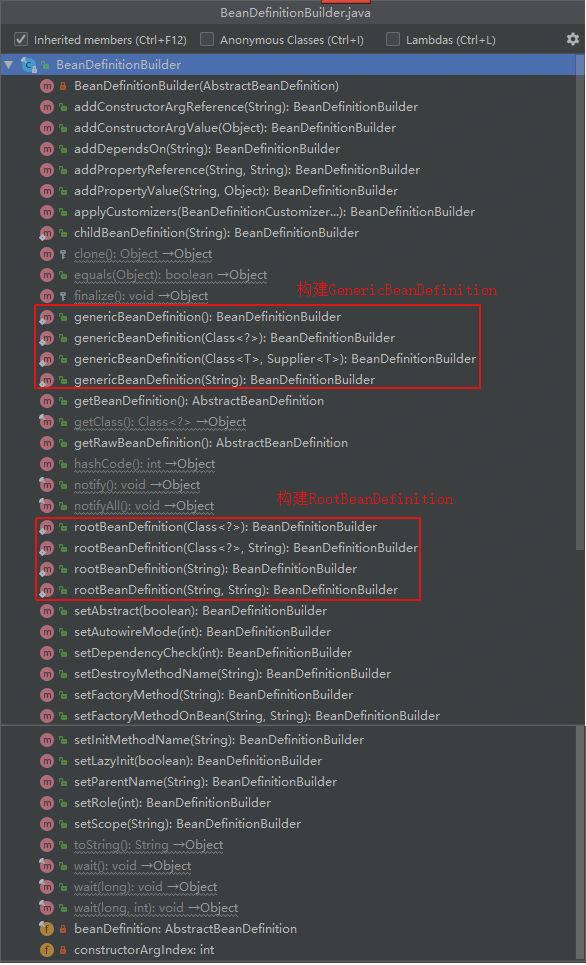
BeanDefinitionBuilder构建BeanDeifinition
2.1.2 父接口AttributeAccessor & BeanMetadataElement
#AttributeAccessor
提供了一些访问bean属性的方法
#BeanMetadataElement
只有一个方法, 用来获取元数据元素的配置源对象
AttributeAccessor
BeanMetadataElement
2.1.3 BeanDefinitionReader
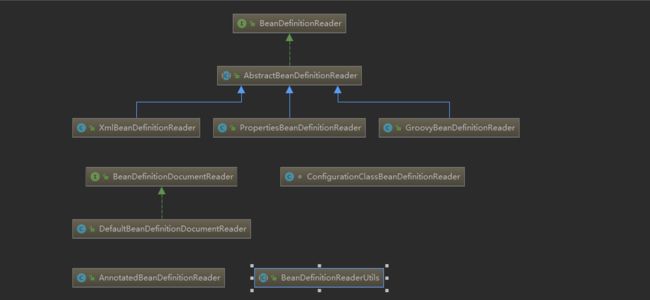
各种BeanDefinitionReader类图
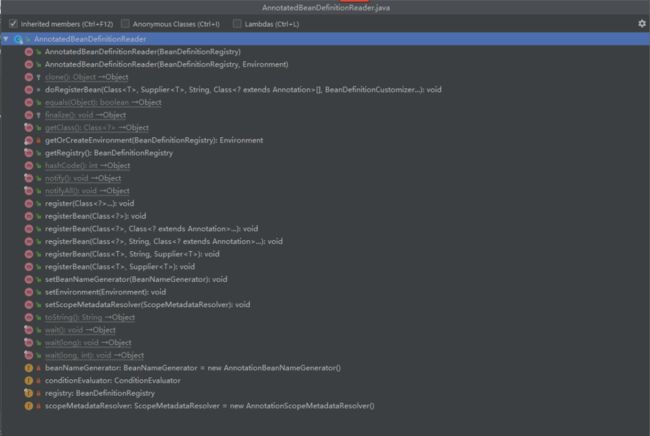
AnnotatedBeanDefinitionReader
ConfigurationClassBeanDefinitionReader
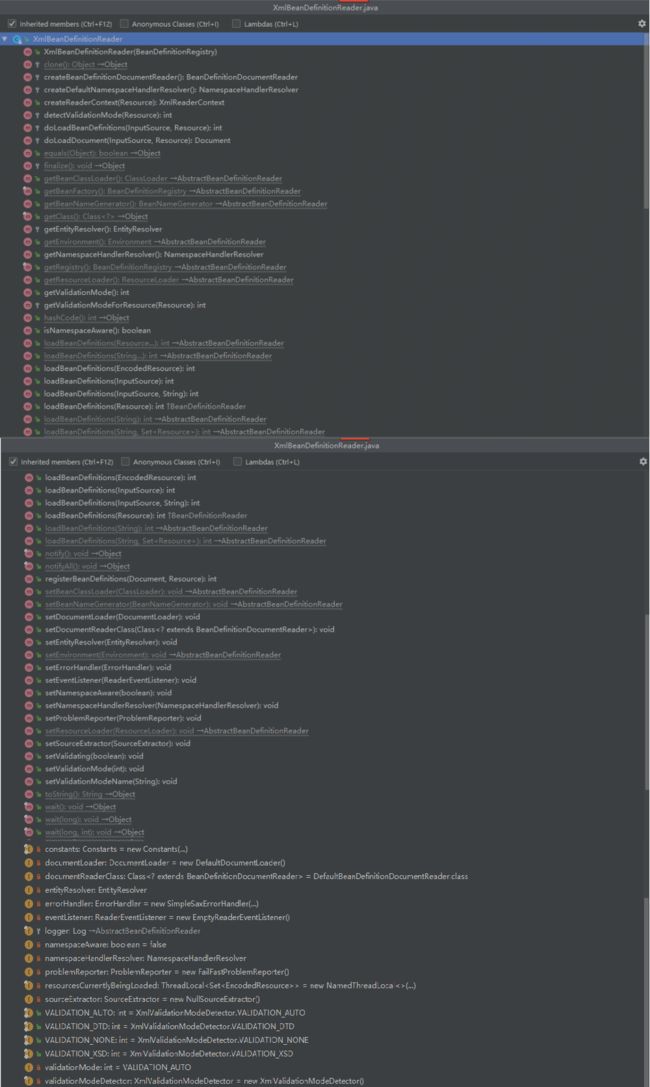
XmlBeanDefinitionReader
2.1.4 BeanDefinitionReaderUtils & BeanDefinitionHolder & BeanDefinitionLoader & ClassPathBeanDefinitionScanner
BeanDefinitionLoader
SpringBoot提供的一个新类, 用来加载BeanDefinition
BeanDefinitionReaderUtils
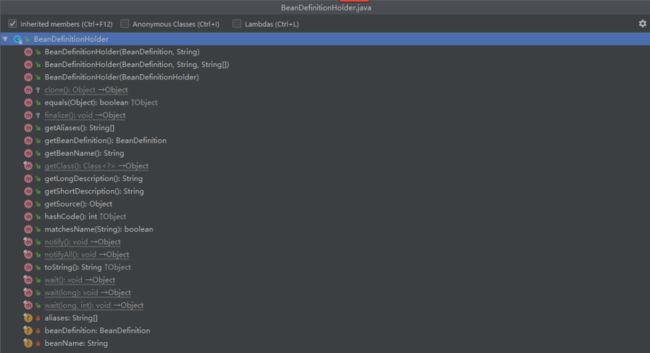
BeanDefinitionHolder
ClassPathBeanDefinitionScanner
2.1.5 BeanDefinitionRegistry
BeanDefinitionRegistry
这里的注册, 实则是将BeanDefinition放置到DefaultListableBeanFactory的beanDefinitionMap中, 缓存起来.
注意:
不是缓存Bean, Bean缓存在其父类DefaultSingletonBeanRegistry的一些成员变量.
2.1.6 ApplicationContext
2.1.7 BeanFactory VS ApplicationContext VS FactoryBean
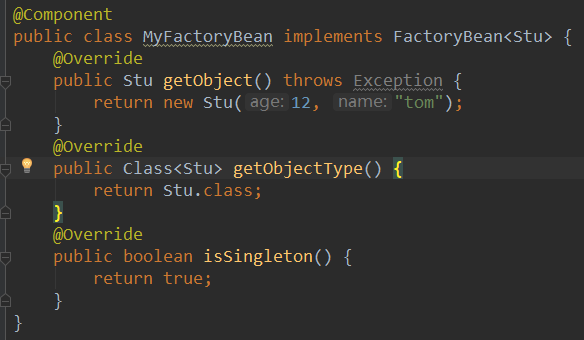
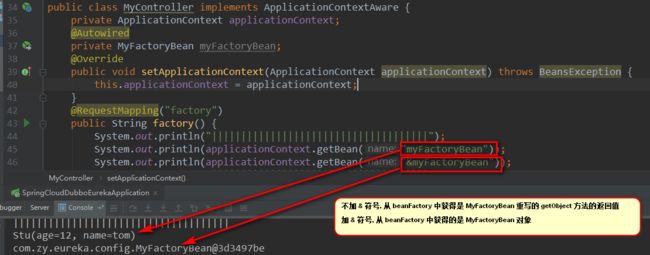
2.1.7.1 FactoryBean
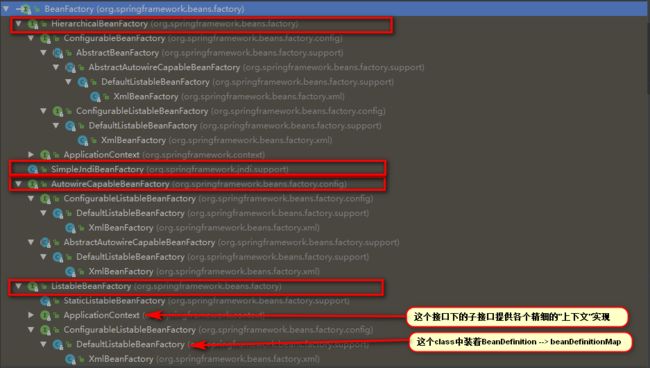
2.1.7.2 BeanFactory
BeanFactory是Spring容器的基础接口,提供了基础的容器访问能力。
BeanFactory提供懒加载方式,只有通过getBean方法调用获取Bean才会进行实例化。
常用的是加载XMLBeanFactory (已废弃).
2.1.7.3 ApplicationContext
ApplicationContext继承自BeanFactory接口,ApplicationContext包含了BeanFactory中所有的功能:
1.国际化
实现了MessageResource接口,因而具有消息处理的能力(i18N)

2.强大的事件机制(Event)
基本上牵涉到事件(Event)方面的设计,就离不开观察者模式,
ApplicationContext的事件机制主要通过ApplicationEvent和ApplicationListener这两个接口来提供的,
和java swing中的事件机制一样。即当ApplicationContext中发布一个事件的时,
所有扩展了ApplicationListener的Bean都将会接受到这个事件,并进行相应的处理。

3.底层资源的访问
ApplicationContext扩展了ResourceLoader(资源加载器)接口,
从而可以用来加载多个Resource,而BeanFactory没有扩展ResourceLoader.

4.对Web应用的支持
与BeanFactory通常以编程的方式被创建不同的是,ApplicationContext能以声明的方式创建,如使用ContextLoader。
当然你也可以使用ApplicationContext的实现之一来以编程的方式创建ApplicationContext实例 。

5.延迟加载
1) BeanFactroy采用的是延迟加载形式来注入Bean的,即只有在使用到某个Bean时(调用getBean()),
才对该Bean进行加载实例化,这样,我们就不能发现一些存在的spring的配置问题。
而ApplicationContext则相反,它是在容器启动时,一次性创建了所有的Bean。
这样,在容器启动时,我们就可以发现Spring中存在的配置错误。
2) BeanFactory和ApplicationContext都支持BeanPostProcessor、BeanFactoryPostProcessor的使用,
但两者之间的区别是:BeanFactory需要手动注册,而ApplicationContext则是自动注册.
summary
ApplicationContext继承了BeanFactory,
BeanFactory是Spring中比较原始的Factory,它不支持AOP、Web等Spring插件,
ApplicationContext不仅包含了BeanFactory的所有功能,还支持Spring的各种插件,
还以一种面向框架的方式工作以及对上下文进行分层和实现继承。

BeanFactory是Spring框架的基础设施,面向Spring本身;
ApplicationContext面向使用Spring的开发者,相比BeanFactory提供了更多面向实际应用的功能,
几乎所有场合都可以直接使用ApplicationContext而不是底层的BeanFactory.
https://www.jianshu.com/p/2808f7c4a24f (beanfactory与applicationcontext)
2.1.8 BeanFactoryPostProcessor & BeanDefinitionRegistryPostProcessor & PostProcessorRegistrationDelegate
#BeanFactoryPostProcessor
我们可以通过实现BeanFactoryPostProcessor接口,获取BeanFactory,
操作BeanFactory对象,修改BeanDefinition,但不要去实例化bean。

#BeanDefinitionRegistryPostProcessor
是BeanFactoryPostProcessor的子类,在父类的基础上,增加了新的方法,
允许我们获取到BeanDefinitionRegistry,从而编码动态修改BeanDefinition。
例如往BeanDefinition中添加一个新的BeanDefinition。

这两个接口是在AbstractApplicationContext#refresh方法中执行到
invokeBeanFactoryPostProcessors(beanFactory)

#典型应用:ConfigurationClassPostProcessor
ConfigurationClassPostProcessor#postProcessBeanFactory:
主要负责对Full Configuration 配置进行增强,拦截@Bean方法来确保增强执行@Bean方法的语义。
ConfigurationClassPostProcessor#postProcessBeanDefinitionRegistry:
负责扫描我们的程序,根据程序的中Bean创建BeanDefinition,并注册到容器中。
BeanDefinitionRegistryPostProcessor手动注册BeanDefinition
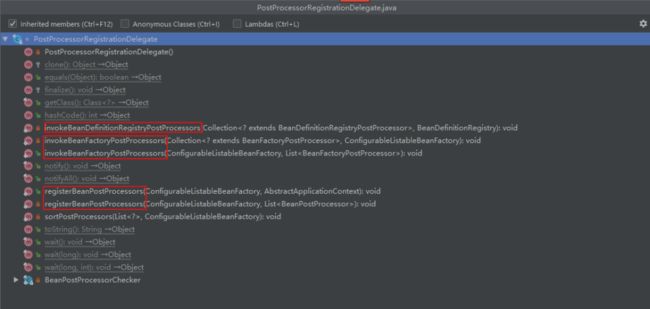
PostProcessorRegistrationDelegate
https://blog.csdn.net/ztchun/article/details/90814135
2.1.9 DefaultSingletonBeanRegistry
/**
 * 共享bean实例的通用注册表,实现了SingletonBeanRegistry.
 * 允许注册表中注册的单例应该被所有调用者共享,通过bean名称获得。
 *
 * 还支持登记的DisposableBean实例,(这可能会或不能正确的注册单例),关闭注册表时destroyed.
 * 可以注册bean之间的依赖关系,执行适当的关闭顺序。
 *
 * 这个类主要用作基类的BeanFactory实现, 提供基本的管理
 * singleton bean 实例功能, 提供一次性bean的注册功能。
 *
 * 三个主要的存储器(map) :
 * singletonObject
 * singletonFactory
 * earlySingletonObject
 * 当注册一个 singleton object 的时候,会在 singletonObject 的存储器中加入此 object,而在其他的两个存储器中移除。
 * 当然,这样的行为是可以在子类中去复写override的。
 *
 * 在 getSingleton的时候,spring的默认实现是:
 * 先从 singleton object 的存储器中去寻找,
 * 如果找不到,再从 early singleton object 存储器中寻找,
 * 再找不到,那就在寻找对应的 singleton factory,造出所需的 singleton object,然后返回。
 */
public class DefaultSingletonBeanRegistry extends SimpleAliasRegistry implements SingletonBeanRegistry {

    //内部标记为一个空的单例对象: 并发 Maps( 不支持空值 )作为标志值。
    protected static final Object NULL_OBJECT = new Object();

    // 日记用来记录子类
    protected final Log logger = LogFactory.getLog(getClass());

    //是存放singleton对象的缓存
    private final Map singletonObjects = new ConcurrentHashMap();

    // 是存放制造singleton的工厂对象的缓存
    private final Map singletonFactories = new HashMap();

    //是存放singletonFactory 制造出来的 singleton 的缓存
    private final Map earlySingletonObjects = new HashMap();

    //就是单例注册表
    private final Set registeredSingletons = new LinkedHashSet(16);

    //目前正在创建中的单例bean的名称的集合
    private final Set singletonsCurrentlyInCreation = Collections.synchronizedSet(new HashSet());

    //存放异常出现的相关的原因的集合
    private Set suppressedExceptions;

    //标志,指示我们目前是否在销毁单例中
    private boolean singletonsCurrentlyInDestruction = false;

    //存放一次性bean的缓存
    private final Map disposableBeans = new LinkedHashMap();

    //外部bean与被包含在外部bean的所有内部bean集合包含关系的缓存
    private final Map> containedBeanMap = new ConcurrentHashMap>();

    //指定bean与依赖指定bean的所有bean的依赖关系的缓存
    private final Map> dependentBeanMap = new ConcurrentHashMap>();

    //指定bean与创建这个bean所需要依赖的所有bean的依赖关系的缓存
    private final Map> dependenciesForBeanMap = new ConcurrentHashMap>();

    ////// 此处省略部分方法, 详见下图 //////
}
2.1.10 bean的初始化
https://blog.csdn.net/qwe6112071/article/details/85224582
3.SpringBoot2.0启动过程
3.1SpringBoot2.0核心启动流程
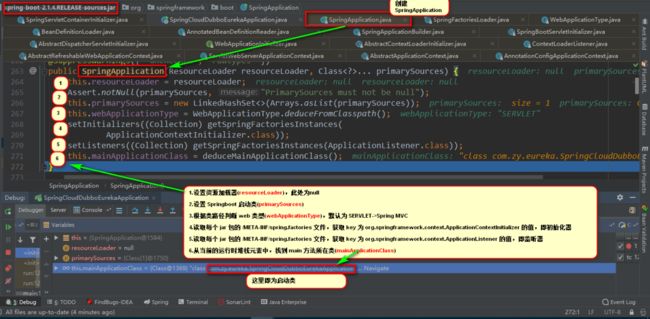
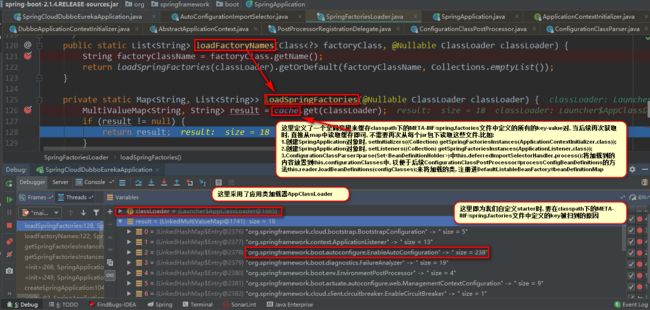
3.1.1创建SpringApplication
3.1.2运行SpringApplication
3.1.3Spring容器的refresh过程 (tomcat容器在这里启动)
#对应于3.1.2流程的step11, refresh流程为:

public void refresh() throws BeansException, IllegalStateException {
    synchronized (this.startupShutdownMonitor) {
        // 1. 初始化 refresh 的上下文环境
        prepareRefresh();
        // 2. 初始化 BeanFactory,加载并解析配置
        ConfigurableListableBeanFactory beanFactory = this.obtainFreshBeanFactory();
        /* ---至此,完成了简单容器 DefaultListableBeanFactory 的所有功能,下面开始对简单容器进行增强--- */
        // 3. 对 BeanFactory 进行功能增强,
        // 如 context's ClassLoader and post-processors
        prepareBeanFactory(beanFactory);
        try {
            // 4. 后置处理 beanFactory,交由子类实现
            postProcessBeanFactory(beanFactory);
            // 5. 调用已注册的 BeanFactoryPostProcessor
            invokeBeanFactoryPostProcessors(beanFactory);
            // 6. 注册 BeanPostProcessor,仅仅是注册,调用在getBean的时候
            registerBeanPostProcessors(beanFactory);
            // 7. 初始化国际化资源
            initMessageSource();
            // 8. 初始化事件广播器
            initApplicationEventMulticaster();
            // 9. 留给子类实现的模板方法
            onRefresh();
            // 10. 注册事件监听器
            registerListeners();
            // 11. 实例化所有非延迟加载的单例
            finishBeanFactoryInitialization(beanFactory);
            // 12. 完成刷新过程,发布应用事件
            finishRefresh();
        } catch (BeansException ex) {
            if (logger.isWarnEnabled()) {
                logger.warn("Exception encountered during context initialization - cancelling refresh attempt: " + ex);
            }
            // Destroy already created singletons to avoid dangling resources.
            destroyBeans();
            // Reset 'active' flag.
            cancelRefresh(ex);
            // Propagate exception to caller.
            throw ex;
        } finally {
            // Reset common introspection caches in Spring's core, since we
            // might not ever need metadata for singleton beans anymore...
            resetCommonCaches();
        }
    }
}
step1: prepareRefresh
// org.springframework.context.support.AbstractApplicationContext#prepareRefresh
protected void prepareRefresh() {
    // Switch to active.
    this.startupDate = System.currentTimeMillis();
    this.closed.set(false);
    this.active.set(true);

    // 这里省略打印日志的代码
    if (logger.isDebugEnabled()) { ... }

    // Initialize any placeholder property sources in the context environment.
    // 初始化上下文环境,容器的一些信息这个时候加载了进来比如:文件路径信息, 由子类实现
    initPropertySources();

    // 校验标示为必填的属性信息是否都有了:
    // see ConfigurablePropertyResolver#setRequiredProperties
    getEnvironment().validateRequiredProperties();

    // 存储 pre-refresh ApplicationListeners...
    if (this.earlyApplicationListeners == null) {
        this.earlyApplicationListeners = new LinkedHashSet<>(this.applicationListeners);
    }
    else {
        // Reset local application listeners to pre-refresh state.
        this.applicationListeners.clear();
        this.applicationListeners.addAll(this.earlyApplicationListeners);
    }
    // Allow for the collection of early ApplicationEvents, to be published once the multicaster is available...
    this.earlyApplicationEvents = new LinkedHashSet<>();
}
step2: obtainFreshBeanFactory
// 方法走进:
org.springframework.context.support.AbstractApplicationContext#obtainFreshBeanFactory

protected ConfigurableListableBeanFactory obtainFreshBeanFactory() {
    // 刷新 BeanFactory: 子类实现, 该方法在所有bean实例化之前被refresh方法调用
    refreshBeanFactory();
    // 获取 BeanFactory: 子类实现, 需检查context是否仍active, 否则 throw e;
    return getBeanFactory();
}

// AbstractApplicationContext有2个子类, 分别实现了上述俩方法,
1.GenericApplicationContext (本例spring-boot启动时, 走进了该类)
2.AbstractRefreshableApplicationContext (xml配置时, 可能走进该类)
https://blog.csdn.net/qq924862077/article/details/60879926
step3: prepareBeanFactory
// org.springframework.context.support.AbstractApplicationContext#prepareBeanFactory

protected void prepareBeanFactory(ConfigurableListableBeanFactory beanFactory) {
    // 设置classloader(用于加载bean),设置表达式解析器(解析bean定义中的一些表达式),添加属性编辑注册器(注册属性编辑器)
    beanFactory.setBeanClassLoader(getClassLoader());
    beanFactory.setBeanExpressionResolver(new StandardBeanExpressionResolver(beanFactory.getBeanClassLoader()));
    beanFactory.addPropertyEditorRegistrar(new ResourceEditorRegistrar(this, getEnvironment()));

    // 添加ApplicationContextAwareProcessor: 主要是对Aware接口的支持,如果实现了相应的 Aware接口,则注入对应的资源
    beanFactory.addBeanPostProcessor(new ApplicationContextAwareProcessor(this));
    // 取消下述6个接口的自动注入, 因为ApplicationContextAwareProcessor把这5个接口的实现工作做了
    beanFactory.ignoreDependencyInterface(EnvironmentAware.class);
    beanFactory.ignoreDependencyInterface(EmbeddedValueResolverAware.class);
    beanFactory.ignoreDependencyInterface(ResourceLoaderAware.class);
    beanFactory.ignoreDependencyInterface(ApplicationEventPublisherAware.class);
    beanFactory.ignoreDependencyInterface(MessageSourceAware.class);
    beanFactory.ignoreDependencyInterface(ApplicationContextAware.class);

    // 注册自动装配规则,如果发现依赖特殊类型,就使用该指定值注入
    // MessageSource registered (and found for autowiring) as a bean.
    beanFactory.registerResolvableDependency(BeanFactory.class, beanFactory);
    beanFactory.registerResolvableDependency(ResourceLoader.class, this);
    beanFactory.registerResolvableDependency(ApplicationEventPublisher.class, this);
    beanFactory.registerResolvableDependency(ApplicationContext.class, this);

    // Register early post-processor for detecting inner beans as ApplicationListeners.
    beanFactory.addBeanPostProcessor(new ApplicationListenerDetector(this));

    // Detect a LoadTimeWeaver and prepare for weaving, if found.
    if (beanFactory.containsBean(LOAD_TIME_WEAVER_BEAN_NAME)) {
        beanFactory.addBeanPostProcessor(new LoadTimeWeaverAwareProcessor(beanFactory));
        // Set a temporary ClassLoader for type matching.
        beanFactory.setTempClassLoader(new ContextTypeMatchClassLoader(beanFactory.getBeanClassLoader()));
    }

    // Register default environment beans.
    if (!beanFactory.containsLocalBean(ENVIRONMENT_BEAN_NAME)) {
        beanFactory.registerSingleton(ENVIRONMENT_BEAN_NAME, getEnvironment());
    }
    if (!beanFactory.containsLocalBean(SYSTEM_PROPERTIES_BEAN_NAME)) {
        beanFactory.registerSingleton(SYSTEM_PROPERTIES_BEAN_NAME, getEnvironment().getSystemProperties());
    }
    if (!beanFactory.containsLocalBean(SYSTEM_ENVIRONMENT_BEAN_NAME)) {
        beanFactory.registerSingleton(SYSTEM_ENVIRONMENT_BEAN_NAME, getEnvironment().getSystemEnvironment());
    }
}
step4: postProcessBeanFactory
// org.springframework.context.support.AbstractApplicationContext#postProcessBeanFactory
这是一个留给子类去拓展的空方法,
AnnotationConfigApplicationContext类中的该方法没有做任何事情。
step5: invokeBeanFactoryPostProcessors
->AbstractApplicationContext#invokeBeanFactoryPostProcessors
--> --> PostProcessorRegistrationDelegate#invokeBeanFactoryPostProcessors(ConfigurableListableBeanFactory, List)
--> PostProcessorRegistrationDelegate#invokeBeanDefinitionRegistryPostProcessors
    --> ConfigurationClassPostProcessor#postProcessBeanDefinitionRegistry
    --> ConfigurationClassPostProcessor#processConfigBeanDefinitions
        --> ConfigurationClassParser#parse(Set)
        --> ConfigurationClassParser#parse(AnnotationMetadata metadata, String beanName)
        --> ConfigurationClassParser#processConfigurationClass
        // 启动类 SpringCloudDubboEurekaApplication 加了 ComponentScan 注解, 这里被解析, 将扫描主类所在包所有 class
        --> ConfigurationClassParser#doProcessConfigurationClass
            // 处理所有加了 @PropertySource 的类
            // 处理所有加了 @ComponentScan 的类
            --> ComponentScanAnnotationParser#parse
                --> ClassPathBeanDefinitionScanner#doScan
                    --> ClassPathScanningCandidateComponentProvider#findCandidateComponents
                    // 扫包路径: packageSearchPath --> classpath*:com/zy/eureka/**/*.class
                    --> ClassPathScanningCandidateComponentProvider#scanCandidateComponents
                        --> GenericApplicationContext#getResources
                            --> PathMatchingResourcePatternResolver#getResources
                            --> PathMatchingResourcePatternResolver#findPathMatchingResources
                            --> PathMatchingResourcePatternResolver#doFindPathMatchingFileResources
                            --> PathMatchingResourcePatternResolver#doFindMatchingFileSystemResources
                            --> PathMatchingResourcePatternResolver#retrieveMatchingFiles
                            // 这一步递归扫描获取所有 classpath*:com/zy/eureka/**/*.class 中需要被 spring 管理的 class
                            --> PathMatchingResourcePatternResolver#doRetrieveMatchingFiles
                    // 扫包后, 处理注解: @Lazy,@Primary,@DependsOn,@Role,@Description
                    --> AnnotationConfigUtils#processCommonDefinitionAnnotations(AnnotatedBeanDefinition)
                    --> AnnotationConfigUtils#processCommonDefinitionAnnotations(AnnotatedBeanDefinition, AnnotatedTypeMetadata)
                    // 注册 BeanDefinition
                    --> ClassPathBeanDefinitionScanner#registerBeanDefinition
                        --> BeanDefinitionReaderUtils#registerBeanDefinition
                            // 将扫描到的需要被 spring 管理的 class 放进: DefaultListableBeanFactory 的 beanDefinitionMap
                            --> DefaultListableBeanFactory#registerBeanDefinition
                            // 别名注册: 将别名放置到 SimpleAliasRegistry 的 aliasMap
                            --> SimpleAliasRegistry#registerAlias
            // 处理所有加了 @Import 的类
            --> ConfigurationClassParser#processImports
            // 处理所有加了 @ImportResource 的类
            // 处理所有加了 @Bean 的类
            // 处理所有接口中被 default 修饰的方法(jdk8提供了此功能)
            // 处理父类
        --> ConfigurationClassParser#parse(Set)
            // 这一步将会获取所有jar包classpath下META-INF/spring.factories文件中的value(此时已从缓存中取, 因为springboot启动时, 已加载过一次)
            // 将加载到的内容放置到 ConfigurationClassParser 的 this.configurationClasses中,
            // 以便于后续 ConfigurationClassPostProcessor#processConfigBeanDefinitions 的方法 this.reader.loadBeanDefinitions(configClasses);
            // 来将加载的类, 注册进DefaultListableBeanFactory#beanDefinitionMap
            --> ConfigurationClassParser.DeferredImportSelectorHandler#process
    --> ConfigurationClassPostProcessor#processConfigBeanDefinitions
        // this.reader.loadBeanDefinitions(configClasses);
        --> ConfigurationClassBeanDefinitionReader#loadBeanDefinitions
        --> ConfigurationClassBeanDefinitionReader#loadBeanDefinitionsForConfigurationClass
        // 这一步, 将项目中加了 @Configuration 注解, 并且加了 @Import 注解的类自身注册进 DefaultListableBeanFactory#beanDefinitionMap
        --> ConfigurationClassBeanDefinitionReader#registerBeanDefinitionForImportedConfigurationClass
        // 这一步, 将项目中加了 @Configuration 注解的类下, 加了 @Bean 注解的类注册进 DefaultListableBeanFactory#beanDefinitionMap
        --> ConfigurationClassBeanDefinitionReader#loadBeanDefinitionsForBeanMethod
        --> ConfigurationClassBeanDefinitionReader#loadBeanDefinitionsFromRegistrars
            // 下面这个类, 是自动配置中, 关于 AOP 的 BeanDefinition 的 register
            --> AspectJAutoProxyRegistrar#registerBeanDefinitions
                --> AopConfigUtils#registerAspectJAnnotationAutoProxyCreatorIfNecessary(BeanDefinitionRegistry)
                --> AopConfigUtils#registerAspectJAnnotationAutoProxyCreatorIfNecessary(BeanDefinitionRegistry, Object)
                // 这一步, 将 @EnableAspectJAutoProxy 所对应的 aop 的BeanDefinition 注册进DefaultListableBeanFactory#beanDefinitionMap
                --> AopConfigUtils#registerOrEscalateApcAsRequired
                // 这些流程之后, 将根据是否存在 proxyTargetClass 属性或 exposeProxy 属性, 对如何进行aop赋值
// AbstractApplicationContext#invokeBeanFactoryPostProcessors

public static void invokeBeanFactoryPostProcessors(ConfigurableListableBeanFactory beanFactory, List beanFactoryPostProcessors) {

    // Invoke BeanDefinitionRegistryPostProcessors first, if any.
    Set processedBeans = new HashSet<>();

    if (beanFactory instanceof BeanDefinitionRegistry) {
        BeanDefinitionRegistry registry = (BeanDefinitionRegistry) beanFactory;
        List regularPostProcessors = new ArrayList<>();
        List registryProcessors = new ArrayList<>();

        // beanFactoryPostProcessors是传进来里的对象,把传入的对象分类放入 BeanFactoryPostProcessor 和  BeanDefinitionRegistryPostProcessor
        // BeanDefinitionRegistryPostProcessor extends BeanFactoryPostProcessor ,是一个特殊的 BeanFactoryPostProcessor
        for (BeanFactoryPostProcessor postProcessor : beanFactoryPostProcessors) {
            if (postProcessor instanceof BeanDefinitionRegistryPostProcessor) {
                BeanDefinitionRegistryPostProcessor registryProcessor =
                        (BeanDefinitionRegistryPostProcessor) postProcessor;
                // 如果传入的beanFactoryPostProcessors是它的子类,即:BeanDefinitionRegistryPostProcessor
                // 则执行传入的BeanDefinitionRegistryPostProcessor的postProcessBeanDefinitionRegistry方法
                registryProcessor.postProcessBeanDefinitionRegistry(registry);
                registryProcessors.add(registryProcessor);
            } else {
                regularPostProcessors.add(postProcessor);
            }
        }

        // 不要在这里初始化 FactoryBeans, 这里要先分离实现了:
        // PriorityOrdered, Ordered, and the rest接口的 BeanDefinitionRegistryPostProcessors
        List currentRegistryProcessors = new ArrayList<>();

        // First, invoke the BeanDefinitionRegistryPostProcessors that implement PriorityOrdered.
        // 这里只能拿到spring内部的BeanDefinitionRegistryPostProcessor,
        // 因为到这里spring还没有去扫描Bean,获取不到我们通过@Component标识的自定义BeanDefinitionRegistryPostProcessor
        // 一般默认情况下,这里只有一个: ConfigurationClassPostProcessor
        String[] postProcessorNames = beanFactory.getBeanNamesForType(BeanDefinitionRegistryPostProcessor.class, true, false);
        for (String ppName : postProcessorNames) {
            if (beanFactory.isTypeMatch(ppName, PriorityOrdered.class)) {
                // 这里开始创建 BeanDefinitionRegistryPostProcessor子类bean 了
                currentRegistryProcessors.add(beanFactory.getBean(ppName, BeanDefinitionRegistryPostProcessor.class));
                processedBeans.add(ppName);
            }
        }
        //排序
        sortPostProcessors(currentRegistryProcessors, beanFactory);
        // registryProcessors 中放的是 implement PriorityOrdered 的 BeanDefinitionRegistryPostProcessor
        registryProcessors.addAll(currentRegistryProcessors);
        // 执行BeanDefinitionRegistryPostProcessor,currentRegistryProcessors中放的是spring内部的BeanDefinitionRegistryPostProcessor
        // 默认情况下,只有 org.springframework.context.annotation.ConfigurationClassPostProcessor
        // ConfigurationClassPostProcessor 里面就是在执行扫描 Bean,并且注册 BeanDefinition
        invokeBeanDefinitionRegistryPostProcessors(currentRegistryProcessors, registry);
        // 清空这个临时变量,方便后面再使用
        currentRegistryProcessors.clear();

        // Next, invoke the BeanDefinitionRegistryPostProcessors that implement Ordered.
        // 这里已经可以获取到我们通过注册到Spring容器的 BeanDefinitionRegistryPostProcessor 了
        postProcessorNames = beanFactory.getBeanNamesForType(BeanDefinitionRegistryPostProcessor.class, true, false);
        for (String ppName : postProcessorNames) {
            // 之前优先处理的是实现PriorityOrdered接口的,而PriorityOrdered接口也实现了Ordered接口
            // 所有这里需要把之前已经处理过的给过滤掉
            if (!processedBeans.contains(ppName) && beanFactory.isTypeMatch(ppName, Ordered.class)) {
                //之前这个临时变量已经被清空了,现在又开始放东西了
                currentRegistryProcessors.add(beanFactory.getBean(ppName, BeanDefinitionRegistryPostProcessor.class));
                processedBeans.add(ppName);
            }
        }
        sortPostProcessors(currentRegistryProcessors, beanFactory);
        // registryProcessors 中放的是 implement Ordered 的 BeanDefinitionRegistryPostProcessor
        registryProcessors.addAll(currentRegistryProcessors);
        invokeBeanDefinitionRegistryPostProcessors(currentRegistryProcessors, registry);
        currentRegistryProcessors.clear();

        // Finally, invoke all other BeanDefinitionRegistryPostProcessors until no further ones appear.
        boolean reiterate = true;
        while (reiterate) {
            reiterate = false;
            postProcessorNames = beanFactory.getBeanNamesForType(BeanDefinitionRegistryPostProcessor.class, true, false);
            for (String ppName : postProcessorNames) {
                //执行没有实现Ordered接口的BeanDefinitionRegistryPostProcessor
                if (!processedBeans.contains(ppName)) {
                    currentRegistryProcessors.add(beanFactory.getBean(ppName, BeanDefinitionRegistryPostProcessor.class));
                    processedBeans.add(ppName);
                    reiterate = true;
                }
            }
            sortPostProcessors(currentRegistryProcessors, beanFactory);
            // registryProcessors 中放的是 未implement Ordered 的 BeanDefinitionRegistryPostProcessor
            registryProcessors.addAll(currentRegistryProcessors);
            invokeBeanDefinitionRegistryPostProcessors(currentRegistryProcessors, registry);
            currentRegistryProcessors.clear();
        }

        // Now, invoke the postProcessBeanFactory callback of all processors handled so far.
        // List registryProcessors
        // 之前已经执行过 BeanDefinitionRegistryPostProcessor 独有方法, 现在执行其父类方法
        invokeBeanFactoryPostProcessors(registryProcessors, beanFactory);

        // List regularPostProcessors
        // 执行 BeanFactoryPostProcessor 方法
        invokeBeanFactoryPostProcessors(regularPostProcessors, beanFactory);
    } else {
        // Invoke factory processors registered with the context instance.
        invokeBeanFactoryPostProcessors(beanFactoryPostProcessors, beanFactory);
    }

    // Do not initialize FactoryBeans here: We need to leave all regular beans
    // uninitialized to let the bean factory post-processors apply to them!
    // 获取 BeanFactoryPostProcessor 的 beanName
    String[] postProcessorNames = beanFactory.getBeanNamesForType(BeanFactoryPostProcessor.class, true, false);

    // Separate between BeanFactoryPostProcessors that implement PriorityOrdered, Ordered, and the rest.
    List priorityOrderedPostProcessors = new ArrayList<>();
    List orderedPostProcessorNames = new ArrayList<>();
    List nonOrderedPostProcessorNames = new ArrayList<>();
    for (String ppName : postProcessorNames) {
        // 如果已经被执行过了, 就不在执行
        // 因为一开始先获取的 BeanDefinitionRegistryPostProcessor, 而BeanDefinitionRegistryPostProcessor继承了BeanFactoryPostProcessor
        if (processedBeans.contains(ppName)) {
            // skip - already processed in first phase above
        } else if (beanFactory.isTypeMatch(ppName, PriorityOrdered.class)) {
            priorityOrderedPostProcessors.add(beanFactory.getBean(ppName, BeanFactoryPostProcessor.class));
        } else if (beanFactory.isTypeMatch(ppName, Ordered.class)) {
            orderedPostProcessorNames.add(ppName);
        } else {
            nonOrderedPostProcessorNames.add(ppName);
        }
    }

    // First, invoke the BeanFactoryPostProcessors that implement PriorityOrdered.
    // 根据不同的优先级,按序执行 BeanFactoryPostProcessor
    sortPostProcessors(priorityOrderedPostProcessors, beanFactory);
    invokeBeanFactoryPostProcessors(priorityOrderedPostProcessors, beanFactory);

    // Next, invoke the BeanFactoryPostProcessors that implement Ordered.
    List orderedPostProcessors = new ArrayList<>();
    for (String postProcessorName : orderedPostProcessorNames) {
        orderedPostProcessors.add(beanFactory.getBean(postProcessorName, BeanFactoryPostProcessor.class));
    }
    sortPostProcessors(orderedPostProcessors, beanFactory);
    invokeBeanFactoryPostProcessors(orderedPostProcessors, beanFactory);

    // Finally, invoke all other BeanFactoryPostProcessors.
    List nonOrderedPostProcessors = new ArrayList<>();
    for (String postProcessorName : nonOrderedPostProcessorNames) {
        nonOrderedPostProcessors.add(beanFactory.getBean(postProcessorName, BeanFactoryPostProcessor.class));
    }
    invokeBeanFactoryPostProcessors(nonOrderedPostProcessors, beanFactory);

    // Clear cached merged bean definitions since the post-processors might have
    // modified the original metadata, e.g. replacing placeholders in values...
    beanFactory.clearMetadataCache();
}
step6: AbstractApplicationContext#registerBeanPostProcessors
// 注意: 与step5调用的是同一个类, 但静态方法不同, 走进:
PostProcessorRegistrationDelegate#registerBeanPostProcessors(ConfigurableListableBeanFactory, AbstractApplicationContext)
-->
最终调用 AbstractBeanFactory#addBeanPostProcessor
将BeanPostProcessor注册进一个List:
private final List beanPostProcessors = new CopyOnWriteArrayList<>();
-->
在后续bean创建步骤前后, 会判断某个bean是否实现了BeanPostProcessor接口,
从而是否需要调用其2个方法postProcessBeforeInitialization & postProcessAfterInitialization.
见bean的生命周期一文
step7: initMessageSource
// AbstractApplicationContext#initMessageSource

protected void initMessageSource() {
    ConfigurableListableBeanFactory beanFactory = getBeanFactory();
    // 看容器中是否包含id为messageSource的bean
    if (beanFactory.containsLocalBean(MESSAGE_SOURCE_BEAN_NAME)) {
        // 如果有名为messageSource的bean, 则取该bean作为messageSource
        this.messageSource = beanFactory.getBean(MESSAGE_SOURCE_BEAN_NAME, MessageSource.class);
        // 如果对应的messageSource是一个HierarchicalMessageSource, 且其ParentMessageSource为null
        // 则会在context父容器存在的情况下取父容器对应的messageSource作为当前messageSource的parentMessageSource
        if (this.parent != null && this.messageSource instanceof HierarchicalMessageSource) {
            HierarchicalMessageSource hms = (HierarchicalMessageSource) this.messageSource;
            if (hms.getParentMessageSource() == null) {
                hms.setParentMessageSource(getInternalParentMessageSource());
            }
        }
        if (logger.isTraceEnabled()) { ... }
    }
    // 如果没有, 则新建 DelegatingMessageSource
    else {
        DelegatingMessageSource dms = new DelegatingMessageSource();
        dms.setParentMessageSource(getInternalParentMessageSource());
        this.messageSource = dms;
        beanFactory.registerSingleton(MESSAGE_SOURCE_BEAN_NAME, this.messageSource);
        if (logger.isTraceEnabled()) { ... }
    }
}
MessageSource接口,以用于支持信息的国际化和包含参数的信息的替换。
ApplicationContext接口继承了MessageSource接口,
所有ApplicationContext实现类对MessageSource接口的实现都是在AbstractApplicationContext中实现的,
可以通过ApplicationContext来调用MessageSource接口方法以实现信息的国际化和替换信息中包含的参数。
MessageSource提供了三个实现类,分别是
>> ReloadableResourceBundleMessageSource
>> StaticMessageSource
>> ResourceBundleMessageSource
https://www.jianshu.com/p/46eda1f96abe (国际化配置)
step8: initApplicationEventMulticaster
// AbstractApplicationContext#initApplicationEventMulticaster

protected void initApplicationEventMulticaster() {
    ConfigurableListableBeanFactory beanFactory = getBeanFactory();
    // 如果 beanFactory 中存在名为 applicationEventMulticaster 的 ApplicationEventMulticaster 广播器, 则设置为本 context 中的
    if (beanFactory.containsLocalBean(APPLICATION_EVENT_MULTICASTER_BEAN_NAME)) {
        this.applicationEventMulticaster = beanFactory.getBean(APPLICATION_EVENT_MULTICASTER_BEAN_NAME, ApplicationEventMulticaster.class);
        if (logger.isTraceEnabled()) { ... }
    }
    // 否则, 新建一个 SimpleApplicationEventMulticaster 的广播器
    else {
        this.applicationEventMulticaster = new SimpleApplicationEventMulticaster(beanFactory);
        beanFactory.registerSingleton(APPLICATION_EVENT_MULTICASTER_BEAN_NAME, this.applicationEventMulticaster);
        if (logger.isTraceEnabled()) { ... }
    }
}
观察者模式的典型应用。观察者模式由主题Subject和Observer组成。
广播器相当于主题Subject,其包含多个监听器。当主题发生变化时会通知所有得监听器。

在后续的 "step12 finishRefresh" 步骤中,
会广播给实现了 ApplicationListener#onApplicationEvent方法的class, 调用其实现方法.

注意:
此处, 不调用项目中自定义的实现了ApplicationListener接口的class的onApplicationEvent方法, 因为bean还未初始化.
step9: onRefresh
AbstractApplicationContext并未实现onRefresh方法, 而是交由子类实现,
这里体现了模板模式, 可以是tomcat容器实现, 也可以是jetty等.
这里启动了Tomcat, 主要是初始化2个核心组件,连接器(Connector)和容器(Container),
一个Tomcat实例就是一个Server,一个Server包含多个Service,
也就是多个应用程序,每个Service包含多个连接器(Connetor)和一个容器(Container),
而容器下又有多个子容器,父子关系为:Engine,Host,Context,Wrapper,
其中除了Engine外,其余的容器都是可以有多个。


--> AbstractApplicationContext#onRefresh
    --> ServletWebServerApplicationContext#onRefresh
    --> ServletWebServerApplicationContext#createWebServer
        --> TomcatServletWebServerFactory#getWebServer
        --> TomcatServletWebServerFactory#getTomcatWebServer
            --> TomcatWebServer#TomcatWebServer(Tomcat, boolean)
            --> TomcatWebServer#initialize
                // Start the server to trigger initialization listeners
                this.tomcat.start();
                // Unlike Jetty, all Tomcat threads are daemon threads.
                // We create a blocking non-daemon to stop immediate shutdown
                startDaemonAwaitThread();
                    --> TomcatWebServer#startDaemonAwaitThread
                        // 这里起了一个线程, 使得 mainThread 一直存活, 并有后台线程池一直监听 http 连接
                        --> StandardServer#await
step10: registerListeners
// AbstractApplicationContext#registerListeners

protected void registerListeners() {
    // 注册静态指定的事件监听器ApplicationListener到事件广播中心ApplicationEventMulticaster
    for (ApplicationListener listener : getApplicationListeners()) {
        getApplicationEventMulticaster().addApplicationListener(listener);
    }

    // 在beanFactory中查找ApplicationListener名称集合
    String[] listenerBeanNames = getBeanNamesForType(ApplicationListener.class, true, false);
    for (String listenerBeanName : listenerBeanNames) {
        //遍历名称并将当前名称的事件监听器注册到事件广播中心
        getApplicationEventMulticaster().addApplicationListenerBean(listenerBeanName);
    }

    // 所有事件监听器添加完成后,遍历发布者(ApplicationEventPublisher-ApplicaitonContext)已经发布的事件集合,并将事件通知到给定的监听器
    Set earlyEventsToProcess = this.earlyApplicationEvents;
    this.earlyApplicationEvents = null;
    if (earlyEventsToProcess != null) {
        for (ApplicationEvent earlyEvent : earlyEventsToProcess) {
            //通过事件广播中心ApplicationEventMulticaster,下发事件到具体的监听器ApplicationListener
            getApplicationEventMulticaster().multicastEvent(earlyEvent);
        }
    }
}
registerListeners 方法主要完成将监听器注册到事件广播中心实例中,
在initApplicationEventMulticaster创建了事件广播中心实例,但广播中心还没有持有任何监听器,
这步主要完成监听器的注册,以便事件下发时,能找到对应的监听器。
step11: finishBeanFactoryInitialization (实例化所有非懒加载的单例)
// AbstractApplicationContext#finishBeanFactoryInitialization

-------------------------------------------------------------------------------
在项目启动的时候会依次加载并实例化的是单例的非懒加载的类, 默认调用的是无参数的构造器。

而对于prototype类型的,即@Scope("prototype"),在首次被用到的时候加载.
-------------------------------------------------------------------------------


--> DefaultListableBeanFactory#preInstantiateSingletons
    --> AbstractBeanFactory#getBean(String)
        --> AbstractBeanFactory#doGetBean
            --> AbstractAutowireCapableBeanFactory#createBean(String, RootBeanDefinition, Object[])
                --> AbstractAutowireCapableBeanFactory#resolveBeforeInstantiation
                    --> AbstractAutowireCapableBeanFactory#resolveBeforeInstantiation
                        // 这里,如果实现了 InstantiationAwareBeanPostProcessor 接口, 则会调用其 postProcessBeforeInstantiation 方法
                        // 这里是在 bean 实例化之前执行的方法
                        --> AbstractAutowireCapableBeanFactory#applyBeanPostProcessorsBeforeInstantiation
                --> AbstractAutowireCapableBeanFactory#doCreateBean
                    --> AbstractAutowireCapableBeanFactory#createBeanInstance
                        // bean实例化:
                        --> AbstractAutowireCapableBeanFactory#instantiateBean
                            --> SimpleInstantiationStrategy#instantiate(RootBeanDefinition, String, BeanFactory)
                                --> BeanUtils#instantiateClass(java.lang.reflect.Constructor, java.lang.Object...)
                                    // 这一步通过反射调用构造器的方式将bean进行了实例化
                                    --> java.lang.reflect.Constructor#newInstance
                    // 这里,如果实现了 InstantiationAwareBeanPostProcessor 接口, 则会调用其 postProcessAfterInstantiation 方法
                    // 这是在 bean 实例化之后, 初始化之前执行的方法
                    --> AbstractAutowireCapableBeanFactory#populateBean
                    // bean实例化后, 开始初始化
                    --> AbstractAutowireCapableBeanFactory#initializeBean(String, Object, RootBeanDefinition)
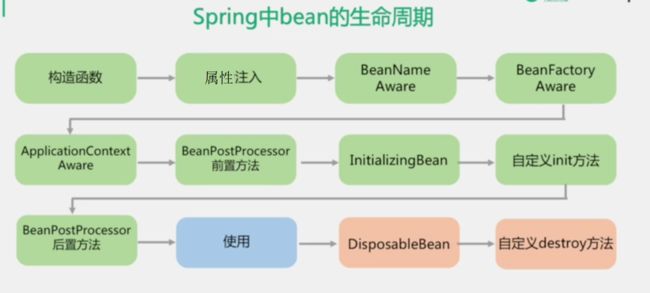
                        // 如果实现了 BeanNameAware 接口, 则调用其 setBeanName 方法
                        // 如果实现了 BeanClassLoaderAware 接口, 则调用其 setBeanClassLoader 方法
                        // 如果实现了 BeanFactoryAware 接口, 则调用其 setBeanFactory 方法
                        --> AbstractAutowireCapableBeanFactory#invokeAwareMethods
                        // 如果实现了 BeanPostProcessor 接口, 则调用其 postProcessBeforeInitialization 方法
                        --> AbstractAutowireCapableBeanFactory#applyBeanPostProcessorsBeforeInitialization
                        // 如果实现了 InitializingBean 接口, 则调用其 afterPropertiesSet 方法
                        --> AbstractAutowireCapableBeanFactory#invokeInitMethods
                            // 如果自定义了初始化方法, 则调用其初始化方法(如 xml 中定义 init-method="xxx")
                            --> AbstractAutowireCapableBeanFactory#invokeCustomInitMethod
                        // 如果实现了 BeanPostProcessor 接口, 则调用其 postProcessAfterInitialization 方法
                        --> AbstractAutowireCapableBeanFactory#applyBeanPostProcessorsAfterInitialization
    // 如果实现了 SmartInitializingSingleton 接口, 则调用其 afterSingletonsInstantiated 方法
    smartSingleton.afterSingletonsInstantiated();

------这个 bean 实例化 & 初始化过程可以参考下述链接------
https://www.jianshu.com/p/a766267be3c6 (bean生命周期)
https://blog.csdn.net/u014082714/article/details/82388931 (bean加载)
step12: finishRefresh
// AbstractApplicationContext#finishRefresh

protected void finishRefresh() {
    //  清除上下文资源缓存(如扫描中的ASM元数据)
    clearResourceCaches();

    // 当ApplicationContext启动或停止时,它会通过LifecycleProcessor来与所有声明的bean的周期做状态更新,
    // 而在LifecycleProcessor的使用前首先需要初始化, 若未定义, 则用 DefaultLifecycleProcessor
    initLifecycleProcessor();

    // 启动所有实现了Lifecycle接口的bean。
    getLifecycleProcessor().onRefresh();

    // 通过Spring中的事件发布机制来发出ContextRefreshedEvent事件
    // 若自定义了实现 ApplicationListener 接口的实现类, 监听 ContextRefreshedEvent 事件, 并加入了 IOC 容器, 则会调用其重写的 onApplicationEvent 方法
    // 如 org.apache.dubbo.config.spring.ServiceBean 在 IOC 容器加载完毕后, 进行服务的导出 --> apache dubbo 也这样搞了
    // 与 ContextRefreshedEvent 事件相似的还有 ContextStartedEvent、ContextClosedEvent、ContextStoppedEvent
    // 当然也可以继承 ApplicationContextEvent 抽象类来实现自定义的事件
    publishEvent(new ContextRefreshedEvent(this));

    // 调用LiveBeansView的registerApplicationContext方法:如果设置了JMX相关的属性,则就调用该方法
    LiveBeansView.registerApplicationContext(this);
}
#涉及到的相关class
1.ApplicationEventMulticaster:
应用事件广播器,用于发布事件到相应的监听器。
2.LifecycleProcessor:
生命周期处理器,用于处理生命周期事件。
3.Lifecycle:
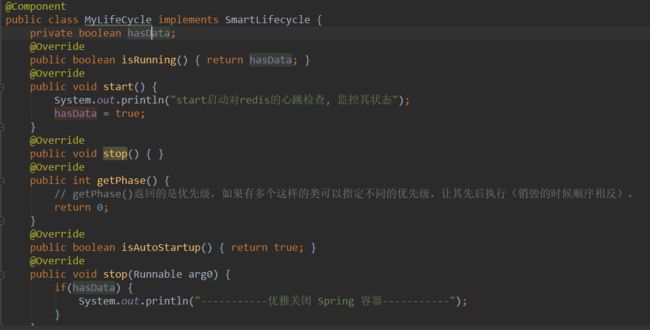
定义生命周期控制方法的接口,特别是 SmartLifecycle,可以在 Spring IoC 容器刷新完毕时进行触发。
通常用来配置后台程序,在启动后一直运行(如对 MQ 进行轮询等)。
3.1 SmartLifecycle
Shutting down the Spring IoC container gracefully in non-web applications.
4.ApplicationContextEvent:
应用事件的基类。
5.ApplicationListener:
应用事件监听器,用于监听应用事件。
https://www.jianshu.com/p/7b8f2a97c8f5 (SmartLifecycle)
4.Spring中的一些问题
4.1 循环依赖的问题
1.什么是循环依赖?
循环依赖-->循环引用。即2个或以上bean 互相持有对方,最终形成闭环。
eg:A依赖B,B依赖C,C又依赖A。

2.Spring中循环依赖的场景?
1) 构造器的循环依赖。【这个Spring解决不了】
A有参构造是B。B的有参构造是C, C的有参构造是A, 这样就产生了一个循环依赖的情况。
2)【setter循环依赖】field属性的循环依赖
Spring是先将Bean对象实例化【依赖无参构造函数】--->再设置对象属性的.
setter方式 单例,默认方式:
通过递归方法找出当前Bean所依赖的Bean,然后提前缓存【会放入Cache中】起来。
当Spring实例化了A、B、C后,紧接着会去设置对象的属性,
此时A依赖B,就会去Map中取出存在里面的单例B对象,以此类推,不会出来循环的问题了。
#Java的引用传递
Spring的循环依赖的理论依据其实是基于Java的引用传递,当我们获取到对象的引用时,
对象的field或属性是可以延后设置的(但是构造器必须是在获取引用之前)。

#Spring的单例对象的初始化主要分为三步:
①createBeanInstance:实例化,其实也就是 调用对象的构造方法实例化对象
②populateBean:填充属性,这一步主要是多bean的依赖属性进行填充
③initializeBean:调用spring xml中的init() 方法。
循环依赖主要发生在第一、第二步。也就是构造器循环依赖和field循环依赖。

那么我们要解决循环引用也应该从初始化过程着手,
对于单例来说,在Spring容器整个生命周期内,有且只有一个对象,
所以很容易想到这个对象应该存在Cache中,Spring为了解决单例的循环依赖问题,使用了三级缓存。

#解决构造函数注入导致的循环依赖问题:
"调整配置文件,将构造函数注入方式改为属性注入方式即可"
#源码中的实现 DefaultSingletonBeanRegistry --> 三级缓存
/** 单例对象的cache. Cache of singleton objects: bean name to bean instance. */
private final Map singletonObjects = new ConcurrentHashMap<>(256);

/** 单例对象工厂的cache. Cache of singleton factories: bean name to ObjectFactory. */
private final Map> singletonFactories = new HashMap<>(16);

/** 提前暴光的单例对象的Cache 。【用于检测循环引用,与singletonFactories互斥】.Cache of early singleton objects: bean name to bean instance. */
private final Map earlySingletonObjects = new HashMap<>(16);

/** 这里 getSingleton 时通过三级缓存解决循环依赖. */
protected Object getSingleton(String beanName, boolean allowEarlyReference) {
    Object singletonObject = this.singletonObjects.get(beanName);
    if (singletonObject == null && isSingletonCurrentlyInCreation(beanName)) {
        synchronized (this.singletonObjects) {
            singletonObject = this.earlySingletonObjects.get(beanName);
            if (singletonObject == null && allowEarlyReference) {
                ObjectFactory singletonFactory = this.singletonFactories.get(beanName);
                if (singletonFactory != null) {
                    singletonObject = singletonFactory.getObject();
                    this.earlySingletonObjects.put(beanName, singletonObject);
                    this.singletonFactories.remove(beanName);
                }
            }
        }
    }
    return singletonObject;
}


#getSingleton()的整个过程分析:
Spring首先从一级缓存singletonObjects中获取。
如果获取不到,并且对象正在创建中,就再从二级缓存earlySingletonObjects中获取。
如果还是获取不到且允许singletonFactories通过getObject()获取,
就从三级缓存singletonFactory.getObject()(三级缓存)获取,
如果获取到了则从singletonFactories中移除,并放入earlySingletonObjects中。
其实也就是从三级缓存移动到了二级缓存。

从上面三级缓存的分析,我们可以知道,Spring解决循环依赖的诀窍就在于singletonFactories这个三级cache。
这个cache的类型是ObjectFactory。
4.2 Spring中父子容器
4.2.1 Spring-SpringMVC中的父子容器
web.xml
    contextConfigLocation
    classpath:spring/applicationContext.xml


    org.springframework.web.context.ContextLoaderListener


    springMVC

    org.springframework.web.servlet.DispatcherServlet

      contextConfigLocation

      classpath:spring/spring-mvc.xml


    springMVC
    /
applicationContext.xml扫包配置
spring-mvc.xml扫包配置
spring & spring-mvc的启动过程
1.对于一个web应用,其部署在web容器中,web容器提供其一个全局的上下文环境,
这个上下文就是ServletContext,其为后面的spring IoC容器提供宿主环境;

2.在web.xml中会提供有ContextLoaderListener。
在web容器启动时,会触发容器初始化事件,
此时ContextLoaderListener会监听到这个事件,其contextInitialized方法会被调用,
在这个方法中,spring会初始化一个启动上下文,这个上下文被称为根上下文,
即WebApplicationContext,其实际的实现类XmlWebApplicationContext。
这个就是spring的IoC容器,其对应的Bean定义的配置由web.xml中的context-param标签指定。
在这个IoC容器初始化完毕后,spring以
WebApplicationContext.ROOTWEBAPPLICATIONCONTEXTATTRIBUTE为属性Key,
将其存储到ServletContext中,便于获取;

3.ContextLoaderListener监听器初始化完毕后,开始初始化web.xml中配置的Servlet,
这个servlet可以配置多个,以最常见的DispatcherServlet为例,
这个servlet实际上是一个标准的前端控制器,用以转发、匹配、处理每个servlet请求。
DispatcherServlet上下文在初始化的时候会建立自己的IoC上下文,用以持有spring mvc相关的bean。
在建立DispatcherServlet自己的IoC上下文时,会利用
WebApplicationContext.ROOTWEBAPPLICATIONCONTEXTATTRIBUTE
先从ServletContext中获取之前的根上下文(即WebApplicationContext)作为自己上下文的parent上下文。
有了这个parent上下文之后,再初始化自己持有的上下文。
这个DispatcherServlet初始化自己上下文的工作在其initStrategies方法中可以看到,
大概的工作就是初始化处理器映射、视图解析等。
这个servlet自己持有的上下文默认实现类也是mlWebApplicationContext。
初始化完毕后,spring以与servlet的名字相关(此处不是简单的以servlet名为Key,而是通过一些转换)
的属性为属性Key,也将其存到ServletContext中,以便后续使用。
这样每个servlet就持有自己的上下文,即拥有自己独立的bean空间,
同时各个servlet共享相同的bean,即根上下文(第2步中初始化的上下文)定义的那些bean。
父子容器特点
#父子容器中的对象<子可访问父对象, 父不可访问子对象>
子容器可以访问父容器的对象,父容器不能访问子容器中的对象。

#父子容器中的属性<属性互相都访问不到>
如果在父容器中有properties文件,其中的属性子容器是访问不到的!子容器也是无法访问到父容器中的属性的.
即: 这个读取配置文件的操作, 配置在哪个文件中, 哪里才能读取到
可能产生的问题
1.重复扫包导致bean可能注册到两个容器中
2.重复扫包导致事务不生效(若controller扫到的bean没有事务)
即@Transactional无效(也可能该注解搞到了private方法上)
3.父容器中Bean找不到
4.SpringMVC不能正常跳转
解决父子容器冲突问题
Spring容器优先加载由ServletContextListener(对应applicationContext.xml)产生的父容器,
而SpringMVC(对应spring-mvc.xml)产生的是子容器。

如果说子容器扫描了service及dao所在的包, 则会将@Service注解的实例也装配到子容器中.
一方面导致bean的重复加载, 另一方面子容器中的bean是没有经过事务加强处理,即没有事务处理能力的Service,
而父容器进行初始化的Service是保证事务的增强处理能力的。

所以若想使得service层仍然有事务处理能力, 在子容器扫包时:
方法1:仅仅扫描controller层即可, 不要扫描其它层.
方法2:在子容器中将Service exclude掉.

#总结:
>> 如果只处理service的bean,那么只在父容器的配置文件中操作
>> 如果只处理controller的bean,那么在mvc的配置文件中修改
>> 如果同时要处理service,还要处理controller,那么在两个配置文件中都进行修改
https://www.jianshu.com/p/e48eeca7c0b7 (Spring父子容器)
https://blog.csdn.net/weixin_39559282/article/details/83352672
4.2.2 SpringCloud项目中的父子容器
https://blog.csdn.net/forezp/article/details/87910226 (cloud父子容器)
参考资源
https://www.jianshu.com/p/524d62ee91fb (加载xml文件的方式)
https://segmentfault.com/a/1190000020742805?utm_source=tag-newest
https://www.cnblogs.com/bigshark/p/11355655.html (springboot2.0启动大概流程)
https://www.jianshu.com/p/09c0581fbacf (SpringCloud启动中SpringApplication构造方法执行多次)
https://www.jianshu.com/p/7164bf18a57b (refresh方法)
https://www.jianshu.com/p/c7a416ba7950 (refresh方法)
https://blog.csdn.net/xingxing513234072/article/details/78247480 (Spring容器初始化过程 & Bean注册 & Bean实例化 ----- IOC & DI)
https://blog.csdn.net/u014082714/article/details/82388931 (Bean的创建和初始化 ---->核心)
https://blog.csdn.net/elim168/article/details/77891450 (国际化MessageSource)
https://blog.csdn.net/v123411739/article/details/99288413 (IOC机制)
https://blog.csdn.net/wugaokai0831/article/details/84008654 (DefaultSingletonBeanRegistry)
https://www.jianshu.com/p/f13f554ee8ce (BeanFactory & ApplicationContext)
https://blog.csdn.net/woshilijiuyi/article/details/82219585 (这一篇挺好)
https://blog.csdn.net/qq_36381855/article/details/79752689 (循环依赖)


