最近做一个新功能,需要上传图片,用到了cube-ui的upLoad组件。我们的需求是默认展示一个示例图片,支持图片自动上传,图片上传之后可以预览,最多上传20张。
界面如下:
需求明确了,下面来看一下实现~
首先需要在入口文件导入
import { Upload, ImagePreview } from 'cube-ui'
Vue.use(Upload)
Vue.use(ImagePreview)
我用到的是自定义结构样式,我们结合代码来分析:
html
![]()
示例
:multiple="false" 控制是否多选;它这里上传图片达到上限后,添加按钮让然会显示,只是选择了图片之后,不执行上传。感觉有点不友好,所以我加了v-show="this.files.length < this.maxLength",当上传图片达到上限后就会隐藏上传的按钮。
resverseList是逆序的this.files数组,这个组件的默认顺组是新上传的在最后,跟我们的需求相反,所以需要逆序一下。
handleImgsClick是预览图片的功能,等下后面再说这个功能。
processFile处理原始文件的函数,可以再这里进行图片压缩处理;
script
import compress from './compress'  // compress方法用的是鹅厂的,compress.js的完整代码在本文最后

  computed: {
    resverseList() {
      // 处理图片展示顺序  逆序
      const list = []
      for (let i = 0; i < this.files.length; i++) {
        list.unshift(this.files[i])
      }
      return list
    }
  },
  data () {
    return {
      imgIds: '', // 凭证图片ID,逗号隔开
      files: [],
      maxLength: 20, // 最多传20张图片
      action: {
        target: 'http://xxx.xx.xxx.xx:xxxx/xxx', // 上传图片接口地址
        data: {
          serviceType: 3,
          userId: 'XXXXX'
        },
        checkSuccess: this.checkSuccess
      },
      imgs: [require('./images/example.jpg'), require('./images/more.jpg')]
    }
  },
// 处理原始文件函数
    processFile(file, next) {
      console.log('file1:', file.base64) // 原图片
      compress(file, {
        compress: {
          width: 1600,
          height: 1600,
          quality: 0.5
        }
      }, (file) => {
        console.log('file2:', file.base64) // 压缩后的图片
        next(file)
      })
    },
// 检查图片上传是否成功
    checkSuccess(res, file) {
      if (res.code === 0) { // 判断是否上传成功  这里根据自己接口实际情况判断
        // 上传成功需要执行的代码
        return true
      }
    // 上传失败需要执行的代码
      return false
    }
checkSuccess是校验上传图片是否成功函数,在这里可以根据自己后台接口的返回做校验。该函数有一个返回值, return true 则是上传成功, return false则是上传失败。
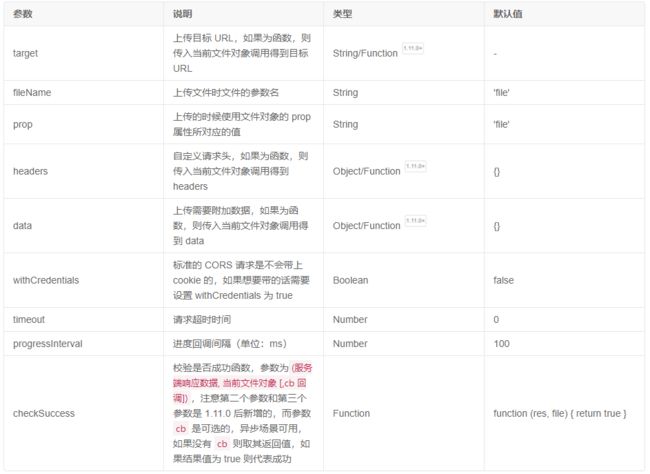
我们看一下官方对action配置的说明:
如果 action 是字符串,则会被处理成 { target: action } 这样结构。
需要注意的是这里向后台传过去的参数 file, data是formData格式的,需要上传图片的接口支持
Content-Type: multipart/form-data;
到这里自动上传图片的功能已经实现了,样式的覆盖我就不多说了,自行调整就好了。点击上传的图片,没办法实现预览。那接下来就来实现这个功能。
实现图片预览,用到了cub-ui的ImagePreview。
我们来看一下刚才的这短代码
![]()
示例
这里就是展示的示例图片,需要支持点击放大预览。预览得我功能主要由handleImgsClick函数来实现的,我们来看一下怎么实现的实现:
// 预览图片
    handleImgsClick(url) {
      let imgs
      if (url) {
        imgs = [url]
      } else {
        imgs = [this.imgs[this.imgIndex]]
      }
      this.$createImagePreview({
        imgs,
        loop: false
      }, (h) => {
        return h('div', {
          class: {
            'image-preview-custom-footer': true
          },
          slot: 'footer'
        }, '')
      }).show()
    }
基础用法就是
this.$createImagePreview({
  imgs: arr // url地址(也可以是base64编码) 数组
}).show()
这样预览的时候,默认会有下标:
要去点此处的下标,或者修改为其它文字,可以自定义使用
this.$createImagePreview({
        imgs,
        loop: false
      }, (h) => {
        return h('div', {
          class: {
            'image-preview-custom-footer': true
          },
          slot: 'footer'
        }, '')
      }).show()
这里是去掉底部显示。
示例的图片就可以预览了;上传的图片也加上这个点击事件@click="handleImgsClick(file.url)"就也能预览了,就是如下代码:
好了,到这里整个功能就实现啦 ^-^
compress.js
/*
* Tencent is pleased to support the open source community by making WeUI.js available.
*
* Copyright (C) 2017 THL A29 Limited, a Tencent company. All rights reserved.
*
* Licensed under the MIT License (the "License"); you may not use this file except in compliance
* with the License. You may obtain a copy of the License at
*
*       http://opensource.org/licenses/MIT
*
* Unless required by applicable law or agreed to in writing, software distributed under the License is
* distributed on an "AS IS" BASIS, WITHOUT WARRANTIES OR CONDITIONS OF ANY KIND,
* either express or implied. See the License for the specific language governing permissions and
* limitations under the License.
*/

/**
 * 检查图片是否有被压扁,如果有,返回比率
 * ref to http://stackoverflow.com/questions/11929099/html5-canvas-drawimage-ratio-bug-ios
 */
function detectVerticalSquash(img) {
    // 拍照在IOS7或以下的机型会出现照片被压扁的bug
    var data;
    var ih = img.naturalHeight;
    var canvas = document.createElement('canvas');
    canvas.width = 1;
    canvas.height = ih;
    var ctx = canvas.getContext('2d');
    ctx.drawImage(img, 0, 0);
    try {
        data = ctx.getImageData(0, 0, 1, ih).data;
    } catch (err) {
        console.log('Cannot check verticalSquash: CORS?');
        return 1;
    }
    var sy = 0;
    var ey = ih;
    var py = ih;
    while (py > sy) {
        var alpha = data[(py - 1) * 4 + 3];
        if (alpha === 0) {
            ey = py;
        } else {
            sy = py;
        }
        py = (ey + sy) >> 1; // py = parseInt((ey + sy) / 2)
    }
    var ratio = (py / ih);
    return (ratio === 0) ? 1 : ratio;
}

/**
 * dataURI to blob, ref to https://gist.github.com/fupslot/5015897
 * @param dataURI
 */
function dataURItoBuffer(dataURI){
    var byteString = atob(dataURI.split(',')[1]);
    var buffer = new ArrayBuffer(byteString.length);
    var view = new Uint8Array(buffer);
    for (var i = 0; i < byteString.length; i++) {
        view[i] = byteString.charCodeAt(i);
    }
    return buffer;
}
function dataURItoBlob(dataURI) {
    var mimeString = dataURI.split(',')[0].split(':')[1].split(';')[0];
    var buffer = dataURItoBuffer(dataURI);
    return new Blob([buffer], {type: mimeString});
}

/**
 * 获取图片的orientation
 * ref to http://stackoverflow.com/questions/7584794/accessing-jpeg-exif-rotation-data-in-javascript-on-the-client-side
 */
function getOrientation(buffer){
    var view = new DataView(buffer);
    if (view.getUint16(0, false) != 0xFFD8) return -2;
    var length = view.byteLength, offset = 2;
    while (offset < length) {
        var marker = view.getUint16(offset, false);
        offset += 2;
        if (marker == 0xFFE1) {
            if (view.getUint32(offset += 2, false) != 0x45786966) return -1;
            var little = view.getUint16(offset += 6, false) == 0x4949;
            offset += view.getUint32(offset + 4, little);
            var tags = view.getUint16(offset, little);
            offset += 2;
            for (var i = 0; i < tags; i++)
                if (view.getUint16(offset + (i * 12), little) == 0x0112)
                    return view.getUint16(offset + (i * 12) + 8, little);
        }
        else if ((marker & 0xFF00) != 0xFF00) break;
        else offset += view.getUint16(offset, false);
    }
    return -1;
}

/**
 * 修正拍照时图片的方向
 * ref to http://stackoverflow.com/questions/19463126/how-to-draw-photo-with-correct-orientation-in-canvas-after-capture-photo-by-usin
 */
function orientationHelper(canvas, ctx, orientation) {
    const w = canvas.width, h = canvas.height;
    if(orientation > 4){
        canvas.width = h;
        canvas.height = w;
    }
    switch (orientation) {
        case 2:
            ctx.translate(w, 0);
            ctx.scale(-1, 1);
            break;
        case 3:
            ctx.translate(w, h);
            ctx.rotate(Math.PI);
            break;
        case 4:
            ctx.translate(0, h);
            ctx.scale(1, -1);
            break;
        case 5:
            ctx.rotate(0.5 * Math.PI);
            ctx.scale(1, -1);
            break;
        case 6:
            ctx.rotate(0.5 * Math.PI);
            ctx.translate(0, -h);
            break;
        case 7:
            ctx.rotate(0.5 * Math.PI);
            ctx.translate(w, -h);
            ctx.scale(-1, 1);
            break;
        case 8:
            ctx.rotate(-0.5 * Math.PI);
            ctx.translate(-w, 0);
            break;
    }
}

/**
 * 压缩图片
 */
function compress(file, options, callback) {
    const reader = new FileReader();
    reader.onload = function (evt) {
        if(options.compress === false){
            // 不启用压缩 & base64上传 的分支,不做任何处理,直接返回文件的base64编码
            file.base64 = evt.target.result;
            callback(file);
            return;
        }

        // 启用压缩的分支
        const img = new Image();
        img.onload = function () {
            const ratio = detectVerticalSquash(img);
            const orientation = getOrientation(dataURItoBuffer(img.src));
            const canvas = document.createElement('canvas');
            const ctx = canvas.getContext('2d');

            const maxW = options.compress.width;
            const maxH = options.compress.height;
            let w = img.width;
            let h = img.height;
            let dataURL;

            if(w < h && h > maxH){
                w = parseInt(maxH * img.width / img.height);
                h = maxH;
            }else if(w >= h && w > maxW){
                h = parseInt(maxW * img.height / img.width);
                w = maxW;
            }

            canvas.width = w;
            canvas.height = h;

            if(orientation > 0){
                orientationHelper(canvas, ctx, orientation);
            }
            ctx.drawImage(img, 0, 0, w, h / ratio);

            if(/image\/jpeg/.test(file.type) || /image\/jpg/.test(file.type)){
                dataURL = canvas.toDataURL('image/jpeg', options.compress.quality);
            }else{
                dataURL =  canvas.toDataURL(file.type);
            }

            if(options.type == 'file'){
                if(/;base64,null/.test(dataURL) || /;base64,$/.test(dataURL)){
                    // 压缩出错,以文件方式上传的,采用原文件上传
                    console.warn('Compress fail, dataURL is ' + dataURL + '. Next will use origin file to upload.');
                    callback(file);
                }else{
                    let blob = dataURItoBlob(dataURL);
                    blob.id = file.id;
                    blob.name = file.name;
                    blob.lastModified = file.lastModified;
                    blob.lastModifiedDate = file.lastModifiedDate;
                    callback(blob);
                }
            }else{
                if(/;base64,null/.test(dataURL) || /;base64,$/.test(dataURL)){
                    // 压缩失败,以base64上传的,直接报错不上传
                    options.onError(file, new Error('Compress fail, dataURL is ' + dataURL + '.'));
                    callback();
                }else{
                    file.base64 = dataURL;
                    callback(file);
                }
            }
        };
        img.src = evt.target.result;
    };
    reader.readAsDataURL(file);
}

export default compress;


