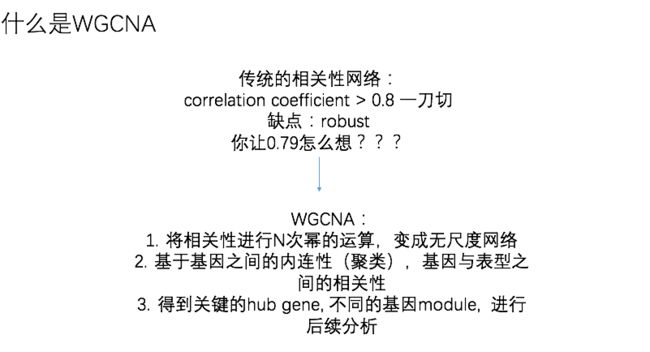
什么是WGCNA
1 样本聚类,查看是否有离群值
library(WGCNA)
## dist用来计算矩阵行之间的距离,聚类分析,行为样本
sampleTree<-hclust(dist(t(sig_gene_droplow)),method = "average")
par(cex=0.5)
plot(sampleTree)
2. 找构建网络合适的阈值
powers = c(c(1:10), seq(from = 12, to=50, by=2))
##选择合适的power值(软阈值)的主程序
sft = pickSoftThreshold(t(sig_gene_droplow), powerVector = powers, verbose = 5)
pdf("/Users/baiyunfan/desktop/1Threshold.pdf",width = 10, height = 5)
##一张PDF上有1*2个图
par(mfrow = c(1,2))
##缩小0.5倍
cex1 = 0.5
##画出
plot(sft$fitIndices[,1], -sign(sft$fitIndices[,3])*sft$fitIndices[,2],
     xlab="Soft Threshold (power)",ylab="Scale Free Topology Model Fit,signed R^2",type="n",
     main = paste("Scale independence")) +
  text(sft$fitIndices[,1], -sign(sft$fitIndices[,3])*sft$fitIndices[,2],
       labels=powers,cex=cex1,col="red")+
  abline(h=0.90,col="red")
plot(sft$fitIndices[,1], sft$fitIndices[,5],
     xlab="Soft Threshold (power)",ylab="Mean Connectivity", type="n",
     main = paste("Mean connectivity")) +
  text(sft$fitIndices[,1], sft$fitIndices[,5], labels=powers, cex=cex1,col="red")
dev.off()
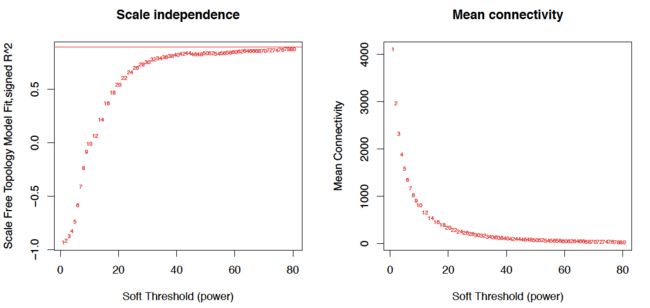
左图纵轴:相关系数的平方,越高说明该网络越逼近无网络尺度的分布。
右图纵轴:Connectivity类似于度的概念,基因模块中所有基因邻近函数的均值,每个基因的连接度是与其相连的基因的边属性之和
两边比较,power值选30
3. 构建网络,找到module
net = blockwiseModules(
  ##这个矩阵行是样本,列是基因
  t(sig_gene_droplow), power = 30,
  TOMType = "unsigned", minModuleSize = 30,
                       reassignThreshold = 0, mergeCutHeight = 0.25,
                       numericLabels = TRUE, pamRespectsDendro = FALSE,
                       saveTOMs = TRUE,
                       #saveTOMFileBase = "MyTOM",
                       verbose = 3)
table(net$colors)
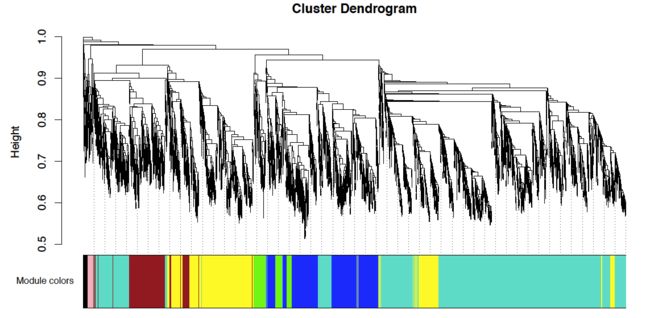
一共找到9个模块,下面是每个模块对应的基因数
4. module的可视化
将每个基因贴上模块的颜色
mergedColors = labels2colors(net$colors)
pdf("/Users/baiyunfan/desktop/2module.pdf",width = 10, height = 5)
##plotDendroAndColors:这是一个聚类函数
##net$dendrograms:第一个聚类
##net$blockGenes:第一个聚类中的基因
plotDendroAndColors(net$dendrograms[[1]], mergedColors[net$blockGenes[[1]]], "Module colors",
                    dendroLabels = FALSE, hang = 0.03,
                    addGuide = TRUE, guideHang = 0.05)
dev.off()
moduleLabels = net$colors
moduleColors = labels2colors(net$colors)
MEs = net$MEs
geneTree = net$dendrograms[[1]]
5. 划分训练集和验证集
library(caret)
train_dataset<-as.data.frame(t(sig_gene_droplow))
m<-c(rep(c(1:4),2))
train_dataset<-cbind(m,train_dataset)
colnames(train_dataset)[1]<-"group"
inTrain<-createDataPartition(y=train_dataset$group,p=0.25,list=FALSE)
train<-train_dataset[inTrain,-1]
test<-train_dataset[-inTrain,-1]
将train和test合成list的形式
setLabels = c("Train", "Test")
multiExpr = list(Train = list(data = train), Test = list(data = test))
multiColor = list(Train = moduleColors)
nSets = 2
6. 找Z值
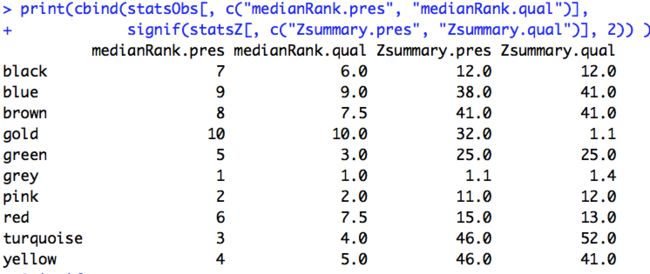
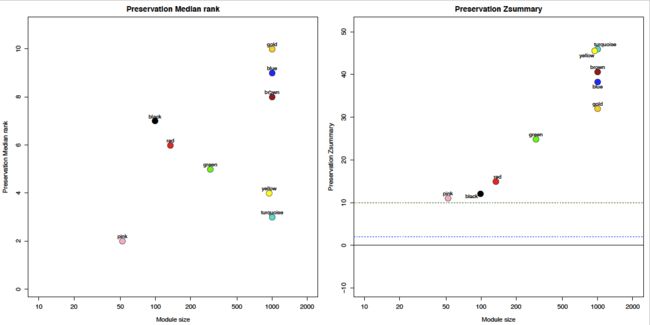
- Z大于10,代表strong preserved,好的module
- 大于2小于10代表weak preserved
- 小于2代表not preserved,不好的module
计算不同独立数据集之间的模块preservation
mp = modulePreservation(multiExpr, multiColor,
                        referenceNetworks = 1,
                        nPermutations = 200,
                        randomSeed = 1,
                        quickCor = 0,
                        verbose = 3)
ref = 1
test = 2
statsObs = cbind(mp$quality$observed[[ref]][[test]][, -1], mp$preservation$observed[[ref]][[test]][, -1])
statsZ = cbind(mp$quality$Z[[ref]][[test]][, -1], mp$preservation$Z[[ref]][[test]][, -1])
print(cbind(statsObs[, c("medianRank.pres", "medianRank.qual")],
            signif(statsZ[, c("Zsummary.pres", "Zsummary.qual")], 2)) )
modColors = rownames(mp$preservation$observed[[ref]][[test]])
moduleSizes = mp$preservation$Z[[ref]][[test]][, 1]
划分训练集后有多少module,每个module的大小
[图片上传失败...(image-35b1b7-1531615305570)]
这几个module的Z值小于10
row.names(statsZ[statsZ$Zsummary.pres<10,])
#去掉Z<10的module
#%in%不在这里的基因
plotMods = !(modColors %in% row.names(statsZ[statsZ$Zsummary.pres<10,]))
#去掉了Z<10的基因
text = modColors[plotMods]
plotData = cbind(mp$preservation$observed[[ref]][[test]][, 2], mp$preservation$Z[[ref]][[test]][, 2])
6. 找Z值
##preservation可视化
mains = c("Preservation Median rank", "Preservation Zsummary")
##新开一个画图窗口
sizeGrWindow(10, 5)
pdf("/Users/baiyunfan/desktop/3preservation.pdf",width = 20, height = 10)
##一行两列
par(mfrow = c(1,2))
##到四边的距离
par(mar = c(4.5,4.5,2.5,1))
for (p in 1:2){
  min = min(plotData[, p], na.rm = TRUE);
  max = max(plotData[, p], na.rm = TRUE);
  # Adjust ploting ranges appropriately
  if (p==2){
    if (min > -max/10) min = -max/10
    ylim = c(min - 0.1 * (max-min), max + 0.1 * (max-min))
  } else
    ylim = c(min - 0.1 * (max-min), max + 0.1 * (max-min))
   #bg 颜色 pch 圆圈的种类
  plot(moduleSizes[plotMods], plotData[plotMods, p], col = 1, bg = modColors[plotMods], pch = 21,
       main = mains[p],
       ##圆圈的大小
       cex = 2.4,
       ylab = mains[p], xlab = "Module size", log = "x",
       ylim = ylim,
       xlim = c(10, 2000), cex.lab = 1.2, cex.axis = 1.2, cex.main =1.4)
   ##贴上标签
  labelPoints(moduleSizes[plotMods], plotData[plotMods, p], text, cex = 1, offs = 0.08);
  # For Zsummary, add threshold lines
  if (p==2){
    abline(h=0)
    abline(h=2, col = "blue", lty = 2)
    abline(h=10, col = "darkgreen", lty = 2)
  }
}
dev.off()
7. 批量写出文件,将不同基因集的写到一起
for(i in 1:length(text)){
  y=sig_gene_droplow[which(moduleColors==text[i]),]
  write.csv(y,paste(paste("/Users/baiyunfan/desktop/",text[i],sep = ""),"csv",sep = "."),quote=F)
}
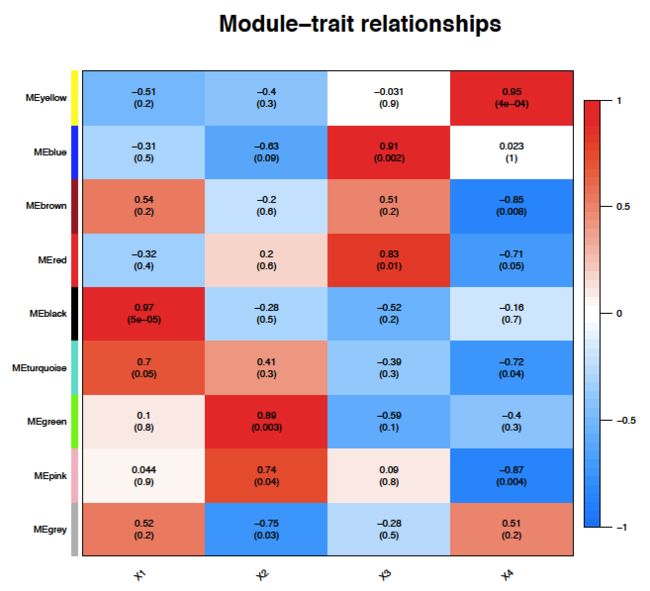
8. 表型与基因的相关性
datExpr = as.data.frame(t(sig_gene_droplow))
nGenes = ncol(datExpr)
nSamples = nrow(datExpr)
将datExpr整理成这个形式
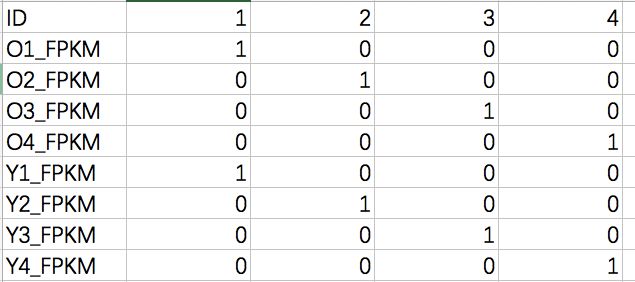
事先做这么一个group_info的文件
samples=read.csv('/Users/baiyunfan/desktop/group_info.csv',sep = ',',row.names = 1)
moduleLabelsAutomatic = net$colors
moduleColorsAutomatic = labels2colors(moduleLabelsAutomatic)
##计算第一主成分
MEs0 = moduleEigengenes(datExpr, moduleColorsWW)$eigengenes
##将相似的聚到一起
MEsWW = orderMEs(MEs0)
##将模块与表型做相关性
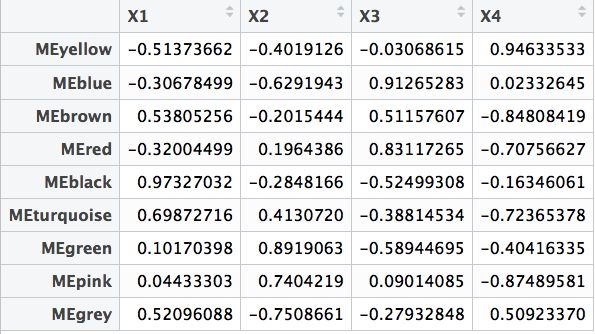
modTraitCor = cor(MEsWW, samples, use = "p")
##计算渐进P值
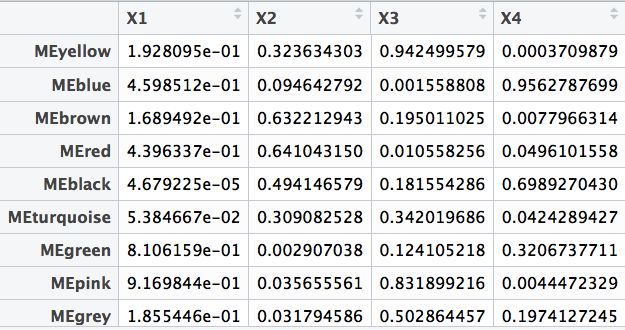
modTraitP = corPvalueStudent(modTraitCor, nSamples)
##将相关性和P值合起来
textMatrix = paste(signif(modTraitCor, 2), "\n(", signif(modTraitP, 1), ")", sep = "")
##将textMatrix变成和mod一样的格式
dim(textMatrix) = dim(modTraitCor)
###展示全部module和表型之间的关系
pdf("/Users/baiyunfan/desktop/4Module-trait.pdf",width = 6, height = 6)
labeledHeatmap(Matrix = modTraitCor, xLabels = colnames(samples), yLabels = names(MEsWW), cex.lab = 0.5,  yColorWidth=0.01,
               xColorWidth = 0.03,
               ySymbols = colnames(modlues), colorLabels = FALSE, colors = blueWhiteRed(50),
               textMatrix = textMatrix, setStdMargins = FALSE, cex.text = 0.5, zlim = c(-1,1)
               , main = paste("Module-trait relationships"))
dev.off()
