一、前言
最近一直在研究深度学习在目标检测的应用,看完了YOLOv2的paper和YAD2K的实现源码,来总结一下自己的收获,以便于加深理解。
二、关于目标检测
目标检测可简单划分成两个任务,一个是分类,一个是确定bounding boxes。目前目标检测领域的深度学习方法主要分为两类:two stage的目标检测算法;one stage的目标检测算法。前者是先由算法生成一系列作为样本的候选框,再通过卷积神经网络进行样本分类;后者则不用产生候选框,直接将目标边框定位的问题转化为回归问题处理。正是由于两种方法的差异,在性能上也有不同,前者在检测准确率和定位精度上占优,后者在算法速度上占优。YOLO(You Only Look Once )则是一种one stage的目标检测算法,目前已经迭代发布了三个版本YOLOv1、YOLOv2、YOLOv3。本文着重介绍的是YOLOv2。
三、YOLOv2的改进
作者在论文中主要总结了关于YOLOv2的三个方面改进:Better、Faster、Stronger。这不是本片文章我想分享的主要内容,因为有太多博主已经写的很透彻了,所以这部分我就只是很简单的稍微叙述了作者的思想,公式比较难编辑也基本没写。可以看下我黑体字的概括,如果想要了解更多的细节,可以搜搜别的博客看看。
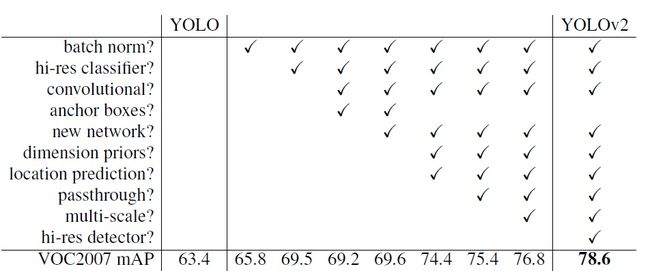
1、Better
-
(1)batch Normalization
每个卷积层后均使用batch Normalization
采用Batch Normalization可以提升模型收敛速度,而且可以起到一定正则化效果,降低模型的过拟合。在YOLOv2中,每个卷积层后面都添加了Batch Normalization层,并且不再使用droput。使用Batch Normalization后,YOLOv2的mAP提升了2.4%。 Bacth_Normalizing
 -
(2)High ResolutionClassifier
预训练分类模型采用了更高分辨率的图片
YOLOv1先在ImageNet(224x224)分类数据集上预训练模型的主体部分(大部分目标检测算法),获得较好的分类效果,然后再训练网络的时候将网络的输入从224x224增加为448x448。但是直接切换分辨率,检测模型可能难以快速适应高分辨率。所以YOLOv2增加了在ImageNet数据集上使用448x448的输入来finetune分类网络这一中间过程(10 epochs),这可以使得模型在检测数据集上finetune之前已经适用高分辨率输入。使用高分辨率分类器后,YOLOv2的mAP提升了约4%。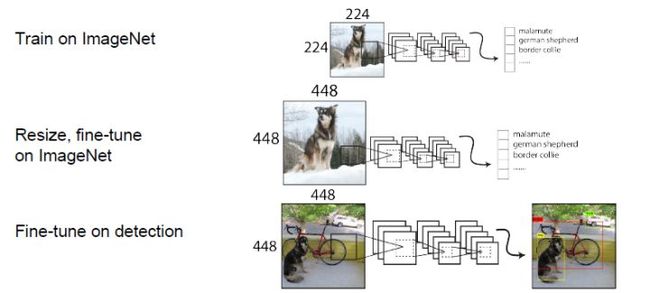 YOLOv2训练的三个阶段
 (3)Convolutional With Anchor Boxes
使用了anchor boxes去预测bounding boxes,去掉了最后的全连接层,网络仅采用了卷积层和池化层
在YOLOv1中,输入图片最终被划分为7x7的gird cell,每个单元格预测2个边界框。YOLOv1最后采用的是全连接层直接对边界框进行预测,其中边界框的宽与高是相对整张图片大小的,而由于各个图片中存在不同尺度和长宽比(scales and ratios)的物体,YOLOv1在训练过程中学习适应不同物体的形状是比较困难的,这也导致YOLOv1在精确定位方面表现较差。YOLOv2则引入了一个anchor boxes的概念,这样做的目的就是得到更高的召回率,yolov1只有98个边界框,yolov2可以达到1000多个(论文中的实现是845个)。还去除了全连接层,保留一定空间结构信息,网络仅由卷积层和池化层构成。输入由448x448变为416x416,下采样32倍,输出为13x13x5x25。采用奇数的gird cell 是因为大图像的中心往往位于图像中间,为了避免四个gird cell参与预测,我们更希望用一个gird cell去预测。结果mAP由69.5下降到69.2,下降了0.3,召回率由81%提升到88%,提升7%。尽管mAP下降,但召回率的上升意味着我们的模型有更大的提升空间。-
(4)Dimension Clusters(关于anchor boxes的第一个问题:如何确定尺寸)
利用Kmeans聚类,解决了anchor boxes的尺寸选择问题
在Faster R-CNN和SSD中,先验框的维度(长和宽)都是手动设定的,带有一定的主观性。如果选取的先验框维度比较合适,那么模型更容易学习,从而做出更好的预测。因此,YOLOv2采用k-means聚类方法对训练集中的边界框做了聚类分析。比较了复杂度和精确度后,选用了K值为5。因为设置先验框的主要目的是为了使得预测框与ground truth的IOU更好,所以聚类分析时选用box与聚类中心box之间的IOU值作为距离指标: 距离公式
距离公式 Dimension_Clusters.png
 (5)Direction locationprediction(关于anchor boxes的第二个问题:如何确定位置)
引入Sigmoid函数预测offset,解决了anchor boxes的预测位置问题,采用了新的损失函数
作者借鉴了RPN网络使用的anchor boxes去预测bounding boxes相对于图片分辨率的offset,通过(x,y,w,h)四个维度去确定anchor boxes的位置,但是这样在早期迭代中x,y会非常不稳定,因为RPN是一个区域预测一次,但是YOLO中是169个gird cell一起预测,处于A gird cell 的x,y可能会跑到B gird cell中,到处乱跑,导致不稳定。作者巧妙的引用了sigmoid函数来规约x,y的值在(0,1)轻松解决了这个offset的问题。关于w,h的也改进了YOLOv1中平方差的差的平方的方法,用了RPN中的log函数。(6)Fine-Grained Features
采用了passthrough层,去捕捉更细粒度的特征
YOLOv2提出了一种passthrough层来利用更精细的特征图,Fine-Grained Features之后YOLOv2的性能有1%的提升。(7)Multi-Scale Training
采用不同尺寸的图片训练,提高鲁棒性
由于YOLOv2模型中只有卷积层和池化层,所以YOLOv2的输入可以不限于416x416大小的图片。为了增强模型的鲁棒性,YOLOv2采用了多尺度输入训练策略,具体来说就是在训练过程中每间隔一定的iterations之后改变模型的输入图片大小。由于YOLOv2的下采样总步长为32,输入图片大小选择一系列为32倍数的值:{320,352,384,...,608},输入图片最小为320x320,此时对应的特征图大小为10x10(不是奇数了,确实有点尴尬),而输入图片最大为 608x608,对应的特征图大小为19x19。在训练过程,每隔10个iterations随机选择一种输入图片大小,然后只需要修改对最后检测层的处理就可以重新训练。采用Multi-Scale Training策略,YOLOv2可以适应不同大小的图片,并且预测出很好的结果。
2、Faster
大多数检测框架依赖于VGG-16作为的基本特征提取器。VGG-16是一个强大的,准确的分类网络,但它是不必要的复杂。在单张图像224×224分辨率的情况下VGG-16的卷积层运行一次前馈传播需要306.90亿次浮点运算。YOLO框架使用基于Googlenet架构的自定义网络。这个网络比VGG-16更快,一次前馈传播只有85.2亿次的操作。然而,它的准确性比VGG-16略差。在ImageNet上,对于单张裁剪图像,224×224分辨率下的top-5准确率,YOLO的自定义模型获得了88.0%,而VGG-16则为90.0%。YOLOv2使用Darknet-19网络,有19个卷积层和5个最大池化层。相比YOLOv1的24个卷积层和2个全连接层精简了网络。
3、Stronger
这里作者的想法也很新颖,解决了2个不同数据集相互排斥(mutualy exclusive)的问题。作者提出了WordTree,使用该树形结构成功的解决了不同数据集中的排斥问题。使用该树形结构进行分层的预测分类,在某个阈值处结束或者最终达到叶子节点处结束。下面这副图将有助于WordTree这个概念的理解。
四、YAD2K代码解析
YAD2K用了90%的Keras和10%Tensorflow实现的YOLOv2。下面主要分析一下/yad2k/models/keras_yolo.py这个文件里的代码。
提示:其实boxes的坐标是[y,x,h,w]而不是[x,y,w,h]。
流程:数据先经过preprocess_true_boxes()函数处理,然后做一些处理输入到模型,损失函数是yolo_loss(),网络最后一个卷积层的输出作为函数yolo_head()的输入,然后再使用函数yolo_eval(),得到结果。
1、preprocess_true_boxes()
这个函数是得到detectors_mask(最佳预测的anchor boxes,每一个true boxes都对应一个anchor boxes),matching_true_boxes(用于后面和pred_boxes做差求loss)代码后都给了比较详细的注释
def preprocess_true_boxes(true_boxes, anchors, image_size):
 """
参数
--------------
true_boxes : 实际框的位置和类别,我们的输入。二个维度:
第一个维度:一张图片中有几个实际框
第二个维度: [x, y, w, h, class],x,y 是框中心点坐标,w,h 是框的宽度和高度。x,y,w,h 均是除以图片
           分辨率得到的[0,1]范围的比值。

anchors : 实际anchor boxes 的值,论文中使用了五个。[w,h],都是相对于gird cell 的比值。二个维度:
第一个维度:anchor boxes的数量,这里是5
第二个维度:[w,h],w,h,都是相对于gird cell长宽的比值。
           [1.08, 1.19], [3.42, 4.41], [6.63, 11.38], [9.42, 5.11], [16.62, 10.52]


image_size : 图片的实际尺寸。这里是416x416。


Returns
--------------
detectors_mask : 取值是0或者1,这里的shape是[13,13,5,1],四个维度。
第一个维度:true_boxes的中心位于第几行(y方向上属于第几个gird cell)
第二个维度:true_boxes的中心位于第几列(x方向上属于第几个gird cell)
第三个维度:哪个anchor box
第四个维度:0/1。1的就是用于预测改true boxes 的 anchor boxes

matching_true_boxes: 这里的shape是[13,13,5,5],四个维度。
第一个维度:true_boxes的中心位于第几行(y方向上属于第几个gird cel)
第二个维度:true_boxes的中心位于第几列(x方向上属于第几个gird cel)
第三个维度:第几个anchor box
第四个维度:[x,y,w,h,class]。这里的x,y表示offset,是相当于gird cell的,w,h是取了log函数的,
class是属于第几类。后面的代码会详细看到
"""

    height, width = image_size
    num_anchors = len(anchors)

    assert height % 32 == 0,   '输入的图片的高度必须是32的倍数,不然会报错。'
    assert width % 32 == 0,   '输入的图片的宽度必须是32的倍数,不然会报错。'

    conv_height = height // 32    '进行gird cell划分'
    conv_width = width // 32    '进行gird cell划分'

    num_box_params = true_boxes.shape[1]
    detectors_mask = np.zeros(
        (conv_height, conv_width, num_anchors, 1), dtype=np.float32)
    matching_true_boxes = np.zeros(
        (conv_height, conv_width, num_anchors, num_box_params),
        dtype=np.float32)    '确定detectors_mask和matching_true_boxes的维度,用0填充'

    for box in true_boxes:    '遍历实际框'
        box_class = box[4:5]    '提取类别信息,属于哪类'

        box = box[0:4] * np.array(
            [conv_width, conv_height, conv_width, conv_height])   '换算成相对于gird cell的值'

        i = np.floor(box[1]).astype('int')    '(y方向上属于第几个gird cell)'
        j = np.floor(box[0]).astype('int')    '(x方向上属于第几个gird cell)'
        best_iou = 0
        best_anchor = 0


        '计算anchor boxes 和 true boxes的iou,找到最佳预测的一个anchor boxes'
        for k, anchor in enumerate(anchors):
            # Find IOU between box shifted to origin and anchor box.
            box_maxes = box[2:4] / 2.
            box_mins = -box_maxes
            anchor_maxes = (anchor / 2.)
            anchor_mins = -anchor_maxes

            intersect_mins = np.maximum(box_mins, anchor_mins)
            intersect_maxes = np.minimum(box_maxes, anchor_maxes)
            intersect_wh = np.maximum(intersect_maxes - intersect_mins, 0.)
            intersect_area = intersect_wh[0] * intersect_wh[1]
            box_area = box[2] * box[3]
            anchor_area = anchor[0] * anchor[1]
            iou = intersect_area / (box_area + anchor_area - intersect_area)
            if iou > best_iou:
                best_iou = iou
                best_anchor = k


        if best_iou > 0:
            detectors_mask[i, j, best_anchor] = 1  '找到最佳预测anchor boxes'
            adjusted_box = np.array(
                [
                    box[0] - j, box[1] - i, 'x,y都是相对于gird cell的位置,左上角[0,0],右下角[1,1]'
                    np.log(box[2] / anchors[best_anchor][0]),  '对应实际框w,h和anchor boxes w,h的比值取log函数'
                    np.log(box[3] / anchors[best_anchor][1]), box_class  'class实际框的物体是属于第几类'
                ],
                dtype=np.float32)
            matching_true_boxes[i, j, best_anchor] = adjusted_box
    return detectors_mask, matching_true_boxes
2、yolo_head()
这个函数是输入yolo的输出层的特征,转化成相对于gird cell坐标的x,y,相对于gird cell长宽的w,h,pred_confidence是判断否存在物体的概率,pred_class_prob是sofrmax后各个类别分别的概率。返回值x,y,w,h在loss function中计算iou,然后计算iou损失。然后和pred_confidence计算confidence_loss,pred_class_prob用于计算classification_loss。
def yolo_head(feats, anchors, num_classes):
    """Convert final layer features to bounding box parameters.

    参数
    ----------
    feats : 神经网络最后一层的输出,shape:[-1,13,13,125]

    anchors : 实际anchor boxes 的值,论文中使用了五个。[w,h],都是相对于gird cell 长宽的比值。二个维度:
    第一个维度:anchor boxes的数量,这里是5
    第二个维度:[w,h],w,h,都是相对于gird cell 长宽的比值。
    [1.08, 1.19], [3.42, 4.41], [6.63, 11.38], [9.42, 5.11], [16.62, 10.52]

    num_classes : 类别个数(有多少类)

    返回值
    -------
    box_xy : 每张图片的每个gird cell中的每个pred_boxes中心点x,y相对于其所在gird cell的坐标值,左上顶点为[0,0],右下顶点为[1,1]。
    有五个维度,shape:[-1,13,13,5,2].
    第一个维度:图片张数
    第二个维度:每组x,y在pred_boxes的行坐标信息(y方向上属于第几个gird cell)
    第三个维度:每组x,y在pred_boxes的列坐标信息(x方向上属于第几个gird cell)
    第四个维度:每组x,y的anchor box信息(使用第几个anchor boxes)
    第五个维度:[x,y],中心点x,y相对于gird cell的坐标值

    box_wh : 每张图片的每个gird cell中的每个pred_boxes的w,h都是相对于gird cell的比值
    有五个维度,shape:[-1,13,13,5,2].
    第一个维度:图片张数
    第二个维度:每组w,h对应的x,y在pred_boxes的行坐标信息(y方向上属于第几个gird cell)
    第三个维度:每组w,h对应的x,y在pred_boxes的列坐标信息(x方向上属于第几个gird cell)
    第四个维度:每组w,h对应的x,y的anchor box信息(使用第几个anchor boxes)
    第五个维度:[w,h],w,h都是相对于gird cell的比值

    box_confidence : 每张图片的每个gird cell中的每个pred_boxes的,判断是否存在可检测物体的概率。五个维度,shape:[-1,13,13,5,1]。各维度信息同上。

    box_class_pred : 每张图片的每个gird cell中的每个pred_boxes所框起来的各个类别分别的概率(经过了softmax)。shape:[-1,13,13,5,20]

    """
    num_anchors = len(anchors)
    # Reshape to batch, height, width, num_anchors, box_params.
    anchors_tensor = K.reshape(K.variable(anchors), [1, 1, 1, num_anchors, 2])

    conv_dims = K.shape(feats)[1:3]  '用多少个gird cell划分图片,这里是13x13'
    # In YOLO the height index is the inner most iteration.
    conv_height_index = K.arange(0, stop=conv_dims[0])
    conv_width_index = K.arange(0, stop=conv_dims[1])
    conv_height_index = K.tile(conv_height_index, [conv_dims[1]])

    conv_width_index = K.tile(
        K.expand_dims(conv_width_index, 0), [conv_dims[0], 1])
    conv_width_index = K.flatten(K.transpose(conv_width_index))
    conv_index = K.transpose(K.stack([conv_height_index, conv_width_index]))
    conv_index = K.reshape(conv_index, [1, conv_dims[0], conv_dims[1], 1, 2])  'shape:[1,13,13,1,2]'
    conv_index = K.cast(conv_index, K.dtype(feats))

    '
    tile():平移,
    expand_dims():增加维度
    transpose():转置
    flatten():降成一维
    stack():堆积,增加一个维度
    conv_index:[0,0],[0,1],...,[0,12],[1,0],[1,1],...,[12,12](大概是这个样子)
    '

    feats = K.reshape(
        feats, [-1, conv_dims[0], conv_dims[1], num_anchors, num_classes + 5])
    conv_dims = K.cast(K.reshape(conv_dims, [1, 1, 1, 1, 2]), K.dtype(feats))

    box_xy = K.sigmoid(feats[..., :2])
    box_wh = K.exp(feats[..., 2:4])
    box_confidence = K.sigmoid(feats[..., 4:5])
    box_class_probs = K.softmax(feats[..., 5:])

    # Adjust preditions to each spatial grid point and anchor size.
    # Note: YOLO iterates over height index before width index.
    box_xy = (box_xy + conv_index) / conv_dims
    box_wh = box_wh * anchors_tensor / conv_dims

    return box_xy, box_wh, box_confidence, box_class_probs
3、yolo_loss()
YOLOv2的损失函数较YOLOv1也有比较大的改变,主要分为三大部分的损失,IOU损失,分类损失,坐标损失。IOU损失分为了no_objects_loss和objects_loss,两者相比对objects_loss的惩罚更大。下面简单介绍一下和YOLOv1的区别。
3.1、confidence_loss:
YOLOv2中,总共有845个anchor_boxes,与true_boxes匹配的用于预测pred_boxes,未与true_boxes匹配的anchor_boxes用于预测background。
- objects_loss(true_boxes所匹配的anchor_boxes)
与true_boxes所匹配的anchor_boxes去和预测的pred_boxes计算objects_loss。 - no_objects_loss(true_boxes未匹配的anchor_boxes)
1、未与true_boxes所匹配的anchor_boxes中,若与true_boxes的IOU>0.6,则无需计算loss。
2、未与true_boxes所匹配的anchor_boxes中,若与true_boxes的IOU<0.6,则计算no_objects_loss。
这里疑惑点比较多,也比较绕,不太好理解,自己当时也理解错了。后来自己理解:confidence是为了衡量anchor_boxes是否有物体的置信度,对于负责预测前景(pred_boxes)的anchors_boxes来说,我们必须计算objects_loss;对于负责预测背景(background)的anchors_boxes来说,若与true_boxes的IOU<0.6,我们需要计算no_objects_loss。这两条都好理解,因为都是各干各的活。但若与true_boxes的IOU>0.6时,则不需要计算no_objects_loss。这是为什么呢?因为它给了我们惊喜,我们不忍苛责它。一个负责预测背景的anchor_boxes居然和true_boxes的IOU>0.6,框的甚至比那些本来就负责预测前景的anchors要准,吃的是草,挤的是奶,怎么能再惩罚它呢?好了言归正传,我个人觉得是因为被true_boxes的中心点可能在附近的gird cell里,但是true_boxes又比较大,导致它和附近gird cell里的anchors_boxes的IOU很大,那么这部分造成的损失可以不进行计算,毕竟它确实框的也准。就像faster rcnn中0.3
与YOLOv1不同的是修正系数的改变,YOLOv1中no_objects_loss和objects_loss分别是0.5和1,而YOLOv2中则是1和5。
3.2、classification_loss:
这部分和YOLOv1基本一致,就是经过softmax()后,20维向量(数据集中分类种类为20种)的均方误差。
3.3、coordinates_loss:
这里较YOLOv1的改动较大,计算x,y的误差由相对于整个图像(416x416)的offset坐标误差的均方改变为相对于gird cell的offset(这个offset是取sigmoid函数得到的处于(0,1)的值)坐标误差的均方。也将修正系数由5改为了1 。计算w,h的误差由w,h平方根的差的均方误差变为了,w,h与对true_boxes匹配的anchor_boxes的长宽的比值取log函数,和YOLOv1的想法一样,对于相等的误差值,降低对大物体误差的惩罚,加大对小物体误差的惩罚。同时也将修正系数由5改为了1。
def yolo_loss(args,
              anchors,
              num_classes,
              rescore_confidence=False,
              print_loss=False):
    """
    参数
    ----------
    yolo_output : 神经网络最后一层的输出,shape:[batch_size,13,13,125]

    true_boxes : 实际框的位置和类别,我们的输入。三个维度:
    第一个维度:图片张数
    第二个维度:一张图片中有几个实际框
    第三个维度: [x, y, w, h, class],x,y 是实际框的中心点坐标,w,h 是框的宽度和高度。x,y,w,h 均是除以图片分辨率得到的[0,1]范围的值。


    detectors_mask : 取值是0或者1,这里的shape是[ batch_size,13,13,5,1],其值可参考函数preprocess_true_boxes()的输出,五个维度:
    第一个维度:图片张数
    第二个维度:true_boxes的中心位于第几行(y方向上属于第几个gird cell)
    第三个维度:true_boxes的中心位于第几列(x方向上属于第几个gird cell)
    第四个维度:哪个anchor box
    第五个维度:0/1。1的就是用于预测改true boxes 的 anchor boxes

    matching_true_boxes :这里的shape是[-1,13,13,5,5],其值可参考函数preprocess_true_boxes()的输出,五个维度:
    第一个维度:图片张数
    第二个维度:true_boxes的中心位于第几行(y方向上属于第几个gird cel)
    第三个维度:true_boxes的中心位于第几列(x方向上属于第几个gird cel)
    第四个维度:第几个anchor box
    第五个维度:[x,y,w,h,class]。这里的x,y表示offset,是相当于gird cell的坐标,w,h是取了log函数的,class是属于第几类。

    anchors : 实际anchor boxes 的值,论文中使用了五个。[w,h],都是相对于gird cell 长宽的比值。二个维度:
    第一个维度:anchor boxes的数量,这里是5
    第二个维度:[w,h],w,h,都是相对于gird cell 长宽的比值。
    [1.08, 1.19], [3.42, 4.41], [6.63, 11.38], [9.42, 5.11], [16.62, 10.52]

    num_classes :类别个数(有多少类)

    rescore_confidence : bool值,False和True计算confidence_loss的objects_loss不同,后面代码可以看到。

    print_loss : bool值,是否打印损失,包括总损失,IOU损失,分类损失,坐标损失

   返回值
    -------
    total_loss : float,总损失
    """
    (yolo_output, true_boxes, detectors_mask, matching_true_boxes) = args
    num_anchors = len(anchors)
    object_scale = 5  '物体位于gird cell时计算置信度的修正系数'
    no_object_scale = 1  '物体位于gird cell时计算置信度的修正系数'
    class_scale = 1   '计算分类损失的修正系数'
    coordinates_scale = 1  '计算坐标损失的修正系数'

    pred_xy, pred_wh, pred_confidence, pred_class_prob = yolo_head(
        yolo_output, anchors, num_classes)

    yolo_output_shape = K.shape(yolo_output)
    feats = K.reshape(yolo_output, [
        -1, yolo_output_shape[1], yolo_output_shape[2], num_anchors,
        num_classes + 5])           'shape:[-1,13,13,5,25]'

    pred_boxes = K.concatenate(
        (K.sigmoid(feats[..., 0:2]), feats[..., 2:4]), axis=-1)
    '合并得到pred_boxes的x,y,w,h,用于和matching_true_boxes计算坐标损失,shape:[-1,13,13,5,4]'


    # Expand pred x,y,w,h to allow comparison with ground truth.
    # batch, conv_height, conv_width, num_anchors, num_true_boxes, box_params
    pred_xy = K.expand_dims(pred_xy, 4)  '增加一个维度由[-1,13,13,5,2]变成[-1,13,13,5,1,2]'
    pred_wh = K.expand_dims(pred_wh, 4)  '增加一个维度由[-1,13,13,5,2]变成[-1,13,13,5,1,2]'

    pred_wh_half = pred_wh / 2.
    pred_mins = pred_xy - pred_wh_half
    pred_maxes = pred_xy + pred_wh_half
    '计算pred_boxes左上顶点和右下顶点的坐标'

    true_boxes_shape = K.shape(true_boxes)

    true_boxes = K.reshape(true_boxes, [true_boxes_shape[0], 1, 1, 1, true_boxes_shape[1], true_boxes_shape[2]])
    'shape:[-1,1,1,1,-1,5],batch, conv_height, conv_width, num_anchors, num_true_boxes, box_params'

    true_xy = true_boxes[..., 0:2]
    true_wh = true_boxes[..., 2:4]

    true_wh_half = true_wh / 2.
    true_mins = true_xy - true_wh_half
    true_maxes = true_xy + true_wh_half
    '计算true_boxes左上顶点和右下顶点的坐标'


    intersect_mins = K.maximum(pred_mins, true_mins)
    intersect_maxes = K.minimum(pred_maxes, true_maxes)
    intersect_wh = K.maximum(intersect_maxes - intersect_mins, 0.)
    intersect_areas = intersect_wh[..., 0] * intersect_wh[..., 1]

    pred_areas = pred_wh[..., 0] * pred_wh[..., 1]
    true_areas = true_wh[..., 0] * true_wh[..., 1]

    union_areas = pred_areas + true_areas - intersect_areas
    iou_scores = intersect_areas / union_areas
    '计算出所有anchor boxes(这里是一张图片845个)和true_boxes的IOU,shape:[-1,13,13,5,2,1]'


    best_ious = K.max(iou_scores, axis=4)  '这里很有意思,若两个true_boxes落在同一个gird cell里,我只取iou最大的那一个,
    因为best_iou这个值只关心在这个gird cell中最大的那个iou,不关心来自于哪个true_boxes。'

    best_ious = K.expand_dims(best_ious)  'shape:[1,-1,13,13,5,1]'

    object_detections = K.cast(best_ious > 0.6, K.dtype(best_ious))
     '选出IOU大于0.6的,不关注其损失。cast()函数,第一个参数是bool值,dtype是int,就会转换成0,1'

    no_object_weights = (no_object_scale * (1 - object_detections) *
                         (1 - detectors_mask))
    no_objects_loss = no_object_weights * K.square(-pred_confidence)

    if rescore_confidence:
        objects_loss = (object_scale * detectors_mask *
                        K.square(best_ious - pred_confidence))
    else:
        objects_loss = (object_scale * detectors_mask *
                        K.square(1 - pred_confidence))
    confidence_loss = objects_loss + no_objects_loss
    '计算confidence_loss,no_objects_loss是计算background的误差, objects_loss是计算与true_box匹配的anchor_boxes的误差,相比较no_objects_loss更关注这部分误差,其修正系数为5'


    matching_classes = K.cast(matching_true_boxes[..., 4], 'int32')
    matching_classes = K.one_hot(matching_classes, num_classes)
    classification_loss = (class_scale * detectors_mask *
                           K.square(matching_classes - pred_class_prob))
    '计算classification_loss,20维向量的差'

    matching_boxes = matching_true_boxes[..., 0:4]
    coordinates_loss = (coordinates_scale * detectors_mask *
                        K.square(matching_boxes - pred_boxes))
    '计算coordinates_loss, x,y都是offset的均方损失,w,h是取了对数的均方损失,与YOLOv1中的平方根的差的均方类似,效果比其略好一点'

    confidence_loss_sum = K.sum(confidence_loss)
    classification_loss_sum = K.sum(classification_loss)
    coordinates_loss_sum = K.sum(coordinates_loss)
    total_loss = 0.5 * (
        confidence_loss_sum + classification_loss_sum + coordinates_loss_sum)
    if print_loss:
        total_loss = tf.Print(
            total_loss, [
                total_loss, confidence_loss_sum, classification_loss_sum,
                coordinates_loss_sum
            ],
            message='yolo_loss, conf_loss, class_loss, box_coord_loss:')

    return total_loss
4、 yolo_boxes_to_corners()
这个函数很简单,就是将yolo_head()函数输出的的x,y作为输入,求出该boxes的左上顶点和右下顶点,作为yolo_filter_boxes()的输入,可用于画出bounding box。
def yolo_boxes_to_corners(box_xy, box_wh):

    box_mins = box_xy - (box_wh / 2.)
    box_maxes = box_xy + (box_wh / 2.)

    return K.concatenate([
        box_mins[..., 1:2],  # y_min
        box_mins[..., 0:1],  # x_min
        box_maxes[..., 1:2],  # y_max
        box_maxes[..., 0:1]  # x_max
    ])
5、yolo_filter_boxes()
从845个 pred_boxes中选出置信度大于0.6的作为最终的predict bounding boxes,实际训练时取了0.3,返回它的左上顶点和右下顶点坐标,置信度,分类类别。
def yolo_filter_boxes(boxes, box_confidence, box_class_probs, threshold=.6):

    box_scores = box_confidence * box_class_probs '定义一个box_scores,就是该 bounding boxes的置信度。shape:[-1,13,13,5,20]'
    box_classes = K.argmax(box_scores, axis=-1)  '求出最大box_scores的索引,即属于第几类'
    box_class_scores = K.max(box_scores, axis=-1) '求出最大box_scores的值,作为bounding boxes的置信度'
    prediction_mask = box_class_scores >= threshold '选出box_scores大于设定阈值的anchor_boxes,bool值,配合tf.boolean_mask()函数获取True所在位置的值'

    boxes = tf.boolean_mask(boxes, prediction_mask)  ' 符合要求的bounding boxes'
    scores = tf.boolean_mask(box_class_scores, prediction_mask)  '其对应的置信度'
    classes = tf.boolean_mask(box_classes, prediction_mask)   '其对应的分类结果'

    return boxes, scores, classes
6、yolo_eval()
其中嵌套使用了yolo_boxes_to_corners()函数和yolo_filter_boxes()函数,然后对使用了置信度筛选后的bounding boxes使用了非极大值抑制输出 boxes, scores, classes,分别是bounding boxes的左上顶点和右下顶点的坐标,bounding boxes的置信度,bounding boxes的的分类类别。
def yolo_eval(yolo_outputs,
              image_shape,
              max_boxes=10,
              score_threshold=.6,
              iou_threshold=.5):
    box_xy, box_wh, box_confidence, box_class_probs = yolo_outputs  'yolo_outputs是yolo_head的输出'
    boxes = yolo_boxes_to_corners(box_xy, box_wh)
    boxes, scores, classes = yolo_filter_boxes(
        boxes, box_confidence, box_class_probs, threshold=score_threshold)

    'image_shape,(416x416)'
    height = image_shape[0]
    width = image_shape[1]
    image_dims = K.stack([height, width, height, width])
    image_dims = K.reshape(image_dims, [1, 4])
    boxes = boxes * image_dims  '乘以图片分辨率,得到真实的x,y,w,h'

    '运行一下NMS,非极大值抑制,iou_threshold默认是0.5,在训练时实际取了0.9,但是这里没有分类别使用,我猜测这也是提高阈值的原因吧'
    max_boxes_tensor = K.variable(max_boxes, dtype='int32')
    K.get_session().run(tf.variables_initializer([max_boxes_tensor]))
    nms_index = tf.image.non_max_suppression(
        boxes, scores, max_boxes_tensor, iou_threshold=iou_threshold)
    boxes = K.gather(boxes, nms_index)  'gather()函数,获取索引对应的值'
    scores = K.gather(scores, nms_index)
    classes = K.gather(classes, nms_index)
    return boxes, scores, classes
五、YOLO的优缺点
不得不感叹作者的创新能力,给我们带来了这么好的YOLO。YOLO算法的优点不言而喻,you only look once,不吃计算资源,在精度保证的情况下,运行速度快。缺点也很明显就是bounding boxes的位置不够准确,对于小物体和密集物体检测效果差,召回率较低,但这也是YOLOv2主要改进的地方。
六、个人问题
同时这里提出一个YOLO的问题,在YAD2K中,如果一张图片中有两个true boxes,然后位于同一个gird cell,最优匹配了同一个anchor boxes,似乎只能预测那个IOU最好的一个true boxes,不知道YOLOv2的源代码是否有这样的问题,也希望有大佬指点一下我。。。
七、总结
写出这篇文章也是自己的总结,看论文啃代码的确实很难熬,但是也让自己更加深刻的理解了YOLO的来龙去脉,领略了作者的思想,收获了更多。接下来我也要去领略一下YOLOv3的魅力了,如果有时间,我也会将YOLOv3的学习过程分享出来。加油!