动态贴纸简介
动态贴纸是基于人脸识别SDK的一种应用。动态贴纸最常用的是二维图像,也有使用3D 图像的动态贴纸,而随着AR和三维点云技术的发展,目前的AR贴纸也流行了起来。比如抖音、快手等短视频应用,或者美颜相机、FaceU激萌等相机类应用。只要涉及图像音视频的APP基本上都会涉及。可见,动态贴纸是一种常用的功能。那么接下来我们来介绍,如何在Android APP中实现动态贴纸功能,这里仅介绍使用二维图像构建的动态贴纸,基于3D图像和AR技术构建的这两种动态贴纸,这里不做介绍。
动态贴纸分类
由于动态贴纸是基于人脸识别SDK构建的功能,那么动态贴纸又会涉及到人脸的各个器官。对此,我们需要对动态贴纸进行分类,分类如下:
头顶、耳朵、眼睛、脸颊、鼻子、下巴、脖子、前景等:
头顶 —— 一般是指头顶中心,头顶中心有可能会放一些帽子之类的贴纸
耳朵 —— 耳朵也放在额头上方,就跟动漫中娘化动物的耳朵一样
眼睛 —— 一般用于眨眼等总眼角等地方喷出花朵、贴合眼泪等功能的实现
脸颊 —— 一般会用来处理贴纸的腮红等功能
鼻子 —— 通常会贴合胡须等
脖子 —— 用来处理围脖之类的装饰
前景 —— 一般会用来模拟相框,就跟2005年前后的中学流行拍大头贴那样
总之,这些是二维图像构建的动态贴纸的常用的器官。我们知道作用之后,接下来我们需要对各个器官部分进行实现。
由于贴纸有很多种,这里我们只介绍最简单的贴纸实现,还有带彩妆、瘦脸等的贴纸这里不介绍。为了方便做成动态下载,我们需要知道贴纸的参数。下面来介绍一下如何实现整个贴纸的功能吧
动态贴纸的实现
动态贴纸参数Json构建
贴纸要做成动态下载的,我们首先需要知道贴纸的类型、名称、宽高、偏移量、相对于人脸的缩放比例、人脸的宽度、贴纸相对于人脸中心点、贴纸帧数、贴纸一帧渲染的时长、是否带音乐、是否循环、贴纸支持的最大人脸数等基本参数。
我们来构建这么一个Json,用来记录动态贴纸,各个参数的意义可以参考下面的注释:
{
    "stickerList": [{
        "type": "sticker",      // 贴纸类型,sticker表示普通贴纸
        "centerIndexList": [43],// 贴纸中心点列表
        "offsetX": 0,           // 贴纸x轴偏移量
        "offsetY": 0.03984,     // 贴纸y轴偏移量
        "baseScale": 1.7602,    // 贴纸缩放倍数(相对于人脸)
        "startIndex": 6,        // 人脸起始位置
        "endIndex": 26,         // 人脸结束位置,起始位置和结束位置用于求人脸宽度的
        "width": 345,           // 贴纸宽度
        "height": 251,          // 贴纸高度
        "frames": 12,           // 贴纸帧数
        "action": 0,            // 贴纸动作
        "stickerName": "face",  // 贴纸名称
        "duration": 50,         // 贴纸一帧的时间间隔
        "stickerLooping": 1,    // 是否循环播放
        "audioPath": "",        // 音乐路径
        "audioLooping": 1,      // 音乐是否循环播放
        "maxcount": 5           // 贴纸最大支持人脸数
    }, {
        "type": "frame",        // 贴纸类型,frame表示前景
        "alignMode":1,          // 对齐方式
        "width": 360,           // 贴纸宽度
        "height": 549,          // 贴纸高度
        "frames": 56,           // 贴纸帧数
        "action": 0,            // 贴纸动作
        "stickerName": "frame",    // 贴纸名称
        "duration": 50,         // 贴纸一帧的时间间隔
        "stickerLooping": 1,    // 贴纸是否循环播放
        "audioPath": "",        // 音乐路径
        "audioLooping": 1,      // 音乐是否循环播放
        "maxcount": 5           // 贴纸支持最大人脸数
    }]
}
有了json,我们接下来就解析json,代码如下:
/**
     * 读取默认动态贴纸数据
     * @param folderPath      json文件所在文件夹路径
     * @return
     * @throws IOException
     * @throws JSONException
     */
    public static DynamicSticker decodeStickerData(String folderPath)
            throws IOException, JSONException {
        File file = new File(folderPath, "json");
        String stickerJson = FileUtils.convertToString(new FileInputStream(file));

        JSONObject jsonObject = new JSONObject(stickerJson);
        DynamicSticker dynamicSticker = new DynamicSticker();
        dynamicSticker.unzipPath = folderPath;
        if (dynamicSticker.dataList == null) {
            dynamicSticker.dataList = new ArrayList<>();
        }

        JSONArray stickerList = jsonObject.getJSONArray("stickerList");
        for (int i = 0; i < stickerList.length(); i++) {
            JSONObject jsonData = stickerList.getJSONObject(i);
            String type = jsonData.getString("type");
            DynamicStickerData data;
            if ("sticker".equals(type)) {
                data = new DynamicStickerNormalData();
                JSONArray centerIndexList = jsonData.getJSONArray("centerIndexList");
                ((DynamicStickerNormalData) data).centerIndexList = new int[centerIndexList.length()];
                for (int j = 0; j < centerIndexList.length(); j++) {
                    ((DynamicStickerNormalData) data).centerIndexList[j] = centerIndexList.getInt(j);
                }
                ((DynamicStickerNormalData) data).offsetX = (float) jsonData.getDouble("offsetX");
                ((DynamicStickerNormalData) data).offsetY = (float) jsonData.getDouble("offsetY");
                ((DynamicStickerNormalData) data).baseScale = (float) jsonData.getDouble("baseScale");
                ((DynamicStickerNormalData) data).startIndex = jsonData.getInt("startIndex");
                ((DynamicStickerNormalData) data).endIndex = jsonData.getInt("endIndex");
            } else {
                // 如果不是贴纸又不是前景的话,则直接跳过
                if (!"frame".equals(type)) {
                    continue;
                }
                data = new DynamicStickerFrameData();
                ((DynamicStickerFrameData) data).alignMode = jsonData.getInt("alignMode");
            }
            DynamicStickerData stickerData = data;
            stickerData.width = jsonData.getInt("width");
            stickerData.height = jsonData.getInt("height");
            stickerData.frames = jsonData.getInt("frames");
            stickerData.action = jsonData.getInt("action");
            stickerData.stickerName = jsonData.getString("stickerName");
            stickerData.duration = jsonData.getInt("duration");
            stickerData.stickerLooping = (jsonData.getInt("stickerLooping") == 1);
            stickerData.audioPath = jsonData.optString("audioPath");
            stickerData.audioLooping = (jsonData.optInt("audioLooping", 0) == 1);
            stickerData.maxCount = jsonData.optInt("maxCount", 5);

            dynamicSticker.dataList.add(stickerData);
        }
渲染动态贴纸
前面一步,我们构建了动态贴纸的json,解析得到了动态贴纸的参数对象,接下来我们就可以构建动态贴纸的渲染过程了。贴纸的渲染过程无非就是逐个人脸、逐个贴纸渲染而已,并没有什么难度。为了支持伪3D效果,模拟远小近大的贴纸效果。我们需要从人脸关键点SDK中引入姿态角来计算贴纸,结合前面的贴纸参数对象,我们需要构建一个视椎体并计算出每一帧贴纸的顶点坐标,计算过程过程如下:
1、构建视椎体:
@Override
    public void onInputSizeChanged(int width, int height) {
        super.onInputSizeChanged(width, height);
        mRatio = (float) width / height;
        Matrix.frustumM(mProjectionMatrix, 0, -mRatio, mRatio, -1.0f, 1.0f, 3.0f, 9.0f);
        Matrix.setLookAtM(mViewMatrix, 0, 0, 0, 6.0f, 0.0f, 0.0f, 0.0f, 0.0f, 1.0f, 0.0f);
    }
这里构建的视椎体加入的长宽比,主要是为了方便后续的计算,并且视点(0.0, 0.0, 6.0) 到中心点(0.0, 0.0, 0.0)的距离为视点到近平面(0.0,0.0,3.0f)的两倍,两倍主要是为了方便后续的计算,你也可以设置成其他倍数,甚至正中心不在z轴上,只不过这样会导致计算变得非常复杂。
2、计算贴纸顶点和总变换矩阵
经过前面的视椎体构建,我们得到了贴纸在三维空间中的假想位置,接下来我们需要在这基础上构建贴纸的顶点以及根据人脸关键点SDK给过来的姿态角做矩阵变换。顶点坐标的计算需要结合前面的贴纸参数对象进行计算。整个计算过程如下:
 /**
     * 更新贴纸顶点
     * TODO 待优化的点:消除姿态角误差、姿态角给贴纸偏移量造成的误差
     * @param stickerData
     */
    private void calculateStickerVertices(DynamicStickerNormalData stickerData, OneFace oneFace) {
        if (oneFace == null || oneFace.vertexPoints == null) {
            return;
        }
        // 步骤一、计算贴纸的中心点和顶点坐标
        // 备注:由于frustumM设置的bottom 和top 为 -1.0 和 1.0,这里为了方便计算,直接用高度作为基准值来计算
        // 1.1、计算贴纸相对于人脸的宽高
        float stickerWidth = (float) FacePointsUtils.getDistance(
                (oneFace.vertexPoints[stickerData.startIndex * 2] * 0.5f + 0.5f) * mImageWidth,
                (oneFace.vertexPoints[stickerData.startIndex * 2 + 1] * 0.5f + 0.5f) * mImageHeight,
                (oneFace.vertexPoints[stickerData.endIndex * 2] * 0.5f + 0.5f) * mImageWidth,
                (oneFace.vertexPoints[stickerData.endIndex * 2 + 1] * 0.5f + 0.5f) * mImageHeight) * stickerData.baseScale;
        float stickerHeight = stickerWidth * (float) stickerData.height / (float) stickerData.width;

        // 1.2、根据贴纸的参数计算出中心点的坐标
        float centerX = 0.0f;
        float centerY = 0.0f;
        for (int i = 0; i < stickerData.centerIndexList.length; i++) {
            centerX += (oneFace.vertexPoints[stickerData.centerIndexList[i] * 2] * 0.5f + 0.5f) * mImageWidth;
            centerY += (oneFace.vertexPoints[stickerData.centerIndexList[i] * 2 + 1] * 0.5f + 0.5f) * mImageHeight;
        }
        centerX /= (float) stickerData.centerIndexList.length;
        centerY /= (float) stickerData.centerIndexList.length;
        centerX = centerX / mImageHeight * ProjectionScale;
        centerY = centerY / mImageHeight * ProjectionScale;
        // 1.3、求出真正的中心点顶点坐标,这里由于frustumM设置了长宽比,因此ndc坐标计算时需要变成mRatio:1,这里需要转换一下
        float ndcCenterX = (centerX - mRatio) * ProjectionScale;
        float ndcCenterY = (centerY - 1.0f) * ProjectionScale;

        // 1.4、贴纸的宽高在ndc坐标系中的长度
        float ndcStickerWidth = stickerWidth / mImageHeight * ProjectionScale;
        float ndcStickerHeight = ndcStickerWidth * (float) stickerData.height / (float) stickerData.width;

        // 1.5、根据贴纸参数求偏移的ndc坐标
        float offsetX = (stickerWidth * stickerData.offsetX) / mImageHeight * ProjectionScale;
        float offsetY = (stickerHeight * stickerData.offsetY) / mImageHeight * ProjectionScale;

        // 1.6、贴纸带偏移量的锚点的ndc坐标,即实际贴纸的中心点在OpenGL的顶点坐标系中的位置
        float anchorX = ndcCenterX + offsetX * ProjectionScale;
        float anchorY = ndcCenterY + offsetY * ProjectionScale;

        // 1.7、根据前面的锚点,计算出贴纸实际的顶点坐标
        mStickerVertices[0] = anchorX - ndcStickerWidth; mStickerVertices[1] = anchorY - ndcStickerHeight;
        mStickerVertices[2] = anchorX + ndcStickerWidth; mStickerVertices[3] = anchorY - ndcStickerHeight;
        mStickerVertices[4] = anchorX - ndcStickerWidth; mStickerVertices[5] = anchorY + ndcStickerHeight;
        mStickerVertices[6] = anchorX + ndcStickerWidth; mStickerVertices[7] = anchorY + ndcStickerHeight;
        mVertexBuffer.clear();
        mVertexBuffer.position(0);
        mVertexBuffer.put(mStickerVertices);

        // 步骤二、根据人脸姿态角计算透视变换的总变换矩阵
        // 2.1、将Z轴平移到贴纸中心点,因为贴纸模型矩阵需要做姿态角变换
        // 平移主要是防止贴纸变形
        Matrix.setIdentityM(mModelMatrix, 0);
        Matrix.translateM(mModelMatrix, 0, ndcCenterX, ndcCenterY, 0);

        // 2.2、贴纸姿态角旋转
        // TODO 人脸关键点给回来的pitch角度似乎不太对??SDK给过来的pitch角度值太小了,比如抬头低头pitch的实际角度30度了,SDK返回的结果才十几度,后续再看看如何优化
        float pitchAngle = -(float) (oneFace.pitch * 180f / Math.PI);
        float yawAngle = (float) (oneFace.yaw * 180f / Math.PI);
        float rollAngle = (float) (oneFace.roll * 180f / Math.PI);
        // 限定左右扭头幅度不超过50°,销毁人脸关键点SDK带来的偏差
        if (Math.abs(yawAngle) > 50) {
            yawAngle = (yawAngle / Math.abs(yawAngle)) * 50;
        }
        // 限定抬头低头最大角度,消除人脸关键点SDK带来的偏差
        if (Math.abs(pitchAngle) > 30) {
            pitchAngle = (pitchAngle / Math.abs(pitchAngle)) * 30;
        }
        // 贴纸姿态角变换,优先z轴变换,消除手机旋转的角度影响,否则会导致扭头、抬头、低头时贴纸变形的情况
        Matrix.rotateM(mModelMatrix, 0, rollAngle, 0, 0, 1);
        Matrix.rotateM(mModelMatrix, 0, yawAngle, 0, 1, 0);
        Matrix.rotateM(mModelMatrix, 0, pitchAngle, 1, 0, 0);

        // 2.4、将Z轴平移回到原来构建的视椎体的位置,即需要将坐标z轴平移回到屏幕中心,此时才是贴纸的实际模型矩阵
        Matrix.translateM(mModelMatrix, 0, -ndcCenterX, -ndcCenterY, 0);

        // 2.5、计算总变换矩阵。MVPMatrix 的矩阵计算是 MVPMatrix = ProjectionMatrix * ViewMatrix * ModelMatrix
        // 备注:矩阵相乘的顺序不同得到的结果是不一样的,不同的顺序会导致前面计算过程不一致,这点希望大家要注意
        Matrix.setIdentityM(mMVPMatrix, 0);
        Matrix.multiplyMM(mMVPMatrix, 0, mProjectionMatrix, 0, mViewMatrix, 0);
        Matrix.multiplyMM(mMVPMatrix, 0, mMVPMatrix, 0, mModelMatrix, 0);
    }
整个shader就很简单,如下:
vertex shader 如下:
uniform mat4 uMVPMatrix;        // 变换矩阵
attribute vec4 aPosition;       // 图像顶点坐标
attribute vec4 aTextureCoord;   // 图像纹理坐标

varying vec2 textureCoordinate; // 图像纹理坐标

void main() {
    gl_Position = uMVPMatrix * aPosition;
    textureCoordinate = aTextureCoord.xy;
}
fragment shader 如下:
precision mediump float;
varying vec2 textureCoordinate;
uniform sampler2D inputTexture;

void main() {
    gl_FragColor = texture2D(inputTexture, textureCoordinate);
}
经过前面计算得到的mMVPMatrix,就是需要传递到shader中总变换矩阵。然后inputTexture就是我们需要绘制的贴纸纹理。至此,贴纸的顶点和变换矩阵我们都算出来了,接下来就是逐个渲染了。这个没啥好说的,就是一张一张纹理渲染上去就好。详细过程请看项目中的代码进行理解。
实现的效果如下:
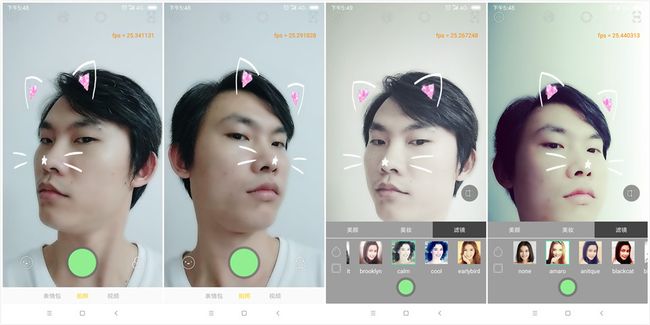
备注:该动态贴纸是通过asset目录下的压缩包资源解压后,再从解压目录动态加载得到的。你只需要提供贴纸、json的压缩包资源即可。这样我们就可以通过服务器下载贴纸的压缩包,解压后,通过选中即可切换动态贴纸。
动态贴纸音乐播放功能
经过前面一步,我们实现了动态贴纸的渲染,接下来我们实现动态贴纸的音乐播放功能。有些动态贴纸会伴随着音乐的播放。这个也没啥好说的,比较简单,就是用MediaPlayer播放出来就好。
详细实现可以参考本人的开源项目:
CainCamera