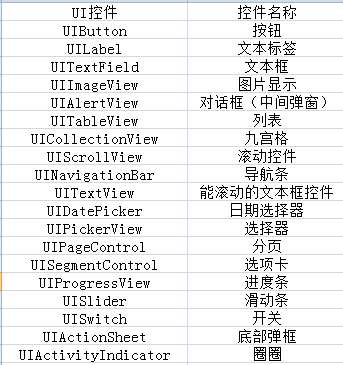
UIView
//创建window和当前屏幕一样大的
self.window = [[UIWindow alloc]initWithFrame:[UIScreen mainScreen].bounds];
//设置window颜色
self.window.backgroundColor = [UIColor whiteColor];
//设置window可见
[self.window makeKeyAndVisible];
//xcode7 崩溃解决
self.window.rootViewController = [[UIViewController alloc] init];
//内存管理
[_window release];
//1.创建视图
UIView *aview = [[UIView alloc]init];
//设置frame
aview.frame = CGRectMake(0, 0, 100, 100);
//设置属性
aview.backgroundColor = [UIColor whiteColor];
//添加到父视图(window)上显示
[self.window addSubview:aview];
//内存管理
[aview release];
//2.中心显示
//数值设置(绝对坐标)
aview.center = CGPointMake(375/2, 667/2);
//通过其他控件的位置设置(相对坐标)
aview.center = self.window.center;
//view属性
//显示/隐藏
aview.hidden = NO;
//透明度 alpha(0-1的浮点数)
aview.alpha = 1;
//动画
[UIView animateWithDuration:1 animations:^{
aview.alpha = 0;
aview.frame = CGRectMake(0, 0, 200, 200);
}];
//标记值 tag
aview.tag = 1000;
//通过标记寻找视图
UIView *tempView = [self.window viewWithTag:1000];
tempView.backgroundColor = [UIColor yellowColor];
//一个视图中只有一个父视图 可以有若干个子视图
//视图从父视图上移除
[aview removeFromSuperview];
//添加父视图
//frame 设置时以父视图左上角为坐标原点
[aview addSubview:tempView];
//子视图自身的hidden和alpha只影响自己
//父视图的hidden和alpha会影响 自身和所有子视图
//层次关系操作 使用父视图操作
//把子视图拿到前端
[self.window bringSubviewToFront:aview];
//把子视图送到最后
[tempView sendSubviewToBack:aview];
//定时器NSTimer
//每隔一段时间让某某做某事
//参数1:时间间隔
//参数2:moumou
//参数3:某事
[NSTimer scheduledTimerWithTimeInterval:6 target:self selector:@selector(haha) userInfo:nil repeats:YES];
UIButton
//1.创建(便利构造器)
UIButton *btn = [UIButton buttonWithType:UIButtonTypeSystem];
//2.设置frame
btn.frame = CGRectMake(100, 100, 100, 100);
//3.设置属性
btn.backgroundColor = [UIColor redColor];
[self.window addSubview:btn];
//4.绑定按钮点击事件(按钮被点击时能够触发一个方法)
//参数1: target 目标(调用方法的人)
//参数2: action 动作(调用的方法)
//参数3: events 事件(方法的触发条件)
// UIControlEventTouchUpInside 控制事件之 触摸顶端按下去
//:参数标志(之后一定会跟随一个参数)
[btn addTarget:self action:@selector(click:) forControlEvents:UIControlEventTouchUpInside];
//5.添加父视图
[self.window addSubview:btn];
//按钮文字
[btn setTitle:@"正常" forState:UIControlStateNormal];
//按钮长按就是高亮状态
[btn setTitle:@"高亮" forState:UIControlStateHighlighted];
//高亮时按钮显示触摸
btn.showsTouchWhenHighlighted = YES;
UILabel
//1.创建+frame
UILabel *label = [[UILabel alloc] initWithFrame:CGRectMake(100, 100, 200, 100)];
//2.属性设置
label.backgroundColor = [UIColor yellowColor];
//3.添加父视图
[self.window addSubview:label];
//4.内存管理
[label release];
//label文字相关的属性
//显示文字 text
//默认 左对齐/居中显示/文本黑色/行数为1/背景透明色
label.text = @"这是一个label";
//文本颜色
label.textColor = [UIColor redColor];
//文本对齐方式
label.textAlignment = NSTextAlignmentCenter;
//文本断行模式(文本省略方式)
label.lineBreakMode = NSLineBreakByTruncatingMiddle;
//文本行数 numberOfLines
//默认为1 为0时行数不限
label.numberOfLines = 0;
//字体 font
label.font = [UIFont fontWithName:@"" size:20];
//阴影 shadow
label.shadowColor = [UIColor grayColor];
//阴影偏移量
label.shadowOffset = CGSizeMake(2, 10);
UITextField
//创建UITextField
UITextField *textField = [[UITextField alloc]initWithFrame:CGRectMake(100, 100, 100, 100)];
//设置背景颜色
textField.backgroundColor = [UIColor grayColor];
//添加父视图
[self.window addSubview:textField];
//内存管理
[textField release];
//文本控制
//占位字符串 placehholder
textField.placeholder = @"请输入:";
//输入控制
//是否可用 enabled
textField.enabled = YES;
//安全文本输入 secureTextEntry(密码输入模式)
textField.secureTextEntry = YES;
//键盘样式 keyboardType
textField.keyboardType = UIKeyboardTypeDefault;
//return (回车按键)样式
textField.returnKeyType = UIReturnKeyGoogle;
//开始输入时清空
textField.text = @"输入内容";
textField.clearsOnBeginEditing = YES;
//外观控制
//输入框样式
textField.borderStyle = UITextBorderStyleNone;
//边框宽度
textField.layer.borderWidth = 1;
//边框颜色
textField.layer.borderColor = [UIColor cyanColor].CGColor;
//切圆角(圆形:正方形边长的一半)
textField.layer.cornerRadius = 20;
textField.layer.cornerRadius = textField.frame.size.width / 2;
//清除按钮
textField.clearButtonMode = UITextFieldViewModeAlways;
//UIVC
//添加图片
//相对路径 修改之后仍然可以正常显示
//绝对路径 如果文件位置修改 就找不到了
// imgView.image = [UIImage imageNamed:@"color.jpg"];
//收获路径(动态变化的绝对路径)
//参数1:文件名
//参数2:文件后缀
NSString *path = [[NSBundle mainBundle]pathForResource:@"color" ofType:@"jpg"];
imgView.image = [UIImage imageWithContentsOfFile:path];
//圆角
imgView.layer.cornerRadius = imgView.frame.size.width/2;
//根据边界把多余部分切掉
imgView.clipsToBounds = YES;
键盘回收
//1.签订系统协议
@interface AppDelegate ()
@end
UITextField *tf1 = [[UITextField alloc]initWithFrame:CGRectMake(100, 100, 200, 40)];
tf1.backgroundColor = [UIColor redColor];
[self.window addSubview:tf1];
[tf1 release];
//2.设置代理人
tf1.delegate = self;
tf1.tag = 1000;
//3.协议方法
//参数(textField):当前触发协议方法的输入框
-(BOOL)textFieldShouldReturn:(UITextField *)textField{
UITextField *tf1 = [self.windowviewWithTag:1000];
//失去第一响应者(点击return 键盘被隐藏)
// [tf1 resignFirstResponder];
}
