最近刚接触tensorflow,同样和广大网友一样采用MINIST数据来做手写识别,内容以注释的形式在代码里了
模型训练和保存
1.首先下载MINIST数据库(下载地址) ,四个文件下载后放到和你的python文件同一个目录下,不用解压,然后输入,其中e2.jpg在文末可下载
#coding=utf-8
# 载入MINIST数据需要的库
from tensorflow.examples.tutorials.mnist import input_data
# 保存模型需要的库
from tensorflow.python.framework.graph_util import convert_variables_to_constants
from tensorflow.python.framework import graph_util
# 导入其他库
import tensorflow as tf
import cv2
import numpy as np
#获取MINIST数据
mnist = input_data.read_data_sets(".",one_hot = True)
# 创建会话
sess = tf.InteractiveSession()

#占位符
x = tf.placeholder("float", shape=[None, 784], name="Mul")
y_ = tf.placeholder("float",shape=[None, 10],  name="y_")
#变量
W = tf.Variable(tf.zeros([784,10]),name='x')
b = tf.Variable(tf.zeros([10]),'y_')

#权重
def weight_variable(shape):
  initial = tf.truncated_normal(shape, stddev=0.1)
  return tf.Variable(initial)
#偏差
def bias_variable(shape):
  initial = tf.constant(0.1, shape=shape)
  return tf.Variable(initial)
#卷积
def conv2d(x, W):
  return tf.nn.conv2d(x, W, strides=[1, 1, 1, 1], padding='SAME')
#最大池化
def max_pool_2x2(x):
  return tf.nn.max_pool(x, ksize=[1, 2, 2, 1],
                        strides=[1, 2, 2, 1], padding='SAME')
#相关变量的创建
W_conv1 = weight_variable([5, 5, 1, 32])
b_conv1 = bias_variable([32])
x_image = tf.reshape(x, [-1,28,28,1])
h_conv1 = tf.nn.relu(conv2d(x_image, W_conv1) + b_conv1)
h_pool1 = max_pool_2x2(h_conv1)
W_conv2 = weight_variable([5, 5, 32, 64])
b_conv2 = bias_variable([64])
#激活函数
h_conv2 = tf.nn.relu(conv2d(h_pool1, W_conv2) + b_conv2)
h_pool2 = max_pool_2x2(h_conv2)
W_fc1 = weight_variable([7 * 7 * 64, 1024])
b_fc1 = bias_variable([1024])
W_fc2 = weight_variable([1024, 10])
b_fc2 = bias_variable([10])

h_pool2_flat = tf.reshape(h_pool2, [-1, 7*7*64])
h_fc1 = tf.nn.relu(tf.matmul(h_pool2_flat, W_fc1) + b_fc1)
keep_prob = tf.placeholder("float",name='rob')
h_fc1_drop = tf.nn.dropout(h_fc1, keep_prob)

#用于训练用的softmax函数
y_conv=tf.nn.softmax(tf.matmul(h_fc1_drop, W_fc2) + b_fc2,name='res')
#用于训练作完后,作测试用的softmax函数
y_conv2=tf.nn.softmax(tf.matmul(h_fc1, W_fc2) + b_fc2,name="final_result")

#交叉熵的计算,返回包含了损失值的Tensor。

cross_entropy = -tf.reduce_sum(y_*tf.log(y_conv))
#优化器,负责最小化交叉熵
train_step = tf.train.AdamOptimizer(1e-4).minimize(cross_entropy)

correct_prediction = tf.equal(tf.argmax(y_conv,1), tf.argmax(y_,1))
#计算准确率
accuracy = tf.reduce_mean(tf.cast(correct_prediction, "float"))
#初始化所以变量
sess.run(tf.global_variables_initializer())

 # 保存输入输出,可以为之后用
tf.add_to_collection('res', y_conv)
tf.add_to_collection('output', y_conv2)
tf.add_to_collection('x', x)

#训练开始
for i in range(20000):
  batch = mnist.train.next_batch(50)
  if i%100 == 0:
    train_accuracy = accuracy.eval(feed_dict={
        x:batch[0], y_: batch[1], keep_prob: 1.0})
    print "step %d, training accuracy %g"%(i, train_accuracy)
#run()可以看做输入相关值给到函数中的占位符,然后计算的出结果,这里将batch[0],给xbatch[1]给y_
  train_step.run(feed_dict={x: batch[0], y_: batch[1], keep_prob: 0.5})

#将当前图设置为默认图
graph_def = tf.get_default_graph().as_graph_def()
#将上面的变量转化成常量,保存模型为pb模型时需要,注意这里的final_result和前面的y_con2是同名,只有这样才会保存它,否则会报错,
# 如果需要保存其他tensor只需要让tensor的名字和这里保持一直即可
output_graph_def = tf.graph_util.convert_variables_to_constants(sess,
                graph_def, ['final_result'])
#保存前面训练后的模型为pb文件
with tf.gfile.GFile("grf.pb", 'wb') as f:
        f.write(output_graph_def.SerializeToString())

#用saver 保存模型
saver = tf.train.Saver()
saver.save(sess, "model_data/model")

#导入图片,同时灰度化
im = cv2.imread('pic/e2.jpg',cv2.IMREAD_GRAYSCALE)
#反转图像,因为e2.jpg为白底黑字
im =reversePic(im)
cv2.namedWindow("camera", cv2.WINDOW_NORMAL);
cv2.imshow('camera',im)
cv2.waitKey(0)

#调整大小
im = cv2.resize(im,(28,28),interpolation=cv2.INTER_CUBIC)
x_img = np.reshape(im , [-1 , 784])


#输出图像矩阵
# print x_img

#用上面导入的图片对模型进行测试
output = sess.run(y_conv2 , feed_dict={x:x_img })
# print 'the y_con :   ', '\n',output
print 'the predict is : ', np.argmax(output)
print "test accracy %g"%accuracy.eval(feed_dict={
    x: mnist.test.images, y_: mnist.test.labels, keep_prob: 1.0})
输出:
没有CUDA加速,训练的会比较慢,但都可以训练,只是速度区别
1)其中用Saver保存模型的代码:
saver = tf.train.Saver()
saver.save(sess, "model_data/model")
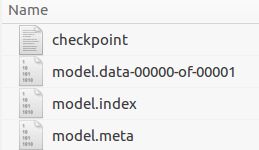
最终会产生model_data文件夹,其中包含了:
2)保存模型为pb格式的代码:
#将当前图设置为默认图
graph_def = tf.get_default_graph().as_graph_def()
#将上面的变量转化成常量,保存模型为pb模型时需要,注意这里的final_result和前面的y_con2是同名,只有这样才会保存它,否则会报错,
# 如果需要保存其他tensor只需要让tensor的名字和这里保持一直即可
output_graph_def = tf.graph_util.convert_variables_to_constants(sess,
                graph_def, ['final_result'])
#保存前面训练后的模型为pb文件
with tf.gfile.GFile("grf.pb", 'wb') as f:
        f.write(output_graph_def.SerializeToString())
最终在当前目录生成grf.pb文件
模型的恢复:
1.用Saver保存的模型的恢复:
# -*- coding:utf-8 -*-
import cv2
import tensorflow as tf
import numpy as np
from sys import path
#用于将自定义输入图片反转
def reversePic(src):
        # 图像反转
    for i in range(src.shape[0]):
        for j in range(src.shape[1]):
            src[i,j] = 255 - src[i,j]
    return src

def main():
    sess = tf.InteractiveSession()
#模型恢复
    saver=tf.train.import_meta_graph('model_data/model.meta')

    saver.restore(sess, 'model_data/model')
    graph = tf.get_default_graph()

    # 获取输入tensor,,获取输出tensor
    input_x = sess.graph.get_tensor_by_name("Mul:0")
    y_conv2 = sess.graph.get_tensor_by_name("final_result:0")

    # 也可以上面注释,通过下面获取输出输入tensor,
    # y_conv2 = tf.get_collection('output')[0]
    # # x= tf.get_collection('x')[0]
    # input_x = graph.get_operation_by_name('Mul').outputs[0]
    # keep_prob = graph.get_operation_by_name('rob').outputs[0]

    path="pic/e2.jpg"
    im = cv2.imread(path,cv2.IMREAD_GRAYSCALE)
    #反转图像,因为e2.jpg为白底黑字
    im =reversePic(im)
    cv2.namedWindow("camera", cv2.WINDOW_NORMAL);
    cv2.imshow('camera',im)
    cv2.waitKey(0)
    # im=cv2.threshold(im, , 255, cv2.THRESH_BINARY_INV)[1];

    im = cv2.resize(im,(28,28),interpolation=cv2.INTER_CUBIC)

    # im=cv2.threshold(im,200,255,cv2.THRESH_TRUNC)[1]
    # im=cv2.threshold(im,60,255,cv2.THRESH_TOZERO)[1]

    #数据从0~255转为-0.5~0.5
    # img_gray = (im - (255 / 2.0)) / 255
    x_img = np.reshape(im , [-1 , 784])
    output = sess.run(y_conv2 , feed_dict={input_x:x_img})
    print 'the predict is %d' % (np.argmax(output))
    #关闭会话
    sess.close()

if __name__ == '__main__':
    main()
2.pb模型的恢复:
#coding=utf-8
from __future__ import absolute_import, unicode_literals
from tensorflow.examples.tutorials.mnist import input_data
from tensorflow.python.framework.graph_util import convert_variables_to_constants
from tensorflow.python.framework import graph_util
import cv2
import numpy as np
mnist = input_data.read_data_sets(".",one_hot = True)
import tensorflow as tf

#用于将自定义输入图片反转
def reversePic(src):
        # 图像反转
    for i in range(src.shape[0]):
        for j in range(src.shape[1]):
            src[i,j] = 255 - src[i,j]
    return src

with tf.Session() as persisted_sess:
  print("load graph")
  with tf.gfile.FastGFile("grf.pb",'rb') as f:
    graph_def = tf.GraphDef()
    graph_def.ParseFromString(f.read())
    persisted_sess.graph.as_default()
    tf.import_graph_def(graph_def, name='')
  # print("map variables")
  with tf.Session() as sess:

        # tf.initialize_all_variables().run()
        input_x = sess.graph.get_tensor_by_name("Mul:0")
        y_conv_2 = sess.graph.get_tensor_by_name("final_result:0")


        path="pic/e2.jpg"
        im = cv2.imread(path,cv2.IMREAD_GRAYSCALE)
        #反转图像,因为e2.jpg为白底黑字
        im =reversePic(im)
        cv2.namedWindow("camera", cv2.WINDOW_NORMAL);
        cv2.imshow('camera',im)
        cv2.waitKey(0)
        # im=cv2.threshold(im, , 255, cv2.THRESH_BINARY_INV)[1];

        im = cv2.resize(im,(28,28),interpolation=cv2.INTER_CUBIC)
        # im =reversePic(im)
        # im=cv2.threshold(im,200,255,cv2.THRESH_TRUNC)[1]
        # im=cv2.threshold(im,60,255,cv2.THRESH_TOZERO)[1]

        # img_gray = (im - (255 / 2.0)) / 255
        x_img = np.reshape(im , [-1 , 784])
        output = sess.run(y_conv_2 , feed_dict={input_x:x_img})
        print 'the predict is %d' % (np.argmax(output))
        #关闭会话
        sess.close()
其中e2.jpg:
两个模型恢复的输出结果都是:
注意:
用MINIST训练出来的模型。主要用来识别手写数字的,而且对输入的图片要求是近似黑底白字的,所以如果图片预处理不合适会导致识别率不高。
如果直接用官方的图片输 入,则识别完全没问题
附官方图片和e2.jpg的下载地址


