https://docs.oracle.com/en/database/oracle/oracle-database/index.html 官方手册
centos 1810 3.10.0-957.el7.x86_64 图形化安装 关闭firewalld selinux
硬件要求
RAM 1GB 扣除分配给HugePages的内存
swap RAM*2 最高16GB
自动内存管理 df -h /dev/shm/
软件要求
软件依赖
binutils-2.23.52.0.1-12.el7.x86_64
compat-libcap1-1.10-3.el7.x86_64
compat-libstdc++-33-3.2.3-71.el7.i686
compat-libstdc++-33-3.2.3-71.el7.x86_64
gcc-4.8.2-3.el7.x86_64
gcc-c++-4.8.2-3.el7.x86_64
glibc-2.17-36.el7.i686
glibc-2.17-36.el7.x86_64
glibc-devel-2.17-36.el7.i686
glibc-devel-2.17-36.el7.x86_64
ksh
libaio-0.3.109-9.el7.i686
libaio-0.3.109-9.el7.x86_64
libaio-devel-0.3.109-9.el7.i686
libaio-devel-0.3.109-9.el7.x86_64
libgcc-4.8.2-3.el7.i686
libgcc-4.8.2-3.el7.x86_64
libstdc++-4.8.2-3.el7.i686
libstdc++-4.8.2-3.el7.x86_64
libstdc++-devel-4.8.2-3.el7.i686
libstdc++-devel-4.8.2-3.el7.x86_64
libXi-1.7.2-1.el7.i686
libXi-1.7.2-1.el7.x86_64
libXtst-1.2.2-1.el7.i686
libXtst-1.2.2-1.el7.x86_64
make-3.82-19.el7.x86_64
sysstat-10.1.5-1.el7.x86_64
unixODBC-2.3.1-6.el7.x86_64 or later
unixODBC-2.3.1-6.el7.i686 or later
unixODBC-devel-2.3.1-6.el7.x86_64 or later
unixODBC-devel-2.3.1-6.el7.i686 or later
yum install binutils compat-libcap1 compat-libstdc++-33 gcc gcc-c++ ksh libaio libaio-devel libXi libXtst sysstat
yum install unixODBC unixODBC-devel
创建组和用户
/usr/sbin/groupadd oinstall
/usr/sbin/groupadd dba
/usr/sbin/useradd -g oinstall -G dba oracle
passwd oracle
调整内核参数 /etc/sysctl.conf
fs.aio-max-nr = 1048576
fs.file-max = 6815744
kernel.shmall = 2097152
kernel.shmmax = 536870912
kernel.shmmni = 4096
kernel.sem = 250 32000 100 128
net.ipv4.ip_local_port_range = 9000 65500
net.core.rmem_default = 262144
net.core.rmem_max = 4194304
net.core.wmem_default = 262144
net.core.wmem_max = 1048576
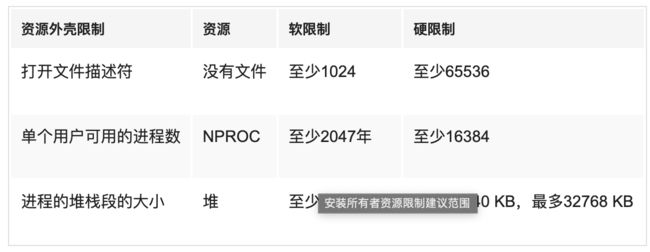
检查资源限制 切换到安装用户
检查命令
ulimit -Sn 打开文件描述符软限制
ulimit -Hn
ulimit -Su 进程数软限制
ulimit -Hu
ulimit -Ss 堆栈设置
ulimit -Hs
修改参数用户资源限制参数 注意用户名 /etc/security/limits.conf
oracle soft nproc 2047
oracle hard nproc 16384
oracle soft nofile 1024
oracle hard nofile 65536
oracle soft stack 10240
oracle hard stack 32768
创建数据目录配置权限
mkdir -p /mount_point/app/
chown -R oracle:oinstall /mount_point/app/
chmod -R 775 /mount_point/app/
chown oracle:oinstall /oracle/
安装图形化

yum -y install xorg*

yum groups install "GNOME Desktop"

    VNC    (windows远程linux图形)

        1、yum install tigervnc-server -y    安装vnc

        2、vncpasswd                        设置密码

        3、vncserver                        启动软件
配置oracle用户环境变量 vim /home/oracle/.bash_profile
ORACLE_BASE=/mount_point/app/ 之前创建的Oracle基本目录
ORACLE_SID=sales 数据库名称
export ORACLE_BASE ORACLE_SID
执行安装
./runInstaller -jreLoc /usr/lib/jvm/jre-openjdk
只安装数据库软件
重新打开一个终端,输入 dbca 命令即可弹出相应的数据库创建向导
/oracle/app/product/11.2.0/dbhome_1/bin/dbca
/oracle/app/product/11.2.0/dbhome_1/bin/netca
ORACLE_HOME=/oracle/app/product/11.2.0/dbhome_1/ 添加到环境变量中
sqlplus / AS SYSDBA
http://127.0.0.1:1158/em
安装日志
tail -f /tmp/OraInstall2019-05-16_09-34-10AM/installActions2019-05-16_09-34-10AM.log
报错
SEVERE: [FATAL] [INS-32033] Central Inventory location is not writable.
CAUSE: Central Inventory location was not writable.
ACTION: Ensure that the inventory location is writable.
可能是第二遍安装的问题,换一个有权限的新路径 或删除指定的目录
静默安装11g
检查操作系统 检查硬件
安装依赖
yum -y install binutils compat-libcap1 compat-libstdc++-33 compat-libstdc++-33i686 compat-libstdc++-33.devel compat-libstdc++-33 compat-libstdc++-33.devel gcc gcc-c++ glibc glibc.i686 glibc-devel glibc-devel.i686 ksh libaio libaio.i686 libaio-devel libaio-devel.devel libgcc libgcc.i686 libstdc++ libstdc++.i686 libstdc++-devel libstdc++-devel.devel libXi libXi.i686 libXtst libXtst.i686 make sysstat unixODBC unixODBC.i686 unixODBC-devel unixODBC-devel.i686
检查依赖 (31)
rpm -q binutils compat-libcap1 compat-libstdc++-33 gcc gcc-c++ glibc glibc-devel ksh libaio libaio-devel libgcc libstdc++ libstdc++-devel libXi libXtst make sysstat unixODBC unixODBC-devel | wc
创建用户组
groupadd oinstall
groupadd dba
useradd -g oinstall -G dba oracle
passwd oracle
配置内核参数. /etc/sysctl.conf 根据实际情况修改
fs.aio-max-nr = 1048576
fs.file-max = 6815744
kernel.shmall = 2097152
kernel.shmmax = 536870912
kernel.shmmni = 4096
kernel.sem = 250 32000 100 128
net.ipv4.ip_local_port_range = 9000 65500
net.core.rmem_default = 262144
net.core.rmem_max = 4194304
net.core.wmem_default = 262144
net.core.wmem_max = 1048576
修改用户限制 vim /etc/security/limits.conf
oracle soft nproc 2047
oracle hard nproc 16384
oracle soft nofile 1024
oracle hard nofile 65536
oracle soft stack 10240
oracle hard stack 32768
vim /etc/pam.d/login
session required /lib64/security/pam_limits.so
session required pam_limits.so
vim /etc/profile
oracle user configuration
if [ $USER = "oracle" ]; then
if [ $SHELL = "/bin/ksh" ]; then
   ulimit -p 16384

   ulimit -n 65536

else

   ulimit -u 16384 -n 65536
fi
fi
创建安装目录
mkdir -p /u01/app/
chmod -R 775 /u01/
chown -R oracle:oinstall /u01/
配置环境变量
vim .bash_profile
export ORACLE_BASE=/u01/app/oracle

export ORACLE_SID=dbsrv2
source .bash_profile
解压安装包 unzip
mkdir etc
cp /home/oracle/database/response/* /home/oracle/etc/
vim etc/db_install.rsp
./runInstaller -silent -responseFile /home/oracle/etc/db_install.rsp
vim .bash_profile
#for oracle

export ORACLE_BASE=/u01/app/oracle

export ORACLE_SID=dbsrv2

export ROACLE_PID=ora11g

#export NLS_LANG=AMERICAN_AMERICA.AL32UTF8

export LD_LIBRARY_PATH=$ORACLE_HOME/lib:/usr/lib

export ORACLE_HOME=/u01/app/oracle/product/11.2.0/db_1

export PATH=$PATH:$ORACLE_HOME/bin

export LANG="zh_CN.UTF-8"

export NLS_LANG="SIMPLIFIED CHINESE_CHINA.AL32UTF8"

export NLS_DATE_FORMAT='yyyy-mm-dd hh24:mi:ss'
/u01/app/oracle/product/11.2.0/db_1/bin/netca -silent -responsefile /home/oracle/etc/netca.rsp
vim etc/dbca.rsp
/u01/app/oracle/product/11.2.0/db_1/bin/dbca -silent -responsefile etc/dbca.rsp
vim /u01/app/oracle/cfgtoollogs/dbca/dbsrv2/dbsrv2.log
参考资料
http://www.cnblogs.com/zydev/p/5827207.html


