下面的代码都可以在demo里找到。
为了能够简单地测试远程推送,一般我们都会用一些方便发送通知的工具,Knuff 就是其中之一。
新建一个工程,在工程里打开Capabilities里的Push Notifications开关。(这个开关不打开无法获取device token)

- (void)registerNotification{
    if (NSClassFromString(@"UNUserNotificationCenter")) {
        //请求使用本地和远程通知的权限
        [[UNUserNotificationCenter currentNotificationCenter] requestAuthorizationWithOptions:UNAuthorizationOptionBadge | UNAuthorizationOptionAlert | UNAuthorizationOptionSound completionHandler:^(BOOL granted, NSError * _Nullable error) {
            if (granted) {
                dispatch_async(dispatch_get_main_queue(), ^{
                    [[UIApplication sharedApplication] registerForRemoteNotifications];
                });
            }
        }];
    }
}

当App第一次调用
requestAuthorizationWithOptions这个方法时,会出现上面的弹框,无论用户选择允许或不允许,之后再调用这个方法,都不会再出现这个弹框了。如果用户选择了不允许,之后只能通过系统的设置为App打开通知功能。
UIApplication调用这个registerForRemoteNotifications方法后,AppDelegate会调用代理方发didRegisterForRemoteNotificationsWithDeviceToken,可以获取到deviceToken。获取得到的 deviceToken 是一个 Data 类型,为了方便使用和传递,我们一般会选择将它转换为一个字符串。
- (void)application:(UIApplication *)application didRegisterForRemoteNotificationsWithDeviceToken:(NSData *)deviceToken {
    NSString *token = [[deviceToken description] stringByTrimmingCharactersInSet: [NSCharacterSet characterSetWithCharactersInString:@"<>"]];
    token = [token stringByReplacingOccurrencesOfString:@" " withString:@""];
    NSLog(@"content---%@", token);
}
你可以对用户设置的推送权限进行检查:
[[UNUserNotificationCenter currentNotificationCenter] getNotificationSettingsWithCompletionHandler:^(UNNotificationSettings * _Nonnull settings) {

 }];
发送一个本地通知:
// 1. 创建通知内容
    UNMutableNotificationContent *content = [UNMutableNotificationContent new];
    content.title = @"Time Interval Notification";
    content.body = @"My first notification";
    content.sound = [UNNotificationSound defaultSound];

    // 2. 创建发送触发
    UNTimeIntervalNotificationTrigger *trigger = [UNTimeIntervalNotificationTrigger triggerWithTimeInterval:5 repeats:false];

    // 3. 发送请求标识符
    NSString *requestIdentifier = @"com.test.usernotification.myFirstNotification";

    // 4. 创建一个发送请求
    UNNotificationRequest *request = [UNNotificationRequest requestWithIdentifier:requestIdentifier content:content trigger:trigger];

    //将请求添加到发送中心
    [[UNUserNotificationCenter currentNotificationCenter] addNotificationRequest:request withCompletionHandler:^(NSError * _Nullable error) {
        if (!error) {
            NSLog(@"Time Interval Notification scheduled: %@", requestIdentifier);
        }
    }];
上面的这种触发器是只对本地通知而言的,远程推送的通知的话默认会在收到后立即显示。现在 UserNotifications 框架中提供了三种触发器,分别是:
-
UNTimeIntervalNotificationTrigger:在一定时间后触发 ; -
UNCalendarNotificationTrigger:在某月某日某时触发 ; -
UNLocationNotificationTrigger:在用户进入或是离开某个区域时触发 。
iOS10中通知不仅支持简单的一行文字,你可以添加title和subtitle。
对于远程推送,iOS10之前一般只含有消息的推送payload是这样的:
{
   "aps":{
     "alert":"Test",
     "sound":"default",
     "badge":1
   }
 }
如果我们想要加入title和subtitle的话,则需要将alert从字符串转换为字典,新的payload是:
 {
   "aps":{
     "alert":{
       "title":"I am title",
       "subtitle":"I am subtitle",
       "body":"I am body"
     },
     "sound":"default",
     "badge":1
   }
 }
好消息是,后一种字典的方法其实在iOS8.2的时候就已经存在了,虽然当时title只能用在Apple Watch上,但是设置好body的话在iOS上也是可以显示的,所以针对iOS10添加标题时是可以保证向前兼容的。
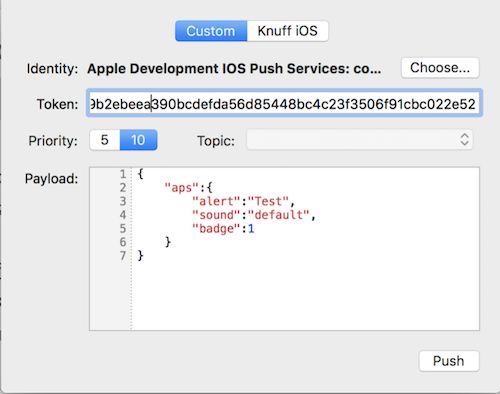
使用knuff测试一下远程推送(远程推送必须在真机上测试):


应用内展示通知
上面的例子当应用在前台时不会显示通知的,如果我们希望应用在前台时也能显示通知,需要额外的工作。
UNUserNotificationCenterDelegate提供了两个代理方法:
- (void)userNotificationCenter:(UNUserNotificationCenter *)center willPresentNotification:(UNNotification *)notification withCompletionHandler:(void (^)(UNNotificationPresentationOptions options))completionHandler {
        completionHandler(UNNotificationPresentationOptionSound | UNNotificationPresentationOptionAlert);
  //如果不想在前台展示通知,可以直接传递UNNotificationPresentationOptionNone
 //completionHandler(UNNotificationPresentationOptionNone);

   }
当App在前台收到通知时,无论是本地还是远程通知,都会调用这个方法。如果你实现了这个方法,就要在这个方法里使用completionHandler这个block。这个block要传递一个UNNotificationPresentationOptions参数,它决定了App在前台展示通知的展示形式。如果你不想App在前台展示通知,可以传递UNNotificationPresentationOptionNone。
Actionable 通知发送和处理
注册一个Category
iOS8和9引入了可交互的通知,通过将一簇action放到category中,然后将这个category注册到UNUserNotificationCenter,最后在发送通知时将你的通知的category设置成你注册的category即可。
    UNNotificationCategory * (^saySomethingCategory)(void) = ^(){
        UNTextInputNotificationAction * inputAction = [UNTextInputNotificationAction actionWithIdentifier:@"input" title:@"Input" options:UNNotificationActionOptionForeground textInputButtonTitle:@"发送" textInputPlaceholder:@"说点什么"];
        UNNotificationAction * goodByeAction = [UNNotificationAction actionWithIdentifier:@"goodbye" title:@"Good bye" options:UNNotificationActionOptionForeground];
        UNNotificationAction * cancelAction = [UNNotificationAction actionWithIdentifier:@"none" title:@"Cancel" options:UNNotificationActionOptionDestructive];


       return [UNNotificationCategory categoryWithIdentifier:@"saySomething" actions:@[inputAction, goodByeAction, cancelAction] intentIdentifiers:@[] options:UNNotificationCategoryOptionCustomDismissAction];
    };

    UNNotificationCategory * (^customUICategory)(void) = ^(){
        UNNotificationAction *nextAction = [UNNotificationAction actionWithIdentifier:@"switch" title:@"Switch" options:UNNotificationActionOptionNone];

        UNNotificationAction *openAction = [UNNotificationAction actionWithIdentifier:@"open" title:@"Open" options:UNNotificationActionOptionForeground];

        UNNotificationAction *dismissAction = [UNNotificationAction actionWithIdentifier:@"dismiss" title:@"Dismiss" options:UNNotificationActionOptionDestructive];
        return [UNNotificationCategory categoryWithIdentifier:@"customUI" actions:@[nextAction, openAction, dismissAction] intentIdentifiers:@[] options:UNNotificationCategoryOptionNone];
    };

    [[UNUserNotificationCenter  currentNotificationCenter] setNotificationCategories:[NSSet setWithObjects:saySomethingCategory(), customUICategory(), nil]];
上面的代码是将一些action放入到了category中,并将category注册到了UNUserNotificationCenter。
注册完category后,发送一个actionable通知就很简单了,只需要在使用UNNotificationContent
时把它的属性categoryIdentifier设置为我们在上面的代码中注册category使用的Id即可。
    UNMutableNotificationContent *content = [UNMutableNotificationContent new];
    content.body = @"说些什么吧";
    content.categoryIdentifier = @"saySomething";
    UNTimeIntervalNotificationTrigger *trigger = [UNTimeIntervalNotificationTrigger triggerWithTimeInterval:5 repeats:false];
    NSString *requestIdentifier = @"actionable";
    UNNotificationRequest *request = [UNNotificationRequest requestWithIdentifier:requestIdentifier content:content trigger:trigger];
    [[UNUserNotificationCenter currentNotificationCenter] addNotificationRequest:request withCompletionHandler:^(NSError * _Nullable error) {
        if (!error) {

        }
    }];

远程推送使用category
远程推送也可以使用category,只需要在payload中添加category字段,并且把它设置为注册过的category即可:
{
  "aps":{
    "alert":"Please say something",
    "category":"saySomething"
  }
}
处理 actionable 通知
处理上面的action后,App会调用UNUserNotificationCenterDelegate的另一个代理方法。我们可以根据request中包含的categoryIdentifier和response中包含的actionIdentifier就可以判定是哪个通知的哪个action被用户操作了。对于UNTextInputNotificationAction出发的response
,把UNNotificationResponse强转成UNTextInputNotificationResponse就可以拿到用户输入的文本了。
- (void)userNotificationCenter:(UNUserNotificationCenter *)center didReceiveNotificationResponse:(UNNotificationResponse *)response withCompletionHandler:(void(^)(void))completionHandler {
    NSString *categoryId = response.notification.request.content.categoryIdentifier;
    if ([categoryId isEqualToString:@"saySomething"]) {
        [self handleSaySomthing:response];
    }

}

#pragma mark -- Private

- (void)handleSaySomthing:(UNNotificationResponse *)response{
    NSString *actionId = response.actionIdentifier;
    NSString *text;
    if ([actionId isEqualToString:@"input"]) {
        text = ((UNTextInputNotificationResponse *)response).userText;
    }
    else if ([actionId isEqualToString:@"goodbye"]) {
        text = @"拜拜";
    }
    else if ([actionId isEqualToString:@"none"]) {
        text = @"";
    }
    else {
        text = @"";
    }
    if (text.length > 0) {
        UIAlertView *a = [[UIAlertView alloc] initWithTitle:@"UserText" message:text delegate:nil cancelButtonTitle:@"确定" otherButtonTitles: nil];
        [a show];
    }

}
在通知中展示图片/视频
在iOS10中,开发者可以在通知中嵌入图片或者是视频。为本地通知添加多媒体内容十分简单,只需要通过本地磁盘上的文件URL创建一个UNNotificationAttachment对象,然后将这个对象放到数组中赋值给content的attachments属性就行了。
    UNMutableNotificationContent *content = [UNMutableNotificationContent new];
    content.title = @"带图片的通知";
    content.body = @"显示了一张图片";
    NSURL * imageURL = [[NSBundle mainBundle] URLForResource:@"timor" withExtension:@"png"];
    NSError *error;
    UNNotificationAttachment * attachment = [UNNotificationAttachment attachmentWithIdentifier:@"imageAttachment" URL:imageURL options:nil error:&error];
    if (!error) {
        content.attachments = @[attachment];
    }
    UNTimeIntervalNotificationTrigger *trigger = [UNTimeIntervalNotificationTrigger triggerWithTimeInterval:5 repeats:false];

    NSString *requestIdentifier = @"media";

    UNNotificationRequest *request = [UNNotificationRequest requestWithIdentifier:requestIdentifier content:content trigger:trigger];

    [[UNUserNotificationCenter currentNotificationCenter] addNotificationRequest:request withCompletionHandler:^(NSError * _Nullable error) {

    }];


除了图片以外,通知还支持音频以及视频,你可以将MP3或者MP4这样的文件提供给系统来在通知中进行展示和播放。不过,这些文件都有尺寸限制,比如图片不能超过10MB,视频不能超过50MB。在创建UNNotificationAttachment时,如果遇到了不支持的格式,SDK会抛出错误。
远程推送也可以带图片和视频,我们会在下面的Notification Extension应用到。
Notification Extension
iOS10中添加了很多extension,作为应用与系统整合的入口。与通知的extension有两个:Service Extension和Content Extension。Service Extension可以让我们在收到远程推送后,修改通知的内容并展示;Content Extension可以让我们自定义通知视图的样式。
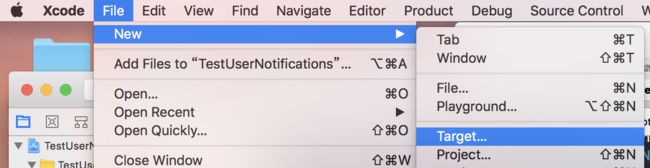

创建Service Extension后,在工程里会多了一个NotificationService文件夹。
NotificationService里已经为我们进行了基本的实现。
- (void)didReceiveNotificationRequest:(UNNotificationRequest *)request withContentHandler:(void (^)(UNNotificationContent * _Nonnull))contentHandler {
    self.contentHandler = contentHandler;
    NSLog(@"aaaa");
    self.bestAttemptContent = [request.content mutableCopy];

    // Modify the notification content here...
    self.bestAttemptContent.body = [NSString stringWithFormat:@"%@ [已经修改了]", self.bestAttemptContent.body];

    self.contentHandler(self.bestAttemptContent);
}

- (void)serviceExtensionTimeWillExpire {
    // Called just before the extension will be terminated by the system.
    // Use this as an opportunity to deliver your "best attempt" at modified content, otherwise the original push payload will be used.
    self.contentHandler(self.bestAttemptContent);
}
上面的第一个方法在通知准备改变的时候会调用,使用这个方法的contentHandler来传递你需要改变的内容。你可以在这个方法里下载图片或视频添加到通知的内容里,也可以改变alert text。这里有一个30s的时间限制让你来修改通知的内容和执行contentHandler,如果超过了这个时间,系统会调用上面的第二个方法serviceExtensionTimeWillExpire给你最后的机会来执行contentHandler。
Service Extension只对远程推送有效,你可以在推送 payload 中增加一个 mutable-content 值为 1 的项来启用内容修改*:
{
  "aps":{
    "alert":{
      "title":"Service Extension",
      "body":"修改Service Extension"
    },
    "mutable-content":1
  }
}
这个 payload 的推送得到的结果,注意 body 被修改了。

使用本机截取推送内容并修改内容的方式,可以用于提高传输内容的安全性。在服务器推送的payload中使用加密过的文本,在客户端接收到通知后使用预先定义或者获取过的密钥进行解密,然后再显示。
在远程通知中展示图片/视频
一般做法是,在推送的payload中指定需要加载的图片资源地址,这个地址可以使应用bundle内已经存在的资源,也可以是网络的资源。不过因为UNNotificationAttachment只能使用本地的资源,所以如果是网络资源的话,需要先下载在本地。
{
  "aps":{
    "alert":{
      "title":"NotificationService",
      "body":"修改内容",
    },
    "mutable-content":1
  },
  "image": "https://pic2.zhimg.com/80/v2-79c46a8b0a3098e72a0d211975acd46e_hd.jpg"
}

自定义通知视图样式
iOS10中新加的另一个Content Extension可以用来自定义通知的详细页面的视图。

新建完之后,在xcode为我们准备的模板包中包含了一个实现了
UNNotificationContentExtension协议的控制器,这个协议中有一个必须实现的方法:
- (void)didReceiveNotification:(UNNotification *)notification {

}
当系统需要显示自定义的通知视图时,这个方法会被调用。自定义的UI可以通过这个extension中的MainInterface.storyboard来进行定义。自定义UI的通知是和通知的category绑定的,我们需要在extension的plist文件中指定这个通知的样式所对应的category。

我们在自定义UI时,虽然可以使用包括按钮在内的各种UI控件,但是系统不允许我们对这些控件进行交互,点击通知视图的UI本身会将我们导航到应用中,不过我们可以通过action的方式来对自定义的UI进行更新。
UNNotificationContentExtension提供了一个可选的代理方法:
- (void)didReceiveNotificationResponse:(UNNotificationResponse *)response completionHandler:(void (^)(UNNotificationContentExtensionResponseOption option))completion{

}
这个方法会在用户点击某个action时调用,你可以在这里更新通知的UI,如果有UI更新,那么在completion这个block中传递UNNotificationContentExtensionResponseOptionDoNotDismiss可以让这个通知继续显示,如果没有必要继续显示,可以传递UNNotificationContentExtensionResponseOptionDismissAndForwardAction,之后app会调用UNUserNotificationCenterDelegate中的didReceiveNotificationResponse:方法。
如果你自定义的UI中包含视频等,你还可以实现UNNotificationContentExtension里的media开头的一系列属性,他将为你提供一些视频播放的控件和相关方法。
取消和更新
在创建通知请求时,我们已经制定了标识符,这标识符可以用来管理通知。