目录
-CountDownLatch 是什么?
-CountDownLatch 用法
-源码分析
-应用范例
CountDownLatch 是什么?
直接看源码解释比较好:
* A synchronization aid that allows one or more threads to wait until
 * a set of operations being performed in other threads completes.
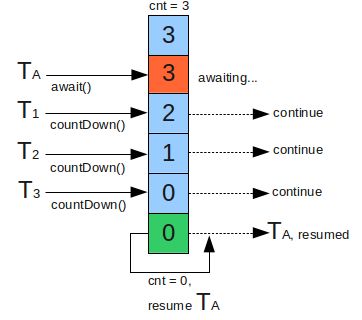
CountDownLatch 是一个同步工具类,它允许一个或多个线程一直等待,直到其他线程的操作执行完后再执行。
 * A {@code CountDownLatch} is initialized with a given count.
 * The {@link #await await} methods block until the current count reaches
 * zero due to invocations of the {@link #countDown} method, after which
 * all waiting threads are released and any subsequent invocations of
 * {@link #await await} return immediately.  This is a one-shot phenomenon
 * -- the count cannot be reset.  If you need a version that resets the
 * count, consider using a {@link CyclicBarrier}.
CountDownLatch 初始化通过给定一个 count,await 方法阻塞线程,直到 count 计数到 0 为止,通过调用 countdown 方法。当所有线程释放之后,await 方法立刻返回。这玩意只能用一次。
count 不能重置,想要重置,用 CyclicBarrier。这也是 CountDownLatch 和 CyclicBarrier 的主要区别
 * A {@code CountDownLatch} is a versatile synchronization tool
 * and can be used for a number of purposes.  A
 * {@code CountDownLatch} initialized with a count of one serves as a
 * simple on/off latch, or gate: all threads invoking {@link #await await}
 * wait at the gate until it is opened by a thread invoking {@link
 * #countDown}.  A {@code CountDownLatch} initialized to N
 * can be used to make one thread wait until N threads have
 * completed some action, or some action has been completed N times.
CountDownLatch 是一个通用同步工具,可以用在很多场景。CountDownLatch 的初始 count 好像一个闭锁或者门,所有线程等待(通过调用 await)这个门开启(通过调用 countdown)。CountDownLatch 让一个线程等待 N 个线程完成行为,或者一些行为被计数 N 次。
简而言之就是,CountDownLatch 是通过一个计数器来实现的,计数器的初始值为线程的数量。每当一个线程完成了自己的任务后,计数器的值就会减 1。当计数器值到达 0 时,它表示所有的线程已经完成了任务,然后在闭锁上等待的线程就可以恢复执行任务。
CountDownLatch 用法
源码中 Doug Lea 大神给的注释:
* Sample usage: Here is a pair of classes in which a group
* of worker threads use two countdown latches:
*
* - The first is a start signal that prevents any worker from proceeding
* until the driver is ready for them to proceed;
*
- The second is a completion signal that allows the driver to wait
* until all workers have completed.
*
* {@code
* class Driver { // ...
* void main() throws InterruptedException {
* CountDownLatch startSignal = new CountDownLatch(1);
* CountDownLatch doneSignal = new CountDownLatch(N);
*
* for (int i = 0; i < N; ++i) // create and start threads
* new Thread(new Worker(startSignal, doneSignal)).start();
*
* doSomethingElse(); // don't let run yet
* startSignal.countDown(); // let all threads proceed
* doSomethingElse();
* doneSignal.await(); // wait for all to finish
* }
* }
*
* class Worker implements Runnable {
* private final CountDownLatch startSignal;
* private final CountDownLatch doneSignal;
* Worker(CountDownLatch startSignal, CountDownLatch doneSignal) {
* this.startSignal = startSignal;
* this.doneSignal = doneSignal;
* }
* public void run() {
* try {
* startSignal.await();
* doWork();
* doneSignal.countDown();
* } catch (InterruptedException ex) {} // return;
* }
*
* void doWork() { ... }
* }}
*
* Another typical usage would be to divide a problem into N parts,
* describe each part with a Runnable that executes that portion and
* counts down on the latch, and queue all the Runnables to an
* Executor. When all sub-parts are complete, the coordinating thread
* will be able to pass through await. (When threads must repeatedly
* count down in this way, instead use a {@link CyclicBarrier}.)
*
*
{@code
* class Driver2 { // ...
* void main() throws InterruptedException {
* CountDownLatch doneSignal = new CountDownLatch(N);
* Executor e = ...
*
* for (int i = 0; i < N; ++i) // create and start threads
* e.execute(new WorkerRunnable(doneSignal, i));
*
* doneSignal.await(); // wait for all to finish
* }
* }
*
* class WorkerRunnable implements Runnable {
* private final CountDownLatch doneSignal;
* private final int i;
* WorkerRunnable(CountDownLatch doneSignal, int i) {
* this.doneSignal = doneSignal;
* this.i = i;
* }
* public void run() {
* try {
* doWork(i);
* doneSignal.countDown();
* } catch (InterruptedException ex) {} // return;
* }
*
* void doWork() { ... }
* }}
*
* Memory consistency effects: Until the count reaches
* zero, actions in a thread prior to calling
* {@code countDown()}
* happen-before
* actions following a successful return from a corresponding
* {@code await()} in another thread.
*
* @since 1.5
* @author Doug Lea
*/
代码其实很容易,我认为这几个例子没有本质的区别,只是使用场景不同。
第一个是让 start 先执行,让 worker 等待 start 初始完了再去执行。
第二个是让 worker 先执行,start/driver 等待 worker 都执行完了在执行。
第三个是将任务分为 N 个 part,让所有的子任务都执行完成,才进行下面的操作。
源码分析
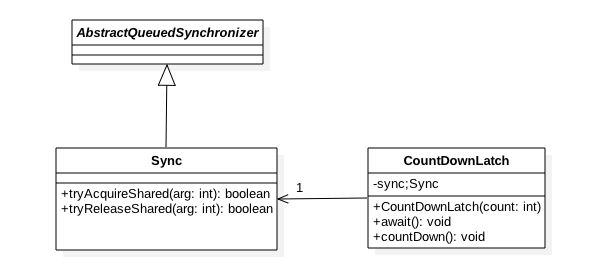
首先我们先看看 CountDownLatch 内部结构,类图如下:
从类图可以知道 CountDownLatch 内部还是使用 AQS 实现的,通过下面构造函数初始化计数器的值,可知实际上是把计数器的值赋值给了 AQS 的 state,也就是这里 AQS 的状态值来表示计数器值。
构造函数源码如下:
public CountDownLatch(int count) {
        if (count < 0) throw new IllegalArgumentException("count < 0");
        this.sync = new Sync(count);
    }

   Sync(int count) {
       setState(count);
   }
接下来主要看一下 CountDownLatch 中几个重要的方法内部是如何调用 AQS 来实现功能的。
1.void await() 方法,当前线程调用了 CountDownLatch 对象的 await 方法后,当前线程会被阻塞,直到下面的情况之一才会返回:(1)当所有线程都调用了 CountDownLatch 对象的 countDown 方法后,
也就是说计时器值为 0 的时候。(2)其他线程调用了当前线程的interrupt()方法中断了当前线程,当前线程会抛出 InterruptedException 异常后返回。接下来让我们看看 await()方法内部是如何调用
AQS的方法的,源码如下:
//CountDownLatch的await()方法
public void await() throws InterruptedException {
   sync.acquireSharedInterruptibly(1);
}
    //AQS的获取共享资源时候可被中断的方法
public final void acquireSharedInterruptibly(int arg)throws InterruptedException {
    //如果线程被中断则抛异常
    if (Thread.interrupted())
         throw new InterruptedException();
        //尝试看当前是否计数值为0,为0则直接返回,否者进入AQS的队列等待
    if (tryAcquireShared(arg) < 0)
         doAcquireSharedInterruptibly(arg);
}

 //sync类实现的AQS的接口
 protected int tryAcquireShared(int acquires) {
       return (getState() == 0) ? 1 : -1;
 }
从上面代码可以看到 await()方法委托 sync 调用了 AQS 的 acquireSharedInterruptibly 方法,该方法的特点是线程获取资源的时候可以被中断,并且获取到的资源是共享资源,这里为什么要调用 AQS 的这个方法,而不是调用独占锁的 accquireInterruptibly 方法呢?这是因为这里状态值需要的并不是非 0 即 1 的效果,而是和初始化时候指定的计数器值有关系,比如你初始化的时候计数器值为 8 ,那么 state 的值应该就有 0 到 8 的状态,而不是只有 0 和 1 的独占效果。
这里 await()方法调用 acquireSharedInterruptibly 的时候传递的是 1 ,就是说明要获取一个资源,而这里计数器值是资源总数,也就是意味着是让总的资源数减 1 ,acquireSharedInterruptibly 内部首先判断如果当前线程被中断了则抛出异常,否则调用 sync 实现的 tryAcquireShared 方法看当前状态值(计数器值)是否为 0 ,是则当前线程的 await()方法直接返回,否则调用 AQS 的 doAcquireSharedInterruptibly 让当前线程阻塞。另外调用 tryAcquireShared 的方法仅仅是检查当前状态值是不是为 0 ,并没有调用 CAS 让当前状态值减去 1 。
2.boolean await(long timeout, TimeUnit unit),当线程调用了 CountDownLatch 对象的该方法后,当前线程会被阻塞,直到下面的情况之一发生才会返回: (1)当所有线程都调用了 CountDownLatch 对象的 countDown 方法后,也就是计时器值为 0 的时候,这时候返回 true; (2) 设置的 timeout 时间到了,因为超时而返回 false; (3)其它线程调用了当前线程的 interrupt()方法中断了当前线程,当前线程会抛出 InterruptedException 异常后返回。源码如下:
public boolean await(long timeout, TimeUnit unit)
        throws InterruptedException {
        return sync.tryAcquireSharedNanos(1, unit.toNanos(timeout));
}
3.void countDown() 当前线程调用了该方法后,会递减计数器的值,递减后如果计数器为 0 则会唤醒所有调用 await 方法而被阻塞的线程,否则什么都不做,接下来看一下countDown()方法内部是如何调用 AQS 的方法的,源码如下:
//CountDownLatch的countDown()方法
    public void countDown() {
       //委托sync调用AQS的方法
        sync.releaseShared(1);
    }
   //AQS的方法
    public final boolean releaseShared(int arg) {
        //调用sync实现的tryReleaseShared
        if (tryReleaseShared(arg)) {
            //AQS的释放资源方法
            doReleaseShared();
            return true;
        }
        return false;
    }
如上面代码可以知道 CountDownLatch 的 countDown()方法是委托sync调用了 AQS 的 releaseShared 方法,后者调用了 sync 实现的 AQS 的 tryReleaseShared,源码如下:
//syn的方法
protected boolean tryReleaseShared(int releases) {
  //循环进行cas,直到当前线程成功完成cas使计数值(状态值state)减一并更新到state
  for (;;) {
      int c = getState();

      //如果当前状态值为0则直接返回(1)
      if (c == 0)
          return false;

      //CAS设置计数值减一(2)
      int nextc = c-1;
      if (compareAndSetState(c, nextc))
          return nextc == 0;
  }
}
如上代码可以看到首先获取当前状态值(计数器值),代码(1)如果当前状态值为 0 则直接返回 false ,则 countDown()方法直接返回;否则执行代码(2)使用 CAS 设置计数器减一,CAS 失败则循环重试,否则如果当前计数器为 0 则返回 true 。返回 true 后,说明当前线程是最后一个调用 countDown() 方法的线程,那么该线程除了让计数器减一外,还需要唤醒调用 CountDownLatch 的 await 方法而被阻塞的线程。这里的代码(1)貌似是多余的,其实不然,之所以添加代码 (1) 是为了防止计数器值为 0 后,其他线程又调用了 countDown 方法,如果没有代码(1),状态值就会变成负数。
4.long getCount() 获取当前计数器的值,也就是 AQS 的 state 的值,一般在 debug 测试时候使用,源码如下:
public long getCount() {
     return sync.getCount();
}

int getCount() {
     return getState();
}
如上代码可知内部还是调用了 AQS 的 getState 方法来获取 state 的值(计数器当前值)。
应用范例
在实际项目中一般都会有,主任务等待外部其他任务完成的这种场景,就可以使用 CountDownLatch 来实现:
这个是外部任务的父类,在这里 调用 countDown 方法,就不用再其他类中一一实现了。
package com.theodore.test.CountDownLatch;

import java.util.concurrent.CountDownLatch;

public abstract class ExternalChecker implements Runnable{

    private CountDownLatch _latch;
    private String _serviceName;
    private boolean _serviceUp;

    public ExternalChecker(CountDownLatch _latch, String _serviceName) {
        this._latch = _latch;
        this._serviceName = _serviceName;
        this._serviceUp = false;
    }

    @Override
    public void run(){
        try{
            verifyService();
            _serviceUp = true;
        }catch (Throwable t){
            t.printStackTrace(System.err);
            _serviceUp = false;
        }finally {
            if (_latch != null){
                _latch.countDown();
            }
        }
    }

    public String get_serviceName() {
        return _serviceName;
    }

    public boolean is_serviceUp(){
        return _serviceUp;
    }

    public abstract void verifyService();
}
外部任务,这里只放了一个例子,应为其他类的实现,只是名字不同罢了:
package com.theodore.test.CountDownLatch;

import java.util.concurrent.CountDownLatch;

public class CacheChecker extends ExternalChecker {

    public CacheChecker (CountDownLatch latch)  {
        super(latch,"Cache Service");
    }

    @Override
    public void verifyService()
    {
        System.out.println("Checking " + this.get_serviceName());
        try
        {
            Thread.sleep(6000);
        }
        catch (InterruptedException e)
        {
            e.printStackTrace();
        }
        System.out.println(this.get_serviceName() + " is UP");
    }
}
主体类,在这里主任务等待外部服务初始化完成,用到了单例模式,外部服务放入到一个 list 中。
package com.theodore.test.CountDownLatch;

import java.util.ArrayList;
import java.util.List;
import java.util.concurrent.CountDownLatch;
import java.util.concurrent.Executor;
import java.util.concurrent.Executors;

public class ApplicationStartupUtil {

    private static List _services;

    private static CountDownLatch _latch;

    private ApplicationStartupUtil(){}

    private final static ApplicationStartupUtil INSTANCE = new ApplicationStartupUtil();

    public static ApplicationStartupUtil getInstance(){
        return INSTANCE;
    }

    public static boolean checkExternalServices()throws Exception{
        _latch = new CountDownLatch(3);

        _services = new ArrayList();
        _services.add(new NetworkChecker(_latch));
        _services.add(new CacheChecker(_latch));
        _services.add(new DataBaseChecker(_latch));

        Executor executor = Executors.newFixedThreadPool(_services.size());

        for (final ExternalChecker v:_services){
            executor.execute(v);
        }
        _latch.await();

        for (final ExternalChecker v:_services){
            if (!v.is_serviceUp()){
                return false;
            }
        }
        return true;
    }

}
测试类:
package com.theodore.test.CountDownLatch;

public class MainTest {
    public static void main(String[] args)
    {
        boolean result = false;
        try {
            result = ApplicationStartupUtil.checkExternalServices();
        } catch (Exception e) {
            e.printStackTrace();
        }
        System.out.println("External services validation completed !! Result was :: "+ result);
    }
}
测试结果:
Checking Network Service
Checking Cache Service
Checking DataBase Service
Cache Service is UP
Network Service is UP
DataBase Service is UP
External services validation completed !! Result was :: true
代码 github 地址:
https://github.com/theodore816/javastudy/tree/master/com/test/CountDownLatch
参考文献
JDK 源码
http://www.importnew.com/15731.html
https://yq.aliyun.com/articles/607220
如果感兴趣,请关注我的微信公众号:


