摘要:树莓派上搭建LNMPWeb服务器。修改Ngnix配置文件(/etc/nginx/sites-available/default),使得可解析PHP文件。
树莓派LNMP搭建Web服务器网站
Linux + Nginx + MySQL + PHP
安装软件前,更新所有软件
$sudo apt-get update && sudo apt-get upgrade
1.安装Nginx
命令安装
sudo apt-get install nginx

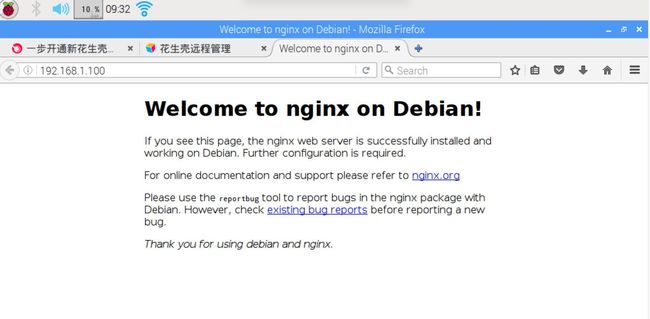
安装完成,Nginx已经启动了,打开浏览器输入本机ip:看到下图展示网页,说明Nginx成功启动了!
默认开机启动Nginx,如果不想开机启动Nginx,修改/etc/init.d/nginx文件
如启动失败,如下命令启动Nginx服务
pi@xxxxxx:/etc/init.d$nginx start
查看Nginx安装目录(whereis nginx)
pi@xxxxxx:~$ whereis  nginx
nginx: /usr/sbin/nginx /etc/nginx /usr/share/nginx /usr/share/man/man1/nginx.1.gz
要搞懂几个目录及文件
/etc/nginx/ ##Nginx服务器配置文件目录
pi@xxxxxx:/etc/nginx$ ls -lF
total 56
drwxr-xr-x 2 root root 4096 Oct 28  2016 conf.d/
-rw-r--r-- 1 root root 1034 Oct 28  2016 fastcgi.conf
-rw-r--r-- 1 root root  964 Oct 28  2016 fastcgi_params
-rw-r--r-- 1 root root 2837 Oct 28  2016 koi-utf
-rw-r--r-- 1 root root 2223 Oct 28  2016 koi-win
-rw-r--r-- 1 root root 3957 Oct 28  2016 mime.types
-rwxrwxrwx 1 root root 1491 Apr 30 15:04 nginx.conf*
-rw-r--r-- 1 root root  180 Oct 28  2016 proxy_params
-rw-r--r-- 1 root root  596 Oct 28  2016 scgi_params
drwxr-xr-x 2 root root 4096 Apr 18 14:26 sites-available/
drwxr-xr-x 2 root root 4096 Apr 18 09:26 sites-enabled/
drwxr-xr-x 2 root root 4096 Apr 18 09:26 snippets/
-rw-r--r-- 1 root root  623 Oct 28  2016 uwsgi_params
-rw-r--r-- 1 root root 3071 Oct 28  2016 win-utf
/usr/share/nginx 用户安装软件的目录
查看跟nginx关联的文件列表(dpkg -L nginx)
pi@xxxxxx:/usr/orayapp$ dpkg -L nginx
/.
/usr
/usr/share
/usr/share/doc
/usr/share/doc/nginx
/usr/share/doc/nginx/copyright
/usr/share/doc/nginx/changelog.gz
/usr/share/doc/nginx/changelog.Debian.gz
1./etc/nginx/ #nginx配置文件目录
/etc/nginx/nginx.conf #nginx配置文件
/etc/nginx/sites-available/default #nginx网站配置文件
2./etc/init.d/nginx #启动/关闭/重启 ngnix服务
3./usr/share/nginx/html/ #nginx默认Web目录
/usr/share/nginx/html/index.html
4./var/www/html/ #通过配置文件修改为ngnix的Web目录
/var/www/html/index.nginx-debian.html
修改Nginx Web站点目录路径
Nginx的默认Web站点目录为 /usr/share/nginx/html
pi@xiaoxiao:~d$ ls /usr/share/nginx/html
index.html
打开Nginx配置文件/etc/nginx/sites-available/default
修改为/var/www/html
server {
        listen 8080 default_server;
        root /usr/share/nginx/html;
        server_name _;

        location / {
                # First attempt to serve request as file, then
                # as directory, then fall back to displaying a 404.
                try_files $uri $uri/ =404;
        }
        location ~ \.php$ {
                root    /usr/share/nginx/html;
                try_files $uri = 404;
                include /etc/nginx/fastcgi_params;
                fastcgi_param SCRIPT_FILENAME $document_root$fastcgi_script_name;
                fastcgi_index index.php;
                fastcgi_pass unix:/var/run/php5-fpm.sock;
               #fastcgi_pass 127.0.0.1:9000;
        }
}
查看Web站点目录/var/www/html下的文件
pi@xiaoxiao:/var/www/html$ ls -l
total 172
-rw-r--r-- 1 root root 867 Apr 18 09:26 index.nginx-debian.html
-rw-r--r-- 1 root root 168373 Apr 18 11:45 live.jpg
pi@xiaoxiao:/var/www/html$
试着浏览live.jpg图片看看

接下来这一步需要安装完成PHP后验证
Nginx Web站点下创建PHP脚本文件:index-raspberry-pi.php
云创智能家庭

欢迎回家
浏览器访问该PHP文件:http://192.168.1.100/index-raspberry-pi.php
结果浏览器并没有解析php文件内容,而是下载了文件。
配置Nginx
配置方式一:
教程:树莓派LNMP开Web服务器搭网站,可外网访问
中的方式配置方法:
打开站点配置文件,进行编辑:
sudo vi /etc/nginx/sites-available/default
然后按下i进入编辑模式,在
server{
…
…
location~.*\.php(\/.*)*${
        fastcgi_split_path_info^(.+\.php)(/.+)$;
        fastcgi_pass unix:/var/run/php5-fpm.sock;
        fastcgi_index index.php;
        fastcgi_param SCRIPT_FILENAME$document_root$fastcgi_script_name;
        include fastcgi_params;
}
}
然后按下ESC,再输入:
:wq
按下Enter,退出了编辑器。重启Nginx:
sudo /etc/init.d/nginx restart
重启失败,错误提示
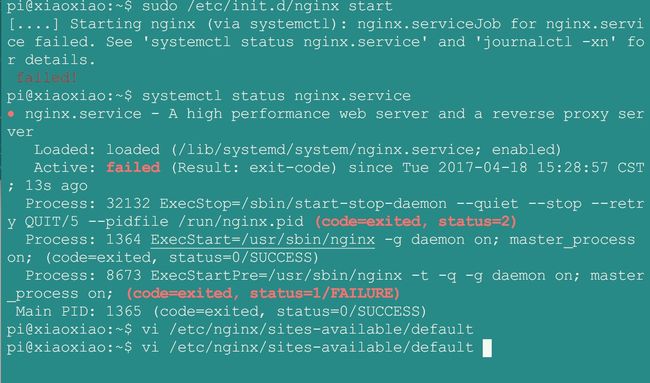
第一次接触Ngnix,摸石头过河,网上搜索了一个多小时,无果。
在无望之时,坐下来心平气和的喝杯茶,心平静下来后,还是得从配置的每一个选项开始研究,不能知其然而不知其所以然,经过研究,算是弄明白些,也配置成功了,浏览器可正确处理PHP代码了,最终的配置文件内容:
server {
        listen 8080 default_server;
        root /usr/share/nginx/html;
        server_name _;

        location / {
                # First attempt to serve request as file, then
                # as directory, then fall back to displaying a 404.
                try_files $uri $uri/ =404;
        }
        location ~ \.php$ {
                root    /usr/share/nginx/html;
                try_files $uri = 404;
                include /etc/nginx/fastcgi_params;
                fastcgi_param SCRIPT_FILENAME $document_root$fastcgi_script_name;
                fastcgi_index index.php;
                fastcgi_pass unix:/var/run/php5-fpm.sock;
               #fastcgi_pass 127.0.0.1:9000;
        }
}
安装PHP5后,再来浏览PHP文件。
2.安装MySQL
MySQL是数据库服务程序。直接安装:
sudo apt-get install mysql-server mysql-client
安装过程中要求输密码,随便设定,最好设个强密码。这样就装好了。

3.安装PHP5
PHP需要有一个与Nginx通信的模块
pi[@xxxxxx]:~$ sudo apt-get install php5-fpm php5-cgi php5-cli php5-curl php5-gd php5-mcrypt php5-mysql
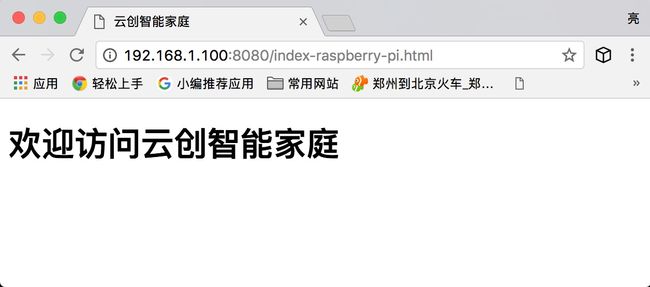
4.验证Web服务站点搭建成功
启动Nginx服务
sudo /etc/init.d/nginx restart
浏览HTML文件--index-raspberry-pi.html
云创智能家庭

欢迎访问云创智能家庭
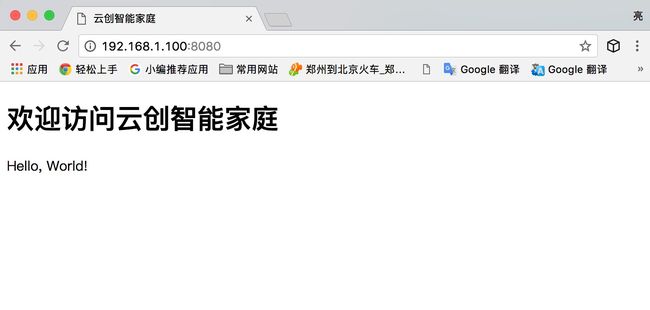
浏览PHP文件--index.php
云创智能家庭

欢迎访问云创智能家庭
到此,树莓派上搭建Web站点结束,有不清楚的地方欢迎留言交流!!!
树莓派LNMP开Web服务器搭网站,可外网访问
将树莓派变成一个Web服务器