Android窗口机制之由setContentView引发的Window,PhoneWindow,DecorView源码理解
Activity启动流程源码分析
简单分析Binder工作机制
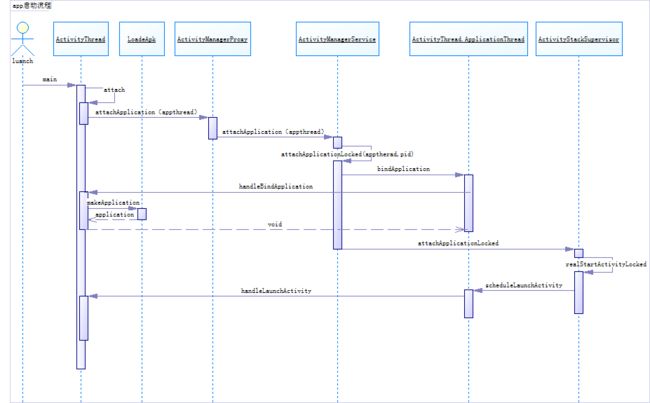
开始之前看一下从Luanch启动一个主Activity的流程图,也就是从ActivityThread的main方法开始,都知道App的启动就是从ActivityThread的main方法开始:
也就说在从Luanch开始调用了ActivityThread的main方法,当然在这之前还有很多的初始化操作,暂时不分析,从main方法开始,其中包括创建Application和进程信息的初始化操作,当然这是和普通的启动Activity有一定的区别。
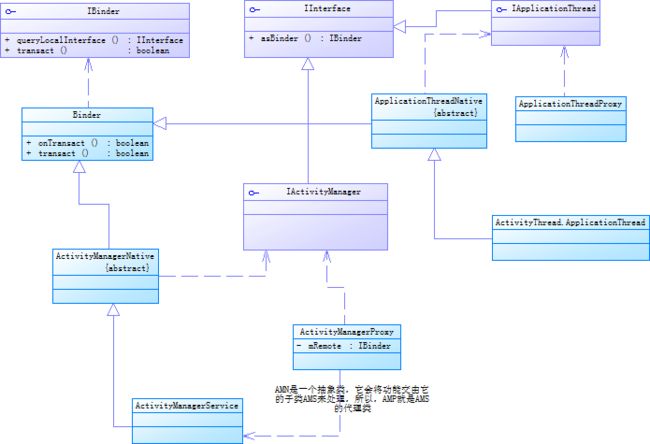
此文章基于AIP25源码,既然我们Activity启动流程源码分析,那么在开始之前我们应该认识一下与Activity启动相关的类,先看类图:
图画的有点乱,但不影响我们分析Activity启动流程,可以看到图中涉及到的类并不多,其中涉及了Binder的相关的知识点,毕竟应用需要和系统服务进程交互,这是Android给我们提供的跨进程通信的机制,当然如果对AIDL和Binder不是很熟悉的话,可以去脑补一下。
IBinder 是一个接口,Binder类实现了它,而Binder是一个抽象类。
IInterface 是一个接口,AIDL接口必须实现它。
asInterface() 从BinderProxy获取一个IInterface对象(Stub$Proxy);
asBinder() 获取IInteface接口所关联的得BinderProxy;
Binder是一个抽象类实现了IBinder,Binder是Android中跨进程通讯的方式,AIDL是最常用的夸进程通讯方式,它是对Binder的封装,AIDL是App和系统基础宁通信的基石,消息机制和AIDL构成Android系统中最核心的两个部分,Binder会和一个BinderProxy对象相关联,
IActivityManager 用于与AMS交互的系统级私有API, 提供了从应用程序返回活动管理器的调用。简单说就是定义操作四大组件相关的的API。
ActivityManagerNative 继承了Binder类并且实现IActivityManager,这里的IActivityManager实际上和ActivityManager并没有太大的联系,不过ActivityManager里面有些操作会用到ActivityManagerNative ,而ActivityManagerNative 是操作Activity的主要类,可以这么说ActivityManager封装了ActivityManagerNative 的部分功能。
ActivityManager它主要对运行中的Activity进行管理,这些管理工作并不是由ActivityManager来处理的, 而是交由AMS来处理,ActivityManager中的方法会通过ActivityManagerNative(简称AMN)的getDefault方法来得到ActivityManagerProxy(简称AMP),通过AMP就可以和AMN进行通信,而AMN是一个抽象类,它会将功能交由它的子类AMS来处理,所以AMP就是AMS的代理类,这句话一定要记住。AMS作为系统核心服务,很多API是不会暴露给ActivityManager的,因此ActivityManager并不算是AMS家族一份子。
ActivityManagerService 作为系统核心服务,并且它继承了ActivityManagerNative,AMS其实是一个Binder类,既然ActivityManagerNative是抽象基类,所以基本操作已经做完了,其余就交给子类完成,比如:AMN做了Binder的机制的操作,而AMS即不需要再做这些,只要关注自己的业务就行了,这样的好处是职责明确。
IApplicationThread、ApplicationThreadNative、ApplicationThreadProxy和ApplicationThread,ApplicationThread是ActivityThread的内部类,其实这些的作用是和AMS族的机制是一样的,比如IApplicationThread,定义了基本的接口,而其他的就是Binder相关的,最后ApplicationThread也是ApplicationThreadNative的子类,ApplicationThreadNative主要负责Binder相关的处理,而ApplicationThread则做自己的逻辑,即:ApplicationThread是Client的Bider,服务如果要操作Client端需要通过ApplicationThread去操作,毕竟是夸进程的通讯嘛,在捋一下,IApplicationThread继承了IInterface接口,它实现类是ApplicationThreadNative继承了Binder类,他是一个抽象类,它仅仅只做了和Binder相关的操作,而 它的子类是ApplicationThread,就是说如果系统服务如AMS想要通知启动Activity,那就要调用ApplicationThread客户端的Binder通信。
Instrumentation 监控应用程序和系统服务的交互
给大家先讲解这些类,是给大家有个印象,看下去就不会很蒙圈接下来就正是开始吧,先从Activity.startActivity开始。
public void startActivity(Intent intent, @Nullable Bundle options) {
    if (options != null) {
        startActivityForResult(intent, -1, options);
    } else {
        startActivityForResult(intent, -1);
    }
}
startActivity根据options选择调用startActivityForResult函数,其中第二个参数requestCode为-1,表示Launcher不需要知道Activity启动的结果,也就是当requestCode>0时,当activity退出时会回调onActivityResult方法,startActivityForResult函数的代码如下所示。
 public void startActivityForResult(@RequiresPermission Intent intent, int requestCode,
        @Nullable Bundle options) {
    if (mParent == null) {
        options = transferSpringboardActivityOptions(options);

        Instrumentation.ActivityResult ar =
            mInstrumentation.execStartActivity(
                this, mMainThread.getApplicationThread(), mToken, this,
                intent, requestCode, options);

    //............
    } else {
      //..........
    }
}
为了简介我把部分代码删掉,只留下比较重要的,mParent是Activity类型的,表示当前Activity的父类。因为当前的Activity还没有创建出来,mParent == null成立。接着调用Instrumentation的execStartActivity方法, Instrumentation主要用来监控应用程序和系统服务的交互。
public ActivityResult execStartActivity(
        Context who, IBinder contextThread, IBinder token, Activity target,
        Intent intent, int requestCode, Bundle options) {

    //注意这里contextThread,是从Activity中传进来的ApplicationThread,后面就是使用它发送消息启动Activity的
    IApplicationThread whoThread = (IApplicationThread) contextThread;
    try {
        intent.migrateExtraStreamToClipData();
        intent.prepareToLeaveProcess(who);

        //获取AMS的代理对象
        IActivityManager aDefault = ActivityManagerNative.getDefault();

        //调用代理对象的startActivity,执行transact执行RPC操作
        int result = aDefault.startActivity(whoThread, who.getBasePackageName(), intent,
                intent.resolveTypeIfNeeded(who.getContentResolver()),
                token, target != null ? target.mEmbeddedID : null,
                requestCode, 0, null, options);
        //检查启动Activity的结果
        checkStartActivityResult(result, intent);
    } catch (RemoteException e) {
        throw new RuntimeException("Failure from system", e);
    }
    return null;
}
首先会调用ActivityManagerNative的getDefault来获取ActivityManageService(后面简称为AMS)的代理对象AMN,接着调用它的startActivity方法。首先我们先来查看ActivityManagerNative的getDefault方法做了什么:
 static public IActivityManager getDefault() {
    return gDefault.get();
}
private static final Singleton gDefault = new Singleton() {
    protected IActivityManager create() {

        //通过名称获取一个service的应用,这里就是AMS
        IBinder b = ServiceManager.getService("activity");//1
        //返回的是一个持有AMS的引用的代理对象
        IActivityManager am = asInterface(b);//2
        return am;
    }
};
static public IActivityManager asInterface(IBinder obj) {
    if (obj == null) {
        return null;
    }
    //AMS
    IActivityManager in = (IActivityManager) obj.queryLocalInterface(descriptor);
    if (in != null) {
        //返回当前ActivityManagerNative
        return in;
    }
    //服务端的代理,返回ActivityManagerProxy,执行transat
    //将返回的AMS的封装成代理
    return new ActivityManagerProxy(obj);
}
getDefault方法调用了gDefault的get方法,gDefault 是一个Singleton类的实例。在1处获取名子为”activity”的Service引用,也就是IBinder类型的ActivityManagerService的引用。接着在2处将它封装成ActivityManagerProxy类型对象,getService方法是有缓存的,此后调用ActivityManagerNative的getDefault方法就会直接获得AMS的代理AMP对象。
回到Instrumentation类的execStartActivity方法中,从上面得知就是调用AMP的startActivity,其中AMP是ActivityManagerNative的内部类,代码如下所示。
/**
 * 首先会将传入的参数写入到Parcel类型的data中。
 * 通过IBinder类型对象mRemote(AMS的引用)向服务端的AMS发送一个START_ACTIVITY_TRANSACTION类型的进程间通信请求。
 * 那么服务端AMS就会从Binder线程池中读取我们客户端发来的数据,最终会调用AMN的onTransact方法,onTransact中会调用AMS的startActivity方法,
 */
public int startActivity(IApplicationThread caller, String callingPackage, Intent intent,
                         String resolvedType, IBinder resultTo, String resultWho, int requestCode,
                         int startFlags, ProfilerInfo profilerInfo, Bundle options) throws RemoteException {
    Parcel data = Parcel.obtain();
    Parcel reply = Parcel.obtain();
    data.writeInterfaceToken(IActivityManager.descriptor);
    data.writeStrongBinder(caller != null ? caller.asBinder() : null);
    data.writeString(callingPackage);
    intent.writeToParcel(data, 0);
    data.writeString(resolvedType);
    data.writeStrongBinder(resultTo);
    data.writeString(resultWho);
    data.writeInt(requestCode);
    data.writeInt(startFlags);
    if (profilerInfo != null) {
        data.writeInt(1);
        profilerInfo.writeToParcel(data, Parcelable.PARCELABLE_WRITE_RETURN_VALUE);
    } else {
        data.writeInt(0);
    }
    if (options != null) {
        data.writeInt(1);
        options.writeToParcel(data, 0);
    } else {
        data.writeInt(0);
    }


    //首先会将传入的参数写入到Parcel类型的data中。
    // 在注释1处通过IBinder类型对象mRemote向AMS发送一个START_ACTIVITY_TRANSACTION类型的进程间通信请求。
    // 那么服务端AMS就会从Binder线程池中读取我们客户端发来的数据,
    // 最终会调用ActivityManagerNative的onTransact方法中执行

    //发起RPC过程 ,这里是会阻塞的,等待transact结束


    //实际上会调用ActivityManagerService的onTransact,之后又回调ActivityManagerNative的onTransact,然后在onTransact中有调用ActivityManagerService的startActivity方法
    mRemote.transact(START_ACTIVITY_TRANSACTION, data, reply, 0);//1
    //  接着从_reply中取出RPC过程返回的结果
    reply.readException();
    //  最后返回_reply中的数据
    int result = reply.readInt();

    reply.recycle();
    data.recycle();
    return result;
}
其实注释写得也是还可以的,首先会将传入的参数写入到Parcel类型的data中,大家知道Binder支持的类型也就那几种。在1处通过IBinder类型对象mRemote向AMS发送一个START_ACTIVITY_TRANSACTION类型的进程间通信请求。那么服务端AMS就会从Binder线程池中读取我们客户端发来的数据,最终会调用ActivityManagerNative的onTransact方法中执行。如下所示。
 @Override
public boolean onTransact(int code, Parcel data, Parcel reply, int flags)
        throws RemoteException {
    switch (code) {

        //通过code知道client调用的目标方法
        case START_ACTIVITY_TRANSACTION: {
            data.enforceInterface(IActivityManager.descriptor);
            IBinder b = data.readStrongBinder();


            //这行代码也是获取到了持有ApplicationThread引用的代理对象,然后传给AMS,以便启动Activity,如:scheduleLaunchActivity
            IApplicationThread app = ApplicationThreadNative.asInterface(b);


            //获取Client传过来的数据
            String callingPackage = data.readString();
            Intent intent = Intent.CREATOR.createFromParcel(data);
            ..........................................
            //调用ActivityNamagerService,具体实现在AMS中,启动ACtivity
            int result = startActivity(app, callingPackage, intent, resolvedType,
                    resultTo, resultWho, requestCode, startFlags, profilerInfo, options);

            //启动完成将结果写入reply,通过Client的启动activity的结果
            reply.writeNoException();
            reply.writeInt(result);
            return true;
        }
}
onTransact中会调用AMS的startActivity方法不是AMN中的startActivity了,我刚开始看得时候就是这想的哈哈,如下所示。
  @Override
public final int startActivity(IApplicationThread caller, String callingPackage,
        Intent intent, String resolvedType, IBinder resultTo, String resultWho, int requestCode,
        int startFlags, ProfilerInfo profilerInfo, Bundle bOptions) {
    return startActivityAsUser(caller, callingPackage, intent, resolvedType, resultTo,
            resultWho, requestCode, startFlags, profilerInfo, bOptions,
            UserHandle.getCallingUserId());
}


  @Override
public final int startActivityAsUser(IApplicationThread caller, String callingPackage,
        Intent intent, String resolvedType, IBinder resultTo, String resultWho, int requestCode,
        int startFlags, ProfilerInfo profilerInfo, Bundle bOptions, int userId) {
    enforceNotIsolatedCaller("startActivity");
    userId = mUserController.handleIncomingUser(Binder.getCallingPid(), Binder.getCallingUid(),
            userId, false, ALLOW_FULL_ONLY, "startActivity", null);
    // TODO: Switch to user app stacks here.
    return mActivityStarter.startActivityMayWait(caller, -1, callingPackage, intent,
            resolvedType, null, null, resultTo, resultWho, requestCode, startFlags,
            profilerInfo, null, null, bOptions, false, userId, null, null);
}
在AMS中startActivity有再次调用startActivityAsUser方法,startActivityAsUser方法中又调用了mActivityStarter的startActivityMayWait方法:这里的调用关系非常多,我直接写得简洁的,就看重点:AMS.startActivity->AMS.startActivityAsUser
->ActivityStack.startActivityMayWait->ActivityStack.startActivityLocked
->ActivityStack.doPendingActivityLaunchesLocked
->ActivityStack.startActivityUnchecked
->ActivityStackSupervisor.resumeFocusedStackTopActivityLocked
->ActivityStackSupervisor.resumeFocusedStackTopActivityLocked
->ActivityStack.resumeTopActivityUncheckedLocked
->ActivityStack.resumeTopActivityInnerLocked
->ActivityStackSupervisor.startSpecificActivityLocked
->ActivityStackSupervisor.realStartActivityLocked
最后看看ActivityStackSupervisor.realStartActivityLocked方法的代码:
final boolean realStartActivityLocked(ActivityRecord r, ProcessRecord app,
        boolean andResume, boolean checkConfig) throws RemoteException {

  ........................


  app.thread.scheduleLaunchActivity(new Intent(r.intent), r.appToken,
                System.identityHashCode(r), r.info, new Configuration(mService.mConfiguration),
                new Configuration(task.mOverrideConfig), r.compat, r.launchedFromPackage,
                task.voiceInteractor, app.repProcState, r.icicle, r.persistentState, results,
                newIntents, !andResume, mService.isNextTransitionForward(), profilerInfo);

...................

return true;
}
这里的 app.thread指的是IApplicationThread,它的实现是ActivityThread的内部类ApplicationThread,其中ApplicationThread继承了ApplicationThreadNative,而ApplicationThreadNative继承了Binder并实现了IApplicationThread接口,所以我们抓重点,去看看那ActivityThread的内部类ApplicationThread的scheduleLaunchActivity方法,代码如下所示:
    //ams最终回调这个方法启动Activity
    @Override
    public final void scheduleLaunchActivity(Intent intent, IBinder token, int ident,
                                             ActivityInfo info, Configuration curConfig, Configuration overrideConfig,
                                             CompatibilityInfo compatInfo, String referrer, IVoiceInteractor voiceInteractor,
                                             int procState, Bundle state, PersistableBundle persistentState,
                                             List pendingResults, List pendingNewIntents,
                                             boolean notResumed, boolean isForward, ProfilerInfo profilerInfo) {

        ActivityClientRecord r = new ActivityClientRecord();

        //发送消息启动Activity
        sendMessage(H.LAUNCH_ACTIVITY, r);
    }
为了简介我删掉了很多无用的代码,所以AMS最终调用ActivityThread的内部类ApplicationThread的scheduleLaunchActivity方法sendMessage发消息启动Activity,sendMessage方法如下:
private void sendMessage(int what, Object obj, int arg1, int arg2, boolean async) {
    if (DEBUG_MESSAGES) Slog.v(
            TAG, "SCHEDULE " + what + " " + mH.codeToString(what)
                    + ": " + arg1 + " / " + obj);
    Message msg = Message.obtain();
    msg.what = what;
    msg.obj = obj;
    msg.arg1 = arg1;
    msg.arg2 = arg2;
    if (async) {
        msg.setAsynchronous(true);
    }
    mH.sendMessage(msg);
}
可以看到最终调用mH的sendMessage,mH是Activity的内部类H,继承了Handler,看看handleMesage:
 public void handleMessage(Message msg) {
        if (DEBUG_MESSAGES) Slog.v(TAG, ">>> handling: " + codeToString(msg.what));
        switch (msg.what) {
            case LAUNCH_ACTIVITY: {
                //最终启动Activity
                final ActivityClientRecord r = (ActivityClientRecord) msg.obj;

                handleLaunchActivity(r, null, "LAUNCH_ACTIVITY");
            }
            break;
    .......................
}
最终调用了handleLaunchActivity。代码如下所示:
 //运行Activity开始的地方,就是Activity的生命周期的开始
private void handleLaunchActivity(ActivityClientRecord r, Intent customIntent, String reason) {
    // If we are getting ready to gc after going to the background, well
    // we are back active so skip it.
    unscheduleGcIdler();
    mSomeActivitiesChanged = true;

    if (r.profilerInfo != null) {
        mProfiler.setProfiler(r.profilerInfo);
        mProfiler.startProfiling();
    }

    // Make sure we are running with the most recent config.
    handleConfigurationChanged(null, null);

    if (localLOGV) Slog.v(
            TAG, "Handling launch of " + r);

    // Initialize before creating the activity
    WindowManagerGlobal.initialize();

    Activity a = performLaunchActivity(r, customIntent);

    if (a != null) {
        r.createdConfig = new Configuration(mConfiguration);
        reportSizeConfigurations(r);
        Bundle oldState = r.state;
        handleResumeActivity(r.token, false, r.isForward,
                !r.activity.mFinished && !r.startsNotResumed, r.lastProcessedSeq, reason);

        if (!r.activity.mFinished && r.startsNotResumed) {
            // The activity manager actually wants this one to start out paused, because it
            // needs to be visible but isn't in the foreground. We accomplish this by going
            // through the normal startup (because activities expect to go through onResume()
            // the first time they run, before their window is displayed), and then pausing it.
            // However, in this case we do -not- need to do the full pause cycle (of freezing
            // and such) because the activity manager assumes it can just retain the current
            // state it has.
            performPauseActivityIfNeeded(r, reason);

            // We need to keep around the original state, in case we need to be created again.
            // But we only do this for pre-Honeycomb apps, which always save their state when
            // pausing, so we can not have them save their state when restarting from a paused
            // state. For HC and later, we want to (and can) let the state be saved as the
            // normal part of stopping the activity.
            if (r.isPreHoneycomb()) {
                r.state = oldState;
            }
        }
    } else {
        // If there was an error, for any reason, tell the activity manager to stop us.
        try {
            ActivityManagerNative.getDefault()
                    .finishActivity(r.token, Activity.RESULT_CANCELED, null,
                            Activity.DONT_FINISH_TASK_WITH_ACTIVITY);
        } catch (RemoteException ex) {
            throw ex.rethrowFromSystemServer();
        }
    }
}
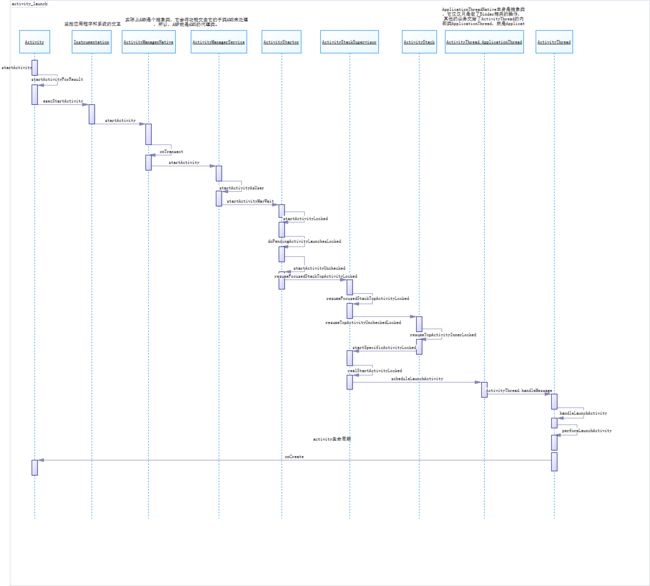
到这一步实际上Activity的启动基本就结束了,接下来就是初始化Activity的窗口主题和视图,这些下篇文章讲解,最后看一下时序图,会更好理解,第一次画图,很丑:
说一下代理模式:代理模式就是多一个代理类出来,替原对象进行一些操作,比如:ActivityManagerNative的代理类ActivityManagerProxy而它们俩都实现了IActivityManager接口,ActivityManagerService是ActivityManagerNative的子类,所以ActivityManagerProxy代理的是ActivityManagerService,在系统服务中大量使用了代理模式去实现Binder的通信,Android系统涉及到Binder的都大量用到了静态代理。
最后,我觉得看完Activity启动的流程,再看Android窗口机制之由setContentView引发的Window,PhoneWindow,DecorView源码理解这篇文章,基本上从Activity启动流程到Activity的初始化和窗口创建以及视图的填充基都会更加的深入。


