
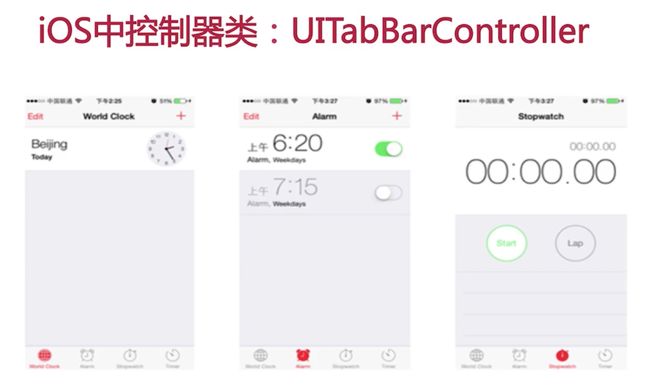

一.视图控制器与MVC结构的关系

实现的效果是点击屏幕,这个200*200的UIView会随机改变颜色
//
//  ViewController.m
//  UIViewController
// UIViewController = UIView + Controller
// UIViewController:代码ViewController.h(.m) + 界面 Main.storyboard
// 视图控制器:代码+界面 息息相关
// self.view:当前视图控制器的UIView

// MVC:Model + View + Controller
// 1 UIView  视图
// 2 Array 数据 Model
// 3 Controller 控制
#import "ViewController.h"

@interface ViewController () {
    UIView *view;
    NSArray *array_color;
}

@end

@implementation ViewController

- (void)viewDidLoad {
    [super viewDidLoad];

    view = [[UIView alloc]initWithFrame:CGRectMake(100, 100, 200, 200)];
    [self.view addSubview:view];
    array_color = [[NSArray alloc]initWithObjects:[UIColor colorWithRed:255.0/255.0 green:127/255.0 blue:29/255.0 alpha:1.0],
[UIColor colorWithRed:138/255.0 green:206/255.0 blue:245/255.0 alpha:1.0],[UIColor colorWithRed:216.0/255.0 green:114/255.0 blue:213/255.0 alpha:1.0], nil];
}

- (void)touchesBegan:(NSSet *)touches withEvent:(UIEvent *)event {
    //随机数对3取余,0 1 2
    int index = arc4random()%3;
    UIColor *color = [array_color objectAtIndex:index];
    view.backgroundColor = color;
}

@end
二.UIApplication以及Plist文件的使用
// 1 UIApplication:代表一个应用程序
// 2 单例:只能创建一个对象
// 3 [UIApplication sharedApplication]拿到当前的UIApplication
// 4 程序启动后创建的第一个对象就是UIApplication
// 5 可以进行一些应用级别的操作: 属性 方法
1. UIApplication属性设置之右上角图标,状态栏,联网状态

//
//  AppDelegate.m
//  UIViewController

// 属性:
// 1 右上角图标(iOS8以上的版本中,要想设置这个属性,必须用户手动点击允许权限才可以设置)
// 2 状态栏:样式 是否显示
// 3 联网状态
#import "AppDelegate.h"
#define IOS8 [[UIDevice currentDevice].systemVersion doubleValue] >= 8.0
@interface AppDelegate ()

@end

@implementation AppDelegate


- (BOOL)application:(UIApplication *)application didFinishLaunchingWithOptions:(NSDictionary *)launchOptions {
    // Override point for customization after application launch.
    if (IOS8) {
        //settings:通知类型 -> 右上角图标
        UIUserNotificationSettings *settings = [UIUserNotificationSettings settingsForTypes:UIUserNotificationTypeBadge categories:nil];
        //注册当前通知
        [[UIApplication sharedApplication]registerUserNotificationSettings:settings];
    }
    return YES;

}


- (void)applicationWillResignActive:(UIApplication *)application {
    // Sent when the application is about to move from active to inactive state. This can occur for certain types of temporary interruptions (such as an incoming phone call or SMS message) or when the user quits the application and it begins the transition to the background state.
    // Use this method to pause ongoing tasks, disable timers, and invalidate graphics rendering callbacks. Games should use this method to pause the game.
}


- (void)applicationDidEnterBackground:(UIApplication *)application {
    // Use this method to release shared resources, save user data, invalidate timers, and store enough application state information to restore your application to its current state in case it is terminated later.
    // If your application supports background execution, this method is called instead of applicationWillTerminate: when the user quits.
}


- (void)applicationWillEnterForeground:(UIApplication *)application {
    // Called as part of the transition from the background to the active state; here you can undo many of the changes made on entering the background.
}


- (void)applicationDidBecomeActive:(UIApplication *)application {
    // Restart any tasks that were paused (or not yet started) while the application was inactive. If the application was previously in the background, optionally refresh the user interface.
}


- (void)applicationWillTerminate:(UIApplication *)application {
    // Called when the application is about to terminate. Save data if appropriate. See also applicationDidEnterBackground:.
}


@end
//
//  ViewController.m
//  UIViewController

#import "ViewController.h"

@implementation ViewController

- (void)viewDidLoad {
    [super viewDidLoad];
    self.view.backgroundColor = [UIColor grayColor];
}

- (void)touchesBegan:(NSSet *)touches withEvent:(UIEvent *)event {

    //拿到当前单例对象
    UIApplication *app = [UIApplication sharedApplication];
    // 右上角图标设为100
    app.applicationIconBadgeNumber = 100;
    //    app.statusBarStyle =  UIStatusBarStyleDefault; 不推荐这种方法,建议重写下面的两个方法
    //显示联网状态
    app.networkActivityIndicatorVisible = true;
}

//重写方法:隐藏当前状态栏 true是隐藏
- (BOOL)prefersStatusBarHidden {
    return false;
}
//重写方法:设置当前状态栏
- (UIStatusBarStyle)preferredStatusBarStyle {
    //白色 UIStatusBarStyleLightContent
    //黑色 UIStatusBarStyleDefault
    return UIStatusBarStyleDefault;
}

@end
2. UIApplication常用方法
//
//  AppDelegate.m
//  UIViewController
// 方法
// 1 常用的方法
// 2 执行顺序 1234567
// 3 openUrl:打电话 发邮件 发短信 打开其他APP
#import "AppDelegate.h"
#define IOS8 [[UIDevice currentDevice].systemVersion doubleValue] >= 8.0
@interface AppDelegate ()

@end

@implementation AppDelegate

// 1 应用程序启动之后UIAPPlication调用的第一个方法
- (BOOL)application:(UIApplication *)application didFinishLaunchingWithOptions:(NSDictionary *)launchOptions {
    NSLog(@"didFinishLaunchingWithOptions");
    return YES;

}

// 3 失去焦点
- (void)applicationWillResignActive:(UIApplication *)application {
    NSLog(@"ResignActive");
}

// 4 进入后台
- (void)applicationDidEnterBackground:(UIApplication *)application {
    NSLog(@"applicationDidEnterBackground");
}
// 5 即将进入到前台
- (void)applicationWillEnterForeground:(UIApplication *)application{
   NSLog(@"applicationWillEnterForeground");
}

// 2 获取焦点 6
- (void)applicationDidBecomeActive:(UIApplication *)application {
   NSLog(@"applicationDidBecomeActive");
}

// 7 应用程序即将被销毁的时候调用
- (void)applicationWillTerminate:(UIApplication *)application {
    NSLog(@"applicationWillTerminate");
}


@end
3. Plist文件的使用
Plist文件key-value的结构

plist.jpeg
1 本地化
2 程序安装包名称
3 应用程序唯一标识符 *
4 plist版本信息
5 APP名字 默认$(PRODUCT_NAME) *
6-9 不常用
10 程序包运行环境
11 应用启动的视图 *
12 Main主视图 *
*代表重点
4. 应用启动流程(面试会考)
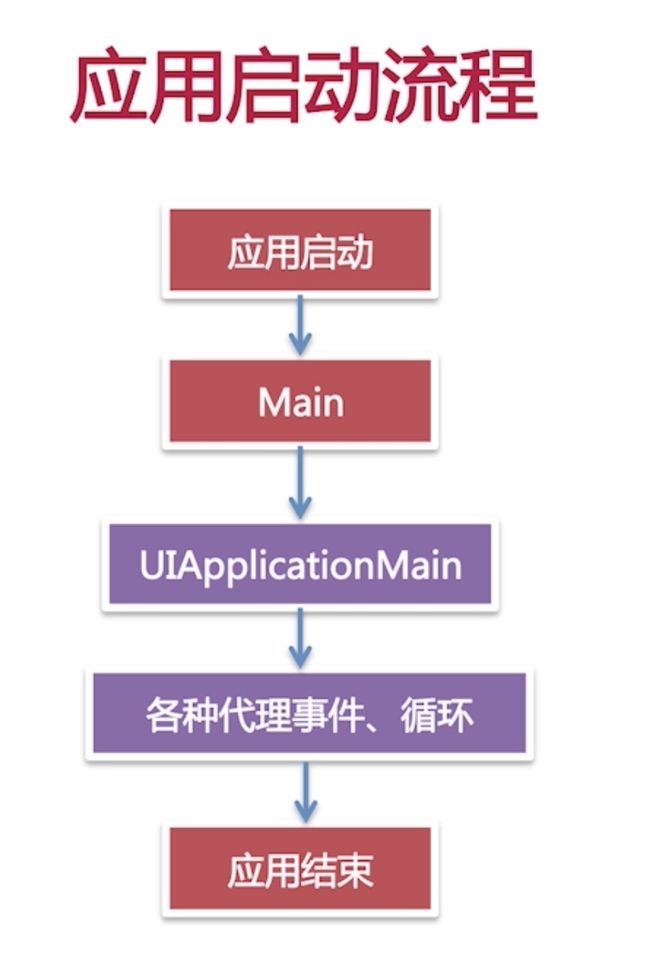
// 应用启动流程(面试会考)
// 1 点击应用图标
// 2 main
// 3 UIApplicationMain
// 4 Delegate
// 5 根据plist加载视图控制器
// 6 RunLoop事件循环
三.UIWindow初识以及视图控制器的生命周期
1. UIWindow初识
//
//  AppDelegate.m
//  UIWindow

// 视图创建过程
// 1 UIWindow
// 2 view -> 视图控制器的view
// 3 将视图控制器的view添加到UIWindow上
// 4 显示
// UIWindow: 屏幕 唯一 第一个创建 (UIApplication是第一个创建的对象,UIWindow是第一个创建的视图)
#import "AppDelegate.h"

@interface AppDelegate ()

@end

@implementation AppDelegate


- (BOOL)application:(UIApplication *)application didFinishLaunchingWithOptions:(NSDictionary *)launchOptions {
    //UIScreen 屏幕大小
    //bounds 带状态栏的大小 返回Rect
    //applicationFrame 不带状态栏的大小 返回Rect
    self.window = [[UIWindow alloc]initWithFrame:[[UIScreen mainScreen] bounds]];
    self.window.backgroundColor = [UIColor whiteColor];
    //iOS7开始不能直接将UI对象作用在UIWindow上,必须将视图控制器绑在UIWindow上
    self.window.rootViewController = [[UIViewController alloc]init];
    [self.window makeKeyAndVisible];//self.window可视化
    return YES;
}
2. 视图控制器的生命周期

//
//  ViewController.m
//  ViewControllerTest

#import "ViewController.h"
#import "NewViewController.h"
@interface ViewController () {
    NewViewController *newViewController;
}
- (IBAction)clearVC:(id)sender;

@end

@implementation ViewController

- (void)viewDidLoad {
    //视图第一次加载时,viewDidLoad会被调用,在进行视图切换时viewDidLoad不会一直调用,除非当前视图已经销毁,再alloc init时才会调用该方法。
    [super viewDidLoad];
    self.view.backgroundColor = [UIColor grayColor];
    newViewController = [[NewViewController alloc]init];
}

- (void)touchesBegan:(NSSet *)touches withEvent:(UIEvent *)event {

    //navigationController导航栏视图控制器
    //push 弹出一个新的视图控制器
    //animated 动画效果
    if (newViewController == nil) {
        newViewController = [[NewViewController alloc]init];
    }
    [self.navigationController pushViewController:newViewController animated:true];
}
- (IBAction)clearVC:(id)sender {
    newViewController = nil;
}
@end
//
//  NewViewController.m
//  ViewControllerTest

#import "NewViewController.h"

@interface NewViewController ()

@end

@implementation NewViewController
// 视图控制器加载流程
// 1 alloc init
// 2 viewDidLoad
// 3 viewWillAppear 添加动画可以写在这里 视图反复切换时viewDidLoad不会反复调用,而viewWillAppear会反复调用,所以还可以在这个方法中完成一些初始化的操作
// 4 viewDidAppear

//加载视图
- (void)viewDidLoad {
    [super viewDidLoad];
    self.view.backgroundColor = [UIColor greenColor];
    NSLog(@"viewDidLoad");
}
//即将可见
- (void)viewWillAppear:(BOOL)animated {
    NSLog(@"viewWilAppear");
}
//已经可见
- (void)viewDidAppear:(BOOL)animated {
    NSLog(@"viewDidAppear");
}
//即将消失
- (void)viewWillDisappear:(BOOL)animated {
    NSLog(@"viewWillDisappear:");
}
//已经消失
- (void)viewDidDisappear:(BOOL)animated {
    NSLog(@"viewDidDisappear");
}
//已经脱离加载 已废弃该方法
- (void)viewDidUnload {
    NSLog(@"viewDidUnload");
}
//即将脱离加载 已废弃该方法
- (void)viewWillUnload {
    NSLog(@"viewWillUnload");
}
//销毁
- (void)dealloc {
    NSLog(@"dealloc");
}
@end
四. 视图控制器的三种加载方式
1. 视图控制器加载之纯代码方式
//
//  AppDelegate.m
//  LoadViewController

#import "AppDelegate.h"
#import "NewViewController.h"
@interface AppDelegate ()

@end

@implementation AppDelegate

//1 纯代码添加视图控制器
- (BOOL)application:(UIApplication *)application didFinishLaunchingWithOptions:(NSDictionary *)launchOptions {

    self.window = [[UIWindow alloc]initWithFrame:[[UIScreen mainScreen] bounds]];
    self.window.backgroundColor = [UIColor whiteColor];
    NewViewController *vc = [[NewViewController alloc]init];
    self.window.rootViewController = vc;
    [self.window makeKeyAndVisible];
    return YES;
}
@end
//
//  NewViewController.m
//  LoadViewController

#import "NewViewController.h"

@interface NewViewController ()

@end

@implementation NewViewController

- (void)viewDidLoad {
    [super viewDidLoad];
    self.view.backgroundColor = [UIColor redColor];
}

@end
2. 视图控制器加载之纯界面方式
//
//  AppDelegate.m
//  LoadViewController
// 重新建一个storyboard,本例命名为Main.storyboard,在里面建两个ViewController

#import "AppDelegate.h"
@interface AppDelegate ()

@end

@implementation AppDelegate

- (BOOL)application:(UIApplication *)application didFinishLaunchingWithOptions:(NSDictionary *)launchOptions {

//      2 纯界面添加视图控制器
    self.window = [[UIWindow alloc]initWithFrame:[[UIScreen mainScreen] bounds]];
    self.window.backgroundColor = [UIColor whiteColor];
    //根据storyboard的name找到storyboard
    UIStoryboard *storyboard = [UIStoryboard storyboardWithName:@"Main" bundle:nil];
    //storyboard -> viewController
    //找到初始化视图控制器 instantiateInitialViewController
    UIViewController *vc = [storyboard instantiateViewControllerWithIdentifier:@"green"];
    self.window.rootViewController = vc;
    [self.window makeKeyAndVisible];
    return YES;
}
@end
3. 视图控制器加载之混合使用
4. 视图控制器综合应用——登陆退出功能
//
//  ViewController.m
//  LogInOut

#import "ViewController.h"
#import "LogOutViewController.h"
@interface ViewController () {
    LogOutViewController *vc;
}
@end

@implementation ViewController

- (void)viewDidLoad {
    [super viewDidLoad];
    self.view.backgroundColor = [UIColor grayColor];
    UIButton *bt = [[UIButton alloc]initWithFrame:CGRectMake(50, 260, 100, 60)];
    [bt setTitle:@"登陆" forState:UIControlStateNormal];
    [bt setTitleColor:[UIColor blueColor] forState:UIControlStateNormal];
    [bt addTarget:self action:@selector(buttonAction) forControlEvents:UIControlEventTouchUpInside];
    [self.view addSubview:bt];
}

- (void)buttonAction {
    vc = [[LogOutViewController alloc]init];
    [self.navigationController pushViewController:vc animated:true];
}

@end
//
//  LogOutViewController.m
//  LogInOut

#import "LogOutViewController.h"
#import "AppDelegate.h"
@interface LogOutViewController ()

@end

@implementation LogOutViewController

- (void)viewDidLoad {
    [super viewDidLoad];

    UIButton *bt = [[UIButton alloc]initWithFrame:CGRectMake(50, 260, 100, 60)];
    [bt setTitle:@"退出" forState:UIControlStateNormal];
    [bt setTitleColor:[UIColor blueColor] forState:UIControlStateNormal];
    [bt addTarget:self action:@selector(buttonAction) forControlEvents:UIControlEventTouchUpInside];
    [self.view addSubview:bt];
}

- (void)buttonAction {
    AppDelegate *app = [UIApplication sharedApplication].delegate;
    UIStoryboard *sb = [UIStoryboard storyboardWithName:@"Main" bundle:nil];
    UIViewController *vc = [sb instantiateInitialViewController];
    app.window.rootViewController = vc;
}


@end