终于来到了ARouter解析的第五篇了,前面陆陆续续分享了四篇ARouter框架的使用和源码内容:
ARouter解析一:基本使用及页面注册源码解析
ARouter解析二:页面跳转源码分析
ARouter解析三:URL跳转本地页面源码分析
ARouter解析四:发现服务和Fragment
这次分享下IoC思想和ARouter的自动注入这块内容。IoC是控制反转的意思,这个在后端开发中用的会比较多,也是Spring框架的核心。 控制反转一般分为两种类型,依赖注入(Dependency Injection,简称DI)和依赖查找(Dependency Lookup)。在Android开发中一般自己实现倒比较少,但并不是说不常用,很多大名鼎鼎的框架都用的这种思想,比如ButterKnife,Dagger等。我们今天先分享下IoC主要的两种实现方式,再分析下ARouter在这方面的相关实践。
这次分享会按照下面的步骤进行:
1.常用的注入方式
2.依赖注入和依赖查找
3.ARouter注入源码分析
IoC这块涉及到的内容会比较多,比如注解,反射,动态代理,我们尽量用简单的语言描述,我之前的博客也有分享到这些内容,不明白的小伙伴可自行参考。
1.常用的注入方式
在开发过程中,肯定会涉及到类之间的依赖,一般都是直接new出来,比如:
class Hello{
    public Hello(){

    }

    public void sayHello(){

    }
}

public class Human {
    public static void main(String[]args) {
        Hello hello = new Hello();
        hello.sayHello();
    }
}
这里的hello实例就是用户自己new出来的,这时控制权还是在用户手中,这有几个缺点:互相依赖, 用户需要管理hello的声明周期。
所以,更进一步的注入方式有构造函数或者set方法,比如下面代码。
public class Human {
    private Hello hello;

    public Human(Hello hello) {
        this.hello = hello;
    }

    public void setHello(Hello hello) {
        this.hello = hello;
    }
}
这会就比上面代码更灵活点,也减少了依赖,但是还是需要用户去调用方法设置实例。有木有更好的办法呢?可能你也想到了注解的办法,没错,我们接着往下看。
2.依赖注入和依赖查找
依赖注入和依赖查找有什么区别呢?我们平时用的依赖注入会比较多一点,依赖注入在Android上大部分是通过自定义注解来实现,其实严格说起来依赖注入也是通过依赖查找来实现的,依赖注入用起来会比依赖查找方便。我们先来看一个简单的栗子,再看看ARouter的实践。
先来看下依赖查找,其实我们上一期分享的ARouter解析四:发现服务和Fragment就是通过依赖查找来发现服务和Fragment的。看下面的栗子,helloService是通过ARouter框架来创建的,比上面直接new构造会方便很多,但是还是用户来找到这个类的实例。
interface HelloService{
    void sayHello();
}

@Route(path = "/service/hello")
class HelloServiceImpl implements HelloService {
    Context mContext;

    @Override
    public void sayHello() {
        Toast.makeText(mContext, "Hello ", Toast.LENGTH_SHORT).show();
    }
}

public class Human {
    public static void main(String[]args) {
        HelloService helloService = ARouter.getInstance().navigation(HelloService.class);
        helloService.sayHello();
    }
}
那么上面的栗子用依赖注入该怎么实现?是不是更为方便了,不需要用户再去给出实例的路径,通过注解@Autowired就可以得到我们需要的实例。
public class Human {
    @Autowired
    private HelloService helloService;

    public static void main(String[]args) {
        ARouter.getInstance().inject(this);
        helloService.sayHello();
    }
}
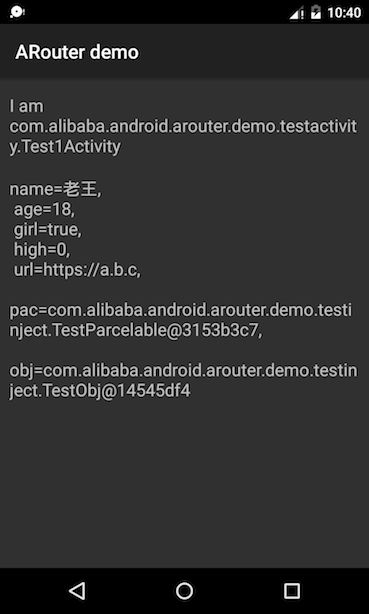
上面的栗子是为了讲解清楚简单拼凑的,我们来看下ARouter官方Demo的栗子。点击依赖注入,可以给Test1Activity传递对象参数
我们看下Test1Activity的代码,可以看出来没有new,没有查找,只有一个注解@Autowired,和一行关键代码ARouter.getInstance().inject(this);
@Route(path = "/test/activity1")
public class Test1Activity extends AppCompatActivity {

    @Autowired
    String name;

    @Autowired
    int age;

    @Autowired(name = "boy")
    boolean girl;

    @Autowired
    TestParcelable pac;

    @Autowired
    TestObj obj;

    private long high;

    @Autowired
    String url;

    @Autowired
    HelloService helloService;

    @Override
    protected void onCreate(Bundle savedInstanceState) {
        super.onCreate(savedInstanceState);
        setContentView(R.layout.activity_test1);

        ARouter.getInstance().inject(this);

        String params = String.format(
                "name=%s,\n age=%s,\n girl=%s,\n high=%s,\n url=%s,\n pac=%s,\n obj=%s",
                name,
                age,
                girl,
                high,
                url,
                pac,
                obj
        );
        helloService.sayHello("Hello moto.");

        ((TextView)findViewById(R.id.test)).setText("I am " + Test1Activity.class.getName());
        ((TextView)findViewById(R.id.test2)).setText(params);
    }
}
那么源码是怎么做到的呢?我们接着往下看。
3.ARouter注入源码分析
上面其实就是一行关键代码ARouter.getInstance().inject(this);,所以我们跟进去看看,来到ARouter的代理类_ARouter中,首先通过以来查找获取AutowiredService的具体实现类,然后得到实例,这个不清楚的可以看下上篇分享,ARouter解析四:发现服务和Fragment。这里就不再解释了。
static void inject(Object thiz) {
        AutowiredService autowiredService = ((AutowiredService) ARouter.getInstance().build("/arouter/service/autowired").navigation());
        if (null != autowiredService) {
            autowiredService.autowire(thiz);
        }
}
我们接着看下AutowiredService,这里会先在混存中查找是否有Test1Activity的辅助注入类,这里刚开始肯定是没有的,所以需要去加载。辅助注入类就是Test1Activity$$ARouter$$Autowired,不用说,这个就是编译期间生成的。
@Route(path = "/arouter/service/autowired")
public class AutowiredServiceImpl implements AutowiredService {
    private LruCache classCache;
    private List blackList;

    @Override
    public void init(Context context) {
        classCache = new LruCache<>(66);
        blackList = new ArrayList<>();
    }

    @Override
    public void autowire(Object instance) {
        String className = instance.getClass().getName();
        try {
            if (!blackList.contains(className)) {
                ISyringe autowiredHelper = classCache.get(className);
                if (null == autowiredHelper) {  // No cache.
                    autowiredHelper = (ISyringe) Class.forName(instance.getClass().getName() + SUFFIX_AUTOWIRED).getConstructor().newInstance();
                }
                autowiredHelper.inject(instance);
                classCache.put(className, autowiredHelper);
            }
        } catch (Exception ex) {
            blackList.add(className);    // This instance need not autowired.
        }
    }
}
通过反射得到辅助注入类的实例后就调用inject方法注入实例。我们来看下这个类的代码。到这里就水落石出了,在跳转时将需要传递的参数写入postcard的bundle中,然后成功跳转到目标页面后就可以通过getIntent取出参数,然后分别给目标页面的每个需要注入的成员变量赋值。
public class Test1Activity$$ARouter$$Autowired implements ISyringe {
    private SerializationService serializationService;

    @Override
    public void inject(Object target) {
        serializationService = ARouter.getInstance().navigation(SerializationService.class);
        ;
        Test1Activity substitute = (Test1Activity) target;
        substitute.name = substitute.getIntent().getStringExtra("name");
        substitute.age = substitute.getIntent().getIntExtra("age", 0);
        substitute.girl = substitute.getIntent().getBooleanExtra("boy", false);
        substitute.pac = substitute.getIntent().getParcelableExtra("pac");
        if (null != serializationService) {
            substitute.obj = serializationService.json2Object(substitute.getIntent().getStringExtra("obj"), TestObj.class);
        } else {
            Log.e("ARouter::", "You want automatic inject the field 'obj' in class 'Test1Activity' , then you should implement 'SerializationService' to support object auto inject!");
        }
        substitute.url = substitute.getIntent().getStringExtra("url");
        substitute.helloService = ARouter.getInstance().navigation(HelloService.class);
    }
}
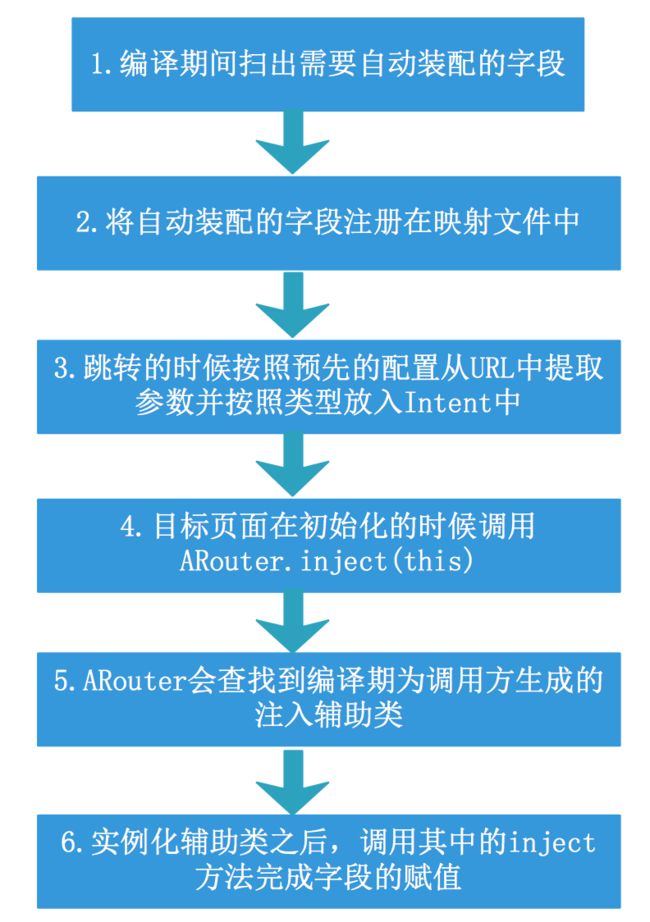
我们再总结下整个注入的过程:
4.总结
今天我们分享了IoC的设计思想,也通过栗子说明了依赖注入和依赖查找,从上面的分析可以看出ARouter的依赖注入是在运行时生成辅助类,在运行时通过反射实例化辅助类并完成跳转后参数的自动注入。这里面涉及到的技术还是比较多的,比如反射,注解,APT技术,IoC,依赖注入和依赖查找,代理,算是比较综合的应用了,这些技术的我在之前的博客中都有分享过,小伙伴们可自行参考。
惯例,感谢@右倾倾的支持与理解!
后面会分享ARouter的拦截器相关的内容,感兴趣的小伙伴欢迎关注。希望我的分享能对大家有点帮助,谢谢!
欢迎关注公众号:JueCode


