在项目开发时,在一些特性的需求中,安全性比较高的操作,往往需要https 才能授权成功,以下为nginx 配置https 的操作流程
操作系统:
liux
操作系统版本:Ubuntu 5.4.0-6ubuntu1~16.04.4
云服务: 阿里云
步骤一 获取并下载证书
在开启https 前,需要有https 证书,有试用期免费下载,也有收费的。目前测试的是阿里云提供的免费一年的使用期限。如何申请下载阿里云免费证书,问度娘。
下载完成证书,解压后文件如下图:
步骤二 将证书文件复制到 liunx 服务器中
新建目录放置证书文件,官方推荐放置在nginx配置文件目录中。
nginx 配置文件路径:/etc/nginx 不同的liunx版本文件路径可能有点区别。
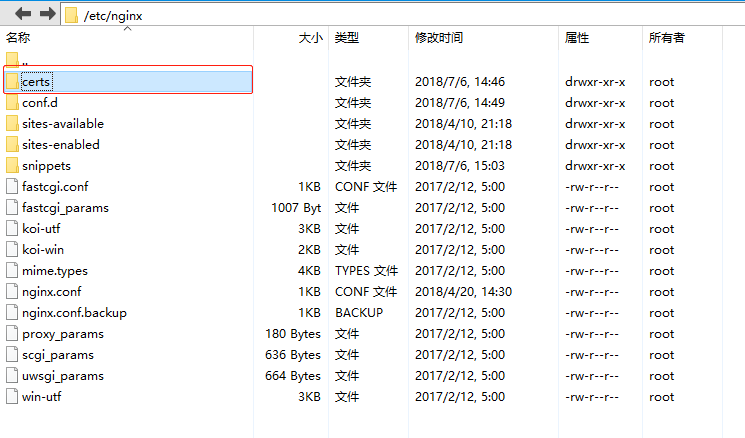
在/etc/nginx文件夹中,新建 certs文件夹
将证书复制到/etc/nginx/certs文件夹中
步骤三 如何找到 nginx.conf 配置文件
如果对nginx配置文件很熟悉,可直接跳过这个步骤。
找到nginx.conf 配置文件,这个配置文件不同的 liunx 版本,配置文件位置可能会不同。还有就是有些系统会将nginx.conf 文件拆分成多个配置文件,所以查看nginx.conf文件时,可能会有“为什么我的nginx.conf文件和网上看到的nginx.conf不一样”这样的疑问。
如何找到配置nginx配置文件(核心配置:例如端口号,根目录配置)流程如下。
首先需要找到 nginx.conf 文件, 一般会在 /etc/nginx/ 目录下,目录结构如下:
打开 nginx.conf 文件,查看里面的配置是否能找到项目编辑的配置,如果有,则保存一份备份文件,开始编辑配置文件。
如果没有找到想要编辑的配置,那就需要在仔细查看nginx.conf 文件,找到 include 关键字,这个关键字后面会有路径,表示其他的配置在该目录下。
例如:include /etc/nginx/conf.d/*.conf; 表示 引入 /etc/nginx/conf.d/ 文件夹中所有的以.conf为后缀的文件。
以这种方式,将 nginx.conf 文件配置中的 include 引入的配置文件一个一个的查看,就能完整的查看到所有的nginx 服务配置 。
步骤四 配置 ssl 证书,开启 https
将以下server配置复制到配置文件中
server {
    listen 443; # 最好使用443端口,在配置完成时,防火墙是可以通过的,如果使用其他的端口,还需要配置防火墙
    server_name localhost; # 不用修改
    ssl on;
    root /home/html; # 根目录,index.html目录,需要修改,可查看 80 端口server配置
    index index.html index.htm;
    ssl_certificate   cert/1531133153917.pem; #ssl 证书路径,复制存放证书的路径
    ssl_certificate_key  cert/1531133153917.key; #ssl 证书路径,复制存放证书的路径
    ssl_session_timeout 5m;
    ssl_ciphers ECDHE-RSA-AES128-GCM-SHA256:ECDHE:ECDH:AES:HIGH:!NULL:!aNULL:!MD5:!ADH:!RC4;
    ssl_protocols TLSv1 TLSv1.1 TLSv1.2;
    ssl_prefer_server_ciphers on;
}
整个配置文件如下,有两个server配置, 80端口为默认端口,443为开启https服务的端口:
##
# You should look at the following URL's in order to grasp a solid understanding
# of Nginx configuration files in order to fully unleash the power of Nginx.
# http://wiki.nginx.org/Pitfalls
# http://wiki.nginx.org/QuickStart
# http://wiki.nginx.org/Configuration
#
# Generally, you will want to move this file somewhere, and start with a clean
# file but keep this around for reference. Or just disable in sites-enabled.
#
# Please see /usr/share/doc/nginx-doc/examples/ for more detailed examples.
##

# Default server configuration
#
server {
    listen 80 default_server;
    listen [::]:80 default_server;

    # SSL configuration
    #
    # listen 443 ssl default_server;
    # listen [::]:443 ssl default_server;
    #
    # Note: You should disable gzip for SSL traffic.
    # See: https://bugs.debian.org/773332
    #
    # Read up on ssl_ciphers to ensure a secure configuration.
    # See: https://bugs.debian.org/765782
    #
    # Self signed certs generated by the ssl-cert package
    # Don't use them in a production server!
    #
    # include snippets/snakeoil.conf;

    root /home/html;

    # Add index.php to the list if you are using PHP
    index index.html index.htm index.nginx-debian.html index.php;

    server_name _;

    #location / {
        # First attempt to serve request as file, then
        # as directory, then fall back to displaying a 404.
    #   try_files $uri $uri/ =404;
    #}

    # pass the PHP scripts to FastCGI server listening on 127.0.0.1:9000
    #
    location ~ \.php$ {
        include snippets/fastcgi-php.conf;

        # With php7.0-cgi alone:
        # fastcgi_pass 127.0.0.1:9000;
        # With php7.0-fpm:
         fastcgi_pass unix:/run/php/php7.0-fpm.sock;
    }

    # deny access to .htaccess files, if Apache's document root
    # concurs with nginx's one
    #
    #location ~ /\.ht {
    #   deny all;
    #}
}


# Virtual Host configuration for example.com
#
# You can move that to a different file under sites-available/ and symlink that
# to sites-enabled/ to enable it.
#
#server {
#   listen 80;
#   listen [::]:80;
#
#   server_name example.com;
#
#   root /var/www/example.com;
#   index index.html;
#
#   location / {
#       try_files $uri $uri/ =404;
#   }
#}

server {
    listen 443;
    server_name localhost;
    ssl on;
    root /home/html;
    index index.html index.htm;
    ssl_certificate   cert/1531133153917.pem;
    ssl_certificate_key  cert/1531133153917.key;
    ssl_session_timeout 5m;
    ssl_ciphers ECDHE-RSA-AES128-GCM-SHA256:ECDHE:ECDH:AES:HIGH:!NULL:!aNULL:!MD5:!ADH:!RC4;
    ssl_protocols TLSv1 TLSv1.1 TLSv1.2;
    ssl_prefer_server_ciphers on;
}
步骤五 重新启动 nginx
$ nginx -s reload
输入:http://***** 浏览器访问项目地址。 测试nginx 是否重启成功,如果使用http都不能访问,肯定是配置文件有问题,可查看nginx日志文件进行查看错误原因。
如果http没有问题再改为:https://***** 进行测试,如果不能访问,可以查看配置文件是否配置成功,以及防火墙配置,是否禁用 443 端口
参考文档:
阿里云官方视频教学https://help.aliyun.com/video_detail/54216.html?spm=5176.11065259.1996646101.searchclickresult.735294efOYL9o7


