作为iOS的初学者,在使用一些基本控件的时候总是遇到一些坑,每次google再google,基本能解决问题,但不免浪费了时间。于是在这里把控件的常规用法以及需要特别注意的地方记录下来,如有不对之处,还请指正。
UIView简介
- UIView可称之为控件或视图,是所有控件的父控件。
- 一个app所呈现出来的,看得到的,如图片、文字等都是来自于UIView,如下图所示,绿色背景为最为常用的控件。
- 不难想象,一个视图要呈现出来,必须有位置和大小等属性,所以View提供了各个控件所需的最基本属性和方法。
UIView属性
- frame属性
frame属性为视图呈现的最基本元素,由位置和大小构成,OC抽象为CGRect这个结构。
struct CGRect {
    CGPoint origin;
    CGSize size;
};
typedef struct CGRect CGRect;
frame属性的基本设置方法:
UIView *view = [UIView alloc]init];
view.frame = CGRectMake(CGFloat x, CGFloat y, CGFloat width, CGFloat height);
我们看到这里用了alloc,再init的方法,即分配内存进而初始化对象,那为什么不直接用new呢?从new方法的原型可以看到alloc方法和new方法几乎没有区别。在原始的OC方法中创建对象一般也是用new方法,在引入Cocoa等框架后,设计者逐渐明白了不能在一棵树上吊死的理念,才逐步将分配内存和初始化对象分开来,使得初始化有了更多的选择,如常用的initWith方法。
 + (id) new
{
    return [[self alloc] init];
}
差点跑偏,说好的View呢!
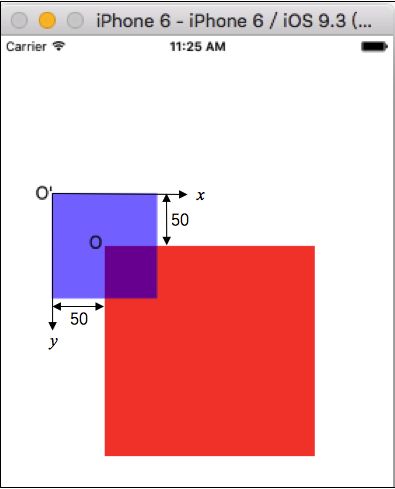
UIView通过CGRectMake方法返回一个CGRect,即一个View的坐标原点和大小。在UIKit中,坐标系的原点(0,0)在左上角,x值向右正向延伸,y值向下正向延伸,如下图所示。
一个view的frame是相对其父类而言的,即view的坐标原点是相对父类view偏离的位置。
- bounds属性
bounds属性和frame属性类似,其主要区别是坐标系的不同,frame以其父类bounds.origin为原点,如上图ViewA以父类O(0,0)为原点,位置为O'(x,y)。bounds属性以自己为原点,位置坐标为(0,0)。
frame = a view's location and size using the parent view's coordinate system
Important for: placing the view in the parent
bounds = a view's location and size using its own coordinate system
Important for: placing the view's content or subviews within itself
当然bounds属性也是可以修改的,当bounds属性origin被修改后产生怎样一种效果呢?如下图所示:
UIView *redView= [[UIView alloc]initWithFrame:CGRectMake(100, 200, 200, 200)];
//修改了redView的bounds
redView.bounds = CGRectMake(50, 50, 200, 200);
redView.backgroundColor = [UIColor redColor];
UIView *blueSubView= [[UIView alloc]initWithFrame:CGRectMake(0, 0, 100, 100)];
blueSubView.backgroundColor = [UIColor blueColor];
subView.alpha = 0.5;
[self.view addSubview:redView];
[redView addSubview:blueSubView];
从上图可以看到,当父类redView的bounds.origin修改后,子类frame origin为(0,0)的blueView左上角并没有与父类redView左上角重合,为什么会出现这种现象呢?因为一个视图的渲染是以父类bounds的坐标系为基础的。当redView的bounds.origin设置(50,50),也即是redView左上角O点的坐标在bounds的坐标系中为(50,50),由此可见bounds坐标系的坐标原点(0,0)由原来的O点变为O'点。因此在新的坐标系下blueView出现的位置就可以理解。
事实上,要知道一个view在它父视图什么地方时,记住这个公式:
//下图O'坐标-50 = 0 - 50;
CompositedPosition.x = View.frame.origin.x - Superview.bounds.origin.x;
CompositedPosition.y = View.frame.origin.y - Superview.bounds.origin.y;
- backgroundColor属性
设置背景颜色方法:
点语法或set方法,虽然点语法的实质就是set方法,但某些情况点语法是失效的(跟控件状态有关的属性),需要特别注意。如果希望uivew透明,可以设置其背景色为clearColor,即白色透明度为0的背景色。
view.backgroundColor = [UIColor redColor];
or [view setBackgroundColor:[UIColor redColor]];
or view.backgroundColor = [UIColor colorWithRed:0.1 green:0.1 blue:0.5 alpha:1];
- alpha属性
设置透明度方法:
透明度范围为0-1,0为全透明,1为不透明。
view.alpha = 0.5;
- tintColor属性
tintColor是ios7加入的新属性,有点魔法色的意思,可以重新渲染图片的色彩。如果一个view没有显示的指定tintColor,那它会继承父类的tintColor,如果view层级没有父类则默认为blue color,通过设置keywindow的tintColor就可以设置整个app的主题色。
[[UIApplication sharedApplication] keyWindow].tintColor = [UIColor redColor];
uivew设置tintColor,button类型需为UIButtonTypeSystem,否则无效。
[self.view setTintColor:[UIColor redColor]];
tint还有一些值得研究的地方,这里不做细讲,另写一篇笔记以其为主题。
UIView移动层级方法
相关方法很多,列出常用的几个。
//添加子view
- (void)addSubview:(UIView *)view;
//插入view在某个view下
- (void)insertSubview:(UIView *)view belowSubview:(UIView *)siblingSubview;
//插入view在某个view上
- (void)insertSubview:(UIView *)view aboveSubview:(UIView *)siblingSubview;
//移动view到最上层
- (void)bringSubviewToFront:(UIView *)view;
UIView单击事件
UIView不同于UIButton,UIButton继承于UIControl有addTarget的添加单击事件的方法,UIView添加单击方法可以通过重写UIResponder相关方法和添加手势来实现。
1. UIResponder
UIResponder是专门用来响应用户操作处理各种事件的类。
- 触摸屏幕
 - (void)touchesBegan:(NSSet *)touches withEvent:(UIEvent *)event {
    NSLog(@"touch begin");
}
- 在屏幕上移动
 - (void)touchesMoved:(NSSet *)touches withEvent:(UIEvent *)event {
    //检测touch点是否在targetView上
    UITouch *touch = [touches anyObject];
    CGPoint location = [touch locationInView:self.view];
    if (CGRectContainsPoint(self.targetView, location)) {
        NSLog(@"touch location in the targetView");
    }
}
- 手指离开屏幕,触摸结束
 - (void)touchesEnded:(NSSet *)touches withEvent:(UIEvent *)event {
    NSLog(@"touch end");
}
- 系统事件干扰(电话干扰等)
 - (void)touchesCancelled:(NSSet *)touches withEvent:(UIEvent *)event {
    NSLog(@"touch cancle");
}
2. Gesture
UIKit框架提供了UIGestureRecognizer手势识别这个类来对触摸进行处理。
    //添加单击手势
    UITapGestureRecognizer *tap = [[UITapGestureRecognizer alloc]initWithTarget:self action:@selector(click)];
    [self.view addGestureRecognizer:tap];
UIResponder和Gesture在这里都不做深入探讨,在其相应主题再行研究。
第一篇iOS笔记,大家一起学习。
PS: I am xinghun who is on the road.


