Auto layout is a constraint-based layout system. It allows developers to create an adaptive UI that responds appropriately to changes in screen size and device orientation. Some beginners find it hard to learn and avoid using it. Some developers even avoid using it. But believe me, you won’t be able to live without it when developing an app today.
With the release of iPhone 6/6s and 6/6s Plus, Apple’s iPhones are available in different screen sizes including 3.5-inch, 4-inch, 4.7-inch and 5.5-inch displays. Without using auto layout, it would be very hard for you to create an app that supports all screen resolutions. And, starting from Xcode 6, it is inevitable to use auto layout to design the user interface. This is why I want to teach you auto layout at the very beginning of this book, rather than jumping right into coding a real app.
In this tutorial, I want to help you build a solid foundation on designing an adaptive user interface using auto layout.
Auto layout is not as difficult as some developers thought. Once you understand the basics, you will be able to use auto layout to create complex user interfaces for all types of iOS devices.
Editor’s note:This tutorial is adapted froma chapter of our Swift book– Beginning iOS 10 Programming with Swift. For the full book, you cancheck it out here.
Why Auto Layout?
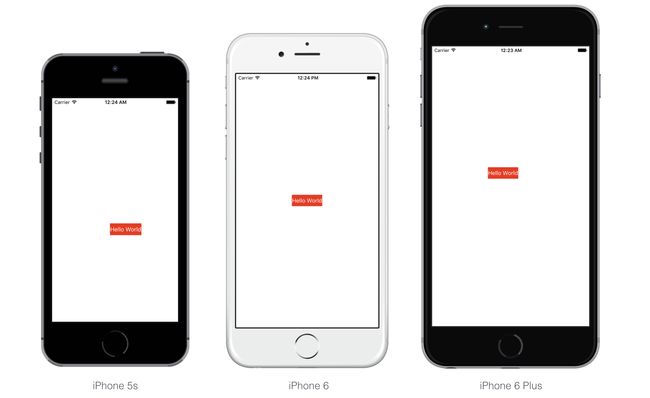
Let me give you an example, and you’ll have a better idea why auto layout is needed. Download and open thestarter project. Instead of running the app on iPhone 6/6s simulator, run it using the iPhone 6 Plus or iPhone 5 simulator. You’ll end up with the results illustrated in figure below. It turns out that the button isn’t centered when running on other iPhone devices, except iPhone 6/6s.
Let’s try one more thing.
Click the Stop button and run the app using the iPhone 6/6s simulator. After the simulator launches, go up to the menu and select Hardware > Rotate Left (or Rotate Right) from the menu. This rotates the device to landscape mode. Alternatively, you can press command+left arrow/right arrow to rotate the device sideway. Again, the Hello World button is not centered.
Why? What’s wrong with it?
As you know, the iPhone devices have different screen dimensions:
For iPhone 5/5s, the screen in portrait mode consists of 320 points (or 640 pixels) horizontally and 568 points (or 1136 pixels) vertically.
For iPhone 6/6s, the screen consists of 375 points (or 750 pixels) horizontally and 667 points (or 1334 pixels) vertically.
For iPhone 6/6s Plus, the screen consists of 414 points (or 1242 pixels) horizontally and 736 points (or 2208 pixels) vertically.
For iPhone 4s, the screen consists of 320 points (or 640 pixels) and 480 points (or 960 pixels).
Why Points instead of Pixels?
Back in 2007, Apple introduced the original iPhone with a 3.5-inch display with a resolution of 320×480. That is 320 pixels horizontally and 480 pixels vertically. Apple retained this screen resolution with the succeeding iPhone 3G and iPhone 3GS. Obviously, if you were building an app at that time, one point corresponds to one pixel. Later, Apple introduced iPhone 4 with retina display. The screen resolution was doubled to 640×960 pixels. So one point corresponds to two pixels for retina display.
The point system makes our developers’ lives easier. No matter how the screen resolution is changed (say, the resolution is doubled again to 1280×1920 pixels), we still deal with with points and the base resolution (i.e. 320×480 for iPhone 4/4s or 320×568 for iPhone 5/5s). The translation between points and pixels is handled by iOS.
Without using auto layout, the position of the button we lay out in the storyboard is fixed. In other words, we “hard-code” the frame origin of the button. In our example, the “Hello World” button’s frame origin is set to (147, 318). Therefore, whether you’re using a 3.5-inch or 4-inch or 5.5-inch simulator, iOS draws the button in the specified position. Below figure illustrates the frame origin on different devices. This explains why the “Hello World” button can only be centered on iPhone 6/6s, and it is shifted away from the screen center on other iOS devices, as well as, in landscape orientation.
Obviously, we want the app to look good on all iPhone models, and in both portrait & landscape orientation. This is why we have to learn auto layout. It’s the answer to the layout issues, that we have just talked about.
Auto Layout is All About Constraints
As mentioned before, auto layout is a constraint-based layout system. It allows developers to create an adaptive UI that responds appropriately to changes in screen size and device orientation. Okay, it sounds good. But what does the term “constraint-based layout” mean? Let me put it in a more descriptive way. Consider the “Hello World” button again, how do you describe its position if you want to place the button at the center of the view? You would probably describe it like this:
The button should be centered both horizontally and vertically, regardless of the screen resolution and orientation.
Here you actually define two constraints:
center horizontally
center vertically
These constraints express rules for the layout of the button in the interface.
Auto layout is all about constraints. While we describe the constraints in words, the constraints in auto layout are expressed in mathematical form. For example, if you’re defining the position of a button, you might want to say “the left edge should be 30 points from the left edge of its containing view.” This translates tobutton.left = (container.left + 30).
Fortunately, we do not need to deal with the formulas. All you need to know is how to express the constraints descriptively and use Interface Builder to create them.
Okay, that’s quite enough for the auto layout theory. Now let’s see how to define layout constraints in Interface Builder to center the “Hello World” button.
Live Previewing in Interface Builder
First, openMain.storyboardof your HelloWorld project (or download it fromhttp://www.appcoda.com/resources/swift3/HelloWorld.zip). Before we add the layout constraints to the user interface, let me introduce a handy feature in Xcode 8.
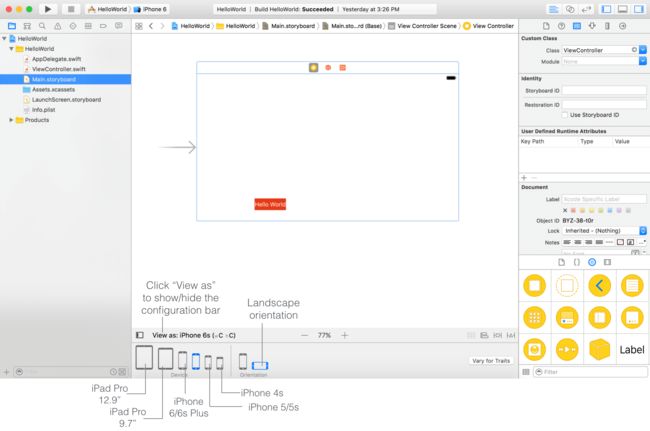
Instead of viewing the app UI in simulators, Xcode 8 provides a configuration bar in Interface Builder for developers to live preview the user interface.
By default, Interface Builder is set to preview the UI on iPhone 6s. To see how your app looks on other devices, clickView as: iPhone 6sbutton to reveal the configuration bar and then choose your preferred iPhone/iPad devices to test. You can also alter the device’s orientation to see how it affects your app’s UI. The figure below shows a live preview of the Hello World app on iPhone 6s in landscape orientation.
The configuration bar is a great feature in Xcode 8. Take some time to play around with it.
Note:You may wonder what “(wC hC)” means. Just forget about it right now and focus on learning auto layout. If you’re interested in learning more about it, you can check outour Swift book.
Using Auto Layout to Center the Button
Now let’s continue to talk about auto layout. Xcode provides two ways to define auto layout constraints:
Auto layout bar
Control-drag
We’ll demonstrate both approaches in this article. First, we begin with the auto layout bar. At the bottom-right corner of the Interface Builder editor, you should find four buttons. These buttons are from the layout bar. You can use them to define various types of layout constraints.
Each button has its own function:
Align – Create alignment constraints, such as aligning the left edges of two views.
Pin – Create spacing constraints, such as defining the width of a UI control.
Issues – Resolve layout issues.
Stack – Embed views into a stack view. Stack view is a new feature since Xcode 7. We will further discuss about it in the next chapter.
As discussed earlier, to center the “Hello World” button, you have to define two constraints:center horizontallyandcenter vertically. Both constraints are with respect to the view.
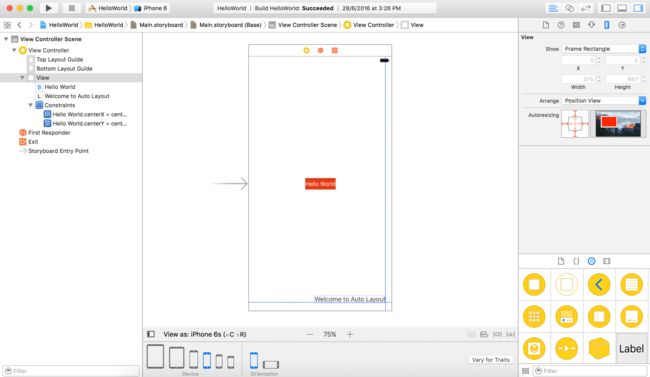
To create the constraints, we will use the Align function. First, select the button in Interface Builder and then click theAlignicon in the layout bar. In the pop-over menu, check both “Horizontal in container” and “Vertically in container” options. Then click the “Add 2 Constraints” button.
Quick tip:You can press command+0 to hide the project navigator. This will free up more screen space for you to work on the app design.
You should now see a set of constraint lines. If you expand theConstraintsoption in the document outline view, you will find two new constraints for the button. These constraints ensure the button is always positioned at the center of the view. Alternatively, you can view these constraints in the Size inspector.
Quick note:When your view layout is being configured correctly and there is no ambiguity, the constraint lines are in blue.
Okay, you’re ready to test the app. You can click the Run button to launch the app on iPhone 6/6s Plus (or iPhone 4s). Alternatively, just choose another device or change the device’s orientation using the configuration bar to verify the layout. The button should be centered perfectly, regardless of screen size and orientation.
Resolving Layout Constraint Issues
The layout constraints that we have just set are perfect. But that is not always the case. Xcode is intelligent enough to detect any constraint issues.
Try to drag the Hello World button to the lower-left part of the screen. Xcode immediately detects some layout issues and the corresponding constraint lines turns orange that indicates a misplaced item.
Auto layout issues occur when you create ambiguous or conflicting constraints. Here we said the button should be vertically and horizontally centered in the container (i.e. the view). However, the button is now placed at the lower-left corner of the view. Interface Builder found this confusing, therefore it uses orange lines to indicate the layout issues.
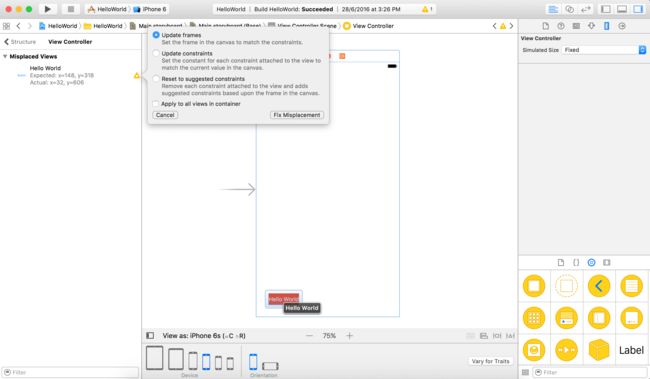
When there is any layout issue, the Document Outline view displays a disclosure arrow (red/orange). Now click the disclosure arrow to see a list of the issues. Interface Builder is smart enough to resolve the layout issues for us. Click the indicator icon next to the issue and a pop-over shows you a number of solutions. In this case, select the “Update Frame” option and click “Fix Misplacement” button. The button will then be moved to the center of the view.
This layout issue was triggered manually. I just wanted to demonstrate how to find the issues and fix them. As you go through the exercises in the later chapters, you will probably face a similar layout issue. You should know how to resolve layout issues easily and quickly.
An Alternative Way to Preview Storyboards
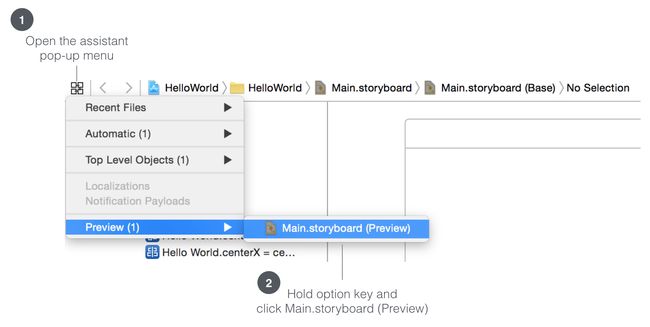
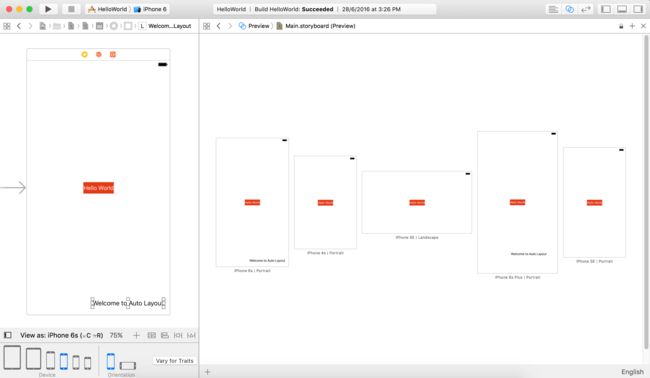
While you can use the configuration bar to live preview your app UI, Xcode provides an alternate Preview feature for developers to preview the user interface on different devices simultaneously.
In Interface Builder, open the Assistant pop-up menu > Preview (1). Now press and holdoptionkey, then click Main.storyboard (Preview). You can refer to the figure below for the steps.
Xcode will display a preview of your app’s UI in the assistant editor. By default, it shows you the preview on a iPhone 6s device. You can click the + button at the lower-left corner of the assistant editor to add other iOS devices (e.g. iPhone 4s/SE) for preview. If you want to see how the screen looks like in landscape orientation, simply click the rotate button. The Preview feature is extremely useful for designing your app’s user interface. You can make changes to the storyboard (say, adding another button to the view) and see how the UI looks on the chosen devices all at once.
If you want to free up some more screen space for the preview pane, hold both command and option keys and then press 0 to hide the Utility area.
Quick tip:When you add more devices in the preview assistant, Xcode may not be able fit the preview of all devices sizes into the screen at the same time. If you’re using a trackpad, you can scroll through the preview by swiping left or right with two fingers. What if you’re still using a mouse with a scroll wheel? Simply hold the shift key to scroll horizontally.
Adding a Label
Now that you have some idea about auto layout and the preview feature, let’s add a label to the lower-right part of the view and see how to define the layout constraints for the label. Labels in iOS are usually used for displaying simple text and messages.
In the Interface Builder editor, drag a label from the Object library and place it near the lower-right corner of the view. Double-click the label and change it to “Welcome to Auto Layout” or whatever title you want.
If you opened the preview assistant again, you should see the UI change immediately. Without defining any layout constraints for the label, you are not able to display the label on all iPhone devices except iPhone 6s and 6s Plus.
How can you resolve this issue? Obviously, we need to setup a couple of constraints to make it work properly. The question is:what constraints should we add?
Let’s try to describe the requirement of the label in words. You probably describe it like this:
The label should be placed at the lower-right corner of the view.
That’s okay, but not precise enough. A more precise way to describe the location of the label is like this:
The label is located 0 points away from the right margin of the view and 20 points away from the bottom of the view.
This is much better. When you describe the position of an item precisely, you can easily come up with the layout constraints. Here, the constraints of the label are:
The label is 0 points away from the right margin of the view.
The label is 20 points away from the bottom of the view.
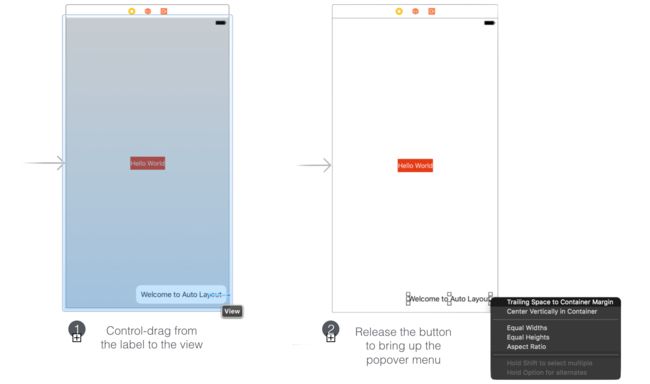
In auto layout, we refer this kind of constraints as spacing constraints. To create these spacing constraints, you can use the Pin button of the layout button. But this time we’ll use theControl-dragapproach to apply auto layout. In Interface Builder, you can control-drag from an item to itself or to another item along the axis for which you want to add constraints.
To add the first spacing constraint, hold thecontrolkey and drag from the label to the right until the view becomes highlighted in blue. Now release the button, you’ll see a pop-over menu showing a list of constraint options. Select “Trailing space to container margin” to add a spacing constraint from the label to the view’s right margin.
In the document outline view, you should see the new constraint. Interface Builder now displays constraint lines in red indicating that there are some missing constraints. That’s normal as we haven’t defined the second constraint.
Now control-drag from the label to the bottom of the view. Release the button and select “Vertical Spacing to Bottom Layout Guide” in the shortcut menu. This creates a spacing constraint from the label to the bottom layout guide of the view.
Once you added the two constraints, all constraint lines should be in solid blue. When you preview the UI or run the app in simulator, the label should display properly on all screen sizes, and even in landscape mode.
Top and Bottom Layout Guide
You may wonder what the Bottom Layout Guide means. Generally, the Bottom Layout Guide refers to the bottom of the view, like the one shown in the example. Sometimes, the Bottom Layout Guide varies. For example, if there is a tab bar, the Bottom Layout Guide will refer to the top of tab bar.
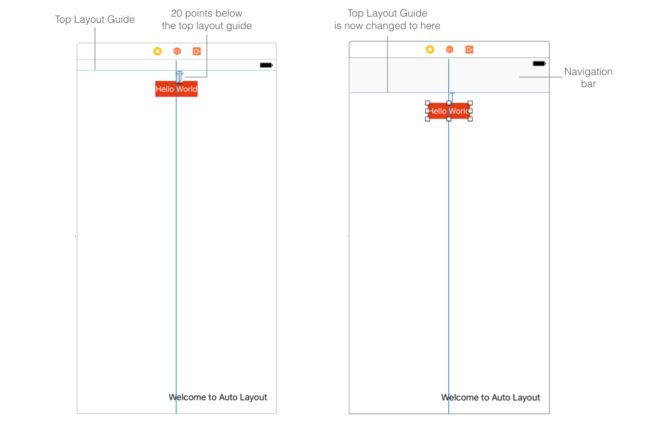
For the Top Layout Guide, it sits at 20 points (which is the height of the status bar) from the top of the view.
These layout guides are particularly useful for defining layout constraints because they automatically varies its position when the view’s layout is changed. For example, if the view contains a navigation bar, the top layout guide sits below the navigation bar (see figure 5-17). Therefore, as long as the UI object is constrained relative to the top/bottom layout guide, your interface will layout correctly even if you add a navigation or tab bar to the interface.
Editing Constraints
The “Welcome to Auto Layout” label is now located 0 points away from the right margin of the view. What if you want to add some space between the label and the right margin of the view? Interface Builder provides a convenient way to edit the constant of a constraint.
You can simply choose the constraint in the document outline view. Here, you should select “trailingMargin” constraint. In the Attributes inspector, you can find the properties of this constraint including relation, constant, and priority. The constant is now set to 0. You can change it to20to add some extra space.
Your Exercise
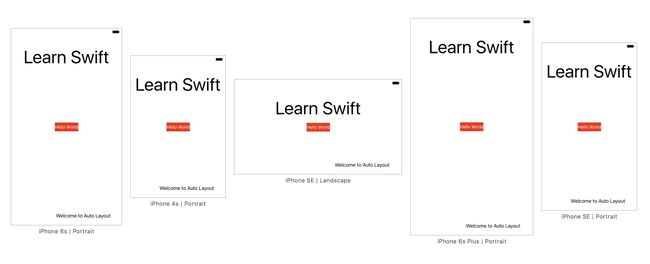
By now, I hope you should have some basic ideas about how to lay out your app UI and make it fit for all screen sizes. Let’s have a simple exercise before moving on to the next chapter. All I need you to do is add another label namedLearn Swiftto the view with the following constraints:
The new label should be 40 points away from the top layout guide.
The new label should be centered horizontally.
Optionally, you can increase the font size of the label to 30 points. To change the font size, you just open the Attributes inspector and edit theFontoption. Your end result should look like this:
Summary
In this chapter, we went through the basics of Auto Layout. It’s just the basics because I don’t want to scare you away from learning auto layout. As we dig deeper and create a real app, we’ll continue to explore some other features of auto layout.
Most of the beginners (and even some experienced iOS programmers) avoid using auto layout because it looks confusing. If you throughly understand what I have covered in this chapter, you’re on your way to becoming a competent iOS developer. The original iPhone was launched in 2007. Over these years, there have been tons of changes and advancements in the area of iOS development. Unlike the good old days when your apps just needed to run on a 3.5-inch, non-retina device, your apps now have to cater to various screen resolution and sizes. This is why I devoted a whole chapter to Auto Layout.
So take some time to digest the materials.
For reference, you can download the complete Xcode project fromhere.
