一、Service的简介
Service为Android四大组件之一,和Activity一样,都是Context的子类,只是它没有界面,Service很适合去执行那些长时间运行又不需要和用户交互的任务。由于Service本身是在主线程运行的,所以如果需要执行耗时操作还是需要另外开启子线程,否则会出现ANR错误。
Service包含三种类型:
- Foreground:前台服务。启动的时候使用通知(Notification),以提示用户此服务正在执行。需要注意的是此时的Service还是在后台运行的。
- Background:后台服务。执行的时候用户是不可感知的。
- Bound:绑定服务。当使用bindService()方法启动Service的时候,此Service为绑定服务。此时Service可以和与它绑定的组件进行交互。可以绑定多个组件,并且当所有绑定的组件对其解绑时此Service才会被销毁。
二、Service的生命周期
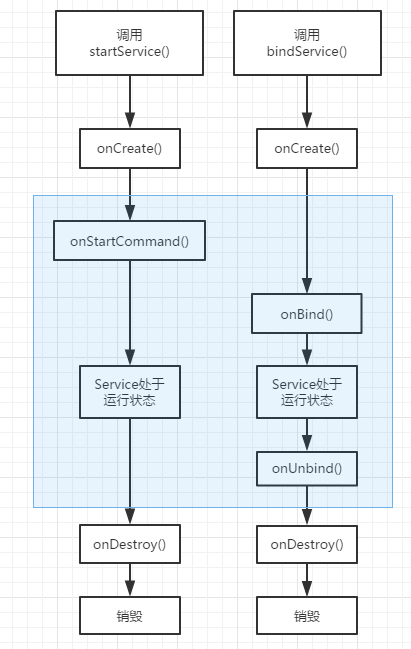
Service 有两种启动方式,startService() 和 bindService()。
-
startService() 启动的生命周期如上图左边所示。特别的,会回调 onStartCommand()方法
- onCreate()在整个生命周期中只会被调用一次
- onStartCommand()可能会被多次调用,包括 Service 重启,重复调用 startService()
- startService() 启动的 Service 停止的方法是 Service 调用自己的 stopSelf() 方法或是其他其他组件调用 stopService(Intent name) 方法,参数中的 name 可以直接 new 一个,只要关联的 class 为要停止的目标 Service就可以了。
- stopSelf()还有个重载方法 stopSelf(int startId),可单独停止 startId 对应的请求。startId 为 onStartCommand() 方法传入的参数 startId,用来区分每次访问请求,
-
bindService()启动的生命周期如上图右边所示。特别的,会调用 onBind() 和 onUnbind()
- onCreate() 在整个生命周期中只会被调用一次
- 同一个组件可以绑定多次
- 当多个组件绑定此服务时 onBind() 只在第一次绑定的时候被调用。
- 用此方式启动的 Service 使用 Service.stopSelf() 或者是在组件调用 stopService() 来停止服务是无效的
- 此服务会一直运行下去,直到绑定的所有的组件调用 unbindService() 方法对其解绑,只要有一个绑定的组件未解绑,则此服务不会停止。
onStartCommand() 方法返回一个整数值,让系统在系统杀死此 Service 的时候如何处理此 Service
- START_NOT_STICKY:Service 被系统杀死后不会重启
- START_STICKY:Service 被系统杀死后会重启,此时调用 onStartCommand() 传入的 Intent 的值为null
- START_REDELIVER_INTENT:Service 被系统杀死后会重启,此时调用 onStartCommand() 传入的 Intent 值为最后一次调用 startService() 时传入的。
三、创建服务
1、创建后台服务(无交互)
不可交互的后台服务的启动方式为 startService(),
public class MyService extends Service{
    public static final String TAG = "MyService";
    @Nullable
    @Override
    public IBinder onBind(Intent intent) {
        Log.e(TAG,"onBind");
        return null;
    }

    @Override
    public void onCreate() {
        Log.e(TAG,"onCreate");
        super.onCreate();
        runAfterStop();
    }

    private void runAfterStop(){
        new Thread(){
            @Override
            public void run() {
                try {
                    Thread.sleep(5000);
                    Log.e(TAG,"stopSelf()");
                    stopSelf();
                } catch (InterruptedException e) {
                    e.printStackTrace();
                }
            }
        }.start();
    }

    @Override
    public int onStartCommand(Intent intent, int flags, int startId) {
        Log.e(TAG,"onStartCommand");
        return START_NOT_STICKY;
    }

    @Override
    public boolean onUnbind(Intent intent) {
        Log.e(TAG,"onUnbind");
        return super.onUnbind(intent);
    }

    @Override
    public void onDestroy() {
        Log.e(TAG,"onDestroy");
        super.onDestroy();
    }
}
启动服务
public class BaseActivity extends AppCompatActivity{
        ...
        Intent intent = new Intent(this, MyService.class);
        startService(intent);
        ...
}
2、创建前台服务
前台服务会在通知栏/状态栏上显示,并且此时的 Service 的优先级比较高,
public class ForegroundService extends Service{
    @Nullable
    @Override
    public IBinder onBind(Intent intent) {
        return null;
    }

    @Override
    public void onCreate() {
        //id不能为0,否则通知栏/状态栏不会显示
        int id = 1;
        startForeground(id,createNotification());
    }

    private Notification createNotification(){
        Intent notifiIntent = new Intent(this, FirstActivity.class);
        PendingIntent pendingIntent = PendingIntent.getActivity(this,0,notifiIntent,0);

        Notification.Builder builder = new Notification.Builder(this)
                .setContentTitle("title")
                .setContentText("Content")
                .setSmallIcon(R.drawable.ic_launcher_background)
                .setContentIntent(pendingIntent);

        return builder.build();
    }
}

...
//启动服务
public class BaseActivity extends AppCompatActivity{
        ...
        Intent intent = new Intent(this, MyService.class);
        startService(intent);
        ...
}
如果要取消前台服务,可以调用 stopForeground(boolean removeNotification) ,
参数 removeNotification 为 true 表示取消前台服务通知也移除掉通知栏/状态栏的图标,false 表示不移除
调用此方法不会导致服务停止,只是把前台转到后台
当服务停止的时候,通知栏/状态栏的图标也会同时被移除
3、创建绑定服务(可交互的)
绑定服务(Bound Services)为客户端-服务器模式。由于需要交互,所以需要有一个中间代理对象,此对象需要服务端创建然后返回给客户端持有,类型为 Binder,由 onBind() 进行返回。
服务端代码:
public class BoundService extends Service {

    private IBinder mBinder = new LocalBinder();

    public class LocalBinder extends Binder{
        public int add(int a,int b){
            return BoundService.this.add(a,b);
        }
    }

    @Nullable
    @Override
    public IBinder onBind(Intent intent) {
        return mBinder;
    }

    private int add(int a,int b){
        return a + b;
    }
}
客户端代码:
public class BoundActivity extends Activity{
    //持有绑定服务返回的 Binder 对象
    private BoundService.LocalBinder mBinder;

    @Override
    protected void onCreate(@Nullable Bundle savedInstanceState) {
        super.onCreate(savedInstanceState);
        serviceBind();
    }

    @Override
    protected void onStop() {
        super.onStop();
        unbindService(mServiceConn );
    }

    //绑定服务
    private void serviceBind() {
        Intent intent = new Intent(this, MyService.class);
        bindService(intent, mServiceConn, Context.BIND_AUTO_CREATE);
    }

    //点击事件
    public void addClick(View view){
        add(2,3);
    }

    //调用绑定服务的方法
    private void add(int a,int b){
        Log.(TAG,mBinder.add(a,b));
    }

    //绑定服务后的回调接口
    private ServiceConnection mServiceConn = new ServiceConnection() {
        @Override
        public void onServiceConnected(ComponentName name, IBinder service) {
            Log.e(TAG,"bing Service Connected");
            mBinder = (BoundService.LocalBinder) service;
        }

        @Override
        public void onServiceDisconnected(ComponentName name) {
            Log.e(TAG,"unBind Service disConnected");
            mBinder = null;
        }
    };

}
这个只是基于简单相同进程内调用,如果在 Manifest 文件中给 BoundService 添加上 process=":remote" 变成远处服务,则上面的代码就会报错,抛出 java.lang.ClassCastException 异常,因为此种情况下返回的是 Binder 的代理对象 BInderProxy,所以抛出类型转换错误。进程间的通信要用到 AIDL ,这个只能另外写篇回顾了。
4、IntentService
IntentService 是 Service 的子类,用来处理异步请求
特点:
1、会创建一个默认的工作子线程处理所有的请求
2、会有一个队列逐个处理所有的 Intent 并会在 onHandleIntent() 实现
3、当 Service 处理所有的工作后会自动结束 Service,不需要手动调用 stopSelf()
4、默认实现返回值为 null 的 onBind() 方法
5、默认实现 onStartCommand(),会把请求的 Intent 放到工作队列里
所以我们不需要去管理 IntentService 的生命周期和管理线程。并且 IntentService 在处理完所以任务后会自动关闭。当业务不需要涉及到多线程任务时,IntentService 就能够满足大多数的需求了。
实现 IntentService 的方式很简单,只需要提供一个构造方法和实现 onHandleIntent() 方法
public class TestIntentService extends IntentService {
    publicTestIntentService() {
        super("TestIntentService");
    }

    @Override
    protected void onHandleIntent(Intent intent) {
        //模拟耗时操作
        try {
            Thread.sleep(5000);
        } catch (InterruptedException e) {
            Thread.currentThread().interrupt();
        }
    }
}
IntentService 的是使用 HandlerThread + Handler 来实现的。HandlerThread 为Thread的子类,Handler 运行在 HandlerThread 线程中,处理耗时操作。
四、Service 和线程 Thread
Service 是 Android 的一种机制,运行在主线程中,如果进行耗时操作,需要创建一个子线程执行。
Service 的优先级高于后台挂起的 Activity 和其所创建的子线程 Thread。系统可能会在内存不足的时候,优先杀死后台挂起的 Activity 或 Thread,而不会轻易杀死 Service。
Thread 的运行是独立于 Activity 的,当 Activity 被 finish 掉的时候,如果没有主动停止 Thread 或未执行完任务,那么它还会继续执行。此时程序将不再持有这个 Thread 的引用,此时将控制不了此 Thread。
所以当需要长期稳定的在后台运行某个任务时,需要使用 Service,而当 Service 在运行这个任务时要处理耗时操作时,要另外创建子线程来执行。