写写文章总结一下之前的工作内容,看来以后还是要及时写总结,现在写好多细节都想不起来了。
公司小程序后台管理页面,由于业务需求需要自定义富文本编辑器用于文章格式的编辑。使用第三方的富文本编辑器改动起来不太灵活,经过调研,决定使用facebook的开源库Draft.js来自定义一个富文本编辑器。
Draft.js官网如下: https://draftjs.org,它是基于React开发的,并不是一个开箱即用的编辑器,如果你直接使用,像这样子:
import React from 'react';
import {Editor, EditorState} from 'draft-js';
class RichEditor extends React.Component {
constructor(props) {
super(props);
this.state = {editorState: EditorState.createEmpty()};
this.onChange = (editorState) => this.setState({editorState});
}
render() {
return (
这样界面只会出现一个可编辑的空白行。Draft.js只提供基础功能模块,开发者需要根据业务需求做进一步的编码。那么相比其他的富文本编辑器Draft.js有什么优势呢?要回答这个答案就要先了解它使用和存储富文本的方式。
- EditorState与ContentState
EditorState 是 Draft.js 最重要的一个对象,它是用来存储富文本编辑器所有内容和状态的。这个对象作为组件属性输入给 Editor 组件,一旦用户进行操作,比如敲一个回车,Editor 组件的 onChange 事件触发,onChange 函数返回一个全新的 EditorState 实例,Editor 接收这个新的输入,渲染新的内容,所以,最简单的写法就是前面代码所示那样。
EditorState 包括的内容大致如下:
(1) 当前文本内容状态(ContentState)
(2) 当前选中内容状态(SelectionState)
(3) 所有的内容修饰器(Decorator)
(4) 撤销和重做栈
(5) 最后一次变更操作的类型。
Draft.js 提供 covertToRaw 方法可以将 EditorState 对象转化为 plain JavaScript 对象,从而可以将这些数据上传到后台,并提供 convertFromRaw 方法将 plain JavaScript 对象转化为 EditorState 对象。那么转化成的 plain JavaScript 对象是保存了什么东西呢?
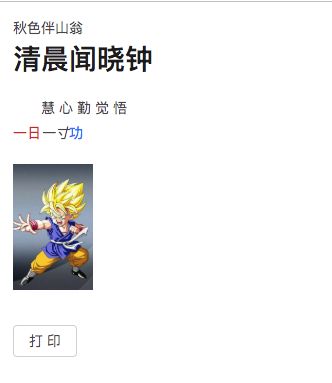
举个例子,现在Draft.js编辑器的内容如下:
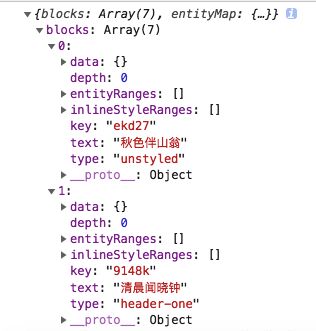
那么经过 covertToRaw 转换的 plain JavaScript 对象打印如下:
可以看到,这个 plain JavaScript 对象包含两个字段 blocks 和 entityMap,各自保存着一个数组。其中blocks数组有7个元素,每个元素都描述着当前内容的一个块级元素,当前内容有4行文字,一张图片,2行空白行(图片的前后是两行空白行,这是Draft.js添加图片,视频等资源时默认生成的空白行),展开blocks数组下标为0和1两个元素如下:
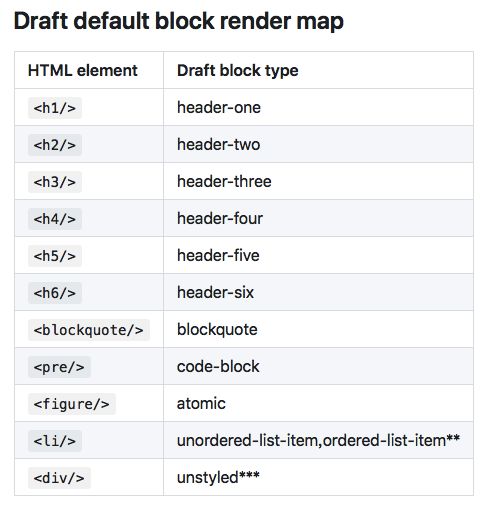
text表示该块级元素中的纯文本,type 表示该块级元素的类型,header-one 表示一级标题、unstyled 表示普通段落、atomic 表示多媒体类的块级元素,这些类型,可以直接是库提供的,也可以自定义。库提供的类型如下:
展开blocks数组下标为2和3的两个元素如下:
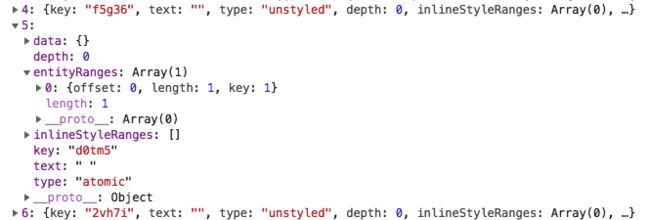
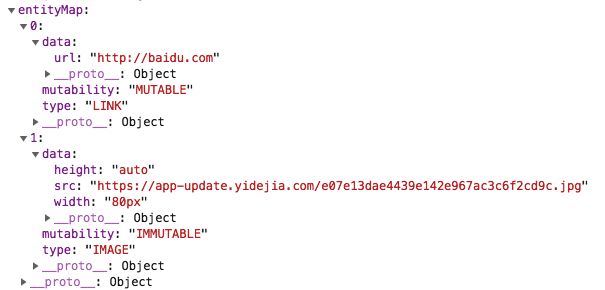
会发现下标为2的元素的data字段是有值的,该字段表示块级元素的样式(可以是自定义的样式),比如我这一行的样式,就设置为了字间距为4px,行间距是2,缩进2个字符,对齐样式为默认(左对齐)。下标为3的元素的inlineStyleRanges字段存储的数组有2个元素,描述着该行的行内样式,比如 0: {offset: 0, length: 5, style: "color-rgb(223, 41, 41)"} 表示该块级元素的文本,从下标为0的文字开始,长度为5的字符串的颜色为color-rgb(223, 41, 41);entityRanges字段存储的是超链接、图片、视频等多媒体资源的信息,比如现在“功”这个字添加了超链接,那么entityRanges 对应的数组的第一个元素是0: {offset: 4, length: 1, key: 0},就表示下标为4,长度为1的字符串关联着一个多媒体资源,而这个资源的具体数据,存储在entityMap数组中,这个key就是用来索引到entityMap数组中的资源的。blocks数组下标为5的元素描述一张图片(4和6下标的元素是图片两个前后空白行),展开如下:
entityRanges展开如下:
根据key就能在entityRanges数组中找到对应位置的资源。其中,data字段是资源的链接等信息,mutability分为"MUTABLE","IMMUTABLE","Segmented",该字段是用来表示对应着 entity 的文本将如何被修改/删除;"MUTABLE"表示对于的文本在链接资源后是可以任意的更改的,"IMMUTABLE"表示对于的文本链接资源后不能随意更改,一旦更改链接就将失效。type表示资源的类型,可以为"LINK","IMAGE","AUDIO","VIDEO"。
由此,知道了 Draft.js 是通过json数据来存储富文本数据的,和传统的使用html文本存储符文文本相比大概有以下几点好处:
(1)更容易取出富文本里面的信息。比如图片,如果用html文本存储,需要写复杂的正则表达式去匹配图片的url,宽高,才能取到这些信息。
(2)多端复用。json存储的数据,app将更容易解析出来用原生渲染,而html由于写法的不统一,有时候很难保证渲染细节的正确性。
(3)更加灵活的使用巴拉巴拉。
-
自定义块样式,行内样式
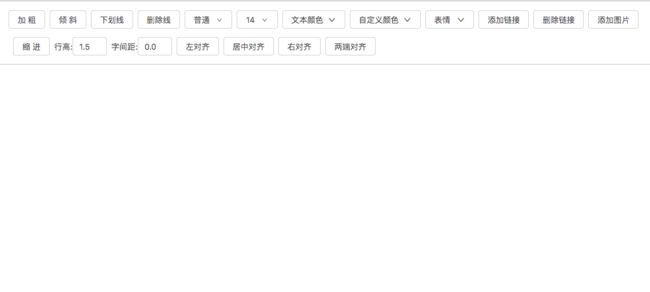
Draft.js 提供了丰富的接口让开发者高度定制自己的编辑器,例如像我这样基于antd组件开发的编辑器界面如下:
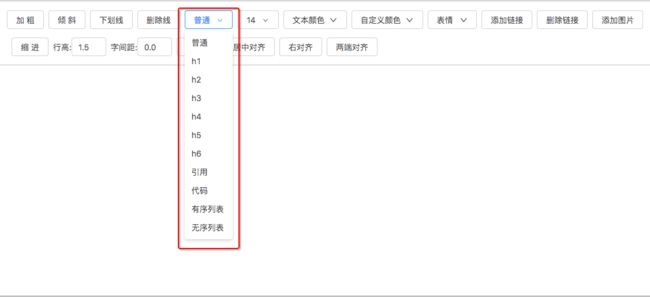
上面的一排按钮就是使用antd组件创建的,基本的思路是点击按钮或者其他操作的时候创建一个新的editorState,再赋值给Editor组件,就改变了内容的状态。比如下面的一系列块类型是系统提供的块类型:
我点击其中一种类型,改变光标所在行的块类型,代码片段如下:
// 块类型
const blockTypes = [
    { label: '普通', style: 'unstyled' },
    { label: 'h1', style: 'header-one' },
    { label: 'h2', style: 'header-two' },
    { label: 'h3', style: 'header-three' },
    { label: 'h4', style: 'header-four' },
    { label: 'h5', style: 'header-five' },
    { label: 'h6', style: 'header-six' },
    { label: '引用', style: 'blockquote' },
    { label: '代码', style: 'code-block' },
    // { label: 'atomic', style: 'atomic' },这个有问题
    { label: '有序列表', style: 'ordered-list-item' },
    { label: '无序列表', style: 'unordered-list-item' },
]

    // 点击菜单
    clickMenu = (e) => {
        const newEditState = RichUtils.toggleBlockType(
            this.props.editorState,
            e.key // unstyled header-one header-two ... blockquote code-block ordered-list-item unordered-list-item ...
        )
        this.props.onBlockTypeChange(newEditState)
    }
通过toggleBlockType函数,传入上一个editorState和系统块类型的key,返回一个新的editorState。
当光标位置改变时,需要获取到当前光标所在行的块类型,改变按钮的文字,代码如下:
// 得到当前块样式的label
    getCurrentBlockLabel = () => {
        const editorState = this.props.editorState
        const selection = editorState.getSelection()
        const blockStyle = editorState.getCurrentContent().getBlockForKey(selection.getStartKey()).getType()
        let blockLabel = ''
        blockTypes.forEach((blockType) => {
            if (blockType.style === blockStyle) {
                blockLabel = blockType.label
                return
            }
        })
        return blockLabel
    }
使用系统的行内样式,也是差不多的逻辑:
// 行内样式
const inlineTypes = [
    { label: '加粗', style: 'BOLD' },
    { label: '倾斜', style: 'ITALIC' },
    { label: '下划线', style: 'UNDERLINE' },
    { label: '删除线', style: 'STRIKETHROUGH' },
]

// 点击按钮
    clickBtn = (e, style) => {
        // 阻止点击按钮后editor失去了焦点,而且按钮的事件必须是onMouseDown,onClick调用该方法editor还是会失去焦点
        e.preventDefault()
        const newEditState = RichUtils.toggleInlineStyle(
            this.props.editorState,
            style
        )
        this.props.onInlineTypeChange(newEditState)
    }
调用 toggleInlineStyle 函数,需要注意的是在点击按钮事件需要使用 onMouseDown ,并且在触发的函数里开头需要写 e.preventDefault(),这样可以阻止按钮获取到焦点,光标依然保持选中文本的状态。
自定义行内样式,调用的是 toggleCustomInlineStyle 函数比如自定义字体大小,文本颜色,代码如下:
// 点击菜单
    clickMenu = (e) => {

        const newEditState = toggleCustomInlineStyle(
            this.props.editorState,
            'fontSize',
            Number(e.key),
          )
        this.props.onFontSizeChange(newEditState)
    }

// 颜色选择器选择的颜色改变,draft.js不支持更改文字透明度
    handleChangeComplete = (color) => {
        const newTextColor = `rgb(${color.rgb.r}, ${color.rgb.g}, ${color.rgb.b})`
        this.setState({ textColor: newTextColor})
        const newEditState = toggleCustomInlineStyle(
            this.props.editorState,
            'color',
            newTextColor,
          )
        this.props.onTextColorChange(newEditState)
    }
改变文字的透明度貌似是不支持的,也可能是我姿势不对。
自定义块样式就稍微复杂点,分为2步:
(1)块样式是存储在上文说过的data字段中的,像这个:
那么就是往data塞入你想添加的块样式。
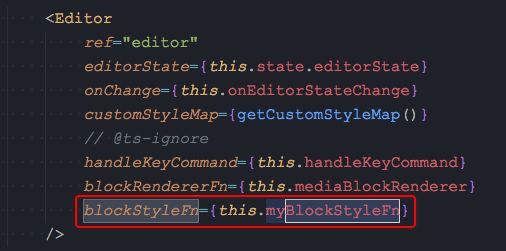
(2)根据data中的块样式渲染文本内容。需要实现 blockStyleFn 函数,如下图:
所以代码也是分2步走,第一步,构建data字段中的数据,需要注意的是当你添加一个块样式的时候,原先的块样式会被完全替换,所以需要记录下之前所有的块样式,再在此基础上添加新的块样式,在赋值回去。例如现在添加缩进:
// 点击缩进按钮
    onHandleIndentation = (e) => {
        e.preventDefault()

        const { editorState } = this.props
        const selectedBlocksMetadata = getSelectedBlocksMetadata(editorState)
        let newEditorState = null

        if (selectedBlocksMetadata.get('text-indent')) {
            const types = this.getAllBlockType(undefined, selectedBlocksMetadata.get('line-height'), selectedBlocksMetadata.get('letter-spacing'), selectedBlocksMetadata.get('text-align'))
            newEditorState = setBlockData(editorState, types)
        } else {
            const types = this.getAllBlockType('2em', selectedBlocksMetadata.get('line-height'), selectedBlocksMetadata.get('letter-spacing'), selectedBlocksMetadata.get('text-align'))
            newEditorState = setBlockData(editorState, types)
        }

        this.props.onBlockStyleChange(newEditorState)
    }

// 得到总样式
    getAllBlockType = (textIndent, lineHeight, letterSpacing, textAlign) => {
        return {
            'text-indent': textIndent,
            'line-height': lineHeight,
            'letter-spacing': letterSpacing,
            'text-align': textAlign
        }
    }
接下来实现 myBlockStyleFn 函数。取出data,动态创建一个css样式并返回:
// 自定义样式匹配
    myBlockStyleFn = contentBlock => {
        const type = contentBlock.getType()
        const metaData = contentBlock.getData()

        const textIndent = metaData.get('text-indent')
        const lineHeight = metaData.get('line-height')
        const letterSpacing = metaData.get('letter-spacing')
        const textAlign = metaData.get('text-align')

        if (textIndent || lineHeight || letterSpacing || textAlign) {
            let letterSpacingName = ''
            if (!letterSpacing) {
                letterSpacingName = letterSpacing
            } else {
                letterSpacingName = Math.round(
                    Number(
                        letterSpacing.substring(0, letterSpacing.indexOf('px'))
                    ) * 100
                ).toString()
            }

            const className =
                'custom' +
                textIndent +
                Math.round(lineHeight * 100) +
                letterSpacingName +
                textAlign
            const { dymanicCssList } = this.state
            let classIsExist = false

            for (const dymanicCss of dymanicCssList) {
                if (dymanicCss === className) {
                    classIsExist = true
                    break
                }
            }

            if (!classIsExist) {
                // console.log(className,textIndent,lineHeight,letterSpacing)
                dymanicCssList.push(className)
                this.loadCssCode(`.${className} {
                    text-indent: ${textIndent};
                    line-height: ${lineHeight};
                    letter-spacing: ${letterSpacing};
                    text-align: ${textAlign};
                }`)
            }

            return className
        }
    }

// 动态创建css
    loadCssCode = code => {
        const style = document.createElement('style')
        style.type = 'text/css'
        // style.rel = 'stylesheet';
        // for Chrome Firefox Opera Safari
        style.appendChild(document.createTextNode(code))
        // for IE
        // style.styleSheet.cssText = code;
        const head = document.getElementsByTagName('head')[0]
        head.appendChild(style)
    }
样式名的创建写的有些复杂,目的就是防止和别的样式名重复了,之前还踩过样式名存在某些特殊字符的时候样式就无效的坑。。。,新创建的样式名会放入一个数组中,下次创建的时候判断数组里面有没有同名的样式,如果存在就不重复创建了。因为这个 myBlockStyleFn 函数是会频繁调用的,基本上你只要改变富文本的任何一个状态(例如光标位置改变,添加一个文字)就会调用,其他赋值给Editor的函数也是同理,所以如果你在函数里的实现比较耗时,就会导致你在编辑器中快速添加文字的时候产生延迟。
3.使用 Entity 对象创建超链接
Entity 是 Draft.js 中用于存储元数据的概念,所以可以用来表示超链接、图片、视频等需要额外数据项的多媒体内容。该对象有三个属性:
(1)用于表示该 Entity 类型的 type,比如可以取值为 link、image。
(2)根据 Entity 是否可变,mutability 具有三种取值:IMMUTABLE、MUTABLE 和 SEGMENTED。
(3)用于存储 Entity 元数据的 data 字段,比如对于超链接 Entity,应该有一个 href 值。
例如,现在我选中一段文字,点击添加链接按钮为其添加超链接:
首先需要获取到选中的文字,然后根据链接创建一个entity对象,再将选中文字和entity对象绑定,再创建新的editorState,代码如下:
// 得到editorState的title
    getBeginTitle = (editorState) => {
        const selectionState = editorState.getSelection()
        const anchorKey = selectionState.getAnchorKey()
        const currentContent = editorState.getCurrentContent()
        const currentContentBlock = currentContent.getBlockForKey(anchorKey)
        const start = selectionState.getStartOffset()
        const end = selectionState.getEndOffset()
        const title = currentContentBlock.getText().slice(start, end)
        return title
    }

// 点击确认按钮
    handleOk = (e) => {
        e.preventDefault()

        // 参考wysiwyg
        const { title, editorUrl } = this.state
        const { editorState } = this.props
        const selection = editorState.getSelection()
        const entityKey = editorState
            .getCurrentContent()
            .createEntity('LINK', 'MUTABLE', { url: editorUrl })
            .getLastCreatedEntityKey()
        const contentState = Modifier.replaceText(
            editorState.getCurrentContent(),
            selection,
            `${title}`,
            editorState.getCurrentInlineStyle(),
            entityKey,
        )
        const newEditorState = EditorState.push(editorState, contentState, 'insert-characters')
        this.props.onAddLink(newEditorState)
        this.setState({
            visible: false,
            title: '',
            editorUrl: ''
        })
    }
-
自定义块级元素的渲染
Draft.js允许开发者自己实现块级元素的渲染,只要实现 blockRendererFn 函数。例如现在我要往富文本中加入一张图片,然后用img标签,左对齐显示这张图片,如图:
// 点击确定按钮
    handleOk = e => {
        e.preventDefault()
        const { editorState } = this.props
        const { url, width, height } = this.state
        const contentState = editorState.getCurrentContent()
        const contentStateWithEntity = contentState.createEntity(
            'IMAGE',
            'IMMUTABLE',
            {
                src: url,
                width,
                height
            }
        )
        const entityKey = contentStateWithEntity.getLastCreatedEntityKey()
        const newEditorState = EditorState.set(editorState, {
            currentContent: contentStateWithEntity
        })

        const newNewEditorState = AtomicBlockUtils.insertAtomicBlock(
            newEditorState,
            entityKey,
            ' '
        )
        this.props.onAddImage(newNewEditorState)
    }
然后在实现 blockRendererFn 函数,该函数接受一个block,判断block是否为atomic类型,如果是,使用自定义组件渲染:
// image,mp3,mp4的渲染组件匹配
mediaBlockRenderer = block => {
if (block.getType() === 'atomic') {
return {
component: Media,
editable: false
}
}
return null
}
const Audio = (props) => {
return
}
const Image = (props) => {
return  }
const Video = (props) => {
return
}
const Media = (props) => {
const key = props.block.getEntityAt(0)
if (key) {
const entity = props.contentState.getEntity(
key
);
const { src } = entity.getData()
const type = entity.getType()
let media
if (type === 'audio') {
media =
} else if (type === 'IMAGE') {
const { width, height } = entity.getData()
media =
}
const Video = (props) => {
return
}
const Media = (props) => {
const key = props.block.getEntityAt(0)
if (key) {
const entity = props.contentState.getEntity(
key
);
const { src } = entity.getData()
const type = entity.getType()
let media
if (type === 'audio') {
media =
} else if (type === 'IMAGE') {
const { width, height } = entity.getData()
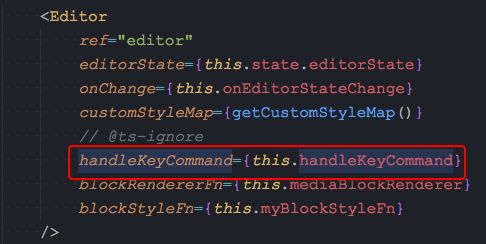
media = 需要注意的是,这里需要实现 handleKeyCommand 函数,处理键盘事件,否则你使用键盘的delete 键删除图片时,只是将图片的块级元素删除掉,entityMap数组里依然保存着这张图片的数据:
handleKeyCommand = (command, editorState) => {
        const newState = RichUtils.handleKeyCommand(editorState, command)
        if (newState) {
            this.onEditorStateChange(newState)
            return true
        }
        return false
    }
- 自定义行内元素的渲染
Draft.js使用装饰器 Decorator 来渲染行内元素,比如对于上面的超链接元素,则需要如下的代码将其渲染成一个 Link 组件:
/ 自定义组件,用于超链接
const Link = (props) => {
    // 这里通过contentState来获取entity�,之后通过getData获取entity中包含的数据
    const { url } = props.contentState.getEntity(props.entityKey).getData();
    return (

            {props.children}

    )
}

// decorator,用于超链接
const decorator = new CompositeDecorator([
    {
        strategy (contentBlock, callback, contentState) {

            // 这个方法接收2个函数作为参数,如果第一个参数的函数执行时�返回true,就会执行第二个参数函数,同时会�将匹配的�字符的起始位置和结束位置传递给第二个参数。
            contentBlock.findEntityRanges(
                (character) => {
                    const entityKey = character.getEntity();
                    return (
                        entityKey !== null &&
                        contentState.getEntity(entityKey).getType() === 'LINK'
                    );
                }, (...arr) => {
                    callback(...arr)
                }
            );
        },
        component: Link
    }
]);
然后在初始化 editorState 的时候传入 decorator:
state = {
        editorState: EditorState.createEmpty(decorator)
    }
editorState plainObject html字符串的相互转化
有时候使用Draft.js生成的富文本可能需要转化为html字符串,官方只提供editorState与plainObject的相互转化,不提供editorState与html的相互转化。不过已经有人将plainObject转html这一层写好了,github链接:https://github.com/jpuri/draftjs-to-html。也能将html转化为editorState。github链接:https://github.com/jpuri/html-to-draftjs。这两个工具都是同一个作者,是为作者写的富文本编辑器服务的:https://github.com/jpuri/react-draft-wysiwyg。实际测试的时候发现,如果是你自定义的样式很有可能使用上面两个工具在html和editorState相互转化会失败。现在我的解决方案是将 plainObject 转化成 json 字符串,利用 draftjs-to-html 将 plainObject 转 html 字符串,将两种字符串都传递给后台,这样使用Draft.js 编辑的富文本可以转化为 html 显示,而使用Draft.js编辑时也能取到json字符串转化为editorState显示。自定义的富文本编辑器github链接:https://github.com/linzhesheng/YdjRichEditor。
参考文章:
Draft.js文档
使用 Draft.js 来构建一个现代化的编辑器
draft.js在知乎的实践
