React-Native Android集成热更新Code-Push
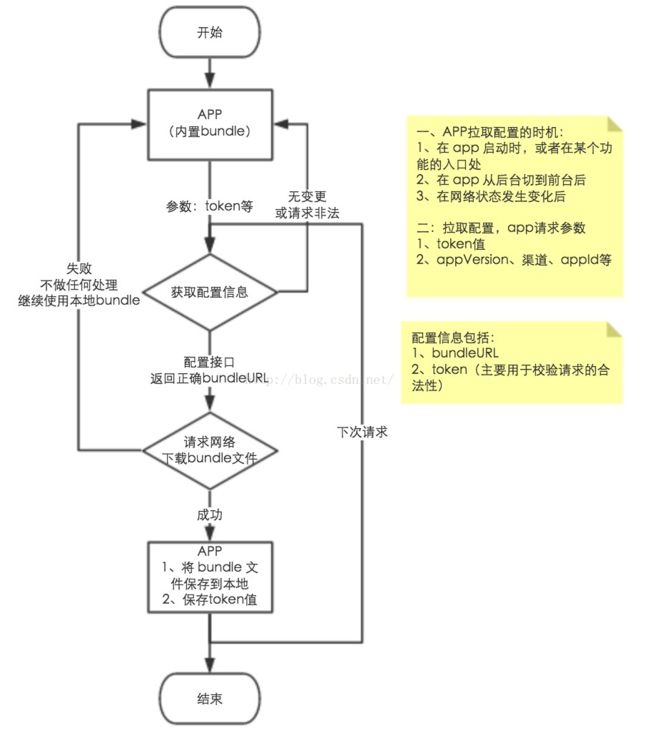
更新流程(图片来源:http://www.jianshu.com/p/cbc6a1dbfe30)
主要参考github上的demo:
https://github.com/lisong/code-push-server
客户端eg.
ReactNative CodePushDemo
可以clone or download下来正常运行
然后参照文档:https://github.com/lisong/code-push-server/blob/master/docs/react-native-code-push.md 执行
安装依赖包
1. react-native-cli react-native命令行工具,安装后可以在终端使用react-native命令
$ npm install react-native-cli@latest -g
2. code-push-cli 连接微软云端,管理发布更新版本命令行工具,安装后可以在终端使用code-push命令
$ npm install code-push-cli@latest -g
3. react-native-code-push 集成到react-native项目,按照以下步骤安装并修改配置既可集成
$ react-native init CodePushDemo #初始化一个react-native项目
$ cd CodePushDemo
$ npm install --save react-native-code-push@latest  #安装react-native-code-push
$ react-native link react-native-code-push  #连接到项目中,提示输入配置可以先行忽略
4. code-push-server 微软云服务在中国太慢,可以用它搭建自己的服务端。具体配置参考该项目
$ npm install code-push-server -g
$ code-push-server-db init --dbhost localhost --dbuser root --dbpassword #初始化数据库
$ code-push-server #启动服务 浏览器中打开 http://127.0.0.1:3000
创建服务端应用
基于code-push-server服务
$ code-push login http://127.0.0.1:3000  #浏览器中登录获取token,用户名:admin, 密码:123456
$ code-push app add CodePushDemo-ios #创建iOS版, 获取Production DeploymentKey
$ code-push app add CodePushDemo-android #创建android版,获取获取Production DeploymentKey
配置CodePushDemo react-native项目
iOS 配置
编辑Info.plist文件,添加CodePushDeploymentKey和CodePushServerURL
CodePushDeploymentKey值设置为CodePushDemo-ios的Production DeploymentKey值。CodePushServerURL值设置为code-push-server服务地址 http://127.0.0.1:3000/ 不在同一台机器的时候,请将127.0.0.1改成外网ip或者域名地址。将默认版本号1.0改成三位1.0.0
...
CodePushDeploymentKey
YourCodePushKey
CodePushServerURL
YourCodePushServerUrl
...
android 配置
编辑MainApplication.java
YourKey替换成CodePushDemo-android的Production DeploymentKey值YourCodePushServerUrl值设置为code-push-server服务地址 http://127.0.0.1:3000/ 不在同一台机器的时候,请将127.0.0.1改成外网ip或者域名地址。将默认版本号1.0改成三位1.0.0
android模拟器和code-push-server在同一台机器上时,需要额外运行命令
adb reverse tcp:3000 tcp:3000代理端口,否则无法访问127.0.0.1:3000端口
@Override
protected List getPackages() {
  return Arrays.asList(
      new MainReactPackage(),
      new CodePushBuilder("YourKey", getApplicationContext())
          .setIsDebugMode(BuildConfig.DEBUG)
          .setServerUrl("YourCodePushServerUrl")
          .build()
  );
}
添加更新检查
可以参考demo.js 可以在入口componentDidMount添加
CodePush.sync({
    installMode: CodePush.InstallMode.IMMEDIATE,
    updateDialog: true
});
不要忘记头部引入
import CodePush from "react-native-code-push"
notice:
demo.js中用到ECMAScript中Decorators语法,需要安装
$ npm install babel-preset-react-native-stage-0 --save, 同时在.babelrc中添加'react-native-stage-0/decorator-support'.eg. { "presets": ["react-native", "react-native-stage-0/decorator-support"] }
运行CodePushDemo react-native项目
按照下面的步骤打包发布热更新
base on
fork from https://github.com/Microsoft/react-native-code-push examples
iOS eg.
$ cd /path/to/code-push-demo-app
$ npm install
$ open ios/CodePushDemoApp.xcodeproj
在Xcode中打开菜单 Product > Scheme > Edit Scheme... > Run 选项中Build Configuration修改成Release, 然后运行编译
android eg.
$ cd /path/to/code-push-demo-app
$ npm install
$ cd android
$ ./gradlew assembleRelease
$ cd app/build/outputs/apk #install app-release.apk into your phone
发布更新到服务上
$ code-push login http://api.code-push.com:8080 #登录code-push-server
$ code-push app add CodePushReactNativeDemo-ios ios react-native  #iOS版
$ code-push app add CodePushReactNativeDemo-android android react-native #android版
$ cd /path/to/code-push-demo-app
$ npm install
$ code-push release-react CodePushReactNativeDemo-ios ios -d Production #发布到code-push-server ios
$ code-push release-react CodePushReactNativeDemo-android android -d Production #发布code-push-server android
在登录的时候,会进入该页面,获取token后在终端命令执行填写处粘贴即可
在按照demo执行的时候,如果自己搭建server,
需要修改application中设置的url地址setServerUrl("yourUrl"),
同时code-push登录的时候也需要是自己的地址:code-push login yourUrl
终端登录成功后,会返回key,然后对应修改,如下形式:
按照demo中执行的命令语句可能会不成功,修改如下:
可以参考code-push常用命令发布更新,命令Android,iOS都可用,对应更换平台及文件名
工程根目录新增 bundles文件夹:
mkdir bundles
发布更新
- 自动生成bundles文件发布:
code-push release-react 《app名称》《平台》 -t 《版本号》 -d Production --des "描述" -m true
例如
code-push release-react CodePushDemo-android android -t 1.0.0 -d Production --des "添加热更新" -m true
- 手动生成bundles文件发布, 首先在根目录创建bundles文件夹(每次重新生成文件时需删除上次的文件)
- 单js文件
1. 创建bundles里的文件
打包命令
react-native bundle --platform 平台 --entry-file 启动文件 --bundle-output 打包js输出文件 --assets-dest 资源输出目录 --dev 是否调试

打包整个项目的js文件,例如:
react-native bundle --platform android --entry-file index.js --bundle-output ./bundles/index.android.bundle --dev false

2. 发布更新
发布命令:
code-push release <应用名称>  <对应的应用版本> --deploymentName 更新环境 --description 更新描述 --mandatory 是否强制更新

例如:
code-push release CodePushDemo-android ./bundles/index.android.bundle 1.0.0 --deploymentName Production --description "热更新" --mandatory true
- js文件+图片资源,–assets-dest 后就是放图片的文件夹路径
打包命令:–assets-dest 后就是放图片的文件夹路径
react-native bundle --platform android --entry-file index.js --bundle-output ./bundles/index.android.bundle --assets-dest ./bundles --dev false

发布bundles文件:
code-push   <版本号> --deploymentName 更新环境 --description 更新描述 --mandatory 是否强制更新
例如:
code-push release CodePushDemo-android ./bundles 1.0.0  //省略默认是发布Staging
code-push release CodePushDemo-android ./bundles 1.0.0 -d Production --des "热更新" --mandatory true
查看发布信息
查看已add appName
code-push app list
查看部署的历史版本信息
code-push deployment ls CodePushDemo-android -k
其他需要注意的,这里的版本versionName需要是“1.0.0”这种格式的,可以app/build.gradle里的配置修改
defaultConfig {
        //其他代码
        versionCode 1
        versionName VERSION_NAME
        ndk {
            abiFilters "armeabi-v7a", "x86"
        }
    }
versionName放在了gradle.properties
VERSION_CODE = 1
VERSION_NAME = 1.0.0


