上一篇 开始用Swift开发iOS 10 - 21 使用WKWebView和SFSafariViewController 学习打开网页,这一篇学习使用CloudKit。
iCloud最初乔布斯在WWDC2011是发布的,只为了给Apps、游戏能够在云端数据保存,让Mac和iOS之间数据自动同步所用。
最近几年才渐渐成长为云服务。如果想创建社交类型的,可以分享用户之间数据的app,就可考虑使用iCloud,这样就不需要自己再去构建一个后端APIs了。虽然可能由于国内的网络环境,iCloud实际应用效果并不好,不过还是有必要学一下的。
如果开发了Web应用,同样也可以访问iOS应用的iCloud中数据。Apple分别提供了CloudKit JS和CloudKit库。
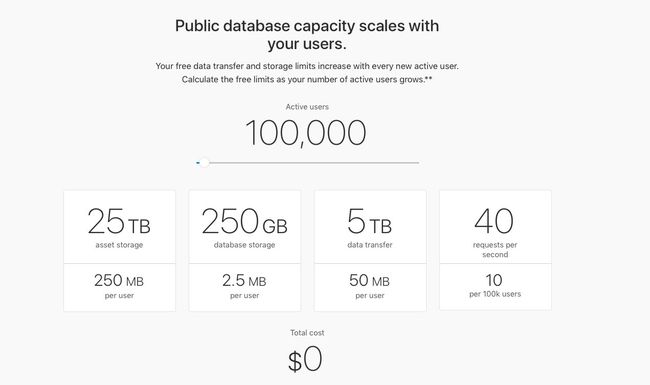
CloudKit默认给我们的app提供一些免费的空间:
当app的用户的活跃数提高,免费空间也会随之提高,详细可查看官网介绍。
理解CloudKit框架
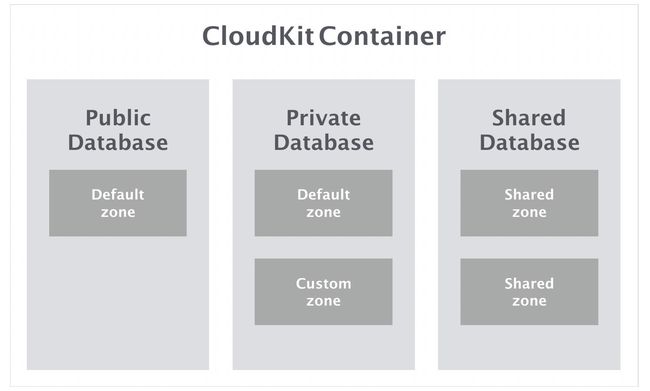
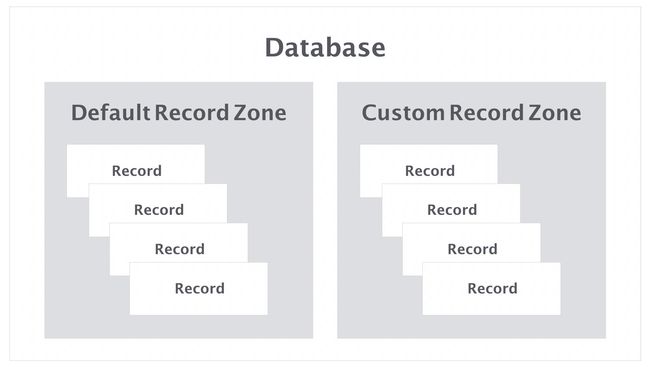
CloudKit框架不仅提供了存储功能,还提供了开发者与iCloud之间的各种交互。Containers和database是CloudKit框架的基础元素。
- 默认,一个app就是一个container,代码中就是
CKContainer,一个container中包括三个database(CKDatabase):- 一个public database: app中所有用户都能查看
- 一个shared database:app中一组用户能查看(iOS 10)
- 一个private database:app中单个用户查看
为应用添加CloudKit
首先需要开发者账号。
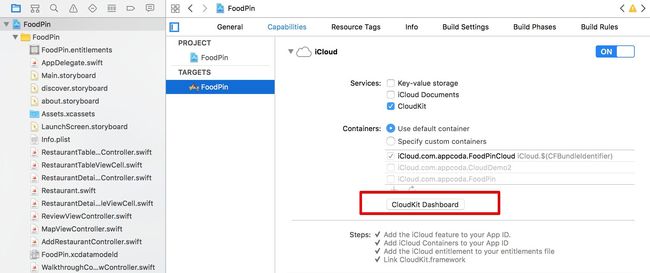
然后在Capabilities中打开iCloud。
在CloudKit Dashboard中管理 Record
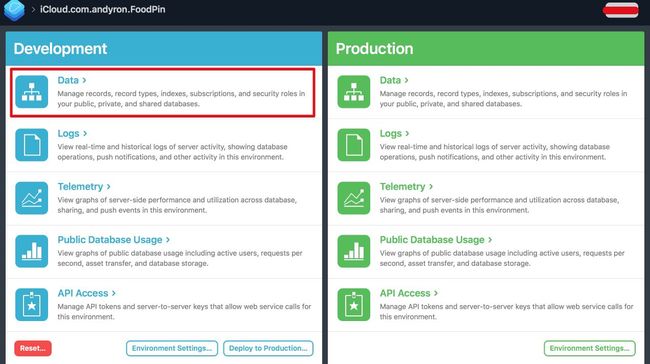
- 点击上图中的CloudKit Dashboard,或者直接访问https://icloud.developer.apple.com/dashboard/。最新的CloudKit Dashboard的页面有了一些变化。首先进去的是应用列表(也就是container列表),点击一个就进入如下页面:
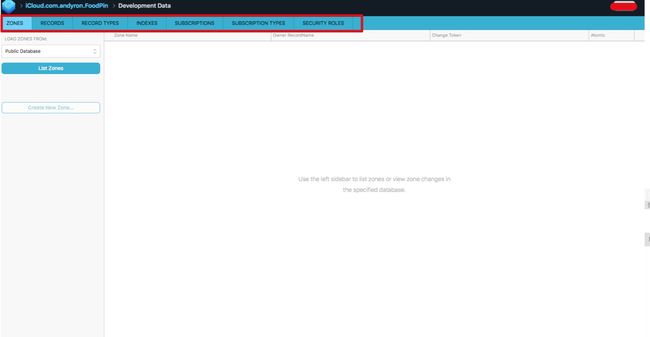
- 点击Development的data,类似下面
- 选择Record Types(有点像关系数据中的表),创建新的类型Restaurant,并添加几个Field的。
- 选择Records(类型表中的数据),添加几条数据,注意选择public database。
使用 Convenience API获取public Database
CloudKit提供两种APIs让开发与iCloud交互:the convenience API 和 the operational API。
-
Convenience API的通常调用方式:
let cloudContainer = CKContainer.default() let publicDatabase = cloudContainer.publicCloudDatabase let predicate = NSPredicate(value: true) let query = CKQuery(recordType: "Restaurant", predicate: predicate) publicDatabase.perform(query, inZoneWith: nil, completionHandler: { (results, error) -> Void in // Process the records })-
CKContainer.default()获取应用的Container。 -
publicCloudDatabase表示默认的public database。 -
NSPredicate和CKQuery是搜索条件
-
新建
DiscoverTableViewController,继承至UITableViewController,关联discover.storyboard中的table view的控制器; 并修改其prototype cell的identifier为Cell。-
在
DiscoverTableViewController.swift中加入import CloudKit,并定义一个CKRecord的数组变量:var restaurants:[CKRecord] = [] -
添加获取Records的函数:
  func fetchRecordsFromCloud() {

      let cloudContainer = CKContainer.default()
      let publicDatabase = cloudContainer.publicCloudDatabase
      let predicate = NSPredicate(value: true)
      let query = CKQuery(recordType: "Restaurant", predicate: predicate)
      publicDatabase.perform(query, inZoneWith: nil, completionHandler: {
          (results, error) -> Void in

          if error != nil {
              print(error)
              return
          }

          if let results = results {
              print("Completed the download of Restaurant data")
              self.restaurants = results

              OperationQueue.main.addOperation {
                  self.spinner.stopAnimating()
                  self.tableView.reloadData()
              }
          }
      })
  }
在
perform中,当确定获取到了数据后,赋值给restaurants,并刷新table。 在
viewDidLoad中添加:fetchRecordsFromCloud()。添加table view相关代理方法:
override func numberOfSections(in tableView: UITableView) -> Int {
    return 1
}

override func tableView(_ tableView: UITableView, numberOfRowsInSection section: Int) -> Int {
    return restaurants.count
}

override func tableView(_ tableView: UITableView, cellForRowAt indexPath: IndexPath) -> UITableViewCell {
    let cell = tableView.dequeueReusableCell(withIdentifier: "Cell", for:
indexPath)
    // Configure the cell...
    let restaurant = restaurants[indexPath.row]
    cell.textLabel?.text = restaurant.object(forKey: "name") as? String
    if let image = restaurant.object(forKey: "image") {
        let imageAsset = image as! CKAsset
        if let imageData = try? Data.init(contentsOf: imageAsset.fileURL) {
            cell.imageView?.image = UIImage(data: imageData)
        }
    }
    return cell
}
-
object(forKey:)是CKRecord中获取Record Field值的方法。 - 图片对象转换为
CKAsset。
为什么慢?
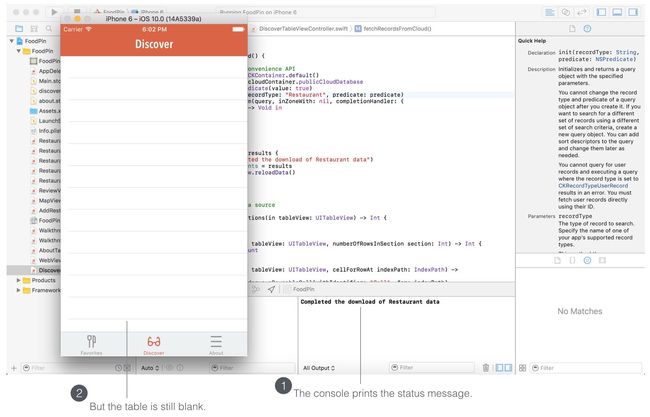
测试以上代码,发现fetchRecordsFromCloud函数中的打印信息"Completed the download of Restaurant data"已经显示在控制台了,但是还需要过一段时间App中才能显示,也就是说向iCloud中获取完数据后才开始准备table view加载。
这边就需要使用到多线程的概念。在iOS中,UI更新(像table重新加载)必须在主线程执行。这样获取iCloud数据的线程在进行时,UI更新也在同步进行。
OperationQueue.main.addOperation {
    self.tableView.reloadData()
}
使用operational API获取public Database
** Convenience API**只适合简单和少量的查询。
- 更新
fetchRecordsFromCloud方法:func fetchRecordsFromCloud() { let cloudContainer = CKContainer.default() let publicDatabase = cloudContainer.publicCloudDatabase let predicate = NSPredicate(value: true) let query = CKQuery(recordType: "Restaurant", predicate: predicate) // Create the query operation with the query let queryOperation = CKQueryOperation(query: query) queryOperation.desiredKeys = ["name", "image"] queryOperation.queuePriority = .veryHigh queryOperation.resultsLimit = 50 queryOperation.recordFetchedBlock = { (record) -> Void in self.restaurants.append(record) } queryOperation.queryCompletionBlock = { (cursor, error) -> Void in if let error = error { print("Failed to get data from iCloud - \(error.localizedDescription)") return } print("Successfully retrieve the data from iCloud") OperationQueue.main.addOperation { self.tableView.reloadData() } } // Execute the query publicDatabase.add(queryOperation) }- 通过
CKQueryOperation代替perform方法,它提供了许多查询选项。 -
desiredKeys代表需要查询的字段。 -
resultsLimit代表依次查询最大Record数目
- 通过
加载指示(菊花转)
- 可以在
viewDidLoad中添加类型如下代码:let spinner:UIActivityIndicatorView = UIActivityIndicatorView() spinner.activityIndicatorViewStyle = .gray spinner.center = view.center spinner.hidesWhenStopped = true view.addSubview(spinner) spinner.startAnimating() - 也可以通过在
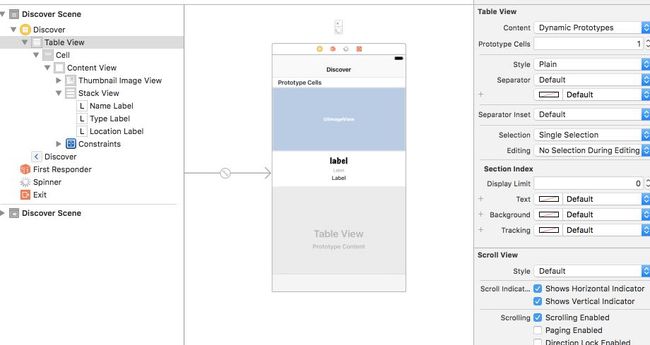
discover.storyboard中添加:
添加完发现** activity indicator view在控制器上面,这在Xcode中叫The Extra Views**
在DiscoverTableViewController中添加接口,并关联。
@IBOutlet var spinner: UIActivityIndicatorView!
在viewDidLoad中添加代码:
  spinner.hidesWhenStopped = true
  spinner.center = view.center
  tableView.addSubview(spinner)
  spinner.startAnimating()
- 数据加载完要隐藏加载提示:
OperationQueue.main.addOperation {
  self.spinner.stopAnimating()
  self.tableView.reloadData()
 }
懒加载图片
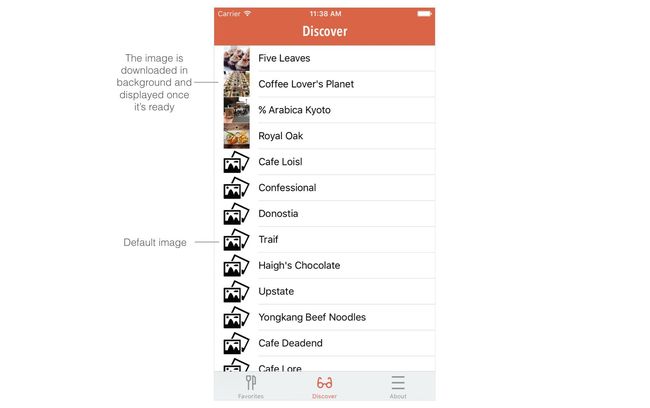
懒加载图片就是先加载一个本地默认图片,暂时不加载远程图片,当图片准备好在去更新图片视图。
修改请求字段
desireKeys,让开始时不加图片:queryOperation.desiredKeys = ["name"]更新
tableView(_:cellForRowAt:):
    override func tableView(_ tableView: UITableView, cellForRowAt indexPath: IndexPath) -> UITableViewCell {
        let cell = tableView.dequeueReusableCell(withIdentifier: "Cell", for: indexPath)

        let restaurant = restaurants[indexPath.row]
        cell.textLabel?.text = restaurant.object(forKey: "name") as? String


        // Set the default image
        cell.imageView?.image = UIImage(named: "photoalbum")
        // Fetch Image from Cloud in background
        let publicDatabase = CKContainer.default().publicCloudDatabase
        let fetchRecordsImageOperation = CKFetchRecordsOperation(recordIDs:[restaurant.recordID])
        fetchRecordsImageOperation.desiredKeys = ["image"]
        fetchRecordsImageOperation.queuePriority = .veryHigh
        fetchRecordsImageOperation.perRecordCompletionBlock = { (record, recordID, error) -> Void in
            if let error = error {
                print("Failed to get restaurant image: \(error.localizedDescription)")
                return
            }
            if let restaurantRecord = record {
                OperationQueue.main.addOperation() {
                    if let image = restaurantRecord.object(forKey: "image") {
                        let imageAsset = image as! CKAsset
                        print(imageAsset.fileURL)
                        if let imageData = try? Data.init(contentsOf:
                            imageAsset.fileURL) {
                            cell.imageView?.image = UIImage(data: imageData)
                        }
                    }
                }
            }
        }
        publicDatabase.add(fetchRecordsImageOperation)
        return cell
    }
-
CKFetchRecordsOperation通过recordID获得特定的Record。 -
CKFetchRecordsOperation一些方法类似CKQueryOperation。
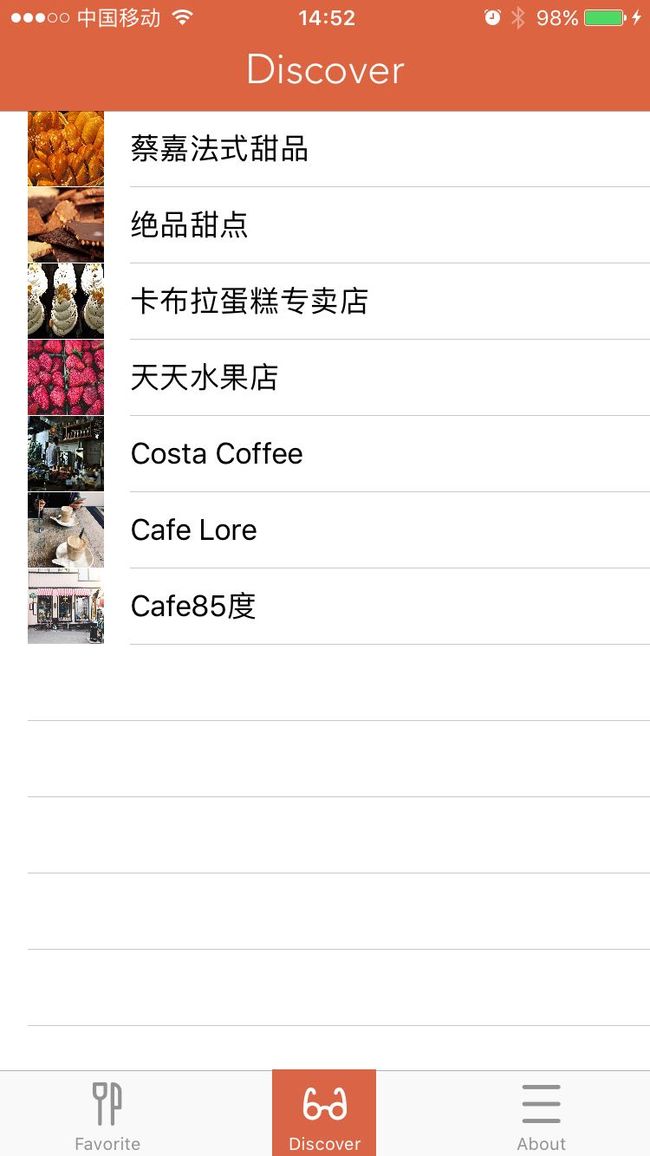
懒加载后发现,图片在其它视图显示后慢慢先后加载显示。
下拉刷新
UIRefreshControl提供了标准的下拉刷新特性。
- 在
DiscoverTableViewController的viewDidLoad中添加:
        // Pull To Refresh Control
        refreshControl = UIRefreshControl()
        refreshControl?.backgroundColor = UIColor.white
        refreshControl?.tintColor = UIColor.gray
        refreshControl?.addTarget(self, action: #selector(fetchRecordsFromCloud), for: UIControlEvents.valueChanged)
每一次下拉是显示菊花转,并且调用fetchRecordsFromCloud方法。
- 在
fetchRecordsFromCloud方法的queryCompletionBlock添加数据加载完成后去除菊花转代码:
if let refreshControl = self.refreshControl {
    if refreshControl.isRefreshing {
        refreshControl.endRefreshing()
    }
}
- 刷新会出现重复数据,要在
fetchRecordsFromCloud方法开始时,清理数据:
restaurants.removeAll()
tableView.reloadData()
使用CloudKit保存数据到iCloud
CKDatabase的save(_:completionHandler:)的方法可用来保存数据到iCloud。
实现用户新加数据时,既保存在本地的Core Data,有保存在iCloud中。
在
AddRestaurantController中添加:import CloudKit。-
在
AddRestaurantController添加方法:// 保存到Core Data的同时也保存的iCloud中 func saveRecordToCloud(restaurant:RestaurantMO!) -> Void { // Prepare the record to save let record = CKRecord(recordType: "Restaurant") record.setValue(restaurant.name, forKey: "name") record.setValue(restaurant.type, forKey: "type") record.setValue(restaurant.location, forKey: "location") record.setValue(restaurant.phone, forKey: "phone") let imageData = restaurant.image as! Data // Resize the image let originalImage = UIImage(data: imageData)! let scalingFactor = (originalImage.size.width > 1024) ? 1024 / originalImage.size.width : 1.0 let scaledImage = UIImage(data: imageData, scale: scalingFactor)! // Write the image to local file for temporary use let imageFilePath = NSTemporaryDirectory() + restaurant.name! let imageFileURL = URL(fileURLWithPath: imageFilePath) try? UIImageJPEGRepresentation(scaledImage, 0.8)?.write(to: imageFileURL) // Create image asset for upload let imageAsset = CKAsset(fileURL: imageFileURL) record.setValue(imageAsset, forKey: "image") // Get the Public iCloud Database let publicDatabase = CKContainer.default().publicCloudDatabase // Save the record to iCloud publicDatabase.save(record, completionHandler: { (record, error) -> Void in try? FileManager.default.removeItem(at: imageFileURL) }) } -
在
save方法的dismiss(animated:completion:)的前面添加:saveRecordToCloud(restaurant: restaurant)
排序
CKQuery有属性sortDescriptors可用来排序。
在DiscoverTableViewController的fetchRecordsFromCloud方法,query定义后添加:
query.sortDescriptors = [NSSortDescriptor(key: "creationDate", ascending: false)]
creationDate是默认的创建时间字段。
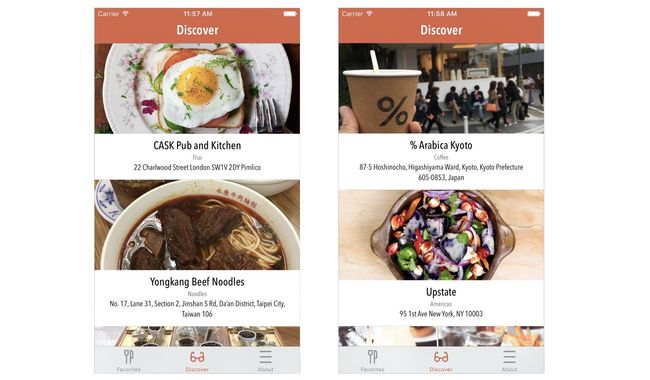
Exercise:修改Discover样式
- 新建一个
DiscoverTableViewCell,继承至UITableViewCell,并关联Discover的cell。 - 修改cell合适的样式,比如下面
- 在
DiscoverTableViewCell中新建四个接口,并关联。
    @IBOutlet var nameLabel: UILabel!
    @IBOutlet var locationLabel: UILabel!
    @IBOutlet var typeLabel: UILabel!
    @IBOutlet var thumbnailImageView: UIImageView!
- 更新
tableView(_:cellForRowAt:)和fetchRecordsFromCloud相关代码
代码
Beginning-iOS-Programming-with-Swift
说明
此文是学习appcode网站出的一本书 《Beginning iOS 10 Programming with Swift》 的一篇记录
系列文章目录
- 开始用Swift开发iOS 10 - 1 前言
- 开始用Swift开发iOS 10 - 2 Hello World!第一个Swift APP
- 开始用Swift开发iOS 10 - 3 介绍Auto Layout
- 开始用Swift开发iOS 10 - 4 用Stack View设计UI
- [开始用Swift开发iOS 10 - 5 原型的介绍]
- 开始用Swift开发iOS 10 - 6 创建简单的Table Based App
- 开始用Swift开发iOS 10 - 7 定制Table Views
- 开始用Swift开发iOS 10 - 8 Table View和UIAlertController的交互
- 开始用Swift开发iOS 10 - 9 Table Row的删除, UITableViewRowAction和UIActivityViewController的使用
- 开始用Swift开发iOS 10 - 10 Navigation Controller的介绍和Segue
- 开始用Swift开发iOS 10 - 11 面向对象编程介绍
- 开始用Swift开发iOS 10 - 12 丰富Detail View和定制化Navigation Bar
- 开始用Swift开发iOS 10 - 13 Self Sizing Cells and Dynamic Type
- 开始用Swift开发iOS 10 - 14 基础动画,模糊效果和Unwind Segue
- 开始用Swift开发iOS 10 - 15 使用地图
- 开始用Swift开发iOS 10 - 16 介绍静态Table Views,UIImagePickerController和NSLayoutConstraint
- 开始用Swift开发iOS 10 - 17 使用Core Data


