1. Nginx简介
Nginx 是一款轻量级的 Web 服务器。通常用在反向代理、负载均衡和 HTTP 缓存。目前全球很多知名互联网公司在使用 Nginx。
反向代理和正向代理
Nginx 的一个作用是反向代理,那什么是正向代理和反向代理?在知乎上有一个回答总结的不错放到这里。
以下内容来自知乎用户班长他姐夫的回答
正向代理隐藏真实客户端,反向代理隐藏真实服务端。
以下内容来自知乎用户刘志军的回答
我们常说的代理也就是只正向代理,正向代理的过程,它隐藏了真实的请求客户端,服务端不知道真实的客户端是谁,客户端请求的服务都被代理服务器代替来请求,某些科学上网工具扮演的就是典型的正向代理角色。用浏览器访问 http://www.google.com 时,被残忍的block,于是你可以在国外搭建一台代理服务器,让代理帮我去请求google.com,代理把请求返回的相应结构再返回给我。
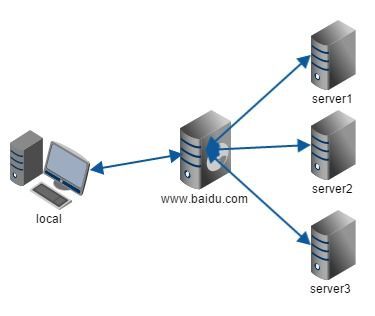
反向代理隐藏了真实的服务端,当我们请求 www.baidu.com 的时候,就像拨打10086一样,背后可能有成千上万台服务器为我们服务,但具体是哪一台,你不知道,也不需要知道,你只需要知道反向代理服务器是谁就好了,www.baidu.com 就是我们的反向代理服务器,反向代理服务器会帮我们把请求转发到真实的服务器那里去。Nginx就是性能非常好的反向代理服务器,用来做负载均衡。两者的区别在于代理的对象不一样:正向代理代理的对象是客户端,反向代理代理的对象是服务端
基于对上面的理解,我们可以看到 Nginx 对于处理有高并发需求的网站是有非常大的作用的。下面我们看一下在 MacOS 上 Nginx 的安装和基本使用。
2. Nginx基本使用
Nginx安装
我们使用 homebrew 来安装 Nginx
- 搜索Nginx
brew search nginx- 安装Nginx
brew install nginx如果 homebrew 需要更新的话这个过程会比较慢,耐心等待即可。安装完成后会有如下提示:
Docroot is: /usr/local/var/www

The default port has been set in /usr/local/etc/nginx/nginx.conf to 8080 so that
nginx can run without sudo.

nginx will load all files in /usr/local/etc/nginx/servers/.

To have launchd start nginx now and restart at login:
  brew services start nginx
Or, if you don't want/need a background service you can just run:
  nginx
==> Summary
  /usr/local/Cellar/nginx/1.17.8: 25 files, 2MB
==> `brew cleanup` has not been run in 30 days, running now...
Removing: /usr/local/Cellar/pcre/8.43... (204 files, 5.5MB)
Pruned 1 symbolic links and 1 directories from /usr/local
==> Caveats
==> nginx
Docroot is: /usr/local/var/www

The default port has been set in /usr/local/etc/nginx/nginx.conf to 8080 so that
nginx can run without sudo.

nginx will load all files in /usr/local/etc/nginx/servers/.

To have launchd start nginx now and restart at login:
  brew services start nginx
Or, if you don't want/need a background service you can just run:
nginx- 查看Nginx信息
brew info nginx这个命令和安装完成之后的提示基本一致,会显示 Nginx 的基本配置信息。
- 卸载Nginx
brew uninstall Nginx注意这个命令只会卸载 Nginx 软件本身,并不会删除配置文件。如果我们想彻底删干净 Nginx,需要手动删除 /usr/local/var/www 和 /usr/local/etc/nginx/ 下的文件。
- 查看Nginx版本
nginx -v我本机的 Nginx 版本如下
nginx version: nginx/1.17.8- 检查Nginx配置是否正常
nginx -t如果正常的话,我们会得到如下输出:
nginx: the configuration file /usr/local/etc/nginx/nginx.conf syntax is ok
nginx: configuration file /usr/local/etc/nginx/nginx.conf test is successful- 配置文件
cat /usr/local/etc/nginx/nginx.conf以上命令可以输出 nginx.conf 默认状态下的配置,在关键的地方我加了注释说明。
#user  nobody;
worker_processes  1;
#(1)进程数

#error_log  logs/error.log;
#error_log  logs/error.log  notice;
#error_log  logs/error.log  info;

#(2)错误日志位置 Mac上在/usr/local/var/log/nginx/

#pid        logs/nginx.pid;


events {
    worker_connections  1024;
    #(3)最大连接数
}


http {
    include       mime.types;
    default_type  application/octet-stream;

    #log_format  main  '$remote_addr - $remote_user [$time_local] "$request" '
    #                  '$status $body_bytes_sent "$http_referer" '
    #                  '"$http_user_agent" "$http_x_forwarded_for"';
    #(4)日志格式

    #access_log  logs/access.log  main;

    #(5)访问日志位置 Mac上在/usr/local/var/log/nginx/

    sendfile        on;
    #tcp_nopush     on;

    #keepalive_timeout  0;
    keepalive_timeout  65;

    #gzip  on;

    server {
        listen       8080;
        server_name  localhost;

        #charset koi8-r;

        #access_log  logs/host.access.log  main;

        location / {
            root   html;
            index  index.html index.htm;

            #(6)第一种情况 拒绝访问ip地址段为 50-100 的ip访问
            deny 192.168.10.50/100;

            # 第二种情况 只允许ip地址为 192.168.10.50 的ip访问
            allow 192.168.10.50;
            deny all;

            # 第三种情况 这样配置都不能访问,从上到下依次匹配
            deny all;
            allow 192.168.10.50;

        }

        #(7)精确匹配 /test 路径拒绝访问
        location =/test {
            deny all;
        }

        #(8)精确匹配 /test2 路径都可以访问
        location =/test2 {
            allow all;
        }

        #(9)精确匹配 已 php 结尾拒绝访问
        location ~ \.php$ { # 正则匹配
            deny all;
        }

        #error_page  404              /404.html;

        # redirect server error pages to the static page /50x.html
        #
        error_page   500 502 503 504  /50x.html;
        location = /50x.html {
            root   html;
        }

        # proxy the PHP scripts to Apache listening on 127.0.0.1:80
        #
        #location ~ \.php$ {
        #    proxy_pass   http://127.0.0.1;
        #}

        # pass the PHP scripts to FastCGI server listening on 127.0.0.1:9000
        #
        #location ~ \.php$ {
        #    root           html;
        #    fastcgi_pass   127.0.0.1:9000;
        #    fastcgi_index  index.php;
        #    fastcgi_param  SCRIPT_FILENAME  /scripts$fastcgi_script_name;
        #    include        fastcgi_params;
        #}

        # deny access to .htaccess files, if Apache's document root
        # concurs with nginx's one
        #
        #location ~ /\.ht {
        #    deny  all;
        #}
    }


    # another virtual host using mix of IP-, name-, and port-based configuration
    #
    #server {
    #    listen       8000;
    #    listen       somename:8080;
    #    server_name  somename  alias  another.alias;

    #    location / {
    #        root   html;
    #        index  index.html index.htm;
    #    }
    #}


    # HTTPS server
    #
    #server {
    #    listen       443 ssl;
    #    server_name  localhost;

    #    ssl_certificate      cert.pem;
    #    ssl_certificate_key  cert.key;

    #    ssl_session_cache    shared:SSL:1m;
    #    ssl_session_timeout  5m;

    #    ssl_ciphers  HIGH:!aNULL:!MD5;
    #    ssl_prefer_server_ciphers  on;

    #    location / {
    #        root   html;
    #        index  index.html index.htm;
    #    }
    #}
    include servers/*;
    #(10)其他配置文件
}- 启动Nginx
cd /usr/local/Cellar/nginx/1.17.8/bin

./nginx- 重新加载配置文件
./nginx -s reload 启动完成之后执行 ps -ef|grep nginx,如果出现下面日志则说明访问成功。
  501 65101     1   0  8:59下午 ??         0:00.00 nginx: master process ./nginx
  501 65102 65101   0  8:59下午 ??         0:00.00 nginx: worker process
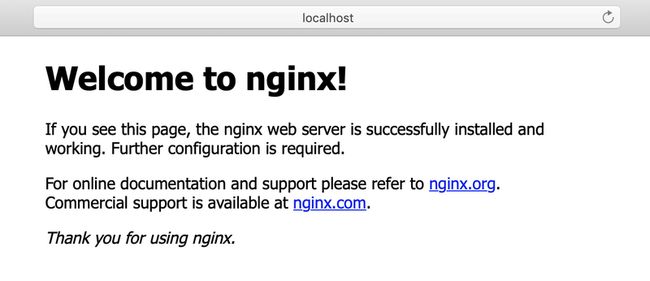
501 65173 63026 0 9:00下午 ttys001 0:00.00 grep nginx访问http://localhost:8080,如果出现以下页面说明我们配置成功,并且访问正常。
3. 实战
现在我们已经安装和配置好了 Nginx,那我们先来看一下在反向代理这种场景下 Nginx 是如何使用的。首先我们先用 SpringBoot 创建一个 Web 服务。
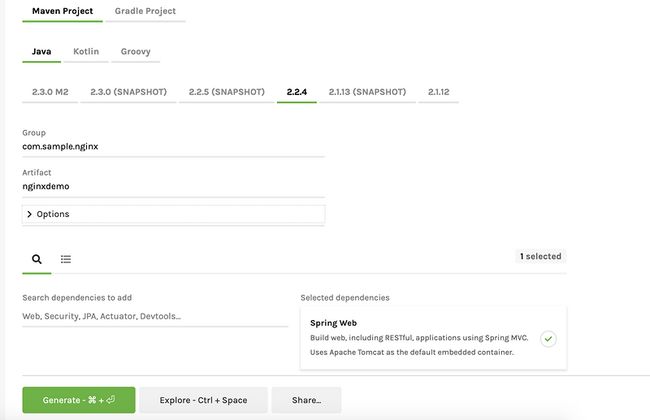
在 start.spring.io 初始化一个项目方便我们测试。
用 Eclipse 或 InteliJ IDEA 打开刚刚初始化好的项目,整个工程的目录如下。
在 NginxTestController 中写两个简单的接口,分别是 /hello/nginx 和 /hi/nginx,同时在接口的响应中返回当前程序在监听哪个端口即 serverPort。
@RestController
public class NginxTestController {

    @Value("${server.port}")
    private int serverPort;

    @RequestMapping(value = "/hello/nginx", method = RequestMethod.GET)
    public TestResponse getNginx() throws Exception {

        TestResponse response = new TestResponse();
        response.setCode(200);
        response.setMessage("success");
        response.setName("hello nginx");
        response.setServerPort(serverPort);
        return response;
    }

    @RequestMapping(value = "/hi/nginx", method = RequestMethod.GET)
    public TestResponse getIncome() throws Exception {

        TestResponse response = new TestResponse();
        response.setCode(200);
        response.setMessage("success");
        response.setName("hi nginx");
        response.setServerPort(serverPort);
        return response;
    }
}
在 application.properties 配置文件中添加监听的端口。
server.port=8090server.port=9090使用 maven 分别打包两个监听 8090 和 9090 端口的 Web 服务的 jar 包为 nginxdemo-SNAPSHOT-8090.jar 和 nginxdemo-SNAPSHOT-9090.jar
分别启动两个 server
启动第一个 server
java -jar nginxdemo-SNAPSHOT-8090.jar
启动第二个 server
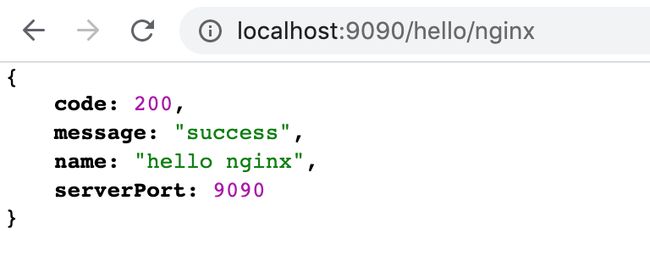
java -jar nginxdemo-SNAPSHOT-9090.jar 在不使用 Nginx 做反向代理的情况下,我们先访问下两个 server 的接口是否都能正常使用,如下图表示均正常。
监听 8090 端口的 tomcat
监听 9090 端口的 tomcat
反向代理
- 规则匹配
我们先来看一下上面讲过的关于访问规则的匹配,在 server 块中添加以下 location。
    location =/hello/nginx {
        deny all;
    }
server 块的完整配置如下,修改完成后重新加载 Nginx 配置。
server {
    listen       9000;
    server_name  localhost;

    location / {
        proxy_pass        http://localhost:8090;
        proxy_set_header  Host $http_host;
        proxy_set_header  X-Real-IP  $remote_addr;
        proxy_set_header  X-Forwarded-For $proxy_add_x_forwarded_for;
        proxy_set_header  X-Forwarded-Proto $scheme;
    }

    location =/hello/nginx {
        deny all;
    }

    error_page   500 502 503 504  /50x.html;
    location = /50x.html {
        root   html;
    }
}
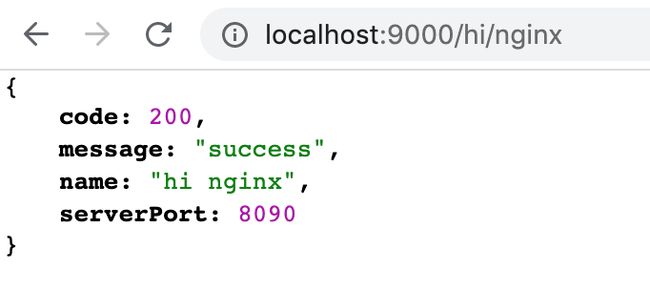
由上面的配置可以 /hello/nginx 被拒绝访问,我们在浏览器访问可得到如下图结果:
/hello/nginx 被拒绝访问。
/hi/nginx 仍然可以访问。
- 使用端口号进行反向代理
#user  nobody;
worker_processes  1;

events {
    worker_connections  1024;
}


http {
    include       mime.types;
    default_type  application/octet-stream;

    sendfile        on;
    keepalive_timeout  65;

    server {
        listen       9000;
        server_name  localhost;

        location / {
            proxy_pass        http://localhost:8090;
            proxy_set_header  Host $http_host;
            proxy_set_header  X-Real-IP  $remote_addr;
            proxy_set_header  X-Forwarded-For $proxy_add_x_forwarded_for;
            proxy_set_header  X-Forwarded-Proto $scheme;
        }

        error_page   500 502 503 504  /50x.html;
        location = /50x.html {
            root   html;
        }
    }

    server {
        listen       9001;
        server_name  localhost;

        location / {
            proxy_pass        http://localhost:9090;
            proxy_set_header  Host $http_host;
            proxy_set_header  X-Real-IP  $remote_addr;
            proxy_set_header  X-Forwarded-For $proxy_add_x_forwarded_for;
            proxy_set_header  X-Forwarded-Proto $scheme;
        }
    }

    include servers/*;
}
使用端口进行反向代理比较简单,我们在配置文件中添加两个 server 块,让 Nginx 分别监听 9000 端口和 9001 端口。然后在 location 块中通过 proxy_pass 分别代理到 tomcat 的 8090 端口和 9090 端口。
通过 Nginx 访问 9000 端口,可以看到返回的是 tomcat 8090 端口的内容。
这样做的目的是,在真实的服务器环境中,我们不可能把所有的端口都开放出去,比如 mysql 常用的 3306 端口,这样会有很大的安全问题,通过 Nginx 的反向代理就可以解决。
- 使用域名进行反向代理
上面讲过了使用端口进行反向代理,在真实的开发环境中,我们更多的是使用域名或者二级域名来访问某些页面或接口,我们通常是不需要在域名上加上端口号的。这是因为 80 是 http 协议的默认端口。我们在访问 http://baidu.com 时其实是访问 http://baidu.com:80。
那么我们来看一下如何使用 Nginx 通过域名来做反向代理。由于我是在本地进行开发测试的,是没有公网的 ip 地址的,这时候怎么让一个域名解析到我自己的 ip 上呢?我们可以修改 hosts 文件。
127.0.0.1 hello.democome.local
127.0.0.1 hi.democome.local
以上是我给本机的 hosts 文件添加的两行配置,我们知道是没有 .local 这个域名的,但是加上上面的配置之后当我访问 hello.democome.local 和 hi.democome.local 时,就会解析到我的本机,这样就可以通过 Nginx 进行反向代理了,我们看看具体的 Nginx 配置文件。
#user  nobody;
worker_processes  1;

events {
    worker_connections  1024;
}


http {
    include       mime.types;
    default_type  application/octet-stream;

    sendfile        on;
    keepalive_timeout  65;

    server {
        listen       80;
        server_name  hello.democome.local;

        location / {
            proxy_pass        http://localhost:8090;
            proxy_set_header  Host $http_host;
            proxy_set_header  X-Real-IP  $remote_addr;
            proxy_set_header  X-Forwarded-For $proxy_add_x_forwarded_for;
            proxy_set_header  X-Forwarded-Proto $scheme;
        }

        error_page   500 502 503 504  /50x.html;
        location = /50x.html {
            root   html;
        }
    }

    server {
        listen       80;
        server_name  hi.democome.local;

        location / {
            proxy_pass        http://localhost:9090;
            proxy_set_header  Host $http_host;
            proxy_set_header  X-Real-IP  $remote_addr;
            proxy_set_header  X-Forwarded-For $proxy_add_x_forwarded_for;
            proxy_set_header  X-Forwarded-Proto $scheme;
        }
    }

    include servers/*;
}
以上配置,我们把两个 server 块中监听的端口都改为了 80,然后两个二级域名 hello.democome.local 和 hi.democome.local 分别代理到了 http://localhost:8090 和http://localhost:9090 两个 web server。
在浏览器访问 http://hello.democome.local/hello/nginx 可以看到可以正常返回 8090 端口的内容。
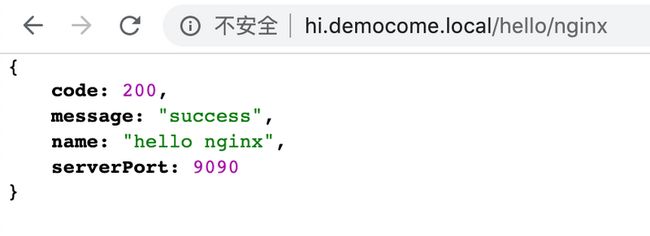
在浏览器访问 http://hi.democome.local/hello/nginx 可以看到可以正常返回 9090 端口的内容。
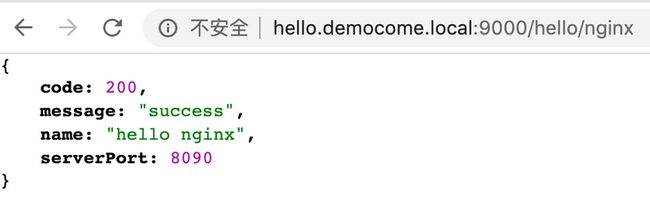
通过以上测试,我们的配置是生效的。
如果不想使用默认的 80 端口,我们依然可以使用域名加上端口的形式访问,配置如下:
server {
    listen       9000;
    server_name  hello.democome.local;

    location / {
        proxy_pass        http://localhost:8090;
        proxy_set_header  Host $http_host;
        proxy_set_header  X-Real-IP  $remote_addr;
        proxy_set_header  X-Forwarded-For $proxy_add_x_forwarded_for;
        proxy_set_header  X-Forwarded-Proto $scheme;
    }

    error_page   500 502 503 504  /50x.html;
    location = /50x.html {
        root   html;
    }
}- 代理到其他网站
server {
    listen       80;
    server_name  hi.democome.local;

    location / {
        proxy_pass        https://www.so.com/;
    }
}
我们把 server 块改成如下配置,然后重新加载 Nginx 配置,可以发现虽然我们访问的是 hi.democome.local 但是真正返回的页面是 360 搜索的页面,并且域名也不会变化。
负载均衡
说到负载均衡,那么什么是负载均衡,先来看一下维基百科的定义
负载平衡(Load balancing)是一种计算机技术,用来在多个计算机(计算机集群)、网络连接、CPU、磁盘驱动器或其他资源中分配负载,以达到最优化资源使用、最大化吞吐率、最小化响应时间、同时避免过载的目的。 使用带有负载平衡的多个服务器组件,取代单一的组件,可以通过冗余提高可靠性。负载平衡服务通常是由专用软件和硬件来完成。 主要作用是将大量作业合理地分摊到多个操作单元上进行执行,用于解决互联网架构中的高并发和高可用的问题。
总结来说负载均衡就是解决高并发的。假如我们有多台服务器,我们在每台服务器上都跑了相同的应用,当用户访问时,我们希望 Nginx 把用户的请求根据一定的策略转发的不同的服务器,已解决单个服务器访问压力大的问题。
为了测试这个效果,我先把之前打包的 jar 文件上传一个到远程的服务器上,并启动。
我们看一下具体如何配置:
#user  nobody;
worker_processes  1;

events {
    worker_connections  1024;
}


http {
    include       mime.types;
    default_type  application/octet-stream;

    sendfile        on;
    keepalive_timeout  65;

    upstream localhost {
        server 62.234.66.219:8090 weight=1; #远程服务器
        server 192.168.0.101:8090 weight=3;
    }

    server {
        listen       80;
        server_name  hello.democome.local;

        location / {
            add_header Backend-IP $upstream_addr;
            proxy_pass        http://localhost;
            proxy_set_header  Host $http_host;
            proxy_set_header  X-Real-IP  $remote_addr;
            proxy_set_header  X-Forwarded-For $proxy_add_x_forwarded_for;
            proxy_set_header  X-Forwarded-Proto $scheme;
        }

        error_page   500 502 503 504  /50x.html;
        location = /50x.html {
            root   html;
        }
    }

    include servers/*;
}
其中主要是 upstream 块的配置,我配置了两个服务器,其中 62.234.66.219:8090 是腾讯云服务器的地址, 192.168.0.101:8090 是我本机的 ip 地址。策略是按照比重来分别转发到两个服务器上,比例为1:3。关于策略还有很多规则,比如根据 ip hash 等。我们这里只演示 weight 策略。
upstream localhost {
    server 62.234.66.219:8090 weight=1; #远程服务器
    server 192.168.0.101:8090 weight=3;
}
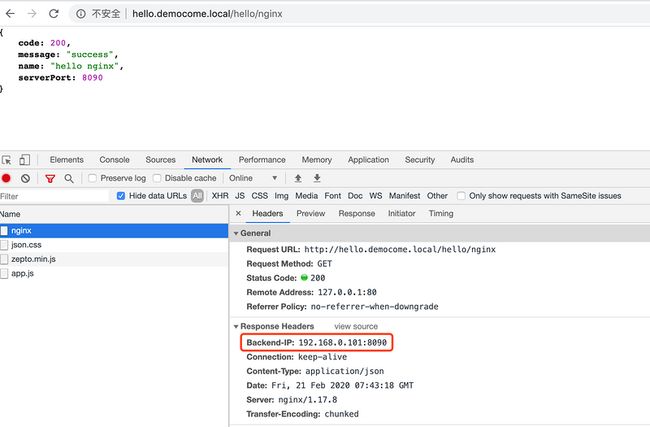
完成好上面的配置执行 nginx -s reload 重新加载配置。继续访问http://hello.democome.local/hello/nginx。
通过多次请求我们发现,转发到各个服务器的比例基本是 1:3,以上说明我们配置的负载均衡策略是生效的。
https证书配置
server {
    listen 443 ssl;
    server_name democome.com www.democome.com; #配置域名
    ssl_certificate /etc/letsencrypt/live/democome.com/fullchain.pem; #配置证书位置
    ssl_certificate_key /etc/letsencrypt/live/democome.com/privkey.pem; #配置证书位置
    location /{                                                         #反向代理配置
        proxy_pass            http://localhost:8080;
        proxy_set_header  Host $http_host;
        proxy_set_header  X-Real-IP  $remote_addr;
        proxy_set_header  X-Forwarded-For $proxy_add_x_forwarded_for;
        proxy_set_header  X-Forwarded-Proto $scheme;
    }
}
配置证书比较简单,首先监听 443 端口,然后执行证书位置即可。
更多推荐
免费 https 证书申请 letsencrypt。

