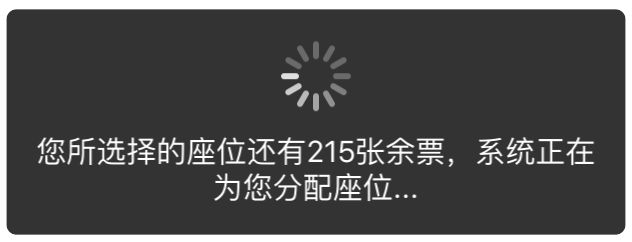
要做的事
下面这个场景大家总是见过的
我们要做的就是这个"菊花下面写一句话"的UI控件。
思路
这个控件有三个显而易见的组件
- 透明黑背景(coverView)
- 一个菊花(activityIndicator)
- 一句话(titleLabel)
很显然,思路就是根据这“一句话”计算coverView所需要的宽度,然后把菊花和这句话塞到coverView中去,稍微做下排版(居中、上下左右间距)就好了。
暴力实现
外部接口
- (nonnull instancetype)initWithFrame:(CGRect)frame title:(nonnull NSString *)title;
内部实现
@implementation zkeyActivityIndicatorView

- (instancetype)initWithFrame:(CGRect)frame title:(NSString *)title
{
    self = [super initWithFrame:frame];

    if (self) {
        self.backgroundColor = [UIColor clearColor];

        // activity indicator
        // defalt size of UIActivityIndicatorViewStyleWhiteLarge is 37*37
        CGFloat activityIndicatorWidth = 37.0;
        CGFloat activityIndicatorHeight = activityIndicatorWidth;
        UIActivityIndicatorView *activityIndicator = [[UIActivityIndicatorView alloc] initWithActivityIndicatorStyle:UIActivityIndicatorViewStyleWhiteLarge];

        // title label
        CGFloat titleLabelHeight = 21;
        UILabel *titleLabel = [[UILabel alloc] init];
        titleLabel.text = title;
        titleLabel.textColor = [UIColor whiteColor];
        titleLabel.textAlignment = NSTextAlignmentCenter;
        UIFont *titleFont = [UIFont systemFontOfSize:15.0];
        titleLabel.font = titleFont;

        //...
        CGFloat leadingAndTrailSpace = 30.0;
        CGFloat topAndBottomSpace = 15;
        CGFloat verticalSpace = 10.0;
        // caculate view width
        CGSize maxLabelSize = CGSizeMake(frame.size.height - 2 * leadingAndTrailSpace, 200);
        CGSize labelSize = [title boundingRectWithSize:maxLabelSize options:(NSStringDrawingUsesLineFragmentOrigin | NSStringDrawingUsesFontLeading) attributes:[NSDictionary dictionaryWithObjectsAndKeys:titleLabel.font, NSFontAttributeName, nil] context:nil].size;

        CGFloat viewWith = MAX(activityIndicatorWidth, labelSize.width) + 2 * leadingAndTrailSpace;
        CGFloat viewHeight = activityIndicatorHeight + labelSize.height + 2 * topAndBottomSpace + verticalSpace;

        // cover view
        UIView *coverView = [[UIView alloc] initWithFrame:CGRectMake(0, 0, viewWith, viewHeight)];
        coverView.center = CGPointMake(frame.size.width / 2.0, frame.size.width / 2.0);
        [self addSubview:coverView];

        coverView.backgroundColor = [UIColor blackColor];
        coverView.alpha = 0.8;
        coverView.layer.masksToBounds = YES;
        coverView.layer.cornerRadius = 5.0;


        // add activity indicator
        CGRect activityIndicatorFrame = CGRectMake(0, 0, activityIndicatorWidth, activityIndicatorHeight);
        activityIndicator.frame = activityIndicatorFrame;
        activityIndicator.center = CGPointMake(coverView.frame.size.width / 2.0, topAndBottomSpace + activityIndicatorHeight / 2.0);
        [coverView addSubview:activityIndicator];
        // add title lable
        CGRect titleLabelFrame = CGRectMake(0, activityIndicator.frame.origin.y + activityIndicatorHeight + verticalSpace, viewWith, titleLabelHeight);
        titleLabel.frame = titleLabelFrame;
        [coverView addSubview:titleLabel];

        // ...
        [activityIndicator startAnimating];
    }

    return self;
}
代码实在惨不忍睹,大家尽情地喷吧,下面开始优化。
优化
关于自定义控件的若干准则,请这篇文章:关于iOS控件开发的若干准则,请参见如何设计一个 iOS 控件? iOS 控件完全解析
使用懒加载整理代码
关于懒加载的概念及优缺点,请参见iOS开发之旅之懒加载
在custom getter中,我个人建议只进行逻辑和特性的初始化,具体的layout(frame的设置)在合适的地方进行(譬如说在layoutSubview中),尤其是那些需要不断适应屏幕尺寸(发生屏幕旋转事件)的控件。这里拿菊花下面的那个titleLabel举例:
#define TITLE_LABEL_FONT_SIZE 15.0f

- (UILabel *)titleLabel
{
    if (!_titleLabel) {
        _titleLabel = ({
            UILabel *label = [[UILabel alloc] init];
            // 逻辑初始化
            label.textAlignment = NSTextAlignmentCenter;
            label.textColor = [UIColor whiteColor];
            // 对于fontSize等其他控制变量使用宏定义 方便以后修改
            label.font = [UIFont systemFontOfSize:TITLE_LABEL_FONT_SIZE];

            label;
        });
    }

    return _titleLabel;
}
同理对coverView和activityIndicator使用懒加载,这样子代码看起来就舒服多了。
控件使用场景(需求分析)
使用这个控件的一般情形:用户在页面激活了与服务器交互的事件,客户端提示用户耐性等待。例如支付宝“设置头像”模块中,选好照片后,便会出现这个控件(透明黑背景+菊花+正在设置中...)。然而在同一个页面中,用户可以激活与服务器交互的事件可能有多个,所以可能需要多个“菊花+一句话”,如果使用多个实例,显然在性能上是划不来的。所以应该是重新设置控件中的“一句话”,控件根据这句话自适应调整子视图布局,然后直接继续使用这个实例就行。
接口设计
- 使用者可以设置控件上显示的消息,同时控件应自适应地改变子视图的布局
- (void)setTitle:(nonnull NSString *)title;
- (void)setTitle:(NSString *)title
{
    // calculate the width of cover view according to the title
    // set the coverView in the center and adjust other subviews's layout correspondingly.
    self.coverView.frame = [self frameOfCoverViewWithTitle:title];
    self.activityIndicator.frame = CGRectMake((self.coverView.frame.size.width - ACTIVITY_INDICATOR_WIDTH) / 2.0f, TOP_OR_BOTTOM_SPACE, ACTIVITY_INDICATOR_WIDTH, ACTIVITY_INDICATOR_HEIGHT);
    self.titleLabel.frame = CGRectMake(0, self.activityIndicator.frame.origin.y + ACTIVITY_INDICATOR_HEIGHT + VERTICAL_SPACE, self.coverView.frame.size.width, TITLE_LABEL_HEIGHT);

    self.titleLabel.text = title;
}
- 无论用户使用何种初始化方式(系统或者自定义),应该得到相同的实例
对于一个UI控件,用户可能通过 alloc + init + setFrame 或 alloc + initWithFrame 或 alloc + initWithFrame:andTitle:(自定义方法) 来得到一个实例。所以我们可能需要重写以下方法
// 因为这两个方法已经在UIView的接口文件中提供了,所以真正的接口文件里无需这两行代码
- (instancetype)initWithFrame:(CGRect)frame;
- (void)setFrame:(CGRect)frame;
- (instancetype)initWithFrame:(CGRect)frame
{
    self = [super initWithFrame:frame];

    if (self) {
        self.backgroundColor = [UIColor clearColor];
        // additional initialization

        [self addSubview:self.coverView];
    }

    return self;
}

- (void)setFrame:(CGRect)frame
{
    [super setFrame:frame];
    // there is no additional initialization

    [self addSubview:self.coverView];
}
自定义的初始化方法如下
- (nonnull instancetype)initWithFrame:(CGRect)frame title:(nonnull NSString *)title
{
    self = [super initWithFrame:frame];

    if (self) {
        self.backgroundColor = [UIColor clearColor];

        [self addSubview:self.coverView];

        [self setTitle:title];
    }

    return self;
}
加上注释后,最终的接口文件如下
@interface zkeyActivityIndicatorView : UIView

/*
 * there is no more work to do if you use the following initializer to get an instance.
 */
- (nonnull instancetype)initWithFrame:(CGRect)frame title:(nonnull NSString *)title;


/*
 * 1. Use this method to set alert title if you use system initializer(eg. initwithFrame:)
 * 2. Change the title when you needed, the layout of subview will auto fit according to the title.
 */
- (void)setTitle:(nonnull NSString *)title;

@end
性能优化
主要的性能优化体现在:控件从父视图中移除(或者控件被隐藏)的时候,停止菊花的转动。根据这个思路,需要重写UIView的三个方法
/*
 * performance improvement
 * start animation when the view is added to superView
 * stop the animation when the view is removed from superView
 */
- (void)removeFromSuperview
{
    [super removeFromSuperview];

    [self.activityIndicator stopAnimating];
}

- (void)didMoveToSuperview
{
    [self.activityIndicator startAnimating];
}

- (void)setHidden:(BOOL)hidden
{
    [super setHidden:hidden];

    if (hidden) {
        [self.activityIndicator stopAnimating];
    } else {
        [self.activityIndicator startAnimating];
    }
}
其他部分的优化
当外部使用者传入的title比较长的时候,控件可见部分(coverView)的宽度应该有个限制,同时根据title计算titleLabel的行数(或者将UILabel替换成UITextView)。
我的做法是根据传入的外部传入的frame和去计算coverView和titleLabel的最大size,设定titleLabel.numberOfLines为2。这样下来,控件大约能显示30个字,足够用了,而且相对于textView来说,这种解决方案比较简单。下面是新的控件尺寸的计算方法,完整的代码可以通过访问我的github得到。
- (CGRect)frameOfCoverViewWithTitle:(NSString *)title
{
    CGSize labelSize = [self sizeForText:title];

    CGFloat viewWith = MAX(ACTIVITY_INDICATOR_WIDTH, labelSize.width) + 2 * LEADING_OR_TRAIL_SPACE;
    viewWith = MIN(viewWith, self.frame.size.width);

    CGFloat viewHeight = ACTIVITY_INDICATOR_HEIGHT + labelSize.height + 2 * TOP_OR_BOTTOM_SPACE + VERTICAL_SPACE;
    viewHeight = MIN(viewHeight, self.frame.size.height);

    CGRect frame = CGRectMake((self.frame.size.width - viewWith) / 2.0f, (self.frame.size.height - viewHeight) / 2.0, viewWith, viewHeight);

    return frame;
}

- (CGSize)sizeForText:(NSString *)text
{
    CGFloat maxLabelWidth = self.frame.size.width - 2 * LEADING_OR_TRAIL_SPACE;
    CGFloat maxLabelHeight = self.frame.size.height - 2 * TOP_OR_BOTTOM_SPACE - VERTICAL_SPACE - ACTIVITY_INDICATOR_HEIGHT
    ;
    CGSize maxLabelSize = CGSizeMake(maxLabelWidth, maxLabelHeight);

    CGSize labelSize = [text boundingRectWithSize:maxLabelSize options:(NSStringDrawingUsesLineFragmentOrigin | NSStringDrawingUsesFontLeading) attributes:[NSDictionary dictionaryWithObjectsAndKeys:self.titleLabel.font, NSFontAttributeName, nil] context:nil].size;

    return labelSize;
}

- (void)setTitle:(NSString *)title
{
    // calculate the width of cover view according to the title
    // set the coverView in the center and adjust other subviews's layout correspondingly.
    self.coverView.frame = [self frameOfCoverViewWithTitle:title];
    self.activityIndicator.frame = CGRectMake((self.coverView.frame.size.width - ACTIVITY_INDICATOR_WIDTH) / 2.0f, TOP_OR_BOTTOM_SPACE, ACTIVITY_INDICATOR_WIDTH, ACTIVITY_INDICATOR_HEIGHT);

    CGSize titleLabelSize = [self sizeForText:title];
    self.titleLabel.frame = CGRectMake((self.coverView.frame.size.width - titleLabelSize.width) / 2.0f, self.activityIndicator.frame.origin.y + ACTIVITY_INDICATOR_HEIGHT + VERTICAL_SPACE, titleLabelSize.width, titleLabelSize.height);

    self.titleLabel.text = title;
}
鲁棒性
外界可能多次改编zkeyActivityIndicatorView.frame,根据之前的代码
- (void)setFrame:(CGRect)frame
{
    [super setFrame:frame];
    // there is no additional initialization

    [self addSubview:self.coverView];
}
coverView可能会被重复添加。而且,在几种初始化方式中,有相当部分的代码是重复的,don't repeat yourself! 所以需要做一下优化处理
- (instancetype)init
{
    self = [super init];

    if (self) {
        [self customInitialized];
    }

    return self;
}


- (instancetype)initWithFrame:(CGRect)frame
{
    self = [super initWithFrame:frame];

    if (self) {
        [self customInitialized];
    }

    return self;
}


- (nonnull instancetype)initWithFrame:(CGRect)frame title:(nonnull NSString *)title
{
    self = [super initWithFrame:frame];

    if (self) {
        [self customInitialized];
        [self setTitle:title];
    }

    return self;
}

- (void)customInitialize
{
    self.backgroundColor = [UIColor clearColor];

    [self addSubview:self.coverView];
}
总结
写一个在功能和鲁棒上都比较完善的UI控件的确不容易,接下来准备写一个图片自动轮播的控件。希望我的文章能帮助到大家。
代码和Demo已上传到Github,欢迎大家使用。

