背景
公司需要做一系列的壳版本,壳版本如果内容雷同提交到App Store会有被拒绝的风险,其中有一种解决方案是在壳版本中注入混淆的代码,防止被苹果检测到内容太过雷同而导致审核被拒绝,本文是针对这个场景,使用shell脚本进行半自动批量添加和删除混淆代码。
结果
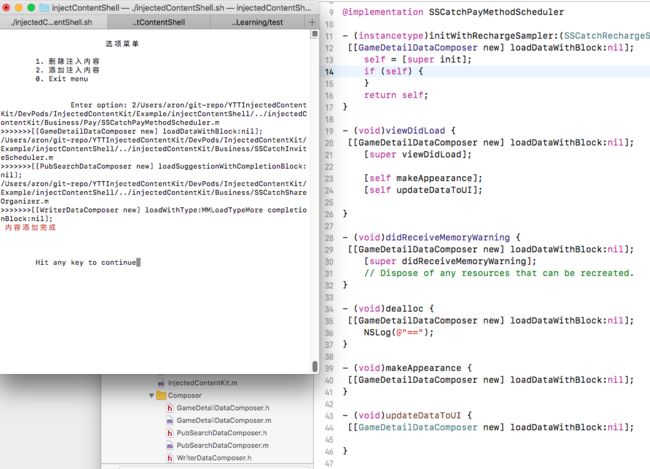
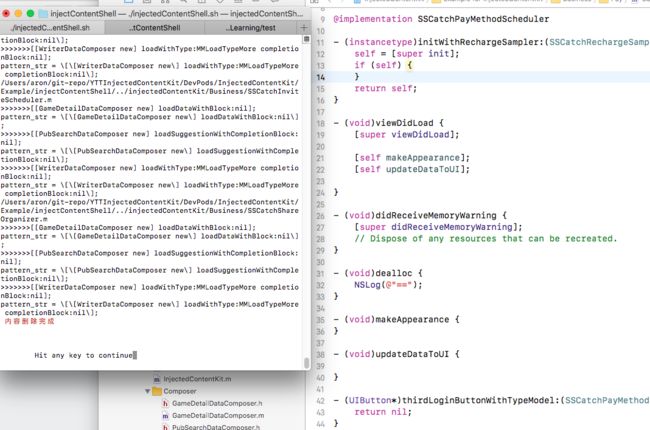
下面以两张图作为添加注入内容和删除注入内容的演示:
添加注入内容到源码中
把注入内容从源码中删除
本文的Demo代码YTTInjectedContentKit
分析
在开始做之前,对步骤流程做了一些构思如下:
初始步骤流程
步骤一:手动处理
混淆注入类列表
混淆注入类对应的方法列表步骤二:配置化
步骤一的形成配置化步骤三:自动化
扫描对应的类和类对应的方法列表,形成对应的配置文件
从配置文件中读取配置注入到对应的目标类中步骤四:自动目标文件的处理
目标文件的查找规则:哪些是需要注入的目标文件
目标文件的注入规则:目标文件中需要在什么位置进行注入步骤五:注入内容自身配置
注入内容需要在不同环境下变换不同的形态,包括类名,方法名等
后面在实现的过程中发现步骤三和步骤五不好实现,所有简化了这部分的流程,最终只保留了以下几个步骤:
优化的步骤流程
步骤一:手动处理
混淆注入类列表
混淆注入类对应的方法列表步骤二:配置化
步骤一的形成配置化步骤三:自动目标文件的处理
目标文件的查找规则:哪些是需要注入的目标文件
目标文件的注入规则:目标文件中需要在什么位置进行注入
以及在实现过程中遇到了一些细节需要处理,这些细节部分作为自步骤如下:
- 子步骤:
步骤三-1:检查时候安装gun-sed,mac下的sed和gun sed 会有差别,所有统一使用gun sed
步骤三-2:用户指定目标位置,需要用户输入
步骤三-3:删除所有的注入内容
实现
步骤一:手动处理
整理一份注入的内容这部分工作是需要手动处理的,这部分的内容应该是具备自完备性的,可以被多个项目做为依赖导入,所以把这些内容作为一个pod库比较合适,也很方便在pod库的测试项目中测试该库的自完备性。库里面的内容可以是任意的,在我实践的过程中,我是把一个旧的项目的网络接口模块作为了这部分内容,因为这部分内容相对的比较独立和容易抽取。
下图是我从旧的项目中提取的一些类作为混淆类

以及我在测试工程中测试混淆的接口调用,在测试工程中测试混淆代码的调用以确保编译链接无误以及确保库的自完备性。
#import "ICKViewController.h"
#import

@implementation ICKViewController

- (void)viewDidLoad
{
    [super viewDidLoad];


    [[GameDetailDataComposer new] loadDataWithBlock:nil];

    [[PubSearchDataComposer new] loadSuggestionWithCompletionBlock:nil];

    [[WriterDataComposer new] loadWithType:MMLoadTypeMore completionBlock:nil];
}

- (void)didReceiveMemoryWarning
{
    [super didReceiveMemoryWarning];
    // Dispose of any resources that can be recreated.
}

@end
步骤二:配置化
配置文件其实就是把测试工程总的接口调用代码拷贝一份到单独的配置文件中,配置文件如下
    [[GameDetailDataComposer new] loadDataWithBlock:nil];

    [[PubSearchDataComposer new] loadSuggestionWithCompletionBlock:nil];

    [[WriterDataComposer new] loadWithType:MMLoadTypeMore completionBlock:nil];
步骤三:自动目标文件的处理
这个是最核心的部分,主要包含了以下内容:
- 配置文件路径配置和需要注入的源码文件夹的配置
- 读取配置文件的注入内容
- 读取源码文件夹下的源码实现文件(XXX.m)
- 把注入内容添加到源码中指定的位置
- 从源码从把注入的内容删除
完整的脚本如下,里面有比较完整的注释,阅读起来应该不会有太大难度:
文本的插入和删除部分使用的是shell中的sed(stream editor)工具,特别滴在mac中sed命令和标准的sed命令有差别,脚本中也会有做这部分的检测,如果机器上安装的不是标准的gun sed程序会自动通过brew安装gun sed
#!/bin/bash

############## 配置

# 需处理文件目录
# mark: TODO
to_process_file_dir="$(pwd)/../injectedContentKit/Business000"
# 配置文件
cfg_file="$(pwd)/injectedContentConfig.cfg"

############## 工具类方法
function printHighlightMessage {
    echo -e "\033[31m $1 \033[0m"
}


# 检查是否安装gunsed
# mac安装gunSed  http://blog.csdn.net/sun_wangdong/article/details/71078083
which_sed=`which sed`
echo $which_sed
echo "testresult = $(expr $which_sed : '.*/gnu-sed/')"
if [[ $(expr $which_sed : '.*/gnu-sed/') -gt 0 ]]; then
    echo "检测到使用gun sed"
else
    if [ ! `which brew` ]
    then
        echo 'Homebrew not found. Trying to install...'
                    ruby -e "$(curl -fsSL https://raw.githubusercontent.com/Homebrew/install/master/install)" \
            || exit 1
    fi
    echo 'Trying to install gun sed...'
    brew install gnu-sed --with-default-names || exit 1
    # 设置局部环境变量
    echo "set PATH...."
    source ./set-gun-sed-path.sh
    echo "set PATH done"

    #mark: echo 颜色选项 http://www.jb51.net/article/43968.htm
    echo "请手动执行命令,然后重新执行"
    command="PATH=\"/usr/local/Cellar/gnu-sed/4.4/bin:\$PATH\""
    printHighlightMessage $command
    echo ""
    exit 1
fi


# 循环检测输入的文件夹
function checkInputDestDir {
    echo -n "请输入需处理源码目录: "
    read path
    if [[ -d $path ]]; then
        to_process_file_dir=$path
    else
        echo -n "输入的目录无效,"
        checkInputDestDir
    fi
}

# 需处理源码目录检查
if [[ -d $to_process_file_dir ]]; then
    echo "需处理源码目录存在 $to_process_file_dir"
else
    echo "请确认需处理源码目录是否存在 $to_process_file_dir"
    checkInputDestDir
fi

# mark: p261
# 配置文件检查
if [[ -f $cfg_file ]]; then
    echo "检测到配置文件存在 $cfg_file"
else
    echo "请确认配置文件是否存在 $cfg_file"
    exit 1
fi

# 读取配置文件
echo "开始读取配置文件..."

declare -a config_content_array
cfg_line_count=0
# mark: p291
IFS_OLD=$IFS
IFS=$'\n'
# 删除文件行首的空白字符 http://www.jb51.net/article/57972.htm
for line in $(cat $cfg_file | sed 's/^[ \t]*//g')
do
    if [[ ${#line} -eq 0 ]]; then
        echo "blank line"
    else
        config_content_array[$cfg_line_count]=$line
    fi
    cfg_line_count=$[ $cfg_line_count + 1 ]
done
IFS=${IFS_OLD}


echo ""

# 读取需要处理目标文件
declare -a implement_source_file_array
implement_source_file_count=0

# mark: p384
# 递归函数读取目录下的所有.m文件
function read_implement_file_recursively {
    echo "read_implement_file_recursively"
    if [[ -d $1 ]]; then
        for item in $(ls $1); do
            itemPath="$1/${item}"
            if [[ -d $itemPath ]]; then
                # 目录
                echo "处理目录 ${itemPath}"
                read_implement_file_recursively $itemPath
                echo "处理目录结束====="
            else
                # 文件
                echo "处理文件 ${itemPath}"
                if [[ $(expr $item : '.*\.m') -gt 0 ]]; then
                    echo ">>>>>>>>>>>>mmmmmmm"
                    implement_source_file_array[$implement_source_file_count]=${itemPath}
                    implement_source_file_count=$[ implement_source_file_count + 1 ];
                fi
                echo ""
            fi
        done
    else
        echo "err:不是一个目录"
    fi
}


echo ${to_process_file_dir}
read_implement_file_recursively ${to_process_file_dir}


# 处理目标文件,添加配置文件中注入的内容
function addInjectedContent {
    # implement_source_file_array
    # ${#config_content_array[@]}
    injected_content_index=0
    for(( i=0;i<${#implement_source_file_array[@]};i++))
    do
        file=${implement_source_file_array[i]};
        echo ${file}
        injected_content=${config_content_array[$injected_content_index]};
        injected_content_index=$[ $injected_content_index + 1 ]

        echo ">>>>>>>${injected_content}"
        # mark: sed 命令中使用变量 http://blog.csdn.net/lepton126/article/details/36374933
        sed -i '/^- \(.*\)/{
            a\ '"$injected_content"'
        }' ${file}

    done;
    message="内容添加完成"
    printHighlightMessage $message
}


# 处理目标文件,删除配置文件中注入的内容
function removeInjectedContent {
    for(( i=0;i<${#implement_source_file_array[@]};i++))
    do
        file=${implement_source_file_array[i]};
        echo ${file}

        for(( j=0;j<${#config_content_array[@]};j++))
        do
            pattern_str=${config_content_array[$j]};
            echo ">>>>>>>${pattern_str}"

            # mark: sed 命令中使用变量 http://blog.csdn.net/lepton126/article/details/36374933
            substring="["
            replacement="\["
            pattern_str=${pattern_str//$substring/$replacement}
            substring="]"
            replacement="\]"
            pattern_str=${pattern_str//$substring/$replacement}
            echo "pattern_str = $pattern_str"
            #pattern_str="[CardDataComposer new]"

            sed -i '/'"$pattern_str"'/ {
                d
            }' ${file}
        done
    done;
    message="内容删除完成"
    printHighlightMessage $message
}


function genMunu {
    clear
    echo
    echo -e "\t\t\t选项菜单\n"
    echo -e "\t1. 删除注入内容"
    echo -e "\t2. 添加注入内容"
    echo -e "\t0. Exit menu\n\n"
    echo -en "\t\tEnter option: "
    read -n 1 option
}


while [[ 1 ]]; do
    genMunu
    case $option in
    0 )
        echo ""
        echo "Bye"
        exit 0
    ;;
    1 )
        # 删除配置文件中注入的内容
        removeInjectedContent
    ;;
    2 )
        # 添加配置文件中注入的内容
        addInjectedContent
    ;;
    h )
        genMunu
    ;;
    * )
        echo "Wrong!!"
    ;;
    esac

    echo
    echo -en "\n\n\tHit any key to continue"
    read -n 1 line

done
总结
以上就是基于shell脚本,从混淆内容注入和把混淆内容删除两方面做了一个半自动化的实现步骤,如果不妥之处,还请不吝赐教。