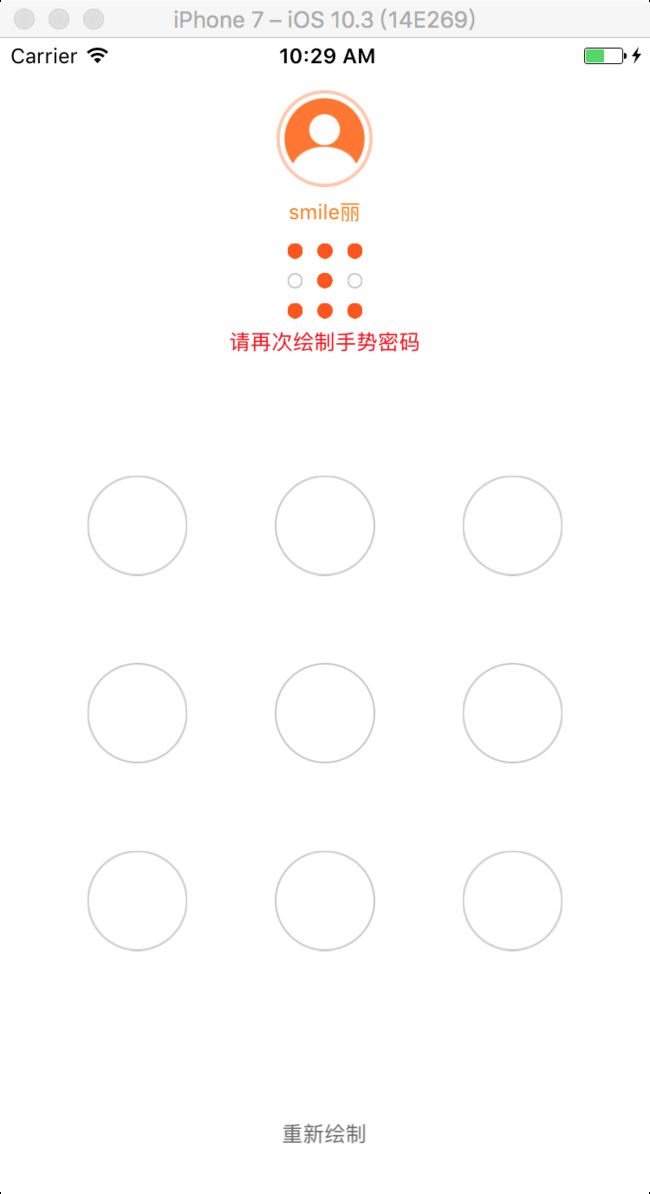
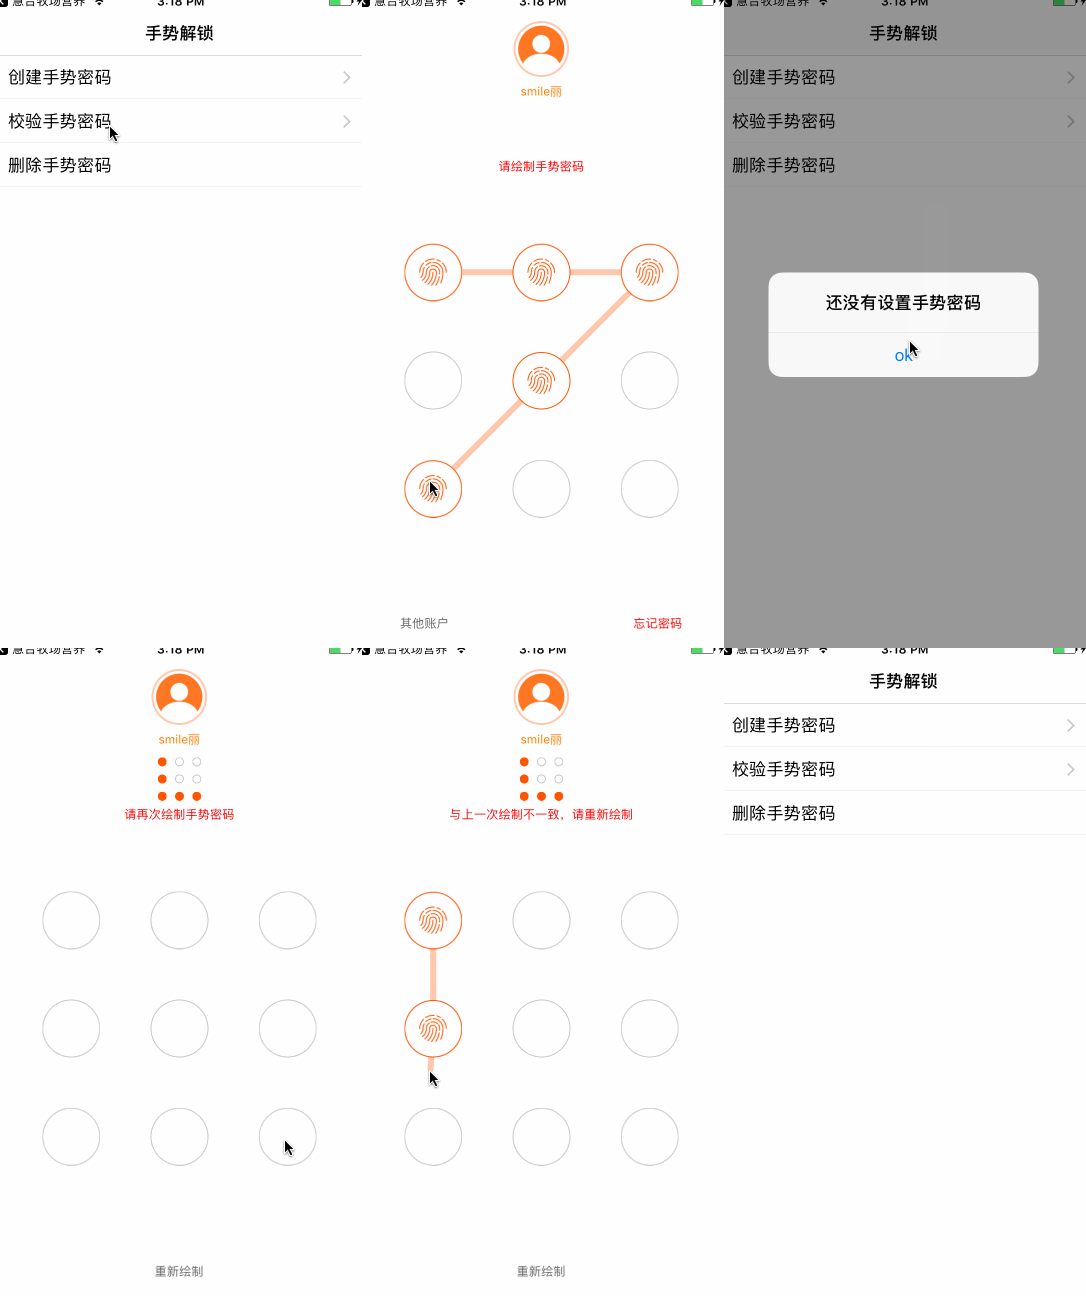
基上篇TouchID 指纹解锁 的技术文, 然后目前又练习一种解锁方式: 九宫格手势解锁.
在一些涉及个人隐私的场景下,为用户的安全考虑是极其有必要的。
首先,我们先分析功能的实现过程,首先我们需要先看大致的实现过程:
1.创建九宫格页面(手势密码页面)
2.九宫格按钮的实现及被点击及滑动过程中按钮状态的改变, 从而创建路径,实现滑动过程中的连线,绘制图形
3.创建九宫格指示器 小图
4.将定义好的九宫格view 和 九宫格指示器view添加到手势密码界面 控制器
5.通过手势枚举去实现手势密码相对应操作。
1 创建九宫格界面ZLGestureLockView.
1.1九宫格内控件的分布 3x3 ,我们可以自定义view(包含3x3个按钮), 选中图片和正常默认按钮图片是可以更换的。
#pragma mark - initializer

- (instancetype)initWithFrame:(CGRect)frame {

    self = [super initWithFrame:frame];

    if (self) {

        [self initSubviews];
    }
    return self;
}

// 子视图初始化
- (void)initSubviews {
    self.backgroundColor = [UIColor clearColor];

    UIPanGestureRecognizer *pan = [[UIPanGestureRecognizer alloc] initWithTarget:self action:@selector(pan:)];
    [self addGestureRecognizer:pan];

    // 创建九宫格 9个按钮
    for (NSInteger i = 0; i < 9; i++) {
        UIButton *btn = [UIButton buttonWithType:UIButtonTypeCustom];
        btn.userInteractionEnabled = NO;
        [btn setImage:[UIImage imageNamed:@"gesture_normal"] forState:UIControlStateNormal];
        [btn setImage:[UIImage imageNamed:@"gesture_selected"] forState:UIControlStateSelected];
        [self addSubview:btn];
        btn.tag = i + 1;
    }
}

//为什么要在这个方法中布局子控件,因为只调用这个方法,就表示父控件的尺寸确定
- (void)layoutSubviews {
    [super layoutSubviews];

    NSUInteger count = self.subviews.count;

    int cols = 3;//总列数

    CGFloat x = 0,y = 0,w = 0,h = 0;

    if (Screen_Width == 320) {
        w = 50;
        h = 50;
    } else {
        w = 58;
        h = 58;
    }

    CGFloat margin = (self.bounds.size.width - cols * w) / (cols + 1);//间距

    CGFloat col = 0;
    CGFloat row = 0;
    for (int i = 0; i < count; i++) {

        col = i % cols;
        row = i / cols;

        x = margin + (w+margin)*col;

        y = margin + (w+margin)*row;
        if (Screen_Height == 480) { // 适配4寸屏幕
            y = (w + margin) * row;
        }else {
            y = margin +(w + margin) * row;
        }

        UIButton *btn = self.subviews[i];
        btn.frame = CGRectMake(x, y, w, h);
    }
}
1.2 定义一个显示九宫格方法
注意:我们在手势密码判定过程中是通过根据之前布局按钮的时候定义的按钮tag值进行字符串拼接,密码传值是通过代理实现的。
@protocol ZLGestureLockDelegate

- (void)gestureLockView:(ZLGestureLockView *)lockView drawRectFinished:(NSMutableString *)gesturePassword;

@end

@interface ZLGestureLockView : UIView

@property (assign, nonatomic) id delegate;

@end
2 九宫格按钮的实现及被点击及滑动过程中按钮状态的改变, 从而创建路径,实现滑动过程中的连线,绘制图形.
2.1 定义数组类型的成员属性,用来装被点击的按钮
@property (strong, nonatomic) NSMutableArray *selectBtns;
#pragma mark - getter

- (NSMutableArray *)selectBtns {
    if (!_selectBtns) {
        _selectBtns = [NSMutableArray array];
    }
    return _selectBtns;
}
2.2 创建路径,实现滑动过程中的连线,绘制图形.
// 只要调用这个方法就会把之前绘制的东西清空 重新绘制
- (void)drawRect:(CGRect)rect {

    if (_selectBtns.count == 0) return;

    // 把所有选中按钮中心点连线
    UIBezierPath *path = [UIBezierPath bezierPath];

    if (self.userInteractionEnabled) {
        [[UIColor yellowColor] set];
    } else {
        [[UIColor orangeColor] set];
    }
    for (int i = 0; i < self.selectBtns.count; i ++) {
        UIButton *btn = self.selectBtns[i];
        if (i == 0) {
            [path moveToPoint:btn.center]; // 设置起点
        } else {
            [path addLineToPoint:btn.center];
        }
    }
    [path addLineToPoint:_currentPoint];

    [UIColorFromRGB(0xffc8ad) set];
    path.lineWidth = 6;
    path.lineJoinStyle = kCGLineCapRound;
    path.lineCapStyle = kCGLineCapRound;
    [path stroke];
}
2.3 开始触摸, 手势密码绘制完成后保存输入密码 且 回调
#pragma mark - action pan

- (void)pan:(UIPanGestureRecognizer *)pan {
    _currentPoint = [pan locationInView:self];

    [self setNeedsDisplay];

    for (UIButton *button in self.subviews) {
        if (CGRectContainsPoint(button.frame, _currentPoint) && button.selected ==   NO) {

            button.selected = YES;
            [self.selectBtns addObject:button];
        }
    }

    [self layoutIfNeeded];

    if (pan.state == UIGestureRecognizerStateEnded) {

        // 保存输入密码
        NSMutableString *gesturePwd = @"".mutableCopy;
        for (UIButton *button in self.selectBtns) {
            [gesturePwd appendFormat:@"%ld",button.tag-1];
            button.selected = NO;
        }
        [self.selectBtns removeAllObjects];

        // 手势密码绘制完成后回调
        if ([self.delegate respondsToSelector:@selector(gestureLockView:drawRectFinished:)]) {
            [self.delegate gestureLockView:self drawRectFinished:gesturePwd];
        }
    }
}
3. 创建九宫格指示器 小图ZLGestureLockIndicator
3.1 九宫格指示器 内控件的分布也是 3x3 ,我们也可以自定义view(包含3x3个按钮)
#pragma mark - initializer

- (instancetype)initWithFrame:(CGRect)frame {
    if (self = [super initWithFrame:frame]) {
        [self initSubviews];
    }
    return self;
}

// 子视图初始化
- (void)initSubviews {
    // 创建9个按钮
    for (int i = 0; i < 9; i++) {
        UIButton *btn = [UIButton buttonWithType:UIButtonTypeCustom];
        btn.userInteractionEnabled = NO;
        [btn setImage:[UIImage imageNamed:@"gesture_indicator_normal"] forState:UIControlStateNormal];
        [btn setImage:[UIImage imageNamed:@"gesture_indicator_selected"] forState:UIControlStateSelected];
        [self addSubview:btn];
        [self.btns addObject:btn];
    }
}

- (void)layoutSubviews {

    [super layoutSubviews];

    NSUInteger count = self.subviews.count;

    int cols = 3;//总列数

    CGFloat x = 0,y = 0,w = 9,h = 9;//bounds
    CGFloat margin = (self.bounds.size.width - cols * w) / (cols + 1);//间距

    CGFloat col = 0;
    CGFloat row = 0;
    for (int i = 0; i < count; i++) {

        col = i%cols;
        row = i/cols;

        x = margin + (w+margin)*col;
        y = margin + (w+margin)*row;

        UIButton *btn = self.subviews[i];
        btn.frame = CGRectMake(x, y, w, h);
    }
}
3.2 定义数组类型的成员属性,用来装九宫格图内被点击的按钮(及缩小显示大九宫格被选展示)
@property (nonatomic, strong) NSMutableArray *btns;
#pragma mark - getter

- (NSMutableArray *)btns {
    if (!_btns) {
        _btns = [NSMutableArray array];
    }
    return _btns;
}
3.3 回显路径
- (void)setGesturePassword:(NSString *)gesturePassword;
#pragma mark - public
- (void)setGesturePassword:(NSString *)gesturePassword {

    if (gesturePassword.length == 0) {
        for (UIButton *button in self.btns) {
            button.selected = NO;
        }
        return;
    }

    for (int i = 0; i < gesturePassword.length; i++) {

        NSString *s = [gesturePassword substringWithRange:NSMakeRange(i, 1)];

        [self.btns[s.integerValue] setSelected:YES];

    }
}
4 将定义好的九宫格view 和 九宫格指示器view添加到手势密码界面 控制器ZLGestureLockViewController上
4.1 加载到控制器上
    // 九宫格指示器 小图
    ZLGestureLockIndicator *gestureLockIndicator = [[ZLGestureLockIndicator alloc]initWithFrame:CGRectMake((self.view.frame.size.width - 60) * 0.5, 110, 60, 60)];
    [self.view addSubview:gestureLockIndicator];
    self.gestureLockIndicator = gestureLockIndicator;

    // 九宫格 手势密码页面
    ZLGestureLockView *gestureLockView = [[ZLGestureLockView alloc]initWithFrame:CGRectMake(0, self.view.frame.size.height - self.view.frame.size.width - 60 - btnH, self.view.frame.size.width, self.view.frame.size.width)];
    gestureLockView.delegate = self;
    [self.view addSubview:gestureLockView];
    self.gestureLockView = gestureLockView;
4.2 创建手势密码的枚举
#import

typedef NS_ENUM(NSInteger,ZLUnlockType) {
    ZLUnlockTypeCreatePsw, // 创建手势密码
    ZLUnlockTypeValidatePsw // 校验手势密码
};

@interface ZLGestureLockViewController : UIViewController

+ (void)deleteGesturesPassword;//删除手势密码
+ (NSString *)gesturesPassword;//获取手势密码

- (instancetype)initWithUnlockType:(ZLUnlockType)unlockType;

@end
// 创建的手势密码
@property (nonatomic, copy) NSString *lastGesturePsw;

@property (nonatomic) ZLUnlockType unlockType;
#pragma mark - inint

- (instancetype)initWithUnlockType:(ZLUnlockType)unlockType {
    if (self = [super init]) {
        _unlockType = unlockType;
    }
    return self;
}

#pragma mark - viewDidLoad
- (void)viewDidLoad {
    [super viewDidLoad];

    self.view.backgroundColor = [UIColor whiteColor];

    [self setupMainUI];

    self.gestureLockView.delegate = self;

    self.resetPswBtn.hidden = YES;
    switch (_unlockType) {
        case ZLUnlockTypeCreatePsw:
        {
            self.gestureLockIndicator.hidden = NO;
            self.otherAcountBtn.hidden = self.forgetPswBtn.hidden = self.nameLabel.hidden = self.headIcon.hidden = YES;
        }
            break;
        case ZLUnlockTypeValidatePsw:
        {
            self.gestureLockIndicator.hidden = YES;
            self.otherAcountBtn.hidden = self.forgetPswBtn.hidden = self.nameLabel.hidden = self.headIcon.hidden = NO;

        }
            break;
        default:
            break;
    }
}
#pragma mark - ZLgestureLockViewDelegate

- (void)gestureLockView:(ZLGestureLockView *)lockView drawRectFinished:(NSMutableString *)gesturePassword {

    switch (_unlockType) {
        case ZLUnlockTypeCreatePsw: // 创建手势密码
        {
            [self createGesturesPassword:gesturePassword];
        }
            break;
        case ZLUnlockTypeValidatePsw: // 校验手势密码
        {
            [self validateGesturesPassword:gesturePassword];
        }
            break;
        default:
            break;
    }
}
4.3 创建手势密码 及 保存手势密码
#pragma mark - 类方法

+ (void)deleteGesturesPassword {
    [[NSUserDefaults standardUserDefaults] removeObjectForKey:GesturesPassword];
    [[NSUserDefaults standardUserDefaults] synchronize];
}

+ (void)addGesturesPassword:(NSString *)gesturesPassword {
    [[NSUserDefaults standardUserDefaults] setObject:gesturesPassword forKey:GesturesPassword];
    [[NSUserDefaults standardUserDefaults] synchronize];
}

+ (NSString *)gesturesPassword {
    return [[NSUserDefaults standardUserDefaults] objectForKey:GesturesPassword];
}
#pragma mark - private

//  创建手势密码
- (void)createGesturesPassword:(NSMutableString *)gesturesPassword {

    if (self.lastGesturePsw.length == 0) {

        if (gesturesPassword.length < 4) {
            self.statusLabel.text = @"至少连接四个点,请重新输入";
            [self shakeAnimationForView:self.statusLabel];
            return;
        }

        if (self.resetPswBtn.hidden == YES) {
            self.resetPswBtn.hidden = NO;
        }

        self.lastGesturePsw = gesturesPassword;
        [self.gestureLockIndicator setGesturePassword:gesturesPassword];
        self.statusLabel.text = @"请再次绘制手势密码";
        return;
    }

    if ([self.lastGesturePsw isEqualToString:gesturesPassword]) { // 绘制成功

        [self dismissViewControllerAnimated:YES completion:^{
            // 保存手势密码
            [ZLGestureLockViewController addGesturesPassword:gesturesPassword];
        }];

    }else {
        self.statusLabel.text = @"与上一次绘制不一致,请重新绘制";
        [self shakeAnimationForView:self.statusLabel];
    }
}
4.4 验证手势密码 及 密码错误输入的逻辑
每个产品需求不一样,我这里是可以输入错误五次且以抖动提示,否则退出重新登录.
// 验证手势密码
- (void)validateGesturesPassword:(NSMutableString *)gesturesPassword {

    static NSInteger errorCount = 5;

    if ([gesturesPassword isEqualToString:[ZLGestureLockViewController gesturesPassword]]) {

        [self dismissViewControllerAnimated:YES completion:^{
            errorCount = 5;
        }];
    } else {

        if (errorCount - 1 == 0) { // 你已经输错五次了! 退出重新登陆!
            UIAlertView *alertView = [[UIAlertView alloc] initWithTitle:@"手势密码已失效" message:@"请重新登陆" delegate:self cancelButtonTitle:nil otherButtonTitles:@"重新登陆", nil];
            [alertView show];
            errorCount = 5;
            return;
        }

        self.statusLabel.text = [NSString stringWithFormat:@"密码错误,还可以再输入%ld次",--errorCount];
        [self shakeAnimationForView:self.statusLabel];
    }
}
// 抖动动画
- (void)shakeAnimationForView:(UIView *)view {

    CALayer *viewLayer = view.layer;
    CGPoint position = viewLayer.position;
    CGPoint left = CGPointMake(position.x - 10, position.y);
    CGPoint right = CGPointMake(position.x + 10, position.y);

    CABasicAnimation *animation = [CABasicAnimation animationWithKeyPath:@"position"];
    [animation setTimingFunction:[CAMediaTimingFunction functionWithName:kCAMediaTimingFunctionEaseInEaseOut]];
    [animation setFromValue:[NSValue valueWithCGPoint:left]];
    [animation setToValue:[NSValue valueWithCGPoint:right]];
    [animation setAutoreverses:YES]; // 平滑结束
    [animation setDuration:0.08];
    [animation setRepeatCount:3];

    [viewLayer addAnimation:animation forKey:nil];
}
#pragma mark - UIAlertViewDelegate

- (void)alertView:(UIAlertView *)alertView clickedButtonAtIndex:(NSInteger)buttonIndex {
    // 重新登陆
    NSLog(@"重新登陆");
}
4.5 底部其他按钮事件
特别是重新绘制按钮, 切记需要把创建的手势密码置为空
#pragma mark - 按钮点击事件 Anction

// 点击其他账号登陆按钮
- (void)otherAccountLogin:(id)sender {
    NSLog(@"%s",__FUNCTION__);
}

// 点击重新绘制按钮
- (void)resetGesturePassword:(id)sender {
    NSLog(@"%s",__FUNCTION__);

    self.lastGesturePsw = nil;
    self.statusLabel.text = @"请绘制手势密码";
    self.resetPswBtn.hidden = YES;
    [self.gestureLockIndicator setGesturePassword:@""];
}

// 点击忘记手势密码按钮
- (void)forgetGesturesPassword:(id)sender {
    NSLog(@"%s",__FUNCTION__);
}
5 通过手势枚举去实现手势密码相对应操作
// 创建手势密码
 ZLGestureLockViewController *vc = [[ZLGestureLockViewController alloc] initWithUnlockType:ZLUnlockTypeCreatePsw];
 [self presentViewController:vc animated:YES completion:nil];
// 校验手势密码
 if ([ZLGestureLockViewController gesturesPassword].length > 0) {

     ZLGestureLockViewController *vc = [[ZLGestureLockViewController alloc] initWithUnlockType:ZLUnlockTypeValidatePsw];
     [self presentViewController:vc animated:YES completion:nil];
 } else {
      UIAlertView *alertView = [[UIAlertView alloc] initWithTitle:nil message:@"还没有设置手势密码" delegate:nil cancelButtonTitle:nil otherButtonTitles:@"ok", nil];
       [alertView show];
 }
//  删除手势密码
[ZLGestureLockViewController deleteGesturesPassword];
OK, 现在就可以来看下效果吧!

