分享是最好的记忆--
如需转发请注明出处
[强调]:共同学习 共同进步 不喜勿喷
内容简介
- 前言
- 实现
- 总结
1. 前言
这次更新有2个目的
1. 复用控件,而不是每次都写冗余代码
2. 好久没有更新了(๑• . •๑)
在Android开发当中自定义View是一项不可或缺的技能,也是我们大部分小白以及小小白的软肋。
自定义View其实也不是很难,因为我们不需要攻克什么技术难关,只需要坐在巨人的肩膀上,抱紧巨人的脑袋就行(ฅ>ω<*ฅ)
自定义View分两大类:
一 : 组合 : 也就是在现有的控件基础上通过组合各种不同功能的控件来组合出功能更强大全民的新控件。
二 : 完全自定义:通过继承View或者ViewGroup来自定义全新的View。 今天讨论的自定义View是第一种方式,即组合方式。如果想了解完全自定义或者更多自定义方面的知识,推荐看扔物线大神以及张鸿翔大神的文章。
2. 实现
功能列表中的Item是我们经常用到的控件之一。它也许是这样的:1. 确定需求
或者是这样的:
再或者是这样的:
为了满足这些情况,我们抽象出功能最丰富的Item;确定了需求之后开始编码。
2. 编码
1. 自定义属性
首先确定我们需要动态设置的属性;包括 :1-左边图片,2-3-左边图片的宽高,4-大标题,5-大标题文字大小,6-大标题文字颜色,7-副标题,8-副标题文字大小,9-副标题文字颜色,10-右边图片,11-12-右边图片宽高等12个属性,当然不止这些,这个可以根据自己的需求丰富,比如 Item 下面是否显示阴影线条,右边图片是否显示等;
那么在../res/attrs.xml中定义自定义属性;
这里有必要解释一下属性定义中的format
| name | format | 描述 |
|---|---|---|
| 资源 | reference | 通过id来指定资源 |
| 颜色 | color | 设置颜色 |
| 尺寸 | dimension | 长宽,字体大小等尺寸 |
| 字符串 | String | 设置文本 |
| 布尔值 | boolean | 通过布尔值设置 |
| 浮点值 | float | 设置浮点值 |
| 百分数 | fraction | 设置百分数值 |
| 枚举值 | enum | 设置枚举值 |
| 位或运算 | flag | 位或运算 |
| 整型值 | integer | 设置整型 |
属性定义时可以指定多种类型值
2.抽象组建
这里说的抽象组建是把该Item可能有的所有功能都写出来;
在../res/layout/item.xml中写出包含组建所有功能的样式;
3.实现功能
选择一个适当的ViewGroup来继承,实现Item;
我的样式中rootView是个RelativeLayout,因此我继承了RelativeLayout。具体实现如下:
package com.uilib.ui.listitem;

import android.content.Context;
import android.content.res.TypedArray;
import android.graphics.Color;
import android.graphics.drawable.Drawable;
import android.text.TextUtils;
import android.util.AttributeSet;
import android.view.View;
import android.widget.ImageView;
import android.widget.RelativeLayout;
import android.widget.TextView;
import com.example.uilibrary.R;
import com.uilib.ui.util.FindView;

/**
 * Created by Elyar.Anwar on 2017/8/10.
 */

public class UILibraryListItem extends RelativeLayout {

    /**
     * 选项控件的左边图片
     */
    private ImageView leftImageView;

    /**
     * 选项控件的右边图片
     */
    private ImageView rightImageView;

    /**
     * 选项控件的标题
     */
    private TextView titleView;

    /**
     * 选项控件的副标题
     */
    private TextView subTitleView;

    /**
     * 左边图片资源
     */
    private Drawable leftImage;

    /**
     * 左边图片资源宽度
     */
    private int leftImageWidth;

    /**
     * 左边图片资源高度
     */
    private int leftImageHeight;

    /**
     * 右边图片资源
     */
    private Drawable rightImage;

    /**
     * 右边图片资源宽度
     */
    private int rightImageWidth;

    /**
     * 右边图片资源高度
     */
    private int rightImageHeight;

    /**
     * 标题文本
     */
    private String title;

    /**
     * 标题文本颜色
     */
    private int titleTextColor;

    /**
     *标题文本字体大小
     */
    private float titleTextSize;

    /**
     *副标题文本
     */
    private String subTitle;

    /**
     *副标题文本颜色
     */
    private int subTitleTextColor;

    /**
     *副标题文本字体大小
     */
    private float subTitleTextSize;

    /**
     *上下文
     */
    private Context mContext;

    /**
     * 属性结合
     */
    private AttributeSet attrs;

    public UILibraryListItem(Context context) {
        this(context,null);
    }

    public UILibraryListItem(Context context, AttributeSet attrs) {
        this(context, attrs,0);
        this.mContext = context;
        this.attrs = attrs;
        init();
    }

    public UILibraryListItem(Context context, AttributeSet attrs, int defStyleAttr) {
        super(context, attrs, defStyleAttr);
        this.mContext = context;
        this.attrs = attrs;
        init();
    }

    /**
     * 初始化视图
     */
    private void init() {
        View.inflate(mContext, R.layout.listitem, this);
        findView();//绑定视图
        loadParams();//加载属性值
        initView();//为视图赋值
    }

    /**
     *  为控件赋值
     */
    private void initView() {
        if(leftImage!=null){
            leftImageView.setImageDrawable(leftImage);
        }
        leftImageView.getLayoutParams().width = leftImageWidth;
        leftImageView.getLayoutParams().height = leftImageHeight;

        if(rightImage!=null){
            rightImageView.setImageDrawable(rightImage);
        }
        rightImageView.getLayoutParams().width = rightImageWidth;
        rightImageView.getLayoutParams().height = rightImageHeight;

        if (!TextUtils.isEmpty(title)){
            titleView.setText(title);
            titleView.setTextColor(titleTextColor);
            titleView.setTextSize(titleTextSize);
        }
        if (!TextUtils.isEmpty(subTitle)){
            subTitleView.setText(subTitle);
            subTitleView.setTextColor(subTitleTextColor);
            subTitleView.setTextSize(subTitleTextSize);
        }
    }


    /**
     * 初始化控件的属性
     */
    private void loadParams() {
        TypedArray typedArray = mContext.obtainStyledAttributes(attrs,R.styleable.UILibraryListItem);
        leftImage = typedArray.getDrawable(R.styleable.UILibraryListItem_leftImg);
        leftImageHeight = typedArray.getDimensionPixelSize(R.styleable.UILibraryListItem_leftImg_height,128);
        leftImageWidth = typedArray.getDimensionPixelSize(R.styleable.UILibraryListItem_leftImg_width,128);

        rightImage = typedArray.getDrawable(R.styleable.UILibraryListItem_rightImg);
        rightImageHeight = typedArray.getDimensionPixelSize(R.styleable.UILibraryListItem_rightImg_height,128);
        rightImageWidth = typedArray.getDimensionPixelSize(R.styleable.UILibraryListItem_rightImg_width,128);

        title = typedArray.getString(R.styleable.UILibraryListItem_title);
        titleTextColor = typedArray.getColor(R.styleable.UILibraryListItem_title_color,Color.BLACK);
        titleTextSize = typedArray.getDimensionPixelSize(R.styleable.UILibraryListItem_title_size,20);

        subTitle = typedArray.getString(R.styleable.UILibraryListItem_subTitle);
        subTitleTextColor = typedArray.getColor(R.styleable.UILibraryListItem_subTitle_color,Color.GRAY);
        subTitleTextSize = typedArray.getDimensionPixelSize(R.styleable.UILibraryListItem_subTitle_size,14);
        typedArray.recycle();
    }

    /**
     * 关联控件
     */
    private void findView() {
        leftImageView =  FindView.findView(this,R.id.leftImg);
        rightImageView = FindView.findView(this,R.id.rightImg);
        titleView = FindView.findView(this,R.id.title);
        subTitleView = FindView.findView(this,R.id.subTitle);
    }


}
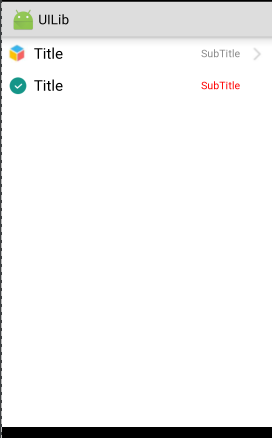
4.引用并预览
引用时为了看出明显效果我定义了2个Item;
可以根据自己的实际情况灵活改变样式,且仅仅在第四步引用处做出更改即可;
总结
自定义View之组合;
通过组合来自定义View能满足我们大部分的需求,且相对容易。
总结其过程:
1.自定义属性
2.抽象出样式
3.编码实现类
4.引用和预览
我是ElyarAnwar,在技术的道路上摸爬滚打;
热爱生活,热爱技术;如果喜欢记得点赞;


