- PHP环境搭建详细教程
好看资源平台
前端php
PHP是一个流行的服务器端脚本语言,广泛用于Web开发。为了使PHP能够在本地或服务器上运行,我们需要搭建一个合适的PHP环境。本教程将结合最新资料,介绍在不同操作系统上搭建PHP开发环境的多种方法,包括Windows、macOS和Linux系统的安装步骤,以及本地和Docker环境的配置。1.PHP环境搭建概述PHP环境的搭建主要分为以下几类:集成开发环境:例如XAMPP、WAMP、MAMP,这
- Vue( ElementUI入门、vue-cli安装)
m0_l5z
elementuivue.js
一.ElementUI入门目录:1.ElementUI入门1.1ElementUI简介1.2Vue+ElementUI安装1.3开发示例2.搭建nodejs环境2.1nodejs介绍2.2npm是什么2.3nodejs环境搭建2.3.1下载2.3.2解压2.3.3配置环境变量2.3.4配置npm全局模块路径和cache默认安装位置2.3.5修改npm镜像提高下载速度2.3.6验证安装结果3.运行n
- 【Python搞定车载自动化测试】——Python实现车载以太网DoIP刷写(含Python源码)
疯狂的机器人
Python搞定车载自动化pythonDoIPUDSISO142291SO13400Bootloadertcp/ip
系列文章目录【Python搞定车载自动化测试】系列文章目录汇总文章目录系列文章目录前言一、环境搭建1.软件环境2.硬件环境二、目录结构三、源码展示1.DoIP诊断基础函数方法2.DoIP诊断业务函数方法3.27服务安全解锁4.DoIP自动化刷写四、测试日志1.测试日志五、完整源码链接前言随着智能电动汽车行业的发展,汽车=智能终端+四个轮子,各家车企都推出了各自的OTA升级方案,本章节主要介绍如何使
- Playwright 自动化验证码教程
吉小雨
python库自动化数据库运维python
Playwright自动化点击验证码教程在自动化测试中,Playwright是一个流行的浏览器自动化工具,支持多种浏览器的高效操作。验证码(如图片验证码、滑动验证码等)是网页中常见的反自动化机制,常常需要特别处理。我们将介绍如何使用Playwright自动化点击验证码,并提供几种常见验证码的处理方案。官方文档链接:Playwright官方文档一、Playwright环境搭建1.1安装Playwri
- python环境安装 pip不能用的问题 pycharm的模板字符
卓越小Y
python学习pythonpycharmpip
学习初衷今天是九月一号,也就是开学日,做大人的也要适当开下学,享受下仪式感。以往都是存储在笔记本的,但是几台电脑,经常很多资料乱成一团,写成博客,方便让有心学习的朋友少走一些弯路。属于自己的开学季也出发了python环境安装和一些小问题环境搭建环境安装添加变量名为PYTHON_HOME地址:安装文件的路径path路径(%代表引用设置好的变量)一般我们会添加一个环境PYTHON_HOME然后指向我们
- 【开发环境搭建】Macbook M1搭建Java开发环境
weixin_44329069
java开发语言
JDK安装与配置下载并安装JDK:ARM64DMG安装包下载链接:JDK21forMac(ARM64)。双击下载的DMG文件,按照提示安装JDK。配置环境变量:打开终端,使用vim编辑.bash_profile文件:vim~/.bash_profile在文件中添加以下内容来设置JAVA_HOME:exportJAVA_HOME=/Library/Java/JavaVirtualMachines/j
- (小白入门)Windows环境下搭建React Native Android开发环境
码农老黑
前端ReactNative移动开发Androidstudio
ReactNative(简称RN)是Facebook于2015年4月开源的跨平台移动应用开发框架,是Facebook早先开源的UI框架React在原生移动应用平台的衍生产物,目前支持iOS和Android两大平台。RN的环境搭建在RN的中文社区有所介绍,但是对于小白来说还是有些太过简略了。RN中文社区详见参考,本文不涉及的问题也许在其中能够有所解答。ReactNative思想底层引擎是JavaSc
- 内网穿透之EW使用、判断服务器是否出网
板栗妖怪
学习内网渗透
环境搭建使用的是下面文章的环境记一次学习--内网穿透-CSDN博客ew代理然后同样通过thinkphp漏洞写入文件,然后通过蚁剑连接然后上传ew的Linux版本,然后加权执行一层代理正向代理设置正向代理(在ubuntu上),然后kali在proxychain配置文件中连接ubuntu的192.168.244.154的代理端口反向代理在ubuntu上设置反向代理,将连接反弹到kali上的某个端口。然
- 性能测试的复习2-jmeter的搭建、使用、参数化
暖阳与晚风
jmeterjmeter
通过网盘分享的文件:性能测试共享文件链接:https://pan.baidu.com/s/1A4Nc8C5Xp6qxQ5QFtecK8g?pwd=s73c提取码:s73c1、性能测试工具2、jmeter环境搭建3、jmeter的基本使用4、jmeter的参数化
- 【深度学习】【OnnxRuntime】【Python】模型转化、环境搭建以及模型部署的详细教程
牙牙要健康
深度学习onnxonnxruntime深度学习python人工智能
【深度学习】【OnnxRuntime】【Python】模型转化、环境搭建以及模型部署的详细教程提示:博主取舍了很多大佬的博文并亲测有效,分享笔记邀大家共同学习讨论文章目录【深度学习】【OnnxRuntime】【Python】模型转化、环境搭建以及模型部署的详细教程前言模型转换--pytorch转onnxWindows平台搭建依赖环境onnxruntime调用onnx模型ONNXRuntime推理核
- Java Spring Boot 全面教程
极客代码
玩转Javajavaspringboot开发语言后端
一、SpringBoot简介与环境搭建1.1SpringBoot简介SpringBoot是一种基于Java的开源框架,由PivotalSoftware开发,旨在简化新Spring应用程序的初始化、配置和部署过程。它遵循约定优于配置的原则,通过内嵌的Tomcat、Jetty或Undertow等容器,使得开发者能够快速构建独立运行的、生产级别的基于Spring框架的应用程序。SpringBoot包含了
- Vue项目中实现AES加密解密
小金子J
前端框架JavaScript分享vue.js前端javascript
在前端开发中,保护用户数据的安全性至关重要。AES(高级加密标准)作为一种广泛使用的对称加密算法,因其高效性和安全性而受到青睐。本文将介绍如何在Vue项目中实现AES加密解密,包括ECB和CBC两种模式。环境搭建在Vue项目中使用AES加密解密功能之前,需要先安装crypto-js库。通过执行以下命令,可以轻松地将crypto-js添加到项目中:npminstallcrypto-js--save-
- Swift基础语法学习
中古传奇
swiftc++面试java
Swift基础语法学习0前言--Swift特点优势(忽悠点)1环境搭建1.1Xcode安装1.2离线安装踩坑指南2Swift语言2.1基本数据类型2.1.1申明常量和变量2.1.2整数类型2.1.3浮点数2.1.4布尔值2.1.5元组2.1.6可选类型2.1.7错误处理3断言和先决条件3.1断言和先决条件调试代码的好处3.2使用断言进行调试3.3强制执行先决条件3.4基本运算符时间:2021-22
- Android移动测试入门—— adb 测试环境搭建及常用命令
蘑菇头上不长草
Androidadbpython爬虫requestandroid
目录搭建abd环境安装jdk并配置环境变量安装adb并配置环境常用命令连接设备1.打开开发者模式2.USB连接移动设备3.查看连接设备4.进入手机5.adbpush电脑文件上传到手机6.adbpull从手机里下载文件到电脑7.adbinstall安装app8.查看手机上安装的所有软件(查看包名)9.卸载app10.monkey测试11.logcat搭建abd环境adb环境搭建主要分为2部分,一是j
- react-native mac 开发环境搭建Android SDK版本N/A问题,已解决
aaaaanqi
reactnative
react-nativemac开发环境搭建AndroidSDK版本N/A问题,已解决使用npxreact-nativedoctor校验开发环境,AndroidSDK报错但是开发环境配置和文档描述得没有什么差别,怀疑是bug,git仓库下的issue有提类似问题,直接使用npmrunandroid运行,报以下错>Failedtoapplyplugin'com.android.internal.app
- Java学习路线:从零基础到高级开发者的完整指南
何遇mirror
java
初学者入门指南1.环境搭建安装JDK:下载并安装最新版本的JDK(JavaDevelopmentKit)。配置环境:设置JAVA_HOME环境变量,并将bin目录添加到PATH中。选择IDE:使用Eclipse、IntelliJIDEA或其他任何你喜欢的Java集成开发环境。2.Java基础知识HelloWorld:编写你的第一个Java程序。基本语法:学习变量、数据类型(原始类型、包装类型)、运
- 【第三天】python和pycharm要不要一起下的问题解答
秋凉fz
pythonpycharm开发语言
要!!!下了pycharm但是没下载python也是运行不了的原文链接:Python环境搭建—安利Python小白的Python和Pycharm安装详细教程-知乎工欲善其事,必先利其器。首先我们先来安装Python,在这里安利一下:其实在没有安装Python之前也可以安装Pycharm的,两者并没有什么冲突关系。但是话说回来,如果没有Python编译器,那么Pycharm其实只是个驱壳,即便你编好
- Java初级学习路线概要~
艾伦~耶格尔
Java初级java学习开发语言intellij-ideajdk
前言如果你刚刚开始学习Java,掌握基础知识是关键。本文将提供一个详细的Java初级学习路线,帮助各位看官从基础开始,逐步掌握Java编程语言的核心概念。1.Java语言基础1.1Java简介-**Java介绍**:Java是一种广泛使用的编程语言,以其跨平台特性和面向对象设计而著名。-**应用场景**:Web应用、桌面应用、移动应用等。1.2环境搭建**安装JDK**:从[Oracle官网](h
- Battery-Historian在win10上的详细环境搭建过程
小赖同学啊
移动端测试运维监控电量测试gitpythonlinux
Battery-historian是Google在GitHub上面开源的一个很强大的电量分析工具,相对来讲安装是比较麻烦的。之前已经在win7系统上搭过一次,这次在win10上再搭一次,整体来说没有发现什么太大的区别。Battery-Historian工具在Windows上运行主要需要有Go语言、Python、Java以及Git的支持。环境搭建详细步骤如下:一、安装配置Go语言环境1.下载:htt
- PAG动效简介
东坡大表哥
Android开发android前端动画
文章目录前言一、PAG是什么?特点二、PAG使用流程图三、PAG动效集成环境搭建代码实现三、动效踩过的坑四、相关资源五、参考链接前言互联网产品动效使用越来越多,不管是播间里面的各种礼物道具动效,还是APP各种场景要展示的动画,为了实现理想的效果,反复打磨,都是困扰设计师和开发工程师的一个主要问题。设计要求:加载要快,显示要清晰,体积要小,可扩展性要强,开发要面对:内存占用,CPU占用,屏幕适配等等
- HarmonyOS NEXT 应用开发详解:基于华为开发者联盟的实践
代码伐木匠
笔记本华为harmonyos
HarmonyOSNEXT应用开发详解:基于华为开发者联盟的实践HarmonyOSNEXT是华为自研的操作系统,作为HarmonyOS的最新版本,旨在推动万物互联时代的全场景生态发展。基于华为开发者联盟,开发者可以利用HarmonyOSNEXT提供的多端协同、分布式技术等功能,构建高性能的应用程序。本篇博文将为你详细介绍如何通过华为开发者联盟进行HarmonyOSNEXT应用开发,从环境搭建、开发
- 彻底理解MyBatis的环境如何搭建(超详细)
努力编程的阿伟
mybatis
环境搭建步骤(烹饪过程)1.添加依赖准备食材当你准备做一顿大餐时,你首先需要列出所有必需的食材。在MyBatis的世界里,这些食材就是依赖库,你需要在你的pom.xml(食谱清单)中添加MyBatis及其数据库驱动的依赖,这样你的项目就有了所需的所有原料。当使用Maven时,可以在pom.xml文件中添加如下依赖:org.mybatismybatis版本号数据库驱动的groupId数据库驱动的ar
- 【环境搭建:onnx模型部署】onnxruntime-gpu安装与测试(python)(1)
2401_83703835
程序员python深度学习pytorch
cuda==10.2cudnn==8.0.3onnxruntime-gpu==1.5.0or1.6.0pipinstallonnxruntime-gpu==1.6.0###2.2方法二:onnxruntime-gpu不依赖于本地主机上cuda和cudnn在conda环境中安装,不依赖于本地主机上已安装的cuda和cudnn版本,灵活方便。这里,先说一下已经测试通过的组合:*python3.6,cu
- 嵌入式QT开发:构建高效智能的嵌入式系统
嵌入式大圣
qt开发语言
摘要:本文深入探讨了嵌入式QT相关的各个方面。从QT框架的基础架构和核心概念出发,详细阐述了其在嵌入式环境中的优势与特点。文中分析了嵌入式QT的开发环境搭建过程,包括交叉编译工具链的配置等关键步骤。进一步探讨了嵌入式QT的界面设计与开发,涵盖了从基本控件的使用到复杂界面布局的构建。同时也深入研究了信号与槽机制在嵌入式系统中的应用,以及嵌入式QT与硬件设备的交互,包括输入输出设备的驱动与集成。还涉及
- 【Linux】从入门到放弃--常见指令以及权限理解
伍伍1GB
Linuxlinux运维服务器
目录一、入门入门,首先要有门--环境搭建二、门的那边是什么--Linux是个啥三、入门先迈左脚--Linux下的基本指令01、ls指令——ls[选项][目录或文件]02、pwd指令——pwd03、cd指令——cd[目录名]04、touch指令——touch[所创建的文件名称]05、mkdir指令——mkdir[所创建的目录名称,例如“dirname”]06、rmdir指令&&rm指令——rmdir
- 从零开始学习Java的100个课程
陈在天box
java大数据开发语言
哈喽大家好,今天给大家推荐的是从零开始学习Java的100个课程,接下来我会每天更新两篇课程经验供大家参考学习;以下是为大家设计的从零开始学习Java的100个课程:一、Java基础语法Java开发环境搭建安装JDK配置环境变量编写并运行第一个Java程序基本数据类型整数类型(byte、short、int、long)浮点类型(float、double)字符类型(char)布尔类型(boolean)
- 交叉编译内核驱动
zhaizhaizhu
第一部分龙芯交叉编译环境搭建1)上传压缩包至Linux2)创建安装目录/data/toolchain(必须使用此目录,否则交叉编译器脚本无法使用)$mkdir-p/data/toolchain3)将压缩包解压到/data/toolchain目录$tarzxftoolchain.loongson-4.9.3.tgz-C/data/toolchain测试1)创建一个脚本,比如bb.sh并添加如下内容:
- 【JDBC教科书】阶段式JDBC数据库连接神操作总结
何学长在奔跑
JDBC数据库JDBC程序人生经验分享
文章目录一、引言1.1如何操作数据1.2实际开发中,会采用客户端操作数据库吗?二、JDBC(JavaDataBaseConnectivity)2.1什么是JDBC?2.2JDBC核心思想2.2.1MySQL数据库驱动2.2.2JDBCAPI2.3环境搭建三、JDBC开发步骤【`重点`】3.1注册驱动3.2连接数据库3.3获取发送SQL的对象3.4执行SQL语句3.5处理结果3.6释放资源3.7综合
- zybo上运行linux,Zybo开发板linux作业系统移植
周行文
zybo上运行linux
文章主要介紹zyboboard上linux作业系统移植过程。分别介绍了开发环境搭建、U-boot编译、linux内核编译、busybox制作等流程及注意事项。文章使用的开发板是zynq7000系列的zyboboard。Vivado版本是2015.1.主机系统是Debian9.1.开发环境搭建工欲善其事必先利其器,做开发前搭建好编译环境是重要的一步,这些步骤大体上都相同,然而对于不同的系统平台、硬件
- Python JSON - 奇客谷qikegu.com
八狐云|酷画册|二维码生成
pythonPython教程python
Python介绍Python开发环境搭建Python语法Python变量Python数值类型Python类型转换Python字符串(String)Python运算符Python列表(list)Python元组(Tuple)Python集合(Set)Python字典(Dictionary)PythonIf…ElsePythonWhile循环PythonFor循环Python函数PythonLambd
- 矩阵求逆(JAVA)初等行变换
qiuwanchi
矩阵求逆(JAVA)
package gaodai.matrix;
import gaodai.determinant.DeterminantCalculation;
import java.util.ArrayList;
import java.util.List;
import java.util.Scanner;
/**
* 矩阵求逆(初等行变换)
* @author 邱万迟
*
- JDK timer
antlove
javajdkschedulecodetimer
1.java.util.Timer.schedule(TimerTask task, long delay):多长时间(毫秒)后执行任务
2.java.util.Timer.schedule(TimerTask task, Date time):设定某个时间执行任务
3.java.util.Timer.schedule(TimerTask task, long delay,longperiod
- JVM调优总结 -Xms -Xmx -Xmn -Xss
coder_xpf
jvm应用服务器
堆大小设置JVM 中最大堆大小有三方面限制:相关操作系统的数据模型(32-bt还是64-bit)限制;系统的可用虚拟内存限制;系统的可用物理内存限制。32位系统下,一般限制在1.5G~2G;64为操作系统对内存无限制。我在Windows Server 2003 系统,3.5G物理内存,JDK5.0下测试,最大可设置为1478m。
典型设置:
java -Xmx
- JDBC连接数据库
Array_06
jdbc
package Util;
import java.sql.Connection;
import java.sql.DriverManager;
import java.sql.ResultSet;
import java.sql.SQLException;
import java.sql.Statement;
public class JDBCUtil {
//完
- Unsupported major.minor version 51.0(jdk版本错误)
oloz
java
java.lang.UnsupportedClassVersionError: cn/support/cache/CacheType : Unsupported major.minor version 51.0 (unable to load class cn.support.cache.CacheType)
at org.apache.catalina.loader.WebappClassL
- 用多个线程处理1个List集合
362217990
多线程threadlist集合
昨天发了一个提问,启动5个线程将一个List中的内容,然后将5个线程的内容拼接起来,由于时间比较急迫,自己就写了一个Demo,希望对菜鸟有参考意义。。
import java.util.ArrayList;
import java.util.List;
import java.util.concurrent.CountDownLatch;
public c
- JSP简单访问数据库
香水浓
sqlmysqljsp
学习使用javaBean,代码很烂,仅为留个脚印
public class DBHelper {
private String driverName;
private String url;
private String user;
private String password;
private Connection connection;
privat
- Flex4中使用组件添加柱状图、饼状图等图表
AdyZhang
Flex
1.添加一个最简单的柱状图
? 1 2 3 4 5 6 7 8 9 10 11 12 13 14 15 16 17 18 19 20 21 22 23 24 25 26 27 28
<?xml version=
"1.0"&n
- Android 5.0 - ProgressBar 进度条无法展示到按钮的前面
aijuans
android
在低于SDK < 21 的版本中,ProgressBar 可以展示到按钮前面,并且为之在按钮的中间,但是切换到android 5.0后进度条ProgressBar 展示顺序变化了,按钮再前面,ProgressBar 在后面了我的xml配置文件如下:
[html]
view plain
copy
<RelativeLa
- 查询汇总的sql
baalwolf
sql
select list.listname, list.createtime,listcount from dream_list as list , (select listid,count(listid) as listcount from dream_list_user group by listid order by count(
- Linux du命令和df命令区别
BigBird2012
linux
1,两者区别
du,disk usage,是通过搜索文件来计算每个文件的大小然后累加,du能看到的文件只是一些当前存在的,没有被删除的。他计算的大小就是当前他认为存在的所有文件大小的累加和。
- AngularJS中的$apply,用还是不用?
bijian1013
JavaScriptAngularJS$apply
在AngularJS开发中,何时应该调用$scope.$apply(),何时不应该调用。下面我们透彻地解释这个问题。
但是首先,让我们把$apply转换成一种简化的形式。
scope.$apply就像一个懒惰的工人。它需要按照命
- [Zookeeper学习笔记十]Zookeeper源代码分析之ClientCnxn数据序列化和反序列化
bit1129
zookeeper
ClientCnxn是Zookeeper客户端和Zookeeper服务器端进行通信和事件通知处理的主要类,它内部包含两个类,1. SendThread 2. EventThread, SendThread负责客户端和服务器端的数据通信,也包括事件信息的传输,EventThread主要在客户端回调注册的Watchers进行通知处理
ClientCnxn构造方法
&
- 【Java命令一】jmap
bit1129
Java命令
jmap命令的用法:
[hadoop@hadoop sbin]$ jmap
Usage:
jmap [option] <pid>
(to connect to running process)
jmap [option] <executable <core>
(to connect to a
- Apache 服务器安全防护及实战
ronin47
此文转自IBM.
Apache 服务简介
Web 服务器也称为 WWW 服务器或 HTTP 服务器 (HTTP Server),它是 Internet 上最常见也是使用最频繁的服务器之一,Web 服务器能够为用户提供网页浏览、论坛访问等等服务。
由于用户在通过 Web 浏览器访问信息资源的过程中,无须再关心一些技术性的细节,而且界面非常友好,因而 Web 在 Internet 上一推出就得到
- unity 3d实例化位置出现布置?
brotherlamp
unity教程unityunity资料unity视频unity自学
问:unity 3d实例化位置出现布置?
答:实例化的同时就可以指定被实例化的物体的位置,即 position
Instantiate (original : Object, position : Vector3, rotation : Quaternion) : Object
这样你不需要再用Transform.Position了,
如果你省略了第二个参数(
- 《重构,改善现有代码的设计》第八章 Duplicate Observed Data
bylijinnan
java重构
import java.awt.Color;
import java.awt.Container;
import java.awt.FlowLayout;
import java.awt.Label;
import java.awt.TextField;
import java.awt.event.FocusAdapter;
import java.awt.event.FocusE
- struts2更改struts.xml配置目录
chiangfai
struts.xml
struts2默认是读取classes目录下的配置文件,要更改配置文件目录,比如放在WEB-INF下,路径应该写成../struts.xml(非/WEB-INF/struts.xml)
web.xml文件修改如下:
<filter>
<filter-name>struts2</filter-name>
<filter-class&g
- redis做缓存时的一点优化
chenchao051
redishadooppipeline
最近集群上有个job,其中需要短时间内频繁访问缓存,大概7亿多次。我这边的缓存是使用redis来做的,问题就来了。
首先,redis中存的是普通kv,没有考虑使用hash等解结构,那么以为着这个job需要访问7亿多次redis,导致效率低,且出现很多redi
- mysql导出数据不输出标题行
daizj
mysql数据导出去掉第一行去掉标题
当想使用数据库中的某些数据,想将其导入到文件中,而想去掉第一行的标题是可以加上-N参数
如通过下面命令导出数据:
mysql -uuserName -ppasswd -hhost -Pport -Ddatabase -e " select * from tableName" > exportResult.txt
结果为:
studentid
- phpexcel导出excel表简单入门示例
dcj3sjt126com
PHPExcelphpexcel
先下载PHPEXCEL类文件,放在class目录下面,然后新建一个index.php文件,内容如下
<?php
error_reporting(E_ALL);
ini_set('display_errors', TRUE);
ini_set('display_startup_errors', TRUE);
if (PHP_SAPI == 'cli')
die('
- 爱情格言
dcj3sjt126com
格言
1) I love you not because of who you are, but because of who I am when I am with you. 我爱你,不是因为你是一个怎样的人,而是因为我喜欢与你在一起时的感觉。 2) No man or woman is worth your tears, and the one who is, won‘t
- 转 Activity 详解——Activity文档翻译
e200702084
androidUIsqlite配置管理网络应用
activity 展现在用户面前的经常是全屏窗口,你也可以将 activity 作为浮动窗口来使用(使用设置了 windowIsFloating 的主题),或者嵌入到其他的 activity (使用 ActivityGroup )中。 当用户离开 activity 时你可以在 onPause() 进行相应的操作 。更重要的是,用户做的任何改变都应该在该点上提交 ( 经常提交到 ContentPro
- win7安装MongoDB服务
geeksun
mongodb
1. 下载MongoDB的windows版本:mongodb-win32-x86_64-2008plus-ssl-3.0.4.zip,Linux版本也在这里下载,下载地址: http://www.mongodb.org/downloads
2. 解压MongoDB在D:\server\mongodb, 在D:\server\mongodb下创建d
- Javascript魔法方法:__defineGetter__,__defineSetter__
hongtoushizi
js
转载自: http://www.blackglory.me/javascript-magic-method-definegetter-definesetter/
在javascript的类中,可以用defineGetter和defineSetter_控制成员变量的Get和Set行为
例如,在一个图书类中,我们自动为Book加上书名符号:
function Book(name){
- 错误的日期格式可能导致走nginx proxy cache时不能进行304响应
jinnianshilongnian
cache
昨天在整合某些系统的nginx配置时,出现了当使用nginx cache时无法返回304响应的情况,出问题的响应头: Content-Type:text/html; charset=gb2312 Date:Mon, 05 Jan 2015 01:58:05 GMT Expires:Mon , 05 Jan 15 02:03:00 GMT Last-Modified:Mon, 05
- 数据源架构模式之行数据入口
home198979
PHP架构行数据入口
注:看不懂的请勿踩,此文章非针对java,java爱好者可直接略过。
一、概念
行数据入口(Row Data Gateway):充当数据源中单条记录入口的对象,每行一个实例。
二、简单实现行数据入口
为了方便理解,还是先简单实现:
<?php
/**
* 行数据入口类
*/
class OrderGateway {
/*定义元数
- Linux各个目录的作用及内容
pda158
linux脚本
1)根目录“/” 根目录位于目录结构的最顶层,用斜线(/)表示,类似于
Windows
操作系统的“C:\“,包含Fedora操作系统中所有的目录和文件。 2)/bin /bin 目录又称为二进制目录,包含了那些供系统管理员和普通用户使用的重要
linux命令的二进制映像。该目录存放的内容包括各种可执行文件,还有某些可执行文件的符号连接。常用的命令有:cp、d
- ubuntu12.04上编译openjdk7
ol_beta
HotSpotjvmjdkOpenJDK
获取源码
从openjdk代码仓库获取(比较慢)
安装mercurial Mercurial是一个版本管理工具。 sudo apt-get install mercurial
将以下内容添加到$HOME/.hgrc文件中,如果没有则自己创建一个: [extensions] forest=/home/lichengwu/hgforest-crew/forest.py fe
- 将数据库字段转换成设计文档所需的字段
vipbooks
设计模式工作正则表达式
哈哈,出差这么久终于回来了,回家的感觉真好!
PowerDesigner的物理数据库一出来,设计文档中要改的字段就多得不计其数,如果要把PowerDesigner中的字段一个个Copy到设计文档中,那将会是一件非常痛苦的事情。
 Python版本.png
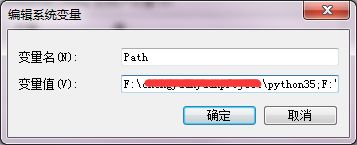 配置环境变量.png
 pip工具.png
 setuptools工具.png
 安装selenium.png