前言
通过ViewPager和贝塞尔曲线实现了一个弧形广告轮播图。
效果图
实现方法
想要实现这个效果,现在几行代码就可以了:
Step 1. Add it in your root build.gradle at the end of repositories:
allprojects {
        repositories {
            ...
            maven { url 'https://www.jitpack.io' }
        }
    }
Step 2. Add the dependency:
dependencies {
          compile 'com.github.Simon986793021:SimonArcViewTest:V1.1'
    }
Step 3. create the layout:
Step 4. use it in Activity
 HomeBanner homeBanner= (HomeBanner) findViewById(R.id.hb_banner);
        homeBanner.setImagesRes(new int[]{R.drawable.banner5,R.drawable.banner5,R.drawable.banner5,R.drawable.banner5});
通过上面几步就可以实现了。
PS:
这里提供了一个额外的接口来改变图片的缩放:
ArcImageView arcImageView=new ArcImageView(this);
        arcImageView.setScale(0.5f);
下面我们再来具体分析下实现过程。
思路
我们可以把弧形ViewPager分为两个部分
1.ViewPager
2.弧形图片
原理
弧形图片是通过二阶贝塞尔曲线画出来的,我们先来看看二阶贝塞尔曲线。
二阶曲线原理:
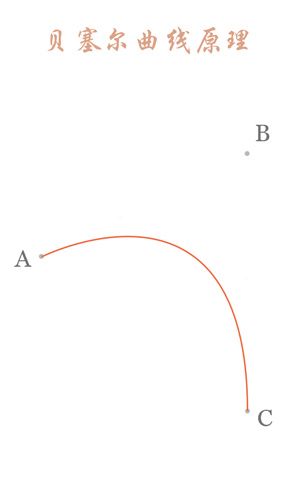
二阶曲线由两个数据点(A 和 C),一个控制点(B)来描述曲线状态,大致如下:
上图中红色曲线部分就是传说中的二阶贝塞尔曲线,那么这条红色曲线是如何生成的呢?接下来我们就以其中的一个状态分析一下:
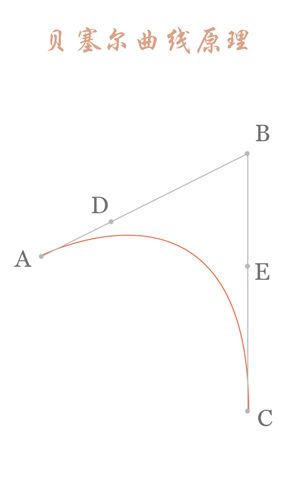
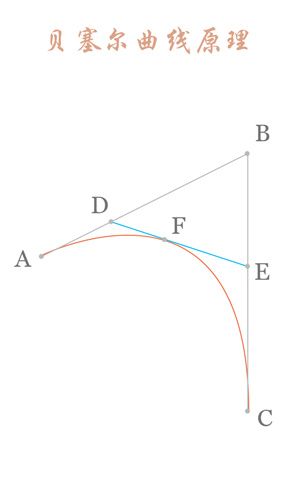
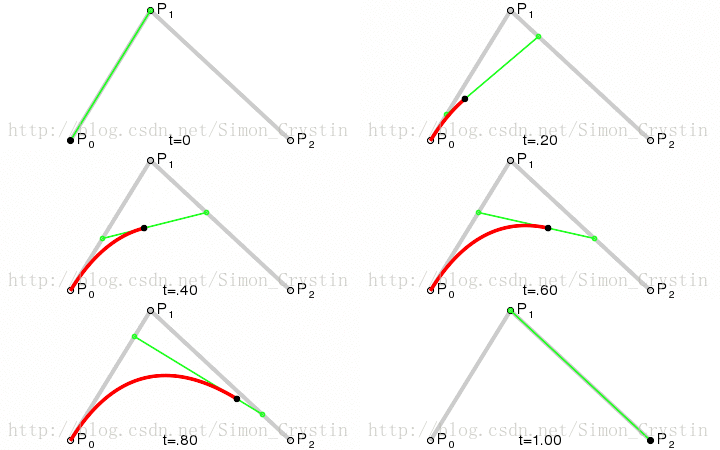
连接AB BC,并在AB上取点D,BC上取点E,使其满足条件: 连接DE,取点F,使得:这样获取到的点F就是贝塞尔曲线上的一个点,动态过程如下:
PS: 二阶曲线对应的方法是quadTo
贝塞尔曲线还有一阶和三阶:
想要了解的点这里
绘制一段二阶贝塞尔曲线需要三个点:一个起始点,一个终点和一个控制点。控制点的位置不同,决定了曲线的弯曲程度不同。绘制二阶贝塞尔曲线的方法为:quadTo(float x1, float y1, float x2, float y2)。
实现过程
1.弧形图片的实现##
我们知道了二阶贝塞尔曲线的原理之后,只需要在图片上加上path就可以。
先在onSizaChanged初始化贝塞尔曲线需要的三个点。
protected void onSizeChanged(int w, int h, int oldw, int oldh) {
        super.onSizeChanged(w, h, oldw, oldh);
        this.width = w;
        this.height = h;
        this.path.reset();
        this.path.moveTo(0.0F, 0.0F);
        this.path.addRect(0.0F, 0.0F, (float)this.width, (float)(this.height - this.ArcHeight), Path.Direction.CCW);
        this.startPoint.x = 0.0F;
        this.startPoint.y = (float)(this.height - this.ArcHeight);
        this.endPoint.x = (float)this.width;
        this.endPoint.y = (float)(this.height - this.ArcHeight);
        this.controlPoint.x = (float)(this.width / 2);
        this.controlPoint.y = (float)(this.height + this.ArcHeight);
        this.invalidate();
    }
再在onDraw方法直接调用:
 this.path.moveTo(this.startPoint.x, this.startPoint.y);
            this.path.quadTo(this.controlPoint.x, this.controlPoint.y, this.endPoint.x, this.endPoint.y);
            canvas.drawPath(this.path,this.paint);
完整代码如下:
public class ArcImageView extends android.support.v7.widget.AppCompatImageView {
    private Paint paint;
    private PointF startPoint;
    private PointF endPoint;
    private PointF controlPoint;
    private int width;
    private int height;
    private int ArcHeight = 50;
    private Path path;
    private Bitmap bitmap;
    private float mScale=1.0f;
    public ArcImageView(Context context) {
        super(context);
        this.init();
    }

    public ArcImageView(Context context, @Nullable AttributeSet attrs) {
        super(context, attrs);
        this.init();
    }

    public ArcImageView(Context context, @Nullable AttributeSet attrs, int defStyleAttr) {
        super(context, attrs, defStyleAttr);
    }
    /**
     * 设置弧形高度
     */
    public void setArcHeight(int height)
    {
        this.ArcHeight=height;
    }
    /**
     * 设置图片缩放大小
     * @param scale
     */
    public void setScale(float scale)
    {
        this.mScale=scale;
    }
    private void init() {
        this.paint = new Paint();
        this.paint.setAntiAlias(true);
        this.startPoint = new PointF(0.0F, 0.0F);
        this.endPoint = new PointF(0.0F, 0.0F);
        this.controlPoint = new PointF(0.0F, 0.0F);
        this.path = new Path();
    }
    @Override
    protected void onSizeChanged(int w, int h, int oldw, int oldh) {
        super.onSizeChanged(w, h, oldw, oldh);
        this.width = w;
        this.height = h;
        this.path.reset();
        this.path.moveTo(0.0F, 0.0F);
        this.path.addRect(0.0F, 0.0F, (float)this.width, (float)(this.height - this.ArcHeight), Path.Direction.CCW);
        this.startPoint.x = 0.0F;
        this.startPoint.y = (float)(this.height - this.ArcHeight);
        this.endPoint.x = (float)this.width;
        this.endPoint.y = (float)(this.height - this.ArcHeight);
        this.controlPoint.x = (float)(this.width / 2);
        this.controlPoint.y = (float)(this.height + this.ArcHeight);
        this.invalidate();
    }
    @Override
    protected void onDraw(Canvas canvas) {
        super.onDraw(canvas);
        if (bitmap!=null)
        {
            //计算缩放比例,之前本来是通过宽高计算缩放比例,现在直接提供接口

            Matrix matrix = new Matrix();
            matrix.setScale(mScale, mScale);

            Shader shader = new BitmapShader(bitmap, Shader.TileMode.CLAMP, Shader.TileMode.CLAMP);
            shader.setLocalMatrix(matrix);
            paint.setShader(shader);
            this.path.moveTo(this.startPoint.x, this.startPoint.y);
            this.path.quadTo(this.controlPoint.x, this.controlPoint.y, this.endPoint.x, this.endPoint.y);
            canvas.drawPath(this.path,this.paint);
        }

    }
    @Override
    public void setImageResource(@DrawableRes int resId) {
        bitmap = BitmapFactory.decodeResource(getResources(),resId);
        Log.i(">>>>>",">>>>");
    }
}
在activity调用:
 arcImageView= (ArcImageView) findViewById(com.wind.arcview.R.id.iv_img);
        arcImageView.setImageResource(R.drawable.banner5);
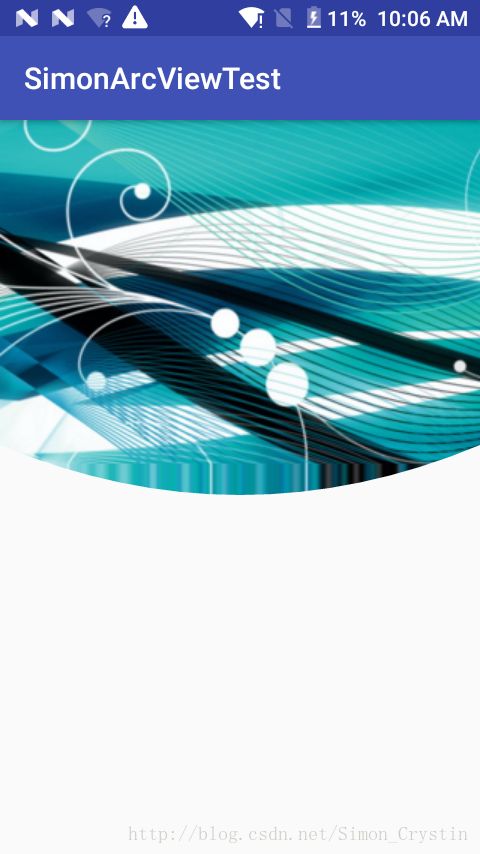
让我们看看效果:
2.ViewPager的实现##
这里主要是自定义了一个Banner,继承自FrameLayout。然后图片用我们上面提到的弧形图片,加上ViewPager,就能实现弧形ViewPager了。这里对ViewPager整个实现进行了封装,提供了外部接口使用。另外既然是广告轮播图,自然是要自动播放,这里采用线程来delay。就可以达到自动播放的效果。
外部接口添加图片资源:
 private void initImgFromRes(int[] imagesRes) {
        count = imagesRes.length;
        for (int i = 0; i < count; i++) {
            ImageView iv_dot = new ImageView(context);
            LinearLayout.LayoutParams params = new LinearLayout.LayoutParams(
                    LinearLayout.LayoutParams.WRAP_CONTENT,
                    LinearLayout.LayoutParams.WRAP_CONTENT);
            params.leftMargin = 5;
            params.rightMargin = 5;
            iv_dot.setImageResource(R.drawable.dot_blur);
            ll_dot.addView(iv_dot, params);
            iv_dots.add(iv_dot);
        }
        iv_dots.get(0).setImageResource(R.drawable.dot_focus);

        for (int i = 0; i <= count + 1; i++) {
            View banner_view = LayoutInflater.from(context).inflate(R.layout.banner_content_layout, null);
            ArcImageView imageView_banner_title = (ArcImageView) banner_view.findViewById(R.id.iv_img);
            if (i == 0) {
                imageView_banner_title.setImageResource(imagesRes[count - 1]);
            } else if (i == count + 1) {
                imageView_banner_title.setImageResource(imagesRes[0]);
            } else {
                imageView_banner_title.setImageResource(imagesRes[i - 1]);
            }
            views.add(banner_view);
        }
        setAtt();
    }
主要实现过程就是这样。
GitHub
github
觉得有帮助的可以点个star。

