今天开始学习小程序,按自己写APP的顺序开始,就不按微信官方文档来了。
有些控件是结合官方和网上其他同学分享的代码。
基础概述
这一部分看官方网站,了解一下小程序的架构页面组成啥的,没什么难度,打开微信开发者工具,创建一个QuickStart 项目就看到了。
下一步看一下官方的小程序demo,看看都有哪些功能样式,这个跟开发文档是对应的。demo在这里:

然后就可以开始开发了!下面就按功能开始学习了~
tabBar
- 先创建几个页面,要注意文件夹和页面名称,以及app.json里面的配置。官方文档描述的很详细。
注意:为了方便开发者减少配置项,描述页面的四个文件必须具有相同的路径与文件名。
创建一个放图片的文件夹,放上几张tabBar小图标。
在app.json中写tanBar的配置,tabBar与pages、window同级。
  "tabBar":{
    "color": "#ddd",
    "selectedColor": "#1AAD00",
    "backgroundColor": "#fff",
    "borderStyle": "black",
    "list":[
      {
        "pagePath": "pages/index/index",
       "iconPath": "images/footer-icon-01.png",
      "selectedIconPath": "images/footer-icon-01-active.png",
        "text": "首页"
      },
      {
        "pagePath": "pages/find/find",
        "iconPath": "images/footer-icon-03.png",
        "selectedIconPath": "images/footer-icon-03-active.png",
        "text": "发现"
      },
      {
        "pagePath": "pages/mine/mine",
        "iconPath": "images/footer-icon-04.png",
        "selectedIconPath": "images/footer-icon-04-active.png",
        "text": "我的"
      }
    ]
  }
编译一下,tabBar就出现了~
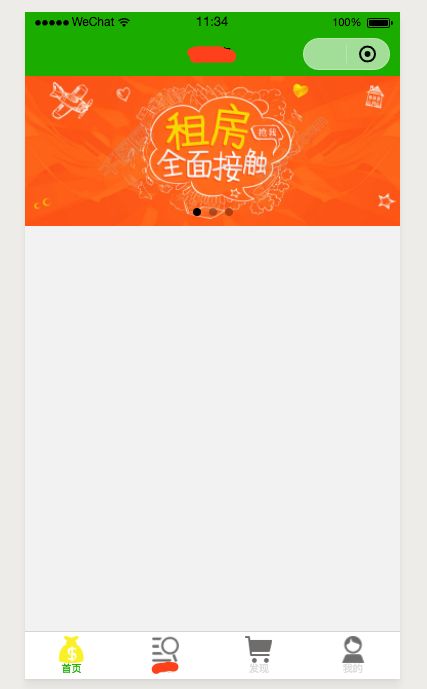
轮播图
- 使用微信提供的swiper控件,在页面wxml中添加控件
- 在wxss中设置样式
swiper {
 height: 400rpx;
 width: 100%;
}
swiper image {
 height: 100%;
 width: 100%;
}
- 在js 中设置数据
  data: {
    background:[
      {url:'../../images/banner/banner1.jpeg'},
      { url: '../../images/banner/banner2.png' },
      { url: '../../images/banner/banner3.png' },

    ],
    indicatorDots: true,
    vertical: false,
    autoplay: true,
    interval: 2000,
    duration: 500
  },
就这么简单,轮播图就出现了,真的比iOS开发简单多了-_-!
现在的样子(直接从别人的项目抠来的图标,配色巨丑请忽略~):
九宫格
九宫格功能上网查了几种实现方式,发现还是直接用weui比较方便
下面是实现步骤:
- .js中添加数据
Page({
  /**
   * 页面的初始数据
   */
  data: {
    routers :[
      {
        text: '我的账户',
        icon: '../../images/mine/mine_account.png',
        url: '../myAccount/myAccount',
      },
      {
        text: '我的合同',
        icon: '../../images/mine/mine_contract.png',
        url: '../myAccount/myAccount',
      },
      {
        text: '浏览记录',
        icon: '../../images/mine/mine_browing.png',
        url: '../myAccount/myAccount',
      },
      {
        text: '我要出租',
        icon: '../../images/mine/mine_lease.png',
        url: '../myAccount/myAccount',
      },
      {
        text: '客服',
        icon: '../../images/mine/mine_customService.png',
        url: '../myAccount/myAccount',
      },
      {
        text: '我的收藏',
        icon: '../../images/mine/mine_collect.png',
        url: '../myAccount/myAccount',
      }
    ]
  },
})
- .wxml中,添加weui-grids
{{item.text}}
- wxss中设置样式
.weui-grids {
  position: relative;
  overflow: hidden;
   margin-top: 10rpx;
}
.weui-grids:before {
  content: " ";
  position: absolute;
  left: 0;
  top: 0;
  right: 0;
  height: 1px;
  border-top: 1px solid #D9D9D9;
  color: #D9D9D9;
  -webkit-transform-origin: 0 0;
          transform-origin: 0 0;
  -webkit-transform: scaleY(0.5);
          transform: scaleY(0.5);
}
.weui-grids:after {
  content: " ";
  position: absolute;
  left: 0;
  top: 0;
  width: 1px;
  bottom: 0;
  border-left: 1px solid #D9D9D9;
  color: #D9D9D9;
  -webkit-transform-origin: 0 0;
          transform-origin: 0 0;
  -webkit-transform: scaleX(0.5);
          transform: scaleX(0.5);
}
.weui-grid {
  position: relative;
  float: left;
  padding: 20px 10px;
  width: 33.33333333%;
  box-sizing: border-box;
  background-color: white;
}
.weui-grid:before {
  content: " ";
  position: absolute;
  right: 0;
  top: 0;
  width: 1px;
  bottom: 0;
  /* border-right: 1px solid #D9D9D9;   */
  color: #D9D9D9;
  -webkit-transform-origin: 100% 0;
          transform-origin: 100% 0;
  -webkit-transform: scaleX(0.5);
          transform: scaleX(0.5);
}
.weui-grid:after {
  content: " ";
  position: absolute;
  left: 0;
  bottom: 0;
  right: 0;
  height: 1px;
   /* border-bottom: 1px solid #D9D9D9;    */
  color: #D9D9D9;
  -webkit-transform-origin: 0 100%;
          transform-origin: 0 100%;
  -webkit-transform: scaleY(0.5);
          transform: scaleY(0.5);
}
.weui-grid:active {
  background-color: #ECECEC;
}
.weui-grid__icon {
  width: 36px;
  height: 36px;
  margin: 0 auto;
}
.weui-grid__icon image {
  display: block;
  width: 100%;
  height: 100%;
}
.weui-grid__icon + .weui-grid__label {
  margin-top: 10px;
}
.weui-grid__label {
  display: block;
  text-align: center;
  color: gray;
  font-size: 14px;
  white-space: nowrap;
  text-overflow: ellipsis;
  overflow: hidden;
}
4.效果展示
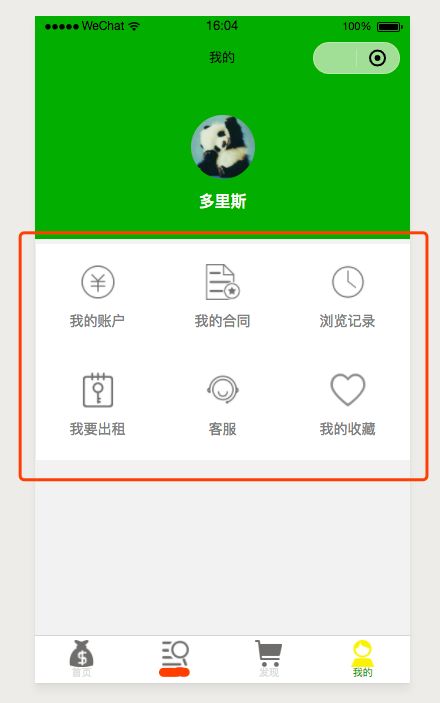
九宫格效果