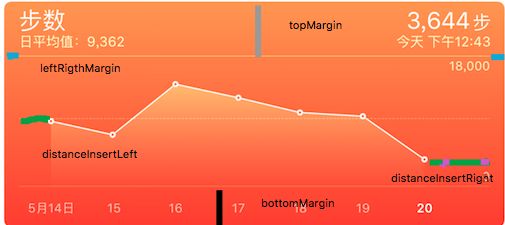
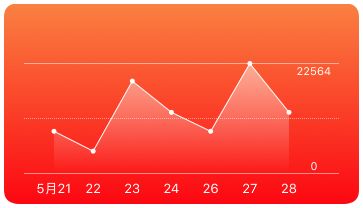
今天我们要完成下图的功能:
开始吧
首先我们设置渐变的背景颜色:
在-(void)drawRect:(CGRect)rect里面添加下面方法
    /**
      *  设置渐变背景图层
      */
- (void)setGradualBackGroundColor{
 // 创建Quartz上下文
CGContextRef context = UIGraphicsGetCurrentContext();

// 创建色彩空间对象
CGColorSpaceRef colorSpaceRef = CGColorSpaceCreateDeviceRGB();

// 创建起点颜色
CGColorRef beginColor = CGColorCreate(colorSpaceRef, (CGFloat[]){0.98, 0.505f, 0.258, 1.0f});

// 创建终点颜色
CGColorRef endColor = CGColorCreate(colorSpaceRef, (CGFloat[]){0.99f, 0.03f, 0.07f, 1.0f});

// 创建颜色数组
CFArrayRef colorArray = CFArrayCreate(kCFAllocatorDefault, (const void*[]){beginColor, endColor}, 2, nil);

// 创建渐变对象
CGGradientRef gradientRef = CGGradientCreateWithColors(colorSpaceRef, colorArray, (CGFloat[]){
    0.0f,       // 对应起点颜色位置
    1.0f        // 对应终点颜色位置
});

// 释放颜色数组
CFRelease(colorArray);

// 释放起点和终点颜色
CGColorRelease(beginColor);
CGColorRelease(endColor);

// 释放色彩空间
CGColorSpaceRelease(colorSpaceRef);

CGContextDrawLinearGradient(context, gradientRef, CGPointMake(0.0f, 0.0f), CGPointMake(0, CGRectGetHeight(self.frame)), 0);

// 释放渐变对象
CGGradientRelease(gradientRef);
}
背景效果图:
从图1可以看出:
折线见的间距 = (视图宽度 -2*leftRigthMargin - distanceInsertLeft - distanceInsertRigth)/(总点数 - 1)
那我们就可以确定每个点的X坐标了。根据_topMargin 和_bottomMargin 来计算出y坐标:
//返回数组中最大的一个数
- (NSInteger)theChartTopY :(NSArray *)arr{
CGFloat max = 0;
for (int index = 0 ; index < arr.count; index ++) {
    NSArray *data = arr[index];
    max = MAX(max, [[data lastObject] floatValue]);
}
 return (NSInteger)max;
}

//返回一个储存宽高的二维数组坐标轴[[x,y],[x,y]]
- (NSArray *)arrayWithPointX{
/*
 数据_dataPoints格式为 @[@[@"5月21",@"8659"],@[@"22",@"4587"],@[@"23",@"18956"],@[@"24",@"12541"],@[@"26",@"8658"],@[@"27",@"22564"],@[@"28",@"12546"]];
 每个点的间距 :
 _distanceOfEachPoint = (CGRectGetWidth(self.frame) - 2*_leftRigthMargin- _distanceInsertLeft - _distanceInsertRigth)/(_dataPoints.count -1);
 */
CGFloat maxNum =(CGFloat)[self theChartTopY:_dataPoints];
NSMutableArray *mutableArr = [NSMutableArray arrayWithCapacity:_dataPoints.count];

for (int index = 0; index <_dataPoints.count; index ++) {
    NSArray *data = _dataPoints[index];

    NSMutableArray *eachArr = [NSMutableArray arrayWithCapacity:_dataPoints.count];

    [eachArr addObject:@(_leftRigthMargin +_distanceInsertLeft + _distanceOfEachPoint*index)];
    [eachArr addObject:@(_topMargin + ((maxNum - [[data lastObject] floatValue])/maxNum)*(CGRectGetHeight(self.frame) - _topMargin - _bottomMargin))];

    [mutableArr addObject:eachArr];
}
return [mutableArr copy];
}
接下来就是画点画线了:
   /**
    *  画圆点
   */
 - (void)drawCircle{
CGFloat side = 5.0;
NSArray *arr = [self arrayWithPointX];
UIColor *color = [UIColor whiteColor];
[color set];
for (int index = 0 ; index < arr.count; index ++) {
    NSArray *eachArr = arr[index];
    UIBezierPath *circlepath = [UIBezierPath bezierPathWithOvalInRect:CGRectMake([eachArr[0] floatValue]- side/2, [eachArr[1] floatValue]- side/2, side, side)];
    [circlepath fill];
  }
}


  /**
   *  画水平线
   */
- (void)drawHorizontingLine{

UIColor *color = [UIColor whiteColor];
[color set];
UIBezierPath *path = [UIBezierPath bezierPath];
path.lineWidth = .5;
[path moveToPoint:CGPointMake(_leftRigthMargin, CGRectGetHeight(self.frame ) - _bottomMargin)];
[path addLineToPoint:CGPointMake(CGRectGetWidth(self.frame) - _leftRigthMargin,   CGRectGetHeight(self.frame ) - _bottomMargin)];


[path moveToPoint:CGPointMake(_leftRigthMargin, _topMargin)];
[path addLineToPoint:CGPointMake(CGRectGetWidth(self.frame) - _leftRigthMargin, _topMargin )];
[path stroke];

//画中间的虚线
UIBezierPath *dashedPath = [UIBezierPath bezierPath];
dashedPath.lineWidth = .5;
[dashedPath moveToPoint:CGPointMake(_leftRigthMargin, (CGRectGetHeight(self.frame ) - _bottomMargin +_topMargin)/2)];
CGFloat dash[] = {1,1};
[dashedPath setLineDash:dash count:1 phase:0];
[dashedPath addLineToPoint:CGPointMake(CGRectGetWidth(self.frame) - _leftRigthMargin, (CGRectGetHeight(self.frame ) - _bottomMargin +_topMargin)/2 )];

[dashedPath stroke];
   }


    /**
     *  添加折线
    */
- (void)drawLine{
NSArray *arr = [self arrayWithPointX];
UIColor *color = [UIColor whiteColor];
[color set];

UIBezierPath *path = [UIBezierPath bezierPath];
path.lineWidth = 1.0;
path.lineCapStyle  = kCGLineCapRound;//线条拐角
path.lineJoinStyle = kCGLineCapRound;//终点处理

for (int index = 0 ; index < arr.count; index ++) {
    NSArray *XYArr = arr[index];


    if (!index) {
        [path moveToPoint:CGPointMake([XYArr[0] floatValue], [XYArr[1] floatValue])];
    }else{
        // Draw the lines

        [path addLineToPoint:CGPointMake([XYArr[0] floatValue], [XYArr[1] floatValue])];
    }
}

[path stroke];

UIBezierPath *copyPath =   [path copy];
[copyPath addLineToPoint:CGPointMake((CGRectGetWidth(self.frame) - _leftRigthMargin - _distanceInsertRigth  ), CGRectGetHeight(self.frame)-_bottomMargin)];
[copyPath addLineToPoint:CGPointMake(_leftRigthMargin + _distanceInsertLeft, CGRectGetHeight(self.frame)-_bottomMargin)];
[copyPath closePath];
//该方法调用后,接下来拿到的UIGraphicsGetCurrentContext()对象就是根据这个贝塞尔曲线路径创建的Quartz上下文
[copyPath addClip];

// 创建Quartz上下文
CGContextRef context = UIGraphicsGetCurrentContext();
// 创建色彩空间对象
CGColorSpaceRef colorSpaceRef = CGColorSpaceCreateDeviceRGB();
// 创建起点颜色
CGColorRef beginColor = CGColorCreate(colorSpaceRef, (CGFloat[]){1, 1, 1,0.5});

// 创建终点颜色
CGColorRef endColor = CGColorCreate(colorSpaceRef, (CGFloat[]){1, 1, 1, 0});

// 创建颜色数组
CFArrayRef colorArray = CFArrayCreate(kCFAllocatorDefault, (const void*[]){beginColor, endColor}, 2, nil);
// 创建渐变对象
CGGradientRef gradientRef = CGGradientCreateWithColors(colorSpaceRef, colorArray, (CGFloat[]){
    0.0f,       // 对应起点颜色位置
    1.0f        // 对应终点颜色位置
  });

  CGContextDrawLinearGradient(context, gradientRef, CGPointMake(_leftRigthMargin , _topMargin), CGPointMake(_leftRigthMargin, CGRectGetHeight(self.frame) - _bottomMargin), 0);
}
添加底部的日期:
   /**
    *  添加底部的日期lable  和最大值的和最小值文本
   */
- (void)addDateInfo{
NSArray *arr = [self arrayWithPointX];

for (int index = 0; index < arr.count; index ++) {
    NSArray *eachArr = arr[index];
    UILabel *label = [[UILabel alloc] initWithFrame:CGRectMake(0, 0,_distanceOfEachPoint , _bottomMargin)];
    label.text = _dataPoints[index][0];
    label.textAlignment = 1;
    label.textColor = [UIColor whiteColor];
    label.font = [UIFont systemFontOfSize:13];
    label.center = CGPointMake([eachArr[0] floatValue], CGRectGetHeight(self.frame) - _bottomMargin/2);
    [self addSubview:label];
}

//最大值
UILabel *topLabel = [[UILabel alloc] initWithFrame:CGRectMake(CGRectGetWidth(self.frame) - _distanceInsertRigth -_leftRigthMargin, _topMargin, _distanceInsertRigth, 15)];
topLabel.text = [NSString stringWithFormat:@"%ld",[self theChartTopY:_dataPoints]];
topLabel.font = [UIFont systemFontOfSize:11];
topLabel.textColor = [UIColor whiteColor];
topLabel.textAlignment = 1;
[self addSubview:topLabel];

//最小值
UILabel *bottomLabel = [[UILabel alloc] initWithFrame:CGRectMake(CGRectGetWidth(self.frame) - _distanceInsertRigth -_leftRigthMargin, CGRectGetHeight(self.frame)-_bottomMargin - 15, _distanceInsertRigth, 15)];
bottomLabel.text = @"0";
bottomLabel.font = [UIFont systemFontOfSize:11];
bottomLabel.textColor = [UIColor whiteColor];
bottomLabel.textAlignment = 1;
[self addSubview:bottomLabel];
}
ps:该demo只是提供一种做渐变的思路,并没有完成整个图表。
demo地址


