- 理解Gunicorn:Python WSGI服务器的基石
范范0825
ipythonlinux运维
理解Gunicorn:PythonWSGI服务器的基石介绍Gunicorn,全称GreenUnicorn,是一个为PythonWSGI(WebServerGatewayInterface)应用设计的高效、轻量级HTTP服务器。作为PythonWeb应用部署的常用工具,Gunicorn以其高性能和易用性著称。本文将介绍Gunicorn的基本概念、安装和配置,帮助初学者快速上手。1.什么是Gunico
- swagger访问路径
igotyback
swagger
Swagger2.x版本访问地址:http://{ip}:{port}/{context-path}/swagger-ui.html{ip}是你的服务器IP地址。{port}是你的应用服务端口,通常为8080。{context-path}是你的应用上下文路径,如果应用部署在根路径下,则为空。Swagger3.x版本对于Swagger3.x版本(也称为OpenAPI3)访问地址:http://{ip
- 高级编程--XML+socket练习题
masa010
java开发语言
1.北京华北2114.8万人上海华东2,500万人广州华南1292.68万人成都华西1417万人(1)使用dom4j将信息存入xml中(2)读取信息,并打印控制台(3)添加一个city节点与子节点(4)使用socketTCP协议编写服务端与客户端,客户端输入城市ID,服务器响应相应城市信息(5)使用socketTCP协议编写服务端与客户端,客户端要求用户输入city对象,服务端接收并使用dom4j
- PHP环境搭建详细教程
好看资源平台
前端php
PHP是一个流行的服务器端脚本语言,广泛用于Web开发。为了使PHP能够在本地或服务器上运行,我们需要搭建一个合适的PHP环境。本教程将结合最新资料,介绍在不同操作系统上搭建PHP开发环境的多种方法,包括Windows、macOS和Linux系统的安装步骤,以及本地和Docker环境的配置。1.PHP环境搭建概述PHP环境的搭建主要分为以下几类:集成开发环境:例如XAMPP、WAMP、MAMP,这
- 使用 FinalShell 进行远程连接(ssh 远程连接 Linux 服务器)
编程经验分享
开发工具服务器sshlinux
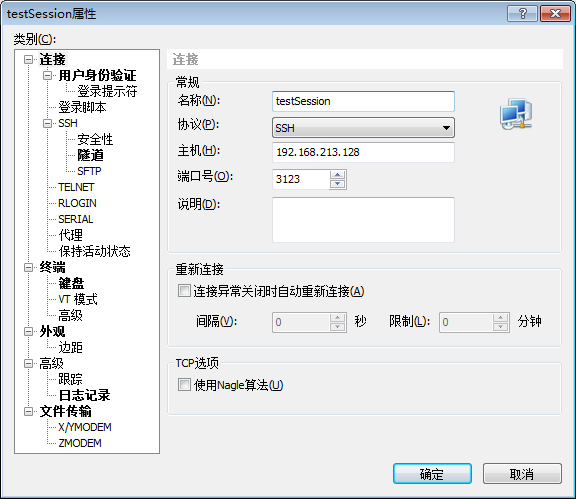
目录前言基本使用教程新建远程连接连接主机自定义命令路由追踪前言后端开发,必然需要和服务器打交道,部署应用,排查问题,查看运行日志等等。一般服务器都是集中部署在机房中,也有一些直接是云服务器,总而言之,程序员不可能直接和服务器直接操作,一般都是通过ssh连接来登录服务器。刚接触远程连接时,使用的是XSHELL来远程连接服务器,连接上就能够操作远程服务器了,但是仅用XSHELL并没有上传下载文件的功能
- git - Webhook让部署自动化
大猪大猪
我们现在有一个需求,将项目打包上传到gitlab或者github后,程序能自动部署,不用手动地去服务器中进行项目更新并运行,如何做到?这里我们可以使用gitlab与github的挂钩,挂钩的原理就是,每当我们有请求到gitlab与github服务器时,这时他俩会根据我们配置的挂钩地扯进行访问,webhook挂钩程序会一直监听着某个端口请求,一但收到他们发过来的请求,这时就知道用户有请求提交了,这时
- 第六集如何安装CentOS7.0,3分钟学会centos7安装教程
date分享
从光盘引导系统按回车键继续进入引导程序安装界面,选择语言这里选择简体中文版点击继续选择桌面安装下面给系统分区选择磁盘,点击完成选择基本分区,点击加号swap分区,大小填内存的两倍在选择根分区,使用所有可用的磁盘空间选择文件系统ext4点击完成,点击开始安装设置root密码,点击完成设置普通用户和密码,点击完成整个过程持续八分钟左右根据个人配置不同,时间长短不同好,现在点击重启系统进入重启状态点击本
- 1分钟解决 -bash: mvn: command not found,在Centos 7中安装Maven
Energet!c
开发语言
1分钟解决-bash:mvn:commandnotfound,在Centos7中安装Maven检查Java环境1下载Maven2解压Maven3配置环境变量4验证安装5常见问题与注意事项6总结检查Java环境Maven依赖Java环境,请确保系统已经安装了Java并配置了环境变量。可以通过以下命令检查:java-version如果未安装,请先安装Java。1下载Maven从官网下载:前往Apach
- Linux查看服务器日志
TPBoreas
运维linux运维
一、tail这个是我最常用的一种查看方式用法如下:tail-n10test.log查询日志尾部最后10行的日志;tail-n+10test.log查询10行之后的所有日志;tail-fn10test.log循环实时查看最后1000行记录(最常用的)一般还会配合着grep用,(实时抓包)例如:tail-fn1000test.log|grep'关键字'(动态抓包)tail-fn1000test.log
- Python多线程实现大规模数据集高效转移
sand&wich
网络python服务器
背景在处理大规模数据集时,通常需要在不同存储设备、不同服务器或文件夹之间高效地传输数据。如果采用单线程传输方式,当数据量非常大时,整个过程会非常耗时。因此,通过多线程并行处理可以大幅提升数据传输效率。本文将分享一个基于Python多线程实现的高效数据传输工具,通过遍历源文件夹中的所有文件,将它们移动到目标文件夹。工具和库这个数据集转移工具主要依赖于以下Python标准库:os:用于文件系统操作,如
- 笋丁网页自动回复机器人V3.0.0免授权版源码
希希分享
软希网58soho_cn源码资源笋丁网页自动回复机器人
笋丁网页机器人一款可设置自动回复,默认消息,调用自定义api接口的网页机器人。此程序后端语言使用Golang,内存占用最高不超过30MB,1H1G服务器流畅运行。仅支持Linux服务器部署,不支持虚拟主机,请悉知!使用自定义api功能需要有一定的建站基础。源码下载:https://download.csdn.net/download/m0_66047725/89754250更多资源下载:关注我。安
- 深入浅出 -- 系统架构之负载均衡Nginx的性能优化
xiaoli8748_软件开发
系统架构系统架构负载均衡nginx
一、Nginx性能优化到这里文章的篇幅较长了,最后再来聊一下关于Nginx的性能优化,主要就简单说说收益最高的几个优化项,在这块就不再展开叙述了,毕竟影响性能都有多方面原因导致的,比如网络、服务器硬件、操作系统、后端服务、程序自身、数据库服务等,对于性能调优比较感兴趣的可以参考之前《JVM性能调优》中的调优思想。优化一:打开长连接配置通常Nginx作为代理服务,负责分发客户端的请求,那么建议开启H
- 最简单将静态网页挂载到服务器上(不用nginx)
全能全知者
服务器nginx运维前端html笔记
最简单将静态网页挂载到服务器上(不用nginx)如果随便弄个静态网页挂在服务器都要用nignx就太麻烦了,所以直接使用Apache来搭建一些简单前端静态网页会相对方便很多检查Web服务器服务状态:sudosystemctlstatushttpd#ApacheWeb服务器如果发现没有安装web服务器:安装Apache:sudoyuminstallhttpd启动Apache:sudosystemctl
- 阿里云服务器4核8G配置购买及价格类文章汇总(10篇)
阿里云最新优惠和活动汇总
阿里云服务器4核8G配置如何购买?价格是多少?4核8G配置的阿里云服务器可以通过云服务器产品页购买也可以通过阿里云活动去下单购买,一般通过活动购买的用户比较多,但是不同实例规格的阿里云服务器价格不一样,带宽不同价格也不一样,本文为大家汇总了10篇关于阿里云服务器4核8G配置购买教程文章和价格类文章,分为购买类文章和价格类文章,以供大家参考如何购买阿里云服务器4核8G配置和最新优惠价格是多少。阿里云
- windows下python opencv ffmpeg读取摄像头实现rtsp推流 拉流
图像处理大大大大大牛啊
opencv实战代码讲解视觉图像项目windowspythonopencv
windows下pythonopencvffmpeg读取摄像头实现rtsp推流拉流整体流程1.下载所需文件1.1下载rtsp推流服务器1.2下载ffmpeg2.开启RTSP服务器3.opencv读取摄像头并调用ffmpeg进行推流4.opencv进行拉流5.opencv异步拉流整体流程1.下载所需文件1.1下载rtsp推流服务器下载RTSP服务器下载页面https://github.com/blu
- NPM私库搭建-verdaccio(Linux)
Beam007
npmlinux前端
1、安装nodelinux服务器安装nodea)、官网下载所需的node版本https://nodejs.org/dist/v14.21.0/b)、解压安装包若下载的是xxx.tar.xz文件,解压命令为tar-xvfxxx.tar.xzc)、修改环境变量修改:/etc/profile文件#SETPATHFORNODEJSexportNODE_HOME=NODEJS解压安装的路径exportPAT
- [实验室服务器使用]使用VSCode、PyCharm、MobaXterm和CMD连接远程服务器
YuanDaima2048
工具使用服务器vscodepycharmcmd代理模式机器学习实验
文章总览:YuanDaiMa2048博客文章总览实验室服务器使用:使用VSCode、PyCharm、MobaXterm和CMD连接远程服务器在进行实验室工作时,远程连接服务器是常见的需求之一。本篇文章根据个人的一些使用介绍使用不同工具连接服务器的方法,并提供优化功能,使服务器能够使用本机代理的说明。准备服务器账号信息Host(主机):10.XXX.XX.XXXPort(端口):[SSHPort]U
- 【2023年】云计算金砖牛刀小试6
geekgold
云计算服务器网络kubernetes容器
第一套【任务1】私有云服务搭建[10分]【题目1】基础环境配置[0.5分]使用提供的用户名密码,登录提供的OpenStack私有云平台,在当前租户下,使用CentOS7.9镜像,创建两台云主机,云主机类型使用4vCPU/12G/100G_50G类型。当前租户下默认存在一张网卡,自行创建第二张网卡并连接至controller和compute节点(第二张网卡的网段为10.10.X.0/24,X为工位号
- L1 L2 L3 缓存
京天不下雨
windows缓存windows
L1L2L3缓存L1Cache(一级bai缓存)是CPU第一层高速缓存,分为数据缓存和指令缓存。du内置的zhiL1高速缓存的容量和结构对daoCPU的性能影响较大,不过高速缓冲存储器均由静态RAM组成,结构较复杂,在CPU管芯面积不能太大的情况下,L1级高速缓存的容量不可能做得太大。一般服务器CPU的L1缓存的容量通常在32—4096KB。L2由于L1级高速缓存容量的限制,为了再次提高CPU的运
- golang实现从服务器下载文件到本地指定目录
余生逆风飞翔
golang服务器开发语言
一、连接服务器,采用sftp连接模式packagemiddlewaresimport("fmt""time""github.com/pkg/sftp""golang.org/x/crypto/ssh")//建立服务器连接funcConnect(user,password,hoststring,portint)(*sftp.Client,error){var(auth[]ssh.AuthMethod
- 鲲鹏 ARM 架构 麒麟 Lylin v10 安装 Nginx (离线)
焚木灵
arm开发架构nginx服务器
最近做一个银行的项目,银行的服务器是鲲鹏ARM架构的服务器,并且是麒麟v10的系统,这里记录一下在无法访问外网安装Nginx的方法。其他文章:鲲鹏ARM架构麒麟Lylinv10安装Mysql8.3(离线)-CSDN博客鲲鹏ARM架构麒麟Lylinv10安装Node和NVM(离线)-CSDN博客鲲鹏ARM架构麒麟Lylinv10安装Pm2(离线)-CSDN博客鲲鹏ARM架构麒麟Lylinv10安装P
- Nginx之代理模块 ngx_http_proxy_module
途径日暮不赏丶
nginxnginx
正向代理正向代理是指位于客户机(A)和站点服务器(B)之间的代理服务器(C),为了从站点服务器(B)获取资源,客户机(A)向代理服务器(C)发送请求并指定站点服务器(B),然后代理服务器(C)向站点服务器(B)转交请求并将获取的资源返回给客户机(A)。上述这样的代理模式称为正向代理,正向代理最大的特点:客户端非常明确要访问的服务器地址;服务器只清楚请求来自哪个代理服务器,而不清楚来自哪个具体的客户
- 导致格式错误的 Lambda 代理响应的原因以及如何修复它
zqhdz米时空
汇编
当人们尝试使用AWSAPIGateway和AWSLambda构建无服务器应用程序时,经常出现的一个问题是_由于配置错误而执行失败:Lambda代理响应格式错误。_没有什么比通用错误消息更糟糕的了,它们不会告诉您解决问题所需的任何内容,对吧?AWS并不是以其错误消息设计而闻名,如果甚至可以这样称呼它的话,更不用说为您提供解决问题的方法了。那么如何修复这个Lambda错误以及是什么原因造成的呢?花椒壳
- 网关gateway学习总结
猪猪365
学习总结学习总结
一微服务概述:微服务网关就是一个系统!通过暴露该微服务的网关系统,方便我们进行相关的鉴权,安全控制,日志的统一处理,易于监控的相关功能!实现微服务网关技术都有哪些呢?1nginx:nginx是一个高性能的http和反向代理web的服务器,同事也提供了IMAP/POP3/SMTP服务.他可以支撑5万并发链接,并且cpu,内存等资源消耗非常的低,运行非常的稳定!2Zuul:Zuul是Netflix公司
- Nginx之ngx_http_proxy_connect_module模块
小米bb
Nginxnginxhttp运维
近期由于项目需要使用到https正向代理,而nginx官方模块仅支持做http正向代理,一番百度学习后发现了该模块,故今日记录下此笔记供大家一起学习交流ngx_http_proxy_connect_module模块主要用于隧道SSL请求的代理服务器GitHub地址:http://www.github.com/chobits/ngx_http_proxy_connect_modulenginx配置:
- Nginx:高性能的Web服务器与反向代理
张某布响丸辣
nginx前端服务器javaSpringBoot
在当今的互联网世界中,Web服务器的选择对于网站的性能、稳定性和安全性至关重要。Nginx(发音为“engineX”)凭借其卓越的性能、丰富的功能集和灵活的配置选项,成为了众多网站和应用程序的首选Web服务器和反向代理。本文将深入探讨Nginx的特点、应用场景、基本配置以及它如何助力你的Web项目。Nginx简介Nginx是一个开源的、高性能的HTTP和反向代理服务器,也是一个IMAP/POP3/
- Android shell 常用 debug 命令
晨春计
Audiodebugandroidlinux
目录1、查看版本2、am命令3、pm命令4、dumpsys命令5、sed命令6、log定位查看APK进程号7、log定位使用场景1、查看版本1.1、Android串口终端执行getpropro.build.version.release#获取Android版本uname-a#查看linux内核版本信息uname-r#单独查看内核版本1.2、linux服务器执行lsb_release-a#查看Lin
- 解决SDK Manager 中 没有 Support Library
木鱼wzh
1、直接修改SDK-MANAGER打开sdk-manager—->Tools—->options然后点击packages—->showobsoletepackages即可在最下面的Extras目录下找到推荐两个自己使用的镜像服务器:mirrors.neusoft.edu.cn端口80mirrors.dormforce.net端口802、去官网下载SupportLibrar点击这里进入官网进入百度云
- Nginx从入门到实践(三)
听你讲故事啊
动静分离动静分离是将网站静态资源(JavaScript,CSS,img等文件)与后台应用分开部署,提高用户访问静态代码的速度,降低对后台应用访问。动静分离的一种做法是将静态资源部署在nginx上,后台项目部署到应用服务器上,根据一定规则静态资源的请求全部请求nginx服务器,达到动静分离的目标。rewrite规则Rewrite规则常见正则表达式Rewrite主要的功能就是实现URL的重写,Ngin
- Nginx的使用场景:构建高效、可扩展的Web架构
张某布响丸辣
nginx前端架构
Nginx,作为当今最流行的Web服务器和反向代理软件之一,凭借其高性能、稳定性和灵活性,在众多Web项目中扮演着核心角色。无论是个人博客、中小型网站,还是大型企业级应用,Nginx都能提供强大的支持。本文将探讨Nginx的几个主要使用场景,帮助读者理解如何在实际项目中充分利用Nginx的优势。1.静态文件服务对于包含大量静态文件(如HTML、CSS、JavaScript、图片等)的网站,Ngin
- 矩阵求逆(JAVA)利用伴随矩阵
qiuwanchi
利用伴随矩阵求逆矩阵
package gaodai.matrix;
import gaodai.determinant.DeterminantCalculation;
import java.util.ArrayList;
import java.util.List;
import java.util.Scanner;
/**
* 矩阵求逆(利用伴随矩阵)
* @author 邱万迟
- 单例(Singleton)模式
aoyouzi
单例模式Singleton
3.1 概述 如果要保证系统里一个类最多只能存在一个实例时,我们就需要单例模式。这种情况在我们应用中经常碰到,例如缓存池,数据库连接池,线程池,一些应用服务实例等。在多线程环境中,为了保证实例的唯一性其实并不简单,这章将和读者一起探讨如何实现单例模式。 3.2
- [开源与自主研发]就算可以轻易获得外部技术支持,自己也必须研发
comsci
开源
现在国内有大量的信息技术产品,都是通过盗版,免费下载,开源,附送等方式从国外的开发者那里获得的。。。。。。
虽然这种情况带来了国内信息产业的短暂繁荣,也促进了电子商务和互联网产业的快速发展,但是实际上,我们应该清醒的看到,这些产业的核心力量是被国外的
- 页面有两个frame,怎样点击一个的链接改变另一个的内容
Array_06
UIXHTML
<a src="地址" targets="这里写你要操作的Frame的名字" />搜索
然后你点击连接以后你的新页面就会显示在你设置的Frame名字的框那里
targerts="",就是你要填写目标的显示页面位置
=====================
例如:
<frame src=&
- Struts2实现单个/多个文件上传和下载
oloz
文件上传struts
struts2单文件上传:
步骤01:jsp页面
<!--在进行文件上传时,表单提交方式一定要是post的方式,因为文件上传时二进制文件可能会很大,还有就是enctype属性,这个属性一定要写成multipart/form-data,不然就会以二进制文本上传到服务器端-->
<form action="fileUplo
- 推荐10个在线logo设计网站
362217990
logo
在线设计Logo网站。
1、http://flickr.nosv.org(这个太简单)
2、http://www.logomaker.com/?source=1.5770.1
3、http://www.simwebsol.com/ImageTool
4、http://www.logogenerator.com/logo.php?nal=1&tpl_catlist[]=2
5、ht
- jsp上传文件
香水浓
jspfileupload
1. jsp上传
Notice:
1. form表单 method 属性必须设置为 POST 方法 ,不能使用 GET 方法
2. form表单 enctype 属性需要设置为 multipart/form-data
3. form表单 action 属性需要设置为提交到后台处理文件上传的jsp文件地址或者servlet地址。例如 uploadFile.jsp 程序文件用来处理上传的文
- 我的架构经验系列文章 - 前端架构
agevs
JavaScriptWeb框架UIjQuer
框架层面:近几年前端发展很快,前端之所以叫前端因为前端是已经可以独立成为一种职业了,js也不再是十年前的玩具了,以前富客户端RIA的应用可能会用flash/flex或是silverlight,现在可以使用js来完成大部分的功能,因此js作为一门前端的支撑语言也不仅仅是进行的简单的编码,越来越多框架性的东西出现了。越来越多的开发模式转变为后端只是吐json的数据源,而前端做所有UI的事情。MVCMV
- android ksoap2 中把XML(DataSet) 当做参数传递
aijuans
android
我的android app中需要发送webservice ,于是我使用了 ksop2 进行发送,在测试过程中不是很顺利,不能正常工作.我的web service 请求格式如下
[html]
view plain
copy
<Envelope xmlns="http://schemas.
- 使用Spring进行统一日志管理 + 统一异常管理
baalwolf
spring
统一日志和异常管理配置好后,SSH项目中,代码以往散落的log.info() 和 try..catch..finally 再也不见踪影!
统一日志异常实现类:
[java]
view plain
copy
package com.pilelot.web.util;
impor
- Android SDK 国内镜像
BigBird2012
android sdk
一、镜像地址:
1、东软信息学院的 Android SDK 镜像,比配置代理下载快多了。
配置地址, http://mirrors.neusoft.edu.cn/configurations.we#android
2、北京化工大学的:
IPV4:ubuntu.buct.edu.cn
IPV4:ubuntu.buct.cn
IPV6:ubuntu.buct6.edu.cn
- HTML无害化和Sanitize模块
bijian1013
JavaScriptAngularJSLinkySanitize
一.ng-bind-html、ng-bind-html-unsafe
AngularJS非常注重安全方面的问题,它会尽一切可能把大多数攻击手段最小化。其中一个攻击手段是向你的web页面里注入不安全的HTML,然后利用它触发跨站攻击或者注入攻击。
考虑这样一个例子,假设我们有一个变量存
- [Maven学习笔记二]Maven命令
bit1129
maven
mvn compile
compile编译命令将src/main/java和src/main/resources中的代码和配置文件编译到target/classes中,不会对src/test/java中的测试类进行编译
MVN编译使用
maven-resources-plugin:2.6:resources
maven-compiler-plugin:2.5.1:compile
&nbs
- 【Java命令二】jhat
bit1129
Java命令
jhat用于分析使用jmap dump的文件,,可以将堆中的对象以html的形式显示出来,包括对象的数量,大小等等,并支持对象查询语言。 jhat默认开启监听端口7000的HTTP服务,jhat是Java Heap Analysis Tool的缩写
1. 用法:
[hadoop@hadoop bin]$ jhat -help
Usage: jhat [-stack <bool&g
- JBoss 5.1.0 GA:Error installing to Instantiated: name=AttachmentStore state=Desc
ronin47
进到类似目录 server/default/conf/bootstrap,打开文件 profile.xml找到: Xml代码<bean
name="AttachmentStore"
class="org.jboss.system.server.profileservice.repository.AbstractAtta
- 写给初学者的6条网页设计安全配色指南
brotherlamp
UIui自学ui视频ui教程ui资料
网页设计中最基本的原则之一是,不管你花多长时间创造一个华丽的设计,其最终的角色都是这场秀中真正的明星——内容的衬托
我仍然清楚地记得我最早的一次美术课,那时我还是一个小小的、对凡事都充满渴望的孩子,我摆放出一大堆漂亮的彩色颜料。我仍然记得当我第一次看到原色与另一种颜色混合变成第二种颜色时的那种兴奋,并且我想,既然两种颜色能创造出一种全新的美丽色彩,那所有颜色
- 有一个数组,每次从中间随机取一个,然后放回去,当所有的元素都被取过,返回总共的取的次数。写一个函数实现。复杂度是什么。
bylijinnan
java算法面试
import java.util.Random;
import java.util.Set;
import java.util.TreeSet;
/**
* http://weibo.com/1915548291/z7HtOF4sx
* #面试题#有一个数组,每次从中间随机取一个,然后放回去,当所有的元素都被取过,返回总共的取的次数。
* 写一个函数实现。复杂度是什么
- struts2获得request、session、application方式
chiangfai
application
1、与Servlet API解耦的访问方式。
a.Struts2对HttpServletRequest、HttpSession、ServletContext进行了封装,构造了三个Map对象来替代这三种对象要获取这三个Map对象,使用ActionContext类。
----->
package pro.action;
import java.util.Map;
imp
- 改变python的默认语言设置
chenchao051
python
import sys
sys.getdefaultencoding()
可以测试出默认语言,要改变的话,需要在python lib的site-packages文件夹下新建:
sitecustomize.py, 这个文件比较特殊,会在python启动时来加载,所以就可以在里面写上:
import sys
sys.setdefaultencoding('utf-8')
&n
- mysql导入数据load data infile用法
daizj
mysql导入数据
我们常常导入数据!mysql有一个高效导入方法,那就是load data infile 下面来看案例说明
基本语法:
load data [low_priority] [local] infile 'file_name txt' [replace | ignore]
into table tbl_name
[fields
[terminated by't']
[OPTI
- phpexcel导入excel表到数据库简单入门示例
dcj3sjt126com
PHPExcel
跟导出相对应的,同一个数据表,也是将phpexcel类放在class目录下,将Excel表格中的内容读取出来放到数据库中
<?php
error_reporting(E_ALL);
set_time_limit(0);
?>
<html>
<head>
<meta http-equiv="Content-Type"
- 22岁到72岁的男人对女人的要求
dcj3sjt126com
22岁男人对女人的要求是:一,美丽,二,性感,三,有份具品味的职业,四,极有耐性,善解人意,五,该聪明的时候聪明,六,作小鸟依人状时尽量自然,七,怎样穿都好看,八,懂得适当地撒娇,九,虽作惊喜反应,但看起来自然,十,上了床就是个无条件荡妇。 32岁的男人对女人的要求,略作修定,是:一,入得厨房,进得睡房,二,不必服侍皇太后,三,不介意浪漫蜡烛配盒饭,四,听多过说,五,不再傻笑,六,懂得独
- Spring和HIbernate对DDM设计的支持
e200702084
DAO设计模式springHibernate领域模型
A:数据访问对象
DAO和资源库在领域驱动设计中都很重要。DAO是关系型数据库和应用之间的契约。它封装了Web应用中的数据库CRUD操作细节。另一方面,资源库是一个独立的抽象,它与DAO进行交互,并提供到领域模型的“业务接口”。
资源库使用领域的通用语言,处理所有必要的DAO,并使用领域理解的语言提供对领域模型的数据访问服务。
- NoSql 数据库的特性比较
geeksun
NoSQL
Redis 是一个开源的使用ANSI C语言编写、支持网络、可基于内存亦可持久化的日志型、Key-Value数据库,并提供多种语言的API。目前由VMware主持开发工作。
1. 数据模型
作为Key-value型数据库,Redis也提供了键(Key)和值(Value)的映射关系。除了常规的数值或字符串,Redis的键值还可以是以下形式之一:
Lists (列表)
Sets
- 使用 Nginx Upload Module 实现上传文件功能
hongtoushizi
nginx
转载自: http://www.tuicool.com/wx/aUrAzm
普通网站在实现文件上传功能的时候,一般是使用Python,Java等后端程序实现,比较麻烦。Nginx有一个Upload模块,可以非常简单的实现文件上传功能。此模块的原理是先把用户上传的文件保存到临时文件,然后在交由后台页面处理,并且把文件的原名,上传后的名称,文件类型,文件大小set到页面。下
- spring-boot-web-ui及thymeleaf基本使用
jishiweili
springthymeleaf
视图控制层代码demo如下:
@Controller
@RequestMapping("/")
public class MessageController {
private final MessageRepository messageRepository;
@Autowired
public MessageController(Mes
- 数据源架构模式之活动记录
home198979
PHP架构活动记录数据映射
hello!架构
一、概念
活动记录(Active Record):一个对象,它包装数据库表或视图中某一行,封装数据库访问,并在这些数据上增加了领域逻辑。
对象既有数据又有行为。活动记录使用直截了当的方法,把数据访问逻辑置于领域对象中。
二、实现简单活动记录
活动记录在php许多框架中都有应用,如cakephp。
<?php
/**
* 行数据入口类
*
- Linux Shell脚本之自动修改IP
pda158
linuxcentosDebian脚本
作为一名
Linux SA,日常运维中很多地方都会用到脚本,而服务器的ip一般采用静态ip或者MAC绑定,当然后者比较操作起来相对繁琐,而前者我们可以设置主机名、ip信息、网关等配置。修改成特定的主机名在维护和管理方面也比较方便。如下脚本用途为:修改ip和主机名等相关信息,可以根据实际需求修改,举一反三!
#!/bin/sh
#auto Change ip netmask ga
- 开发环境搭建
独浮云
eclipsejdktomcat
最近在开发过程中,经常出现MyEclipse内存溢出等错误,需要重启的情况,好麻烦。对于一般的JAVA+TOMCAT项目开发,其实没有必要使用重量级的MyEclipse,使用eclipse就足够了。尤其是开发机器硬件配置一般的人。
&n
- 操作日期和时间的工具类
vipbooks
工具类
大家好啊,好久没有来这里发文章了,今天来逛逛,分享一篇刚写不久的操作日期和时间的工具类,希望对大家有所帮助。
/*
* @(#)DataFormatUtils.java 2010-10-10
*
* Copyright 2010 BianJing,All rights reserved.
*/
package test;
impor
