写在开头
标题中列出的4个控件是学习UI过程中最先接触到的几个控件,经常看系统头文件或者API的童鞋应该发现了,这四个控件都没有初始化方法! 这是多么神奇的一件事!那么它们如何初始化? 或者说如何创建它们?
OC三大特性之一的继承是这一切的元凶。
UILabel,UIIMageView都是直接继承于UIView,UIButton和UITextField继承于UIControll,UIControll继承于UIView,UIView为我们提供了一个初始化的方法:
- (instancetype)initWithFrame:(CGRect)aRect
也就是说,这4个控件都可以通过上述方法来初始化,以下对4个控件的初始化将不再赘述
一. UIButton
1. UIButton提供了一个构造器方法:
+ (instancetype)buttonWithType:(UIButtonType)buttonType
其中的buttonType参数是一个枚举值,如下所示:
   typedef enum {
     UIButtonTypeCustom = 0, 自定义风格
     UIButtonTypeSystem, 系统的风格
     UIButtonTypeRoundedRect, 圆角矩形
     UIButtonTypeDetailDisclosure,  蓝色小箭头按钮,主要做详细说明用
     UIButtonTypeInfoLight,  亮色感叹号
     UIButtonTypeInfoDark, 暗色感叹号
     UIButtonTypeContactAdd, 加号添加按钮
  } UIButtonType;
2. 接下来再说说UIButton的构成
titleLabel Property
imageView Property
这两个属性相信宝宝们都注意到了,titleLabel属性表示按钮的标题,这个很容易理解,可是UIButton的imageView属性是个什么鬼!这就要说到UIButton的神奇构成了,UIButton是由imageView和label构成的,具体的请看下图:

现在来详细说一下这张图
蓝色的部分代码如下:
button.backgroundColor = [UIColor cyanColor];//给UIButton设置背景颜色
这里又要提到神奇的继承啦,没错,UIButton的backgroundColor属性是从UIView一路继承下来的,UIView作为UILabel和UIImageView的爸爸,UIButton和UITextField的爷爷,有没有感觉它很无解......
红色的文字本分就是一个UILabel,给UIButton设置标题的代码如下:
[button setTitle:@"这里是label哦" forState:UIControlStateNormal];
文字左边的图片就是铺在UIButton的imageView上面的,代码如下:
[button setImage:imageObject forState:UIControlStateNormal];
3. 设置UIButton的标题字体大小
button.titleLabel.font = [UIFont systemFontOfSize:30];
4. UIButton点击事件
相信很多童鞋都听说过Button点击事件,可是UIButton的头文件里并没有相关的方法,这是怎么回事呢?对的,没错,神奇的继承又来了,UIButton继承于UIControll,UIControll的头文件中有相关方法的声明,即:
- (void)addTarget:(id)target action:(SEL)action forControlEvents:(UIControlEvents)controlEvents
也就是说,UIButton可以通过这个方法来添加点击事件,同时也只有UIControll的子类才有这个添加事件的方法。
二. UILabel(负责显示文本)
1. UILabel 的属性
  // 1.text文本
  label.text = @"这就是一个UILabel";
  // 2.textColor文本颜色
  label.textColor = [UIColor redColor];
  // 3.font 设置字体
  label.font = [UIFont systemFontOfSize:30];
  // 文本加粗
  label.font = [UIFont boldSystemFontOfSize:15];
  // 4.textAlignment 文本对齐方式, 默认是左对齐
  label.textAlignment = NSTextAlignmentCenter;
  // 文本对齐方式:
  typedef enum NSTextAlignment : NSUInteger {
     NSTextAlignmentLeft      = 0,左对齐
     NSTextAlignmentCenter    = 1,居中
     NSTextAlignmentRight     = 2,右对齐
     NSTextAlignmentJustified = 3,在一个段落的最后一行自然对齐
     NSTextAlignmentNatural   = 4,
  } NSTextAlignment;
  // 5.numberOfLines 默认为1行
  // 不确定行数时, 给0
  // 6.换行模式
  enum {
      NSLineBreakByWordWrapping = 0,以单词为显示单位显示,后面部分省略不显示,默认
      NSLineBreakByCharWrapping,以字符为显示单位显示,后面部分省略不显示
      NSLineBreakByClipping,剪切与文本宽度相同的内容长度,后半部分被删除
      NSLineBreakByTruncatingHead,开头省略,显示尾部文字内容
      NSLineBreakByTruncatingTail,结尾省略,显示开头的文字内容
      NSLineBreakByTruncatingMiddle 中间省略,显示头尾的文字内容
  };
  typedef NSUInteger NSLineBreakMode
  // 7.shadowColor 阴影
  newLabel.shadowColor = [UIColor blackColor];
  // shadowOffset 阴影偏移
  newLabel.shadowOffset = CGSizeMake(1, 1);
三. UITextField
1. UITextField基本属性
  textField.backgroundColor = [UIColor redColor];/**< 该属性默认是nil */
  // 1.text 给文本框赋初值
  // textField.text = @"你好";
  // 2.textColor 文本框初值的文字颜色
  textField.textColor = [UIColor yellowColor];
  // 3.UITextBorderStyleLine边框有边缘线
  textField.borderStyle = UITextBorderStyleLine;
  // 4.UITextBorderStyleRoundedRect边缘带圆角
  textField.borderStyle = UITextBorderStyleRoundedRect;
  // UITextBorderStyle枚举值:
  typedef enum UITextBorderStyle : NSInteger {
     UITextBorderStyleNone,
     UITextBorderStyleLine,
     UITextBorderStyleBezel,
     UITextBorderStyleRoundedRect
   } UITextBorderStyle;
  // 5.placeholder占位符
  // 当textField不为空(.text属性有值)时, placeHolder是不显示的
  textField.placeholder = @"这是牛逼的文本框";
  // 6.clearsOnBeginEditing开始编辑时清空文本框的输入(输错密码时)
  textField.clearsOnBeginEditing = YES;
  // 7.secureTExtEntry 密文输入(BOOL值)(输密码)
  textField.secureTextEntry = YES;
  // 8.leftView/rightView 左右视图
  // 9.leftViewMode
  textField.leftView = view;
  textField.leftViewMode = UITextFieldViewModeAlways;
  //10.输入框中是否有个叉号,在什么时候显示,用于一次性删除输入框中的内容
  text.clearButtonMode = UITextFieldViewModeAlways;
  typedef enum {
     UITextFieldViewModeNever, 从不出现
     UITextFieldViewModeWhileEditing, 编辑时出现
     UITextFieldViewModeUnlessEditing, 除了编辑外都出现
     UITextFieldViewModeAlways  一直出现
   } UITextFieldViewMode;
 //11.是否纠错
   text.autocorrectionType = UITextAutocorrectionTypeNo;
 typedef enum {
    UITextAutocorrectionTypeDefault, 默认
    UITextAutocorrectionTypeNo,  不自动纠错
    UITextAutocorrectionTypeYes, 自动纠错
  } UITextAutocorrectionType;
//12.再次编辑就清空
  text.clearsOnBeginEditing = YES;
2. UITextFieldDelegate
  - (BOOL)textFieldShouldBeginEditing:(UITextField *)textField; //控制是否允许输入,返回值是NO的时候,禁止输入;
  - (void)textFieldDidBeginEditing:(UITextField *)textField; //文本框已经开始编辑
  - (BOOL)textFieldShouldEndEditing:(UITextField *)textField; //是否结束输入,返回值是YES时候,允许停止输入,并且释放第一响应;返回NO的时候,则相反;
  - (void)textFieldDidEndEditing:(UITextField *)textField;
  - (BOOL)textFieldShouldClear:(UITextField *)textField; //当清空按钮时候调用,返回是NO的时候,忽视清空
  - (BOOL)textFieldShouldReturn:(UITextField *)textField; //当点击return按钮时候调用该方法,返回是NO的时候,不做任何响应;
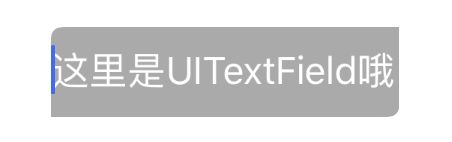
3. UITextField设置圆角
  // 出了利用属性中的borderStyle来是文本框四个角变成圆角外,还可以用UIBezierPath和CAShapeLayer来画圆角
  UITextField *textField = [[UITextField alloc] initWithFrame:CGRectMake(100, 100, 155, 40)];
  textField.backgroundColor = [UIColor lightGrayColor];
  textField.placeholder = @"这里是UITextField哦";
  // 设置placeHolder的颜色
  [textField setValue:[UIColor whiteColor] forKeyPath:@"_placeholderLabel.textColor"];
  // 这个方法的好处是可以将UITextField的任意一个角画成圆角
  // 设置UITextField的左上角和右下角为圆角,并设置了圆角的弧度
  UIBezierPath *maskPath = [UIBezierPath bezierPathWithRoundedRect:textField.bounds byRoundingCorners:UIRectCornerTopLeft | UIRectCornerBottomRight cornerRadii:CGSizeMake(5, 5)];
  CAShapeLayer *maskLayer = [[CAShapeLayer alloc] init];
  maskLayer.path = maskPath.CGPath;
  maskLayer.frame = textField.bounds;
  textField.layer.mask = maskLayer;
效果图如下: