服务器通讯
- web服务器搭建
- http通讯
- webSocket通讯
1、web服务器
- 使用Nodejs创建服务器
- 使用Express创建restFul的httpe服务
- 监控服务器文件的变化
1.1新建nodeServer文件夹;并运行命令
npm init -y
1.2安装typescript的node的类型安义文件
npm i @types/node --save
1.3新建tsconfig.json文件
{
  /*编译器配置*/
  "compilerOptions": {
    "module": "commonjs",//用的规范
    "target": "es5",//编译成es5
    "emitDecoratorMetadata": true,//编译的时候保留装饰器元数据
    "experimentalDecorators": true,
    "outDir": "build",//编译后放到build目录中去
    "lib": ["es6"] //使用es6语法
  },
  "exclude": [//编译时排除项目
    "node_modules"
  ]
}
1.4 在webstorm中配置
1.5 测试运行node服务器
- 新建server文件夹和hello_server.ts文件
import * as http from 'http';

const server = http.createServer((request,response)=>{
    response.end('hello Node!');
});
server.listen(8000);
- 运行编译好的js文件,放在build文件夹中
node build/hello_server.js
- 为方便开发,安装express框架和express的typescript的类型描述文件
npm install express --save
npm install @types/express --save
- node服务器运行时不能时时编译,可能安装nodemon来解决这个问题
npm install -g nodemon
安装完成后就可以用nodemon命令来代替node命令来运行服务
如:
nodemon build/hello_server.js
实例 新建auction_server.ts
import * as express from 'express';

const app = express();

/*商品字段定义*/
export class Product {
    constructor(public id: number,
                public title: string,
                public price: number,
                public rating: number,
                public desc: string,
                public categorys: Array) {

    }
}

/*商品的数据*/
const products: Product[] = [
    new Product(1, '商品1', 1.99, 3.5, '第一个商品', ['电子产品', '硬件产品']),
    new Product(2, '商品2', 2.99, 4, '第二个商品', ['电子产品']),
    new Product(3, '商品3', 1.89, 5, '第三个商品', ['图书']),
    new Product(4, '商品4', 1.33, 4.5, '第四个商品', ['电子产品', '硬件产品']),
    new Product(5, '商品5', 3.0, 2.5, '第五个商品', ['硬件产品']),
    new Product(6, '商品6', 4.50, 1.5, '第六个商品', ['电子产品']),
];


app.get('/',(req,res)=>{
    res.send('hello express');
});

//查询商品信息
app.get('/products',(req,res)=>{
    res.json(products);
});

//通过商品id查询
app.get('/product/:id',(req,res)=>{
    res.json(products.find((product) => {
        return product.id == req.params.id
    }))
});

const server = app.listen(8000,"localhost",()=>{
    console.log("服务器启动成功,地址是:http://localhost:8000");
});
运行:
nodemon build/auction_server.js
服务器搭建成功。
http通讯
*angular服务器配置
1、新建proxy.conf.json
{
  "/api":{
    "target":"http://localhost:8000"
  }
}
2、在package.json中修改start命令脚本
"start": "ng serve --proxy-config proxy.conf.json",
这样angular运行的localhost:4200端口请求就会代理到localhost:8000端口上/api路由上
angular的http请求是通过响应式编程的流来实现的
- 一种是组件中的Observable流通过subscribe来发射http请求;
结合上面搭建的http服务器,
ng new client 命令生成一个项目;
ng g component product 命令生成product组件;
- product.component.ts代码
import { Component, OnInit } from '@angular/core';
import {Observable} from "rxjs/Observable";
import {Http} from "@angular/http";
import 'rxjs/Rx';

@Component({
  selector: 'app-product',
  templateUrl: './product.component.html',
  styleUrls: ['./product.component.css']
})
export class ProductComponent implements OnInit {

  //定义数据流
  dataSource:Observable;
  //与模块数据绑定的数组
  products:Array=[];

  constructor(private http:Http) {
    /*
    *get方法返回的数据流是response数据类型,要用json方法转换成json格式;
    * 作用map方法,需要import 'rxjs/Rx'
    * */

    this.dataSource = this.http.get('/api/products')
      .map((res)=>res.json());
  }

  ngOnInit() {
    /*
    * dataSource数据流通过订阅subscribe把data传给this.products做模板绑定
    * */
    this.dataSource.subscribe(
      (data)=>this.products = data
      );
  }
}
product.component.html代码:
商品信息
-
{{product.title}}
- 一种是通过管道命令async在模板中自动的订阅一个流;
代码重构后如下:
- product.component.ts中
import { Component, OnInit } from '@angular/core';
import {Observable} from "rxjs/Observable";
import {Headers, Http} from "@angular/http";
import 'rxjs/Rx';

@Component({
  selector: 'app-product',
  templateUrl: './product.component.html',
  styleUrls: ['./product.component.css']
})
export class ProductComponent implements OnInit {


  //模板中通过管道async自动订阅了products流
  products:Observable;

  constructor(private http:Http) {
    //增加请求头信息
    let myHeaders:Headers = new Headers();
    myHeaders.append('Authorization',"Basic 123456");
    this.products = this.http.get('/api/products',{headers:myHeaders})
      .map((res)=>res.json());
  }

  ngOnInit() {
  }

}
- product.component.html中
商品信息
-
{{product.title}}
Websocket协议
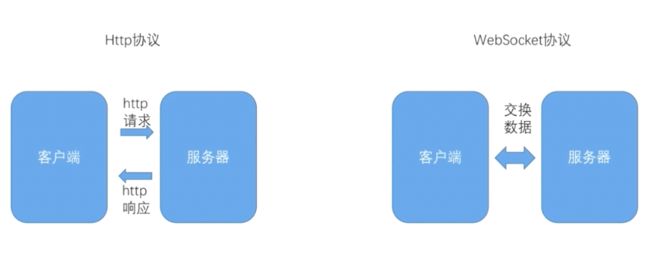
Websocket是个长连接,可以在接收数据的同时发送数据。
- 接上上面的nodejs搭建的server的例子;我们用ws来实现一个Websocket的服务器
npm install ws --save
npm install @types/ws --save
在client这个项目中新建个service
ng g service shared/webSocket
- web-socket.service.ts代码
import {Injectable} from '@angular/core';
import {Observable} from "rxjs/Observable";
import 'rxjs/Rx';

@Injectable()
export class WebSocketService {

  //定义一个WebSocket类型的属性
  ws: WebSocket;

  constructor() {
  }


//创建一个websocket的流
  createObservableSocket(url: string): Observable {
    //开始WebSocket连拉
    this.ws = new WebSocket(url);
    /*
    * 返回一个定义的流
    * 1、什么时候发躲一个元素
    * 2、什么时候抛一个异常
    * 3、什么时候发出流结束的信号
    * */
    return new Observable(
      observer => {
        this.ws.onmessage = (event) => observer.next(event.data);
        this.ws.onerror = (event) => observer.error(event);
        this.ws.onclose = (event) => observer.complete();
      }
    );
  }

//给服务器发送消息
  sendMessage(message: string) {
    this.ws.send(message);
  }

}
新建一个webSocket组件
ng g component webSocket
通过一个按扭给服务器发送消息
- web-socket.component.ts组件代码
import { Component, OnInit } from '@angular/core';
import {WebSocketService} from "../shared/web-socket.service";

@Component({
  selector: 'app-web-socket',
  templateUrl: './web-socket.component.html',
  styleUrls: ['./web-socket.component.css']
})
export class WebSocketComponent implements OnInit {

  constructor(private wsServer:WebSocketService) { }

  ngOnInit() {
    //订阅webSocket的流
    this.wsServer.createObservableSocket("ws://localhost:8085")
      .subscribe(
        data =>console.log(data),
        err =>console.log(err),
        ()=>console.log('流已经结束')
      );
  }
  sendMessageToServer(){
    this.wsServer.sendMessage('Hello form client!');
  }

}
- web-socket.component.html模板代码
- 定义一个创建流格式的服务
web-socket.service.ts代码
import {Injectable} from '@angular/core';
import {Observable} from "rxjs/Observable";
import 'rxjs/Rx';

@Injectable()
export class WebSocketService {

  //定义一个WebSocket类型的属性
  ws: WebSocket;

  constructor() {
  }

//创建一个websocket的流
  createObservableSocket(url: string): Observable {
    //开始WebSocket连拉
    this.ws = new WebSocket(url);
    /*
    * 返回一个定义的流
    * 1、什么时候发躲一个元素
    * 2、什么时候抛一个异常
    * 3、什么时候发出流结束的信号
    * */
    return new Observable(
      observer => {
        this.ws.onmessage = (event) => observer.next(event.data);
        this.ws.onerror = (event) => observer.error(event);
        this.ws.onclose = (event) => observer.complete();
      }
    );
  }

//给服务器发送消息
  sendMessage(message: string) {
    this.ws.send(message);
  }
}
service中只是定义流,只有在组件中注入后,用subscribe订阅后,才会产生流。
- http服务器端代码
auction_server.ts
import * as express from 'express';

import { Server } from 'ws';

const app = express();

/*商品字段定义*/
export class Product {
    constructor(public id: number,
                public title: string,
                public price: number,
                public rating: number,
                public desc: string,
                public categorys: Array) {

    }
}

/*商品的数据*/
const products: Product[] = [
    new Product(1, '商品1', 1.99, 3.5, '第一个商品', ['电子产品', '硬件产品']),
    new Product(2, '商品2', 2.99, 4, '第二个商品', ['电子产品']),
    new Product(3, '商品3', 1.89, 5, '第三个商品', ['图书']),
    new Product(4, '商品4', 1.33, 4.5, '第四个商品', ['电子产品', '硬件产品']),
    new Product(5, '商品5', 3.0, 2.5, '第五个商品', ['硬件产品']),
    new Product(6, '商品6', 4.50, 1.5, '第六个商品', ['电子产品']),
];


app.get('/',(req,res)=>{
    res.send('hello express');
});

//查询商品信息
app.get('/api/products',(req,res)=>{
    res.json(products);
});

//通过商品id查询
app.get('/api/product/:id',(req,res)=>{
    res.json(products.find((product) => {
        return product.id == req.params.id
    }))
});

const server = app.listen(8000,"localhost",()=>{
    console.log("服务器启动成功,地址是:http://localhost:8000");
});

//new ws的Server对象
const wsServer = new Server({port:8085});
//当websocket连接成功后,服务器主动推送的数据
wsServer.on('connection',websocket =>{
    //连接上服务器,推送消息
    websocket.send('这是服务器主动推送的消息');
    //接收到消息,打印到控制台上。
    websocket.on('message',message =>{
        console.log('接收到消息是:'+message);
    })
});

//设置定时推送消息
setInterval(()=>{
    //如果有客户端连接上来
    if(wsServer.clients){
        wsServer.clients.forEach(client => {
            client.send('这是定时推送的消息');
        })
    }
},2000)
源码1 nodeServer 链接:http://pan.baidu.com/s/1dFniw8p 密码:elap
源码2 client 链接:http://pan.baidu.com/s/1i5ckS5n 密码:fbw2


