环境准备
-
配置HADOOP_HOME环境变量
 hadoop-home.png
 -
配置Path环境变量
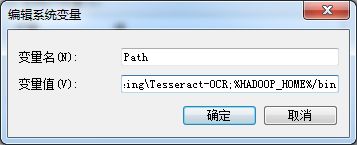 path.png
 - 创建一个Maven工程,HDFSClientDemo
- 导入对应依赖
            junit
            junit
            RELEASE


            org.apache.logging.log4j
            log4j
            2.10.0


            org.apache.hadoop
            hadoop-common
            2.8.3


            org.apache.hadoop
            hadoop-client
            2.8.3


            org.apache.hadoop
            hadoop-hdfs
            2.8.3
- 添加日志
在项目的/src/main/resource目录下,新建一个文件,名字为log4j.properties,输入以下内容
log4j.rootLogger=INFO, stdout
log4j.appender.stdout=org.apache.log4j.ConsoleAppender
log4j.appender.stdout.layout=org.apache.log4j.PatternLayout
log4j.appender.stdout.layout.ConversionPattern=%d %p [%c] - %m%n
log4j.appender.logfile=org.apache.log4j.FileAppender
log4j.appender.logfile.File=target/spring.log
log4j.appender.logfile.layout=org.apache.log4j.PatternLayout
log4j.appender.logfile.layout.ConversionPattern=%d %p [%c] - %m%n
- 创建包名
- 创建HdfsClientDemo类
常用API
文件上传
使用文件上传这个例子,测试下参数的优先级顺序
编写如下代码
    @Test
    public void testPutWithParmOrder() throws URISyntaxException, IOException, InterruptedException {
        Configuration configuration = new Configuration();
        configuration.set("dfs.replication", "1");
        fileSystem = FileSystem.get(
                        new URI("hdfs://hadoop-100:9000"),
                        configuration,
                        "hadoop");
        fileSystem.copyFromLocalFile(new Path("E:\\迅雷下载\\CentOS-7-x86_64-Minimal-1804.iso"), new Path("/user/hadoop/client/"));

    }
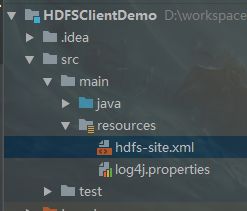
在/src/main/resource目录下,创建hdfs-site.xml文件,输入如下内容
创建hdfs-site.xml文件.png
        dfs.replication
        2
将configuration.set("dfs.replication", "1");注释,重新上传一个文件
将hdfs-site.xml文件删除,再次上传一个文件
结果如下图

测试参数顺序.png
参数优先级排序: 客户端代码中设置的值 > classpath下的用户自定义配置文件 >服务器的默认配置
文件下载
首先修改下获取hdfs客户端方法
    FileSystem fileSystem = null;
    @Before
    public void init() throws URISyntaxException, IOException, InterruptedException {
        fileSystem = FileSystem.get(
                new URI("hdfs://hadoop-100:9000"),
                new Configuration(),
                "hadoop");
    }

    @After
    public void close() throws IOException {
        fileSystem.close();
    }
文件下载方法
    @Test
    public void testGet() throws IOException {
        fileSystem.copyToLocalFile(new Path("/user/hadoop/client/"), new Path("G:\\test"));
    }
文件名更改
    @Test
    public void testRename() throws IOException {
        fileSystem.rename(new Path("/user/hadoop/client/CentOS-6.10-x86_64-minimal.iso"), new Path("/user/hadoop/client/CentOS6"));
    }
文件详情查看
    @Test
    public void testViewFileDetail() throws IOException {
        RemoteIterator listFiles = fileSystem.listFiles(new Path("/user/hadoop/client"), true);
        while (listFiles.hasNext()) {
            LocatedFileStatus fileStatus = listFiles.next();
            System.out.println("fileStatus.getLen() = " + fileStatus.getLen());
            System.out.println("fileStatus.getReplication() = " + fileStatus.getReplication());
            System.out.println("fileStatus.getPath() = " + fileStatus.getPath());
            System.out.println("fileStatus.getGroup() = " + fileStatus.getGroup());
            System.out.println("fileStatus.getOwner() = " + fileStatus.getOwner());
            System.out.println("fileStatus.getPermission() = " + fileStatus.getPermission());
            BlockLocation[] blockLocations = fileStatus.getBlockLocations();
            for(BlockLocation blockLocation : blockLocations) {
                String[] hosts = blockLocation.getHosts();
                for(String host : hosts) {
                    System.out.println("host = " + host);
                }
                System.out.println("------------------------");
            }
        }
    }
文件和文件夹的判断
    @Test
    public void testMkdir() throws IOException {
        boolean isDirectory = fileSystem.isDirectory(new Path("/user/hadoop/client/"));
        boolean isFile = fileSystem.isFile(new Path("/user/hadoop/client/"));
        System.out.println("isFile = " + isFile);
        System.out.println("isDirectory = " + isDirectory);
        isDirectory = fileSystem.isDirectory(new Path("/user/hadoop/client/CentOS6"));
        isFile = fileSystem.isFile(new Path("/user/hadoop/client/CentOS6"));
        System.out.println("isFile = " + isFile);
        System.out.println("isDirectory = " + isDirectory);
    }
文件夹删除
    @Test
    public void testDeleteDir() throws IOException {
        fileSystem.delete(new Path("/user"), true);
    }
IO流操作
文件上传
    @Test
    public void testIoPut() throws IOException {
        FileInputStream fileInputStream = new FileInputStream(new File("E:\\chrome下载\\zookeeper-3.4.12.tar.gz"));
        FSDataOutputStream fsDataOutputStream = fileSystem.create(new Path("/user/hadoop/client"));
        IOUtils.copyBytes(fileInputStream, fsDataOutputStream, new Configuration(), true);
    }
文件下载
    @Test
    public void testIoGet() throws IOException {
        FSDataInputStream fsDataInputStream = fileSystem.open(new Path("/user/hadoop/client"));
        FileOutputStream fileOutputStream = new FileOutputStream(new File("H:/zookeeper.tar.gz"));
        IOUtils.copyBytes(fsDataInputStream, fileOutputStream, new Configuration(), true);
    }
定位文件读取
    @Test
    public void testIoPartGet() throws IOException {
        // fileSystem.copyFromLocalFile(
        //         new Path("E:\\迅雷下载\\CentOS-6.10-x86_64-minimal.iso"),
        //         new Path("/user/hadoop/client1/CentOS-6.10-x86_64-minimal.iso"));
        // 下载第一块
        FSDataInputStream inputStream = fileSystem.open(new Path("/user/hadoop/client1/CentOS-6.10-x86_64-minimal.iso"));
        FileOutputStream outputStream = new FileOutputStream(new File("H:/centos6.part1"));
        byte[] bytes = new byte[1024];
        for(int i = 0; i < 1024 * 128; i++) {
            inputStream.read(bytes);
            outputStream.write(bytes);
        }
        // 下载第二块
        outputStream = new FileOutputStream(new File("H:/centos6.part2"));
        inputStream.seek(1024 * 1024 * 128);
        for(int i = 0; i < 1024 * 128; i++) {
            inputStream.read(bytes);
            outputStream.write(bytes);
        }
        // 下载第三块
        outputStream = new FileOutputStream(new File("H:/centos6.part3"));
        inputStream.seek(1024 * 1024 * 256);
        for(int i = 0; i < 1024 * 128; i++) {
            inputStream.read(bytes);
            outputStream.write(bytes);
        }
        // 下载第四块
        outputStream = new FileOutputStream(new File("H:/centos6.part4"));
        inputStream.seek(1024 * 1024 * 384);
        IOUtils.copyBytes(inputStream, outputStream, new Configuration(), true);
    }
文件合并
type centos6.part2 >> centos6.part1
type centos6.part3 >> centos6.part1
type centos6.part4 >> centos6.part1
将centos6.part1 名字更改为 centos6.iso可以正常使用