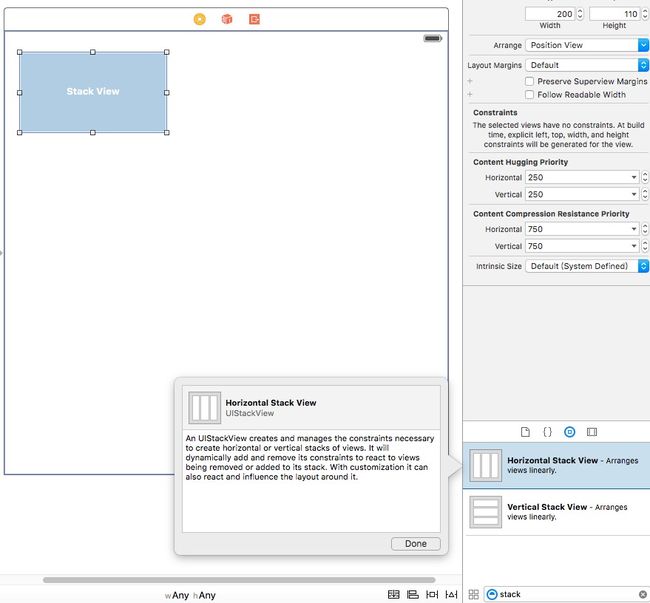
Xcode7提供两种方式使用UIStackView.你可以从对象库中拖一个Stack View(水平的/竖直的)放到storyboard的正确位置上.然后你可以托一些label,button,imageView等视图放到stack view中.另外,你可以在自动布局栏中使用Stack选项.对于这个方式,你可以简单的选择两个或更多的视图,之后点击Stack选项,IB将会把这些视图嵌入到一个stackView中,并自动的调整.
Demo App
先瞧一眼我们将要构建的demo app.在这篇文章中我将会给你展示如何使用stackView布局一个类似的用户界面:
从对象库中添加Stack Views
打开Xcode并打开Main.storyboard.从对象库中拖出水平的stack view放到storyboard中的view controller中.Stack View可以在纵向和横向布局安排其子视图.因为我们要布局水平的图像视图,所以我们选择垂直的Stack View.
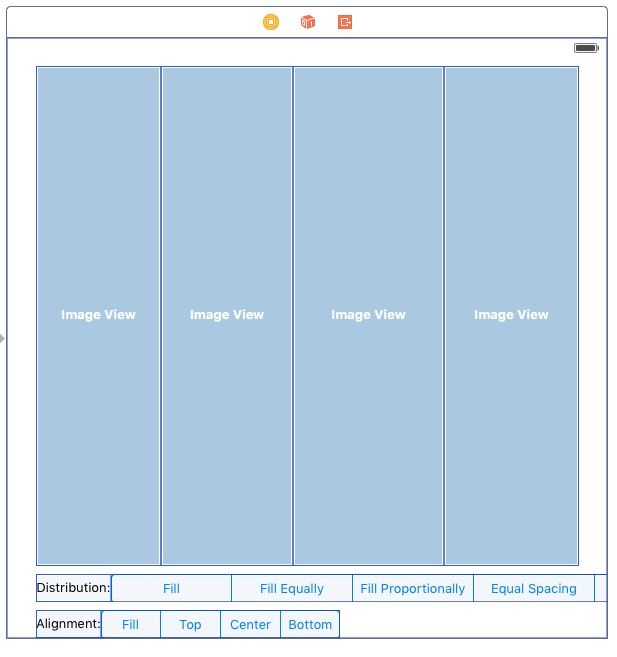
接下来,从对象库中拖出一个图像视图,当你把图像视图放到stack view中,图像视图会自动调整.重复同样的操作,添加更多的image view.这就是它神奇的地方: 当你添加另一个图像视图时,stack view 会自动布局图像视图.为你设置必要的约束.
image view的宽和高分别设置为宽125,高500
接下来,从对象库中拖出一个label控件放到刚刚建好的stack view的下方.在属性控制器中设置属性,分别为宽75, 高28, X:29 字体大小为13号.再从对象库中拖出一个Segmented Control放到label的→_→,,设置其相关的属性.宽477,Segment:5接下来我们将这两个控件放到一个UIStackView里面,会发生什么呢?
就是这么的神奇,这两个控件合成一个StackView 接下来我们约束这个StackView就可以了,可以不再约束里面的label和segmented control
同理我们再建一个Alignment的Segmented control.
然后我们对刚刚我们建的那两个stack view进行简单的高约束

接下来我们选中这三个StackView把这三个放到一个大的StackView中然后我们对这个大的StackView进行相应的约束就可以了.
设置居上,居左,居右都为0,居下为8
然后托几张图片进来,这里要注意的是图片的像素很重要,有的需要在2倍像素下,这里看情况而定.然后图片还可以选择显示的样子,利用Mode属性进行调整,调整图片所在的stackview的相关属性,将distribution设置为Fill Spacing 间距的大小为5个像素
调整完成之后我们就来实现segmented control的点击事件,分别拖成属性和方法去实现代码部分代码如下:
//distribution的Segement
-
(IBAction)distribution:(id)sender {
[UIView animateWithDuration:1.0 delay:0 usingSpringWithDamping:0.5 initialSpringVelocity:0.2 options:UIViewAnimationOptionCurveEaseInOut animations:^{
  if (self.distribution.selectedSegmentIndex == 0) {
      self.stackView.distribution = UIStackViewDistributionFill;
  } else if (self.distribution.selectedSegmentIndex == 1) {
      self.stackView.distribution = UIStackViewDistributionFillEqually;
  } else if (self.distribution.selectedSegmentIndex == 2) {
      self.stackView.distribution = UIStackViewDistributionFillProportionally;
  } else if (self.distribution.selectedSegmentIndex == 3) {
      self.stackView.distribution = UIStackViewDistributionEqualSpacing;
  } else if (self.distribution.selectedSegmentIndex == 4) {
      self.stackView.distribution = UIStackViewDistributionEqualCentering;
  }
} completion:^(BOOL finished) {
}];
}
//alignment的Segement
-
(IBAction)alignment:(id)sender {
[UIView animateWithDuration:1.0 delay:0 usingSpringWithDamping:0.5 initialSpringVelocity:0.2 options:UIViewAnimationOptionCurveEaseInOut animations:^{
  if (self.alignment.selectedSegmentIndex == 0) {
      self.stackView.alignment = UIStackViewAlignmentFill;
  } else if (self.alignment.selectedSegmentIndex == 1) {
      self.stackView.alignment = UIStackViewAlignmentTop;
  } else if (self.alignment.selectedSegmentIndex == 2) {
      self.stackView.alignment = UIStackViewAlignmentCenter;
  } else if (self.alignment.selectedSegmentIndex == 3) {
      self.stackView.alignment = UIStackViewAlignmentBottom;
  }
} completion:^(BOOL finished) {
}];
}