因为工作上的事情,将SK学习搁置了一周左右,心头实在过意不去,所以晚上继续抽空开始学习新的篇章:Tile Maps
地图编辑
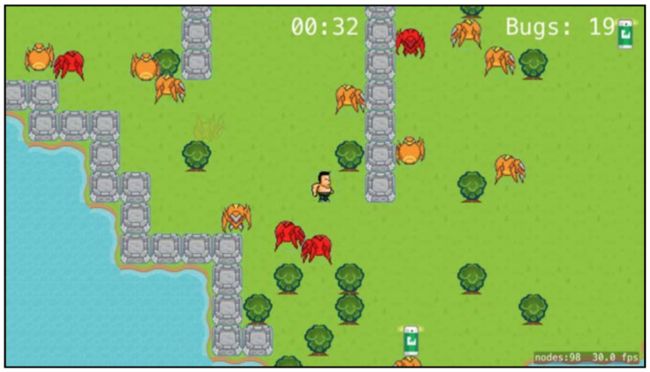
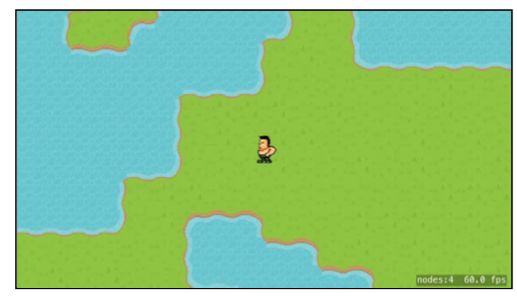
地图编辑大概原理就是将背景拆分成一个个的单元格,首先预置一些单元格的填充元素,比如花花草草啊、河流啊,植物啊之类的,然后通过地图编辑器将之前预置的填充元素编辑到bg中即可,效果如下:
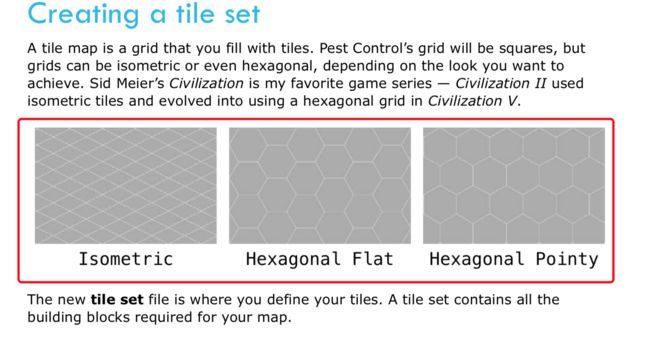
单元格的形状也可以是多样,除了标准的正方形以外,还可以是以下形状:
本教程运用的是标准正方形的单元格,步骤如下:
1. 创建预置单元格模板TileSet
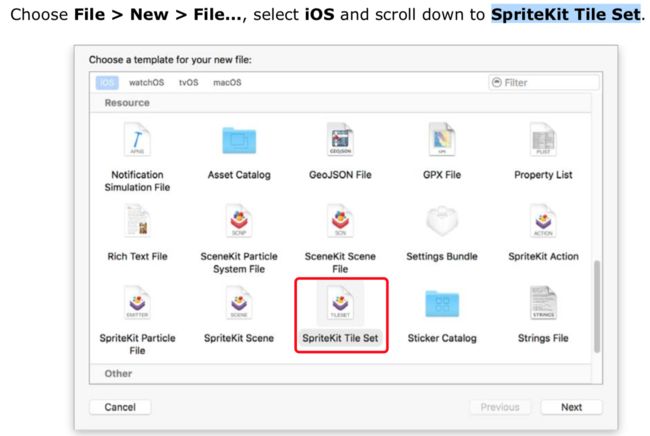
快捷键 cmd+N 选择 SpriteKit Tile Set,自己命名,一路enter到底就完成了TileSet的创建。
2. 创建grass tile模板
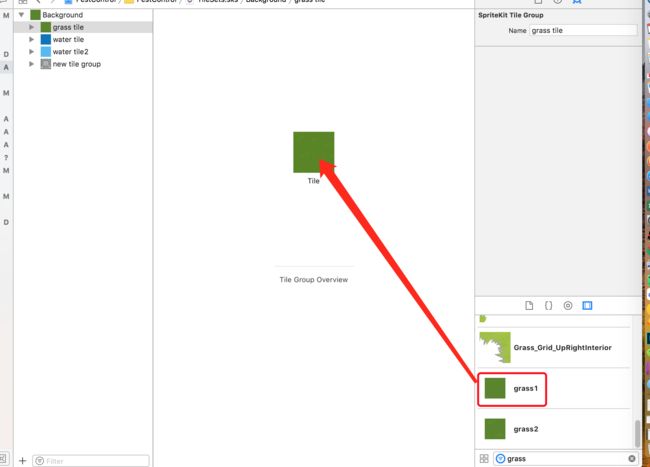
方法很简单,首先将父节点命名为Background,然后将默认的子节点命名为grass tile(一开始就种点花花草草嘛),在media library中选择花花草草的素材并拖动到屏幕中间就完成了grass tile模板的创建。
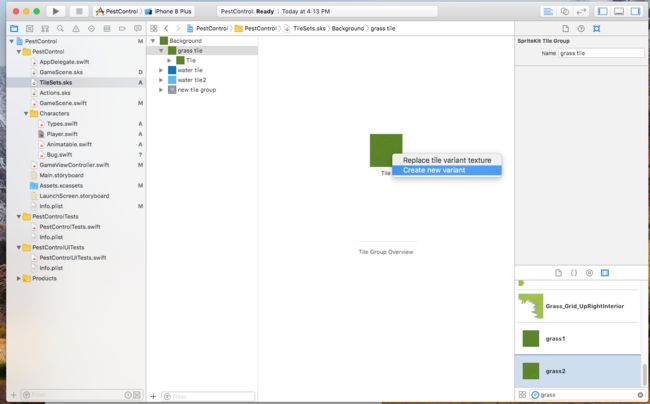
有时候我们可能会在地图中随机生成不同样式的花花草草,实现也非常简单,我们只需要再拖点其他样式的花花草草到中间的tile中,选择create new variant即可
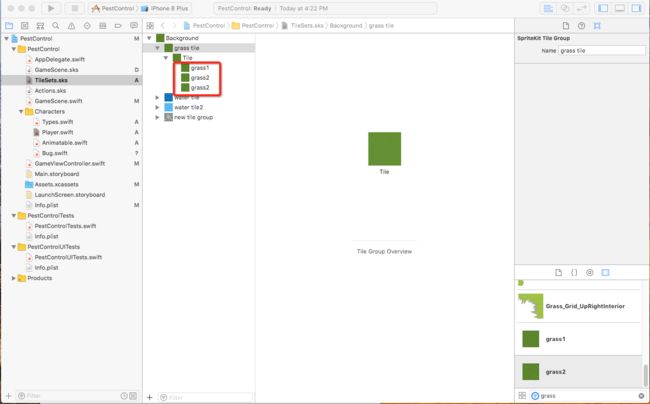
拖了以后该Tile下就会有多个素材了(因为我将grass2拖了两遍,所以出现了两个grass2)
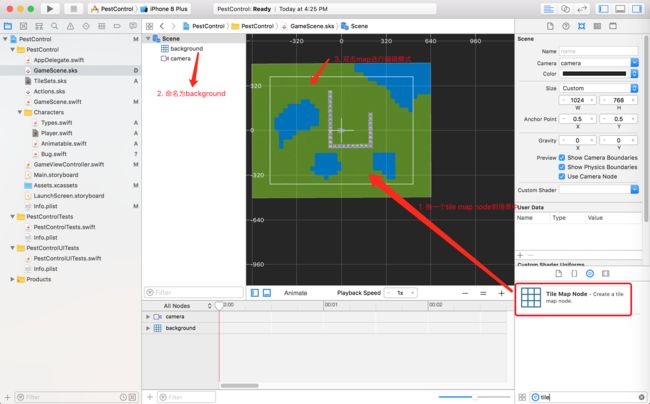
3. 回到GameScene.sks,拖一个Tile Map Node到场景中,双击编辑地图
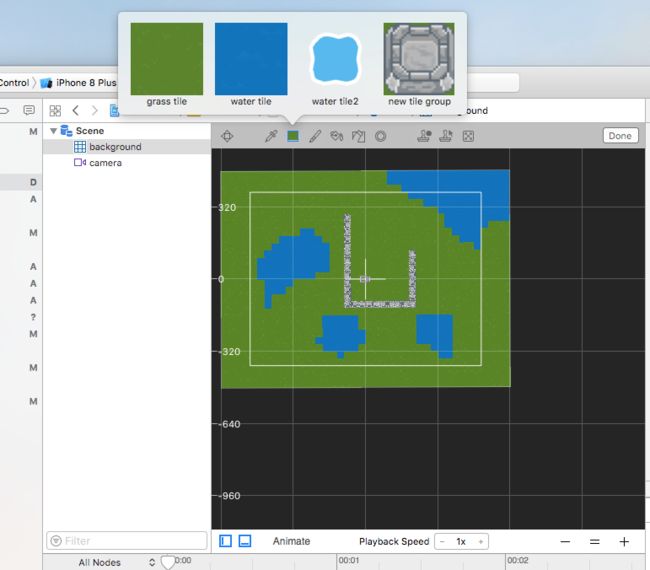
双击地图后如下图所示,这样就可以选择不同的素材进行地图编辑了。
编辑完成点击“Done”退出编辑。
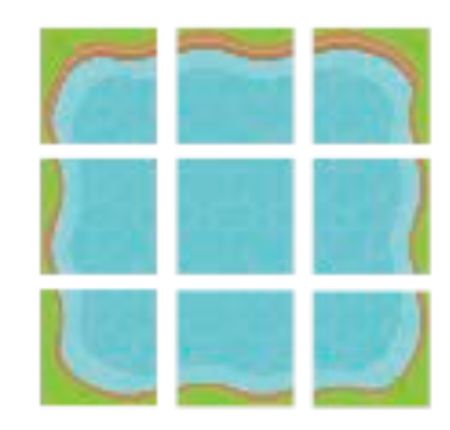
还有一种比较使用的tile,就是8-Way Adjacency Group,大概原理就是将素材拆分成九宫格进行处理,这样我就可以编辑一条带边框、不规则的河了。
以上就是纯界面操作的地图基本编辑功能。接下来我们就要在这个地图上来添加player和bugs了
添加Player
1. 创建Player类,初始化相关参数
//创建Player类
class Player: SKSpriteNode {

    //预置player的动画数组
    var animations: [SKAction] = []


    //大概的意思就是要求初始化吧,否则报错,不能理解就暂时当成模板记住吧?
    required init?(coder aDecoder: NSCoder) {
        fatalError("Please use init()")
    }

    /*初始化player的参数如下:
     1. 图片纹理
     2. 名称
     3. zPosition
     4. 物理碰撞相关参数
     5. 添加动画效果
    */
    init() {

        let texture = SKTexture(imageNamed: "player_bk1")

        super.init(texture:texture,
                   color:.white,
                   size:texture.size())

        name = "Player"

        zPosition = 50

        physicsBody = SKPhysicsBody(circleOfRadius: size.width/2)

        physicsBody?.restitution = 1.0

        physicsBody?.linearDamping = 0.5

        physicsBody?.friction = 0

        physicsBody?.allowsRotation = false

        createAnimations(character: "player")

    }
2. 设置player运动速率
enum PlayersSetting {
    static let playerSpeed: CGFloat = 5.0
}
3. 创建player运动方法
教程中是如下写的,直接让两个CGPoint值相减,我按照这个来写,直接报错。
func move(target: CGPoint) {
  guard let physicsBody = physicsBody else { return }
  let newVelocity = (target - position).normalized()
                             * PlayerSettings.playerSpeed
  physicsBody.velocity = CGVector(point: newVelocity)
}
所以我还是老老实实x-x y-y咯
func move(target: CGPoint) {

        guard let physicsBody = physicsBody else {
            return
        }

        let newVelocity = CGVector(dx: (target.x - position.x) * PlayersSetting.playerSpeed, dy: (target.y - position.y)  * PlayersSetting.playerSpeed)

        physicsBody.velocity = newVelocity


        print("* \(animationDirection(for: physicsBody.velocity))")

        checkDirection()


    }
然后在GameScene.swift中的touchesBegan中添加player的move事件即可
 override func touchesBegan(_ touches: Set, with event: UIEvent?) {
        guard let touch  = touches.first else {
            return
        }

        player.move(target: touch.location(in: self))
    }
到现在player就指哪打哪了,但是player没有动画,也无法转向
设置Camera
设置camera的需求是想让相机(也就是视角)跟随player。
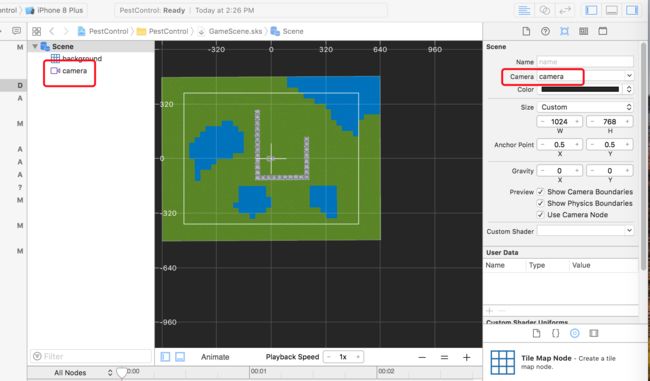
我们先拖一个camera到场景中并命名为“camera”。然后点击Scene,将Camera设置为camera如下图所示。
在学习这一节时,又学到了一个新的东东SKConstraint。顾名思义就是跟约束相关的吧。这节用到这个类的作用就是要设置相机的constraint,使得相机跟随player动,而且不能漏出边框。
首先让相机跟随player动,实现方法如下(Player类中):
func setupCamera() {
  // 保证有camera的存在
  guard let camera = camera else { return }
// 保证与player的距离为0
  let zeroDistance = SKRange(constantValue: 0)
  let playerConstraint = SKConstraint.distance(zeroDistance,
// 设置该约束于camera
  camera.constraints = [playerConstraint]
}
然后在GameScene中didMove中添加setCamera()
现在player到哪,camera就到哪了(2D第一人称视角,哈哈哈)
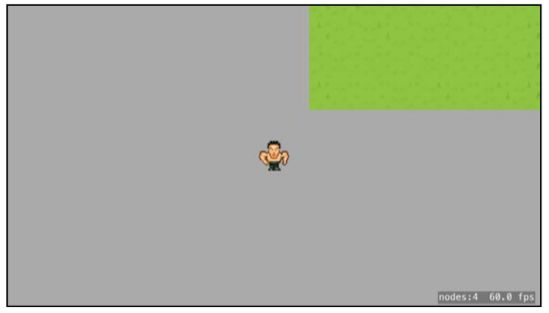
但是问题就来了,当player到场景边框时,边框以外的空白区域就显现出来了,很难看,而且player会跑到场景边框以外,如下所示
我们想要的是如果player接近场景边框了,相机照到的区域就是对齐场景边框的区域。而且player触碰到场景边框了就要被弹回来。
首先我们需要将场景也设置为物理体,那么我们就新建以下方法:
func setupWorldPhysics() {
  background.physicsBody =
      SKPhysicsBody(edgeLoopFrom: background.frame)
}
现在我们需要设置到边框的constraint了,大概的原理就是长宽都取view和background的最小值,用这个范围设置为相机到边框的约束条件。最后将相机的constraints数组添加edgeConstraint。关于SKConstraint的用法,以后用到了再详细参阅
func setupCamera() {

        guard let camera = camera else {
            return
        }

        let zeroDistance = SKRange(constantValue: 0)

        let playerConstraint = SKConstraint.distance(zeroDistance, to: player)

        let xInset = minValue(a: (view?.bounds.width)!/2 * camera.xScale, b: background.frame.width/2)

        let yInset = minValue(a: (view?.bounds.width)!/2 * camera.yScale, b: background.frame.height/2)

        let constraintRect = background.frame.insetBy(dx: xInset, dy: yInset)

        let xRange = SKRange(lowerLimit: constraintRect.minX, upperLimit: constraintRect.maxX)

        let yRange = SKRange(lowerLimit: constraintRect.minY, upperLimit: constraintRect.maxY)

        let edgeConstraint = SKConstraint.positionX(xRange, y: yRange)

        edgeConstraint.referenceNode = background

        camera.constraints = [playerConstraint,edgeConstraint]


    }
这样相机就能随着player移动,如果player接近边框了,相机就会停留在依照view的尺寸对齐background边框的中心区域(我擦,好拗口,还真不好描述,大概能意会到那个位置就行),直到player移除了那个区域再跟随player一起动(感觉我的上述描述,我都想到了可以用另外一种实现方式来实现了~~~而不用SKConstraint)
让player动起来
1. 设定player运动的四个方向及player的动画素材
新建Type.swift文件,加入方向的枚举,问了搞iOS的朋友,如果首个forward的值设为0,后面的backward,left,right在没有特别指定值的情况下默认依次递增(也就是1,2,3)
enum Direction: Int {
  case forward = 0, backward, left, right
}
新建Animatable.swift文件,设置Animatable协议
protocol Animatable  {
}
然后设置extension延展规则,让遵从Animatable协议的对象都可使用以下方法(解释请查看注释):
extension Animatable {

    func animationDirection(for directionVector: CGVector) -> Direction {

        let direction: Direction

        if abs(directionVector.dy) > abs(directionVector.dx) {

            //当Y位移大于X位移时,如果Y位移为负,则player朝向为forward。否则player朝向为backward。

            direction = directionVector.dy < 0 ? .forward : .backward

        } else {

            //当Y位移小于X位移时,如果X位移为负,则player朝向为left。否则player朝向为right。

            direction = directionVector.dx < 0 ? .left : .right

        }

        return direction

    }

    //加载player行走动画纹理并添加到animations动画数组中。
    func createAnimations(character:String) {

        let actionForward: SKAction = SKAction.animate(with: [
            SKTexture(imageNamed: "\(character)_ft1"),
            SKTexture(imageNamed: "\(character)_ft2")
            ], timePerFrame: 0.2)

        animations.append(SKAction.repeatForever(actionForward))


        let actionBackward: SKAction = SKAction.animate(with: [
            SKTexture(imageNamed: "\(character)_bk1"),
            SKTexture(imageNamed: "\(character)_bk2")
            ], timePerFrame: 0.2)

        animations.append(SKAction.repeatForever(actionBackward))


        let actionLeft: SKAction = SKAction.animate(with: [
            SKTexture(imageNamed: "\(character)_lt1"),
            SKTexture(imageNamed: "\(character)_lt2")
            ], timePerFrame: 0.2)

        animations.append(SKAction.repeatForever(actionLeft))


        //这里加两次的原因是left和right朝向的素材是一个,当朝向为right时,只需要将动画素材的xScale值设为-1即可
        animations.append(SKAction.repeatForever(actionLeft))


    }


}
然后在Player.swift中添加以下代码,让Player类的对象遵从Animatable协议
extension Player : Animatable {}
然后在Animatable.swift的协议中添加以下成员变量,使得每一个遵从该协议的实例化对象都必须要定义承载动作的animations数组(必须实例化Player类的对象就必须要定义该数组)
var animations: [SKAction] {get set}
因为player对象需遵从Animatable协议,所以我们需要在Player类中定义该动画数组
var animations: [SKAction] = []
这里有个细节需要说明或者说是Mark一下,之前我们定义Animatable的时候是如下定义的。
protocol Animatable  {
}
然后我们在写Animatable的extension方法以后发现变异的时候会报错,大概报错的意思就是那两个方法返回的数据类型是mutable的,但实际是不允许mutable的,查了一下教程,原版的解释如下:
Unfortunately, the protocol no longer compiles. Protocols assume that conforming types may have value semantics (i.e. structures and enumerations) which would make animations immutable. In this situation, the Characters (Player and Bug) are the only classes which will conform to Animatable and, being classes, they have reference semantics. So you can safely inform Animatable that only class types will conform.
翻译一下
不幸地是,有了这个协议就编译不过了。协议通常会认为遵循协议的这些类型可能会包含值语义(比如结构体和枚举),从而使得animations不可改变。在这种情况下只有 Characters 中的Player、 Bug类将遵循Animatable协议,正是因为他们属于class所以有引用语义,所以你可以告诉Animatable只有class类的对象才会遵循该协议。(新手表示到这里的时候有点一脸懵逼,大概的意思就是因为player是class类的实例化对象,而Animatable又是为player量身定制的,所以让Animatable只作用class类的对象,其extension的方法就是mutable的了?先暂时这样理解,等日后再来笑话现在的自己,哈哈哈)。
 protocol Animatable: class {
}
2. 让player动起来
回到Player.swift,在其初始化函数中添加以下代码:
createAnimations(character: "player")
返回createAnimations方法一看就知道,这样就把相关的素材全部合成了动画并添加到了animations[]数组中以备后用。
然后就是根据当前player的velocity判断player的朝向并让他动起来。
func checkDirection() {

        guard let physicsBody = physicsBody else { return }

        let direction = animationDirection(for: physicsBody.velocity)

        if direction == .left {

            xScale = abs(xScale)

        }
        if direction == .right {

            xScale = -abs(xScale)

        }

        run(animations[direction.rawValue], withKey: "animation")


    }
查了一下rawValue的意思是指返回枚举对象的成员值,那就想通了这里的运行原理。
因为之前定义的时候就将forward、backward、left及right的值分别定义为0、1、2、3
enum Direction: Int {
    case forward = 0, backward, left, right
}
然后对应的动画动作也是按照forward、backward、left及right的顺序添加到animations中,所以数组animation[i]中的动画对象就和枚举中的对象一一对应,自然通过animations[direction.rawValue]就可以找到对应的动画了。
因为方向校验是通过move(target:)中去触发的,所以需要将checkDirection()添加到move(target:)中。
现在player不仅仅可以指哪打哪了,而且可以根据对应的方向调整朝向,而且也动起来了
创建Bug
在challenge中让添加bug类并添加到场景中,这个就没什么说的了,代码如下(留作下一章使用):
class Bug: SKSpriteNode {


    required init?(coder aDecoder: NSCoder) {
        fatalError("Please use init()")
    }

    init() {

        let texture = SKTexture(imageNamed: "bug_bk1")

        super.init(texture:texture,
                   color:.white,
                   size:texture.size()
                   )

        name = "Bug"

        zPosition = 49

        physicsBody = SKPhysicsBody(circleOfRadius: size.width/2)

        physicsBody?.restitution = 0.3

        physicsBody?.linearDamping = 0.5

        physicsBody?.friction = 0

        physicsBody?.allowsRotation = false


    }


}
这一章大概就这样了,话说实际操作一遍,然后边梳理逻辑边写笔记好累啊,不过这样确实也很有用,免得无脑跟着教程敲一遍代码就over了,接下来的两章就是中级地图编辑及保存和加载数据。
年前就先这样了,好好过年放松一下,年后再战。大家新年快乐。在此我也给自己树立个小目标吧。争取今年能有两个成熟的小游戏成功上架APP STORE吧~新年还要加油
