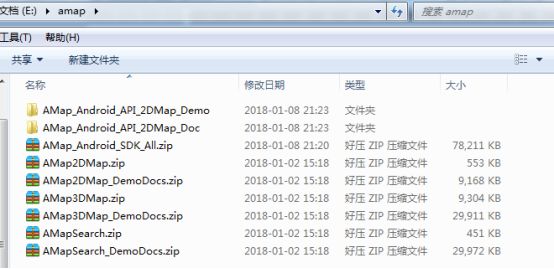
一,下载sdk --代开2Dmap_Demo
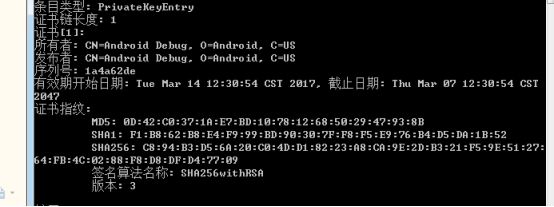
二,获取appkey(先要获取keystore的shaw1值)
(1),在C:\Users\Administrator.android目录下找到debug.keystore,
(2,接着在该目录下的地址栏输入cmd命令
Keytool -v -list -keystore debug.keystore的绝对路径
(3,回车-->输入密码(密码是android)
(4,复制
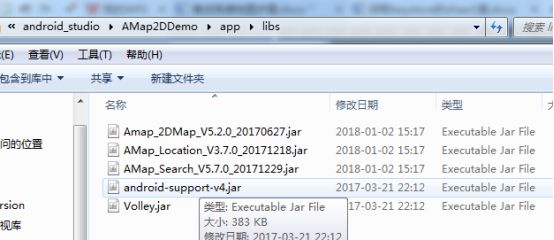
三,导入jar包,并添加到依赖库(将2D地图demo的jar拷贝到项目)
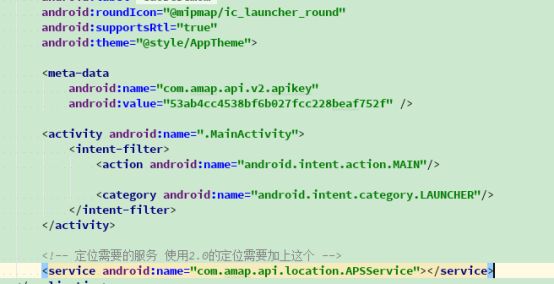
四,拷贝Demo的清单文件
五,copy高德sdk的Demo的代码
六,地图页面的代码:
public class SecondLocationActivity extends AppCompatActivityimplements LocationSource, AMapLocationListener, PoiSearch.OnPoiSearchListener, View.OnClickListener {
private AMap aMap;
private OnLocationChangedListener mListener;
private AMapLocationClient mlocationClient;
private AMapLocationClientOption mLocationOption;
private int currentPage;
private String keyWord = "";
private String city = "深圳市";
private PoiSearch.Query query;
private PoiSearch poiSearch;
private LatLng lp;
private PoiResult poiResult;
private ArrayList poiItems;
private AroundRvAdapter mAroundRvAdapter;
private ActivitySecondLocationBinding mBinding;
@Override
protected void onCreate(@Nullable Bundle savedInstanceState) {
    super.onCreate(savedInstanceState);
    mBinding = DataBindingUtil.setContentView(this, R.layout.activity_second_location);

    mBinding.mapView.onCreate(savedInstanceState);
    mBinding.recycleView.setLayoutManager(new LinearLayoutManager(this));
    mAroundRvAdapter = new AroundRvAdapter(this);
    mBinding.recycleView.setAdapter(mAroundRvAdapter);
    intiUI();
}

private void intiUI() {
    if (aMap == null) {
        aMap = mBinding.mapView.getMap();
        setUpMap();
    }
}

/**
 * 设置一些amap的属性
 */
private void setUpMap() {
    // 自定义系统定位小蓝点
    MyLocationStyle myLocationStyle = new MyLocationStyle();
    myLocationStyle.myLocationIcon(BitmapDescriptorFactory
            .fromResource(R.drawable.location_marker));// 设置小蓝点的图标
    myLocationStyle.strokeColor(Color.BLACK);// 设置圆形的边框颜色
    myLocationStyle.radiusFillColor(Color.argb(100, 0, 0, 180));// 设置圆形的填充颜色
    // myLocationStyle.anchor(int,int)//设置小蓝点的锚点
    myLocationStyle.strokeWidth(1.0f);// 设置圆形的边框粗细
    aMap.setMyLocationStyle(myLocationStyle);
    aMap.setLocationSource(this);// 设置定位监听
    aMap.getUiSettings().setMyLocationButtonEnabled(true);// 设置默认定位按钮是否显示
    aMap.setMyLocationEnabled(true);// 设置为true表示显示定位层并可触发定位,false表        示隐藏定位层并不可触发定位,默认是false
    // aMap.setMyLocationType()
}

/**
 * 方法必须重写,关联生命周期,减少消耗,提高性能
 */
@Override
protected void onResume() {
    super.onResume();
    mBinding.mapView.onResume();
}

/**
 * 方法必须重写,关联生命周期,减少消耗,提高性能
 */
@Override
protected void onPause() {
    super.onPause();
    mBinding.mapView.onPause();
}

/**
 * 方法必须重写,关联生命周期,减少消耗,提高性能
 */
@Override
protected void onSaveInstanceState(Bundle outState) {
    super.onSaveInstanceState(outState);
    mBinding.mapView.onSaveInstanceState(outState);
}

/**
 * 方法必须重写,关联生命周期,减少消耗,提高性能
 */
@Override
protected void onDestroy() {
    super.onDestroy();
    mBinding.mapView.onDestroy();
}

/**
 * 激活定位,激活以后才能够定位
 */
@Override
public void activate(OnLocationChangedListener listener) {
    mListener = listener;
    if (mlocationClient == null) {
        mlocationClient = new AMapLocationClient(this);
        mLocationOption = new AMapLocationClientOption();
        //设置定位监听
        mlocationClient.setLocationListener(this);
        //设置为高精度定位模式
        mLocationOption.setLocationMode(AMapLocationClientOption.AMapLocationMode.Hight_Accuracy);
        //设置定位参数
        mlocationClient.setLocationOption(mLocationOption);
        // 此方法为每隔固定时间会发起一次定位请求,为了减少电量消耗或网络流量消耗,
        // 注意设置合适的定位时间的间隔(最小间隔支持为2000ms),并且在合适时间调用stopLocation()方法来取消定位请求
        // 在定位结束后,在合适的生命周期调用onDestroy()方法
        // 在单次定位情况下,定位无论成功与否,都无需调用stopLocation()方法移除请求,定位sdk内部会移除
        mlocationClient.startLocation();
    }
}

/**
 * 停止定位
 */
@Override
public void deactivate() {
    mListener = null;
    if (mlocationClient != null) {
        mlocationClient.stopLocation();
        mlocationClient.onDestroy();
    }
    mlocationClient = null;
}

/**
 * 定位成功后回调函数
 */
@Override
public void onLocationChanged(AMapLocation amapLocation) {
    if (mListener != null && amapLocation != null) {
        if (amapLocation != null
                && amapLocation.getErrorCode() == 0) {
            // 1,显示系统小蓝点
            mListener.onLocationChanged(amapLocation);
            lp = new LatLng(amapLocation.getLatitude(), amapLocation.getLongitude());
            // aMap.moveCamera(CameraUpdateFactory.changeLatLng(new LatLng(amapLocation.getLatitude(),amapLocation.getLongitude())));
            aMap.moveCamera(CameraUpdateFactory.changeLatLng(lp));
            aMap.moveCamera(CameraUpdateFactory.zoomTo(19)); //范围在3-20之间
            Log.e("date", "搜索结果:" + amapLocation.getAddress());
            //2,只定位一次,就终止(为了提高性能)
            if (mlocationClient != null) {
                mlocationClient.stopLocation();
                mlocationClient.onDestroy();
            }
            //3,尝试搜索周边,搜索所有poi点,500米内
            doSearchQuery();
        } else {
            String errText = "定位失败," + amapLocation.getErrorCode() + ": " + amapLocation.getErrorInfo();
            Log.e("AmapErr", errText);
        }
    }
}

protected void doSearchQuery() {
    currentPage = 0;
    // 第一个参数表示搜索字符串,第二个参数表示poi搜索类型,第三个参数表示poi搜索区域(空字符串代表全国)
    query = new PoiSearch.Query(keyWord, "", city);
    query.setPageSize(50);// 设置每页最多返回多少条poiitem
    query.setPageNum(currentPage);// 设置查第一页

    if (lp != null) {
        poiSearch = new PoiSearch(this, query);
        poiSearch.setOnPoiSearchListener(this);
        poiSearch.setBound(new PoiSearch.SearchBound(new LatLonPoint(lp.latitude, lp.longitude), 5000, true));//200米范围内
        // 设置搜索区域为以lp点为圆心,其周围5000米范围
        poiSearch.searchPOIAsyn();// 异步搜索
    }
}

@Override
public void onPoiSearched(PoiResult result, int rcode) {
    if (rcode == 1000) {
        if (result != null && result.getQuery() != null) {// 搜索poi的结果
            if (result.getQuery().equals(query)) {// 是否是同一条
                poiResult = result;
                poiItems = poiResult.getPois();// 取得第一页的poiitem数据,页数从数字0开始
                Toast.makeText(this, "一共有" + poiItems.size() + "个结果", Toast.LENGTH_SHORT).show();
                mAroundRvAdapter.setPoiItemList(poiItems);

            }
        }
    }
}

@Override
public void onPoiItemSearched(PoiItem poiItem, int i) {
}

@Override
public void onClick(View view) {
    switch (view.getId()) {
        case R.id.rl_exit:
            finish();
            if(Integer.valueOf(android.os.Build.VERSION.SDK)  >= 5) {
                overridePendingTransition(0,0);  //2个0表示activity切换不需要动画效果
            }
            break;
    }
}
}
七,适配器
public class AroundRvAdapter extends RecyclerView.Adapter {
private Context mContext;
public AroundRvAdapter(Context context) {
    mContext = context;
}
private List mPoiItemList = new ArrayList<>();

public void setPoiItemList(List poiItemList) {
    mPoiItemList = poiItemList;
    notifyDataSetChanged();
}

@Override
public RecyclerView.ViewHolder onCreateViewHolder(ViewGroup parent, int viewType) {
    View itemView = LayoutInflater.from(mContext).inflate(R.layout.item_around, parent, false);
    ViewHolder viewHolder = new ViewHolder(itemView);
    return viewHolder;
}

@Override
public void onBindViewHolder(RecyclerView.ViewHolder holder, int position) {
    ViewHolder viewHolder = (ViewHolder) holder;
    viewHolder.setData(mPoiItemList.get(position));
}

@Override
public int getItemCount() {
    if(mPoiItemList!=null){
        return mPoiItemList.size();
    }
    return 0;
}

class ViewHolder extends RecyclerView.ViewHolder{
    TextView mTitle;
    TextView mAddress;

    ViewHolder(View view) {
        super(view);
        mTitle = view.findViewById(R.id.title);
        mAddress = view.findViewById(R.id.address);
    }

    public void setData(PoiItem poiItem) {
        mTitle.setText(poiItem.getTitle());
        mAddress.setText(poiItem.getSnippet()); //摘要信息
    }
}
}
八,activity布局
android:layout_height="match_parent"
android:fitsSystemWindows="true"
android:orientation="vertical">
九,适配器布局
android:padding="5dp"
android:layout_width="match_parent"
android:layout_height="wrap_content">
